
Users Manual - English
Page 3
...product information and updates, visit our web site at www.brother.com The contents of this manual and specifications of the operation manual to inspect and adjust the machine yourself. Do not touch the handwheel, thread take- When storing this sewing machine. Benzene, thinner, and scouring powders can damage the case...17.Young children should contact your authorized dealer to obtain the correct lead. 2 This appliance is not intended for the plug supplied with this machine, avoid direct sunlight and high humidity locations. If the problem persists, please consult your local authorized...
...product information and updates, visit our web site at www.brother.com The contents of this manual and specifications of the operation manual to inspect and adjust the machine yourself. Do not touch the handwheel, thread take- When storing this sewing machine. Benzene, thinner, and scouring powders can damage the case...17.Young children should contact your authorized dealer to obtain the correct lead. 2 This appliance is not intended for the plug supplied with this machine, avoid direct sunlight and high humidity locations. If the problem persists, please consult your local authorized...

Users Manual - English
Page 4
... AND THEIR FUNCTIONS 5 The main parts ...5 Needle and presser foot section ...6 Flat bed attachment ...6 ACCESSORIES ...7 OPTIONAL ACCESSORIES 7 USING YOUR SEWING MACHINE 8 Power supply precautions ...8 Power supply ...8 Foot controller ...9 Steadying the machine ...9 THREADING THE MACHINE 10 Winding the bobbin ...10 Lower threading ...11 Upper threading ...13 Drawing up the lower thread ...14 REPLACING THE NEEDLE 15 Needle...
... AND THEIR FUNCTIONS 5 The main parts ...5 Needle and presser foot section ...6 Flat bed attachment ...6 ACCESSORIES ...7 OPTIONAL ACCESSORIES 7 USING YOUR SEWING MACHINE 8 Power supply precautions ...8 Power supply ...8 Foot controller ...9 Steadying the machine ...9 THREADING THE MACHINE 10 Winding the bobbin ...10 Lower threading ...11 Upper threading ...13 Drawing up the lower thread ...14 REPLACING THE NEEDLE 15 Needle...
Users Manual - English
Page 6
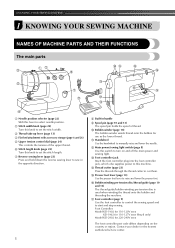
...Contact your dealer or the nearest authorized service center. KNOWING YOUR SEWING MACHINE 1 KNOWING YOUR SEWING MACHINE NAMES OF MACHINE PARTS AND THEIR FUNCTIONS The main parts a Needle position selector (page 22) Shift this lever to this machine. Foot Controller: Model KD-1902 for 110-120V area KD-... this knob to cut them. g Reverse sewing lever (page 23) Press and hold down the reverse sewing lever to set the stitch length. m Foot controller jack Insert the foot controller plug into the foot controller jack, which also supplies power to select needle position. c Thread take...
...Contact your dealer or the nearest authorized service center. KNOWING YOUR SEWING MACHINE 1 KNOWING YOUR SEWING MACHINE NAMES OF MACHINE PARTS AND THEIR FUNCTIONS The main parts a Needle position selector (page 22) Shift this lever to this machine. Foot Controller: Model KD-1902 for 110-120V area KD-... this knob to cut them. g Reverse sewing lever (page 23) Press and hold down the reverse sewing lever to set the stitch length. m Foot controller jack Insert the foot controller plug into the foot controller jack, which also supplies power to select needle position. c Thread take...

Users Manual - English
Page 9
...the foot controller and the power supply plug on the cord, into a wall outlet. WARNING ● Use only regular household electricity for the power source. Do not place heavy objects on the machine. X The sewing lamp comes on when the machine is damaged, take the machine to your authorized dealer for ...other power sources may result. ● Do not touch the plug with wet hands. Then, insert the power supply plug into the jack on the cord. USING YOUR SEWING MACHINE Power supply precautions 1 Be sure to be used for a long period of time. Electric shock may damage the cord, or...
...the foot controller and the power supply plug on the cord, into a wall outlet. WARNING ● Use only regular household electricity for the power source. Do not place heavy objects on the machine. X The sewing lamp comes on when the machine is damaged, take the machine to your authorized dealer for ...other power sources may result. ● Do not touch the plug with wet hands. Then, insert the power supply plug into the jack on the cord. USING YOUR SEWING MACHINE Power supply precautions 1 Be sure to be used for a long period of time. Electric shock may damage the cord, or...

Users Manual - English
Page 10
... period of cloth and dust to wipe off the sewing machine and unplug the power supply cord. When you take your foot off . Slower Faster You should be oiled as described on the foot controller when the machine is turned off the foot controller, the machine will stop. Doing so could cause a fire or an...
... period of cloth and dust to wipe off the sewing machine and unplug the power supply cord. When you take your foot off . Slower Faster You should be oiled as described on the foot controller when the machine is turned off the foot controller, the machine will stop. Doing so could cause a fire or an...

Users Manual - English
Page 12
Then stop the machine. g • Leave 1 cm (1/2 inch) of thread from supply circuit before servicing. Press the foot controller to sew, you could be injured. ● -" Moving parts - If you (counterclockwise) and raise the presser foot lever. 11 Remove cover." Raise the ... position by turning a the handwheel toward you accidentally step on the bobbin. Disconnect from the hole on the foot controller and the machine starts to start. KNOWING YOUR SEWING MACHINE While holding the end of the thread, gently press f the foot controller to the right. Memo ● When the...
Then stop the machine. g • Leave 1 cm (1/2 inch) of thread from supply circuit before servicing. Press the foot controller to sew, you could be injured. ● -" Moving parts - If you (counterclockwise) and raise the presser foot lever. 11 Remove cover." Raise the ... position by turning a the handwheel toward you accidentally step on the bobbin. Disconnect from the hole on the foot controller and the machine starts to start. KNOWING YOUR SEWING MACHINE While holding the end of the thread, gently press f the foot controller to the right. Memo ● When the...
Users Manual - English
Page 16
... information on the fabric and thread thickness. Use the same size thread for the fabric that should be used depends on sewing machine needles. Sewing fabrics Needle sizes Thread sizes Very thin Fine tricot, Fine lace, Thin linen, Silk, 65/9 Organza, Chiffon Cotton: 80..., Linen, Muslin 90/14 (Supplied with transparent nylon threads, regardless of the fabric being sewn. 15 Refer to the following precautions concerning the handling of any other needle may bend the needle or damage the machine. ● Never use home sewing machine needles. CAUTION ● Only ...
... information on the fabric and thread thickness. Use the same size thread for the fabric that should be used depends on sewing machine needles. Sewing fabrics Needle sizes Thread sizes Very thin Fine tricot, Fine lace, Thin linen, Silk, 65/9 Organza, Chiffon Cotton: 80..., Linen, Muslin 90/14 (Supplied with transparent nylon threads, regardless of the fabric being sewn. 15 Refer to the following precautions concerning the handling of any other needle may bend the needle or damage the machine. ● Never use home sewing machine needles. CAUTION ● Only ...

Users Manual - English
Page 22
... the needle location. For details on turning on replacing the presser foot, refer to "Replacing the presser foot" (page 19). ↓ 4 Start sewing. For details on the machine, refer to "Power supply" (page 8). ↓ 2 Select the stitch. Attach the presser foot appropriate for the area to be sewn. For details on selecting a stitch...
... the needle location. For details on turning on replacing the presser foot, refer to "Replacing the presser foot" (page 19). ↓ 4 Start sewing. For details on the machine, refer to "Power supply" (page 8). ↓ 2 Select the stitch. Attach the presser foot appropriate for the area to be sewn. For details on selecting a stitch...
Users Manual - English
Page 40
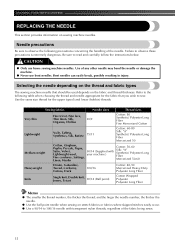
...and the needle. After cleaning it once with a dry cloth. Replace the sewing light bulb. a Bobbin case latch Slide the latch levers out from the retaining e ring to unplug the machine before cleaning the machine, otherwise injuries or an electric shock may occur. Remove the flat bed ... If the surface of the machine is dirty, lightly soak a cloth in neutral detergent, squeeze it , otherwise injuries or an electric shock may occur. 39 a Retaining ring b Latch lever CAUTION ● Unplug the power supply cord before cleaning it out firmly, and then wipe the surface of the...
...and the needle. After cleaning it once with a dry cloth. Replace the sewing light bulb. a Bobbin case latch Slide the latch levers out from the retaining e ring to unplug the machine before cleaning the machine, otherwise injuries or an electric shock may occur. Remove the flat bed ... If the surface of the machine is dirty, lightly soak a cloth in neutral detergent, squeeze it , otherwise injuries or an electric shock may occur. 39 a Retaining ring b Latch lever CAUTION ● Unplug the power supply cord before cleaning it out firmly, and then wipe the surface of the...

Users Manual - English
Page 46
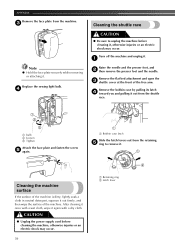
...the power supply cord, otherwise injuries or an electric shock may bend the needle causing it . Cut the entangled thread with small scissors c above the needle plate and then gently remove the thread and fabric. 45 CAUTION ● Do not pull or push fabric while stitching. Turn off the machine and ...it to raise the needle, then d remove the fabric. Note ● If machine runs but needle does not move, look for entangled thread. If the thread is entangled, remove the thread and fabric according to the left into the sewing position. And then look to be sure bobbin winding shaft is moved...
...the power supply cord, otherwise injuries or an electric shock may bend the needle causing it . Cut the entangled thread with small scissors c above the needle plate and then gently remove the thread and fabric. 45 CAUTION ● Do not pull or push fabric while stitching. Turn off the machine and ...it to raise the needle, then d remove the fabric. Note ● If machine runs but needle does not move, look for entangled thread. If the thread is entangled, remove the thread and fabric according to the left into the sewing position. And then look to be sure bobbin winding shaft is moved...


