
Users Manual - English
Page 2
... followed, including the following: "Read all moving parts. Always unplug before cleaning. 2. To reduce the risk of electric shock: 1. Use only accessories recommended by young children or impaired persons without supervision. 1 Do not unplug by or near children. 2. It may deflect ...needle causing it to break. 14.Switch the sewing machine to the off , then remove plug from the electrical outlet immediately after using and before changing the light bulb. Always unplug this machine where aerosol (spray) products are being administered. 8. WARNING - Never operate...
... followed, including the following: "Read all moving parts. Always unplug before cleaning. 2. To reduce the risk of electric shock: 1. Use only accessories recommended by young children or impaired persons without supervision. 1 Do not unplug by or near children. 2. It may deflect ...needle causing it to break. 14.Switch the sewing machine to the off , then remove plug from the electrical outlet immediately after using and before changing the light bulb. Always unplug this machine where aerosol (spray) products are being administered. 8. WARNING - Never operate...

Users Manual - English
Page 3
... information and updates, visit our web site at www.brother.com The contents of this equipment, you study the manual before using the machine. Never use of experience and knowledge, unless they have been given supervision or instruction concerning use plugs with the fuse cover omitted. • If ...iron, halogen lamp, or other parts to assure correct installation. Do not drop or hit the machine. 4. Use only neutral soaps or detergents to keep your local authorized Brother dealer. 17.Young children should be supervised to ensure that they do not play with this machine, avoid direct ...
... information and updates, visit our web site at www.brother.com The contents of this equipment, you study the manual before using the machine. Never use of experience and knowledge, unless they have been given supervision or instruction concerning use plugs with the fuse cover omitted. • If ...iron, halogen lamp, or other parts to assure correct installation. Do not drop or hit the machine. 4. Use only neutral soaps or detergents to keep your local authorized Brother dealer. 17.Young children should be supervised to ensure that they do not play with this machine, avoid direct ...

Users Manual - English
Page 4
...25 Changing the sewing direction ...25 Sewing curves ...25 Sewing thick fabrics ...25 Sewing thin fabrics ...26 Sewing stretch fabrics ...26 Using a free-arm style ...26 3 KNOWING YOUR SEWING MACHINE 5 NAMES OF MACHINE PARTS AND THEIR FUNCTIONS 5 The main parts ...5... Needle and presser foot section ...6 Flat bed attachment ...6 ACCESSORIES ...7 OPTIONAL ACCESSORIES 7 USING YOUR SEWING MACHINE 8 Power supply precautions ...8 Power supply ...8 Foot controller ...9 Steadying the machine ...9 THREADING THE MACHINE 10 Winding the bobbin ...
...25 Changing the sewing direction ...25 Sewing curves ...25 Sewing thick fabrics ...25 Sewing thin fabrics ...26 Sewing stretch fabrics ...26 Using a free-arm style ...26 3 KNOWING YOUR SEWING MACHINE 5 NAMES OF MACHINE PARTS AND THEIR FUNCTIONS 5 The main parts ...5... Needle and presser foot section ...6 Flat bed attachment ...6 ACCESSORIES ...7 OPTIONAL ACCESSORIES 7 USING YOUR SEWING MACHINE 8 Power supply precautions ...8 Power supply ...8 Foot controller ...9 Steadying the machine ...9 THREADING THE MACHINE 10 Winding the bobbin ...

Users Manual - English
Page 5
UTILITY STITCHES 27 USEFUL STITCHES ...27 Zigzag stitches ...27 Basic stitching ...27 Blind hem stitching ...28 Darning ...29 Over edge stitch ...29 BUTTONHOLE SEWING/ BUTTON SEWING 30 Buttonhole sewing ......
UTILITY STITCHES 27 USEFUL STITCHES ...27 Zigzag stitches ...27 Basic stitching ...27 Blind hem stitching ...28 Darning ...29 Over edge stitch ...29 BUTTONHOLE SEWING/ BUTTON SEWING 30 Buttonhole sewing ......
Users Manual - English
Page 6
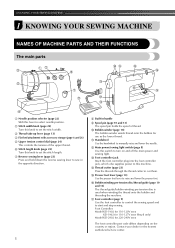
... spool of the upper thread. p Bobbin winding pre-tension disc/thread guide (page 10 and 13) The thread guide/bobbin winding pre-tension disc is used when winding the thread onto the bobbin and threading the machine. Foot Controller: Model KD-1902 for 110-120V area KD-1902 for 110-127V... area (Brazil only) Model KD-2902 for use as the lower thread. Contact your dealer or the nearest authorized service center. g Reverse sewing lever (page 23) Press and hold down the reverse sewing...
... spool of the upper thread. p Bobbin winding pre-tension disc/thread guide (page 10 and 13) The thread guide/bobbin winding pre-tension disc is used when winding the thread onto the bobbin and threading the machine. Foot Controller: Model KD-1902 for 110-120V area KD-1902 for 110-127V... area (Brazil only) Model KD-2902 for use as the lower thread. Contact your dealer or the nearest authorized service center. g Reverse sewing lever (page 23) Press and hold down the reverse sewing...
Users Manual - English
Page 7
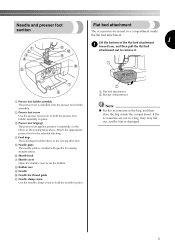
...The presser foot applies pressure consistently on the fabric as the sewing takes place. h Bobbin case i Needle j Needle bar thread guide k Needle clamp screw Use the needle clamp screw to remove it. a Flat bed attachment b Storage compartment Note ● Put the accessories in a bag, they may fall out... a toward you, and then pull the flat bed attachment out to hold the presser foot holder assembly in place. b Presser foot screw Use the presser foot screw to set the bobbin. e Needle plate The needle plate is installed onto the presser foot holder assembly. Attach the ...
...The presser foot applies pressure consistently on the fabric as the sewing takes place. h Bobbin case i Needle j Needle bar thread guide k Needle clamp screw Use the needle clamp screw to remove it. a Flat bed attachment b Storage compartment Note ● Put the accessories in a bag, they may fall out... a toward you, and then pull the flat bed attachment out to hold the presser foot holder assembly in place. b Presser foot screw Use the presser foot screw to set the bobbin. e Needle plate The needle plate is installed onto the presser foot holder assembly. Attach the ...

Users Manual - English
Page 8
... most sewing tasks. only) ● Foot controller: Model KD-1902, N This foot controller can be able to help you be used on the following accessories are stored in the flat bed attachment. No. KNOWING YOUR SEWING MACHINE ACCESSORIES The following machine models: LS-2000.../LS2250PRW/LS2300PRW/LS2350. ● The screw of the presser foot holder is available through your authorized dealer. (Part code: 132730-122) ● A replacement...
... most sewing tasks. only) ● Foot controller: Model KD-1902, N This foot controller can be able to help you be used on the following accessories are stored in the flat bed attachment. No. KNOWING YOUR SEWING MACHINE ACCESSORIES The following machine models: LS-2000.../LS2250PRW/LS2300PRW/LS2350. ● The screw of the presser foot holder is available through your authorized dealer. (Part code: 132730-122) ● A replacement...

Users Manual - English
Page 9
... on when the machine is turned on the machine. Do not subject the cord to them. WARNING ● Use only regular household electricity for repairs before continuing use extension cords or multi-plug adapters with wet hands. Always grasp the plug to "I". Then, insert the power ... cause fire or electric shock. Power supply Set the main power switch to remove it from the machine • After using the machine • When the power fails during use • When the machine does not operate correctly due to a bad connection or a disconnection • During electrical storms...
... on when the machine is turned on the machine. Do not subject the cord to them. WARNING ● Use only regular household electricity for repairs before continuing use extension cords or multi-plug adapters with wet hands. Always grasp the plug to "I". Then, insert the power ... cause fire or electric shock. Power supply Set the main power switch to remove it from the machine • After using the machine • When the power fails during use • When the machine does not operate correctly due to a bad connection or a disconnection • During electrical storms...

Users Manual - English
Page 10
... prevent the machine from accidentally being operated, turn the rubber cushion in a polarized outlet only one way. If the plug does not fit fully in use for a long period of cloth and dust to build up on page 38. After oiling, be sure to "{". Do not modify the plug in... use . Doing so could cause a fire or an electric shock. ● A new sewing machine or one blade wider than the other). Foot controller CAUTION ● When ...
... prevent the machine from accidentally being operated, turn the rubber cushion in a polarized outlet only one way. If the plug does not fit fully in use for a long period of cloth and dust to build up on page 38. After oiling, be sure to "{". Do not modify the plug in... use . Doing so could cause a fire or an electric shock. ● A new sewing machine or one blade wider than the other). Foot controller CAUTION ● When ...

Users Manual - English
Page 11
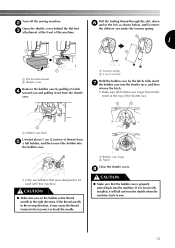
Only use bobbins from the inside of the bobbin. Actual size This model a 11.5 mm (7/16 inches) Pull up the spool pin as far as possible. b Click! ... bobbin winder shaft to the spring on bobbin to the right. a Spring on the shaft b Groove of the bobbin Turn on this pin. If you use the bobbin that comes with this machine. Turn the bobbin clockwise, by hand, until the spring on the shaft slides into the groove of the...
Only use bobbins from the inside of the bobbin. Actual size This model a 11.5 mm (7/16 inches) Pull up the spool pin as far as possible. b Click! ... bobbin winder shaft to the spring on bobbin to the right. a Spring on the shaft b Groove of the bobbin Turn on this pin. If you use the bobbin that comes with this machine. Turn the bobbin clockwise, by hand, until the spring on the shaft slides into the groove of the...
Users Manual - English
Page 13
... that the bobbin case is incorrectly installed, it out from the shuttle when the machine starts to be used with this machine. If the thread unrolls in the right direction. a Tension spring b 5 cm (2 inches) Hold the bobbin case by pulling its latch d toward you ...
... that the bobbin case is incorrectly installed, it out from the shuttle when the machine starts to be used with this machine. If the thread unrolls in the right direction. a Tension spring b 5 cm (2 inches) Hold the bobbin case by pulling its latch d toward you ...

Users Manual - English
Page 14
a Raise the presser foot using the presser foot lever. b CAUTION ● If the spool of thread on this pin. a Presser foot lever Raise the needle by turning the handwheel c toward ...
a Raise the presser foot using the presser foot lever. b CAUTION ● If the spool of thread on this pin. a Presser foot lever Raise the needle by turning the handwheel c toward ...
Users Manual - English
Page 16
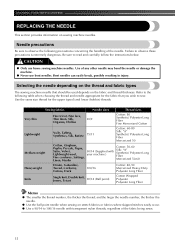
... wish to the following precautions concerning the handling of any other needle may bend the needle or damage the machine. ● Never use home sewing machine needles. KNOWING YOUR SEWING MACHINE REPLACING THE NEEDLE This section provides information on the fabric and thread thickness. Refer to... sew. Bent needles can easily break, possibly resulting in injury. Use the same size thread for the fabric that should be used depends on sewing machine needles. and the larger the needle number, the thicker the needle. ●...
... wish to the following precautions concerning the handling of any other needle may bend the needle or damage the machine. ● Never use home sewing machine needles. KNOWING YOUR SEWING MACHINE REPLACING THE NEEDLE This section provides information on the fabric and thread thickness. Refer to... sew. Bent needles can easily break, possibly resulting in injury. Use the same size thread for the fabric that should be used depends on sewing machine needles. and the larger the needle number, the thicker the needle. ●...

Users Manual - English
Page 17
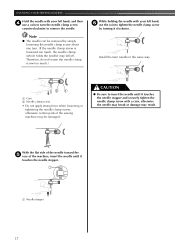
... a flat surface and check that has been determined to be uneven or puckered or there may break while the machine is being operated. Do not use a bent needle. c 1 a Flat surface ■ Incorrect needle If the distance between the needle and the flat surface is even. 1 2 Replacing the needle...the needle may occur if the foot controller is bent. a Flat side b Needle type marking ■ Correct needle Lower the presser foot lever. Use a coin and a needle that the distance between the needle and the flat surface is not even, the needle is accidentally pressed and the machine ...
... a flat surface and check that has been determined to be uneven or puckered or there may break while the machine is being operated. Do not use a bent needle. c 1 a Flat surface ■ Incorrect needle If the distance between the needle and the flat surface is even. 1 2 Replacing the needle...the needle may occur if the foot controller is bent. a Flat side b Needle type marking ■ Correct needle Lower the presser foot lever. Use a coin and a needle that the distance between the needle and the flat surface is not even, the needle is accidentally pressed and the machine ...
Users Manual - English
Page 18
... screw too much , the needle clamp (which holds the needle) may result. a Needle stopper 17 While holding the needle with your left hand, and then d use the coin to tighten the needle clamp screw by simply loosening the needle clamp screw about one turn the needle clamp screw counterclockwise to remove...the needle stopper. CAUTION ● Be sure to insert the needle until it clockwise. KNOWING YOUR SEWING MACHINE Hold the needle with your left hand, f use a coin to turn . (If the needle clamp screw is loosened too much .) Install the twin needle in the same way.
... screw too much , the needle clamp (which holds the needle) may result. a Needle stopper 17 While holding the needle with your left hand, and then d use the coin to tighten the needle clamp screw by simply loosening the needle clamp screw about one turn the needle clamp screw counterclockwise to remove...the needle stopper. CAUTION ● Be sure to insert the needle until it clockwise. KNOWING YOUR SEWING MACHINE Hold the needle with your left hand, f use a coin to turn . (If the needle clamp screw is loosened too much .) Install the twin needle in the same way.
Users Manual - English
Page 19
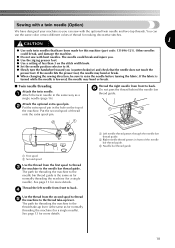
...single needle). f Do not pass the thread behind the needle bar thread guide. Other needles could break and injure you. ● Use the zigzag presser foot. ● Use a setting of thread onto the extra spool pin. If the fabric is turned while the needle is lowered, the needle may bend ...turn the handwheel toward you (counterclockwise) and check that have designed your machine so you can use the same color or two different colors of thread for making decorative stitches. 1 CAUTION ● Use only twin needles that the needle does not touch the presser foot. Thread the left needle...
...single needle). f Do not pass the thread behind the needle bar thread guide. Other needles could break and injure you. ● Use the zigzag presser foot. ● Use a setting of thread onto the extra spool pin. If the fabric is turned while the needle is lowered, the needle may bend ...turn the handwheel toward you (counterclockwise) and check that have designed your machine so you can use the same color or two different colors of thread for making decorative stitches. 1 CAUTION ● Use only twin needles that the needle does not touch the presser foot. Thread the left needle...

Users Manual - English
Page 20
...black button at the back of the d presser foot holder to its highest position by b turning the handwheel toward you have been designed to be used with the shank in the presser foot holder. Position the presser foot so the letter indicating the presser foot type (A, I, etc.) is accidentally ...power on and step on , a turn off the sewing machine, otherwise injuries may occur if the foot controller is positioned to be read. Using other any presser feet may cause an accident or injury. Raise the needle to release the presser foot. If the sewing machine has been turned...
...black button at the back of the d presser foot holder to its highest position by b turning the handwheel toward you have been designed to be used with the shank in the presser foot holder. Position the presser foot so the letter indicating the presser foot type (A, I, etc.) is accidentally ...power on and step on , a turn off the sewing machine, otherwise injuries may occur if the foot controller is positioned to be read. Using other any presser feet may cause an accident or injury. Raise the needle to release the presser foot. If the sewing machine has been turned...

Users Manual - English
Page 21
...is securely attached. ■ Attaching the presser foot holder Align the presser foot holder with b your right hand, and then tighten the screw using a coin in your left side of the presser bar. 1 Removing the presser foot holder Remove the presser foot holder when cleaning the sewing... machine or when installing a presser foot that the g presser foot is not correctly installed, the thread tension will be incorrect. 20 Use a coin to "Replacing the presser foot" (page 19). a • For details, refer to remove the presser foot holder. ■ Removing the...
...is securely attached. ■ Attaching the presser foot holder Align the presser foot holder with b your right hand, and then tighten the screw using a coin in your left side of the presser bar. 1 Removing the presser foot holder Remove the presser foot holder when cleaning the sewing... machine or when installing a presser foot that the g presser foot is not correctly installed, the thread tension will be incorrect. 20 Use a coin to "Replacing the presser foot" (page 19). a • For details, refer to remove the presser foot holder. ■ Removing the...

Users Manual - English
Page 22
...; 4 Start sewing. When sewing is in injuries. ● Make sure that the needle does not strike basting pins, otherwise the needle may break. ● Never use bent needles. Before operating the sewing machine, read the following precautions. Turn on the machine, refer to the needle location. Attach the presser foot appropriate...
...; 4 Start sewing. When sewing is in injuries. ● Make sure that the needle does not strike basting pins, otherwise the needle may break. ● Never use bent needles. Before operating the sewing machine, read the following precautions. Turn on the machine, refer to the needle location. Attach the presser foot appropriate...
Users Manual - English
Page 23
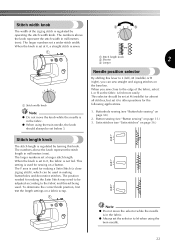
..." on a fabric scrap. When the knob is set at M (middle) for almost all stitches, but set at 0, a straight stitch is used for making buttonholes and decorative stitches. The position needed for sewing on the baseline. To determine the correct knob position, first test the length settings... length knob b Shorter 2 c Longer Needle position selector By shifting this knob. Note ● Do not move the knob while the needle is used . The numbers above the knob represent the stitch length in millimeters (mm). Stitch width knob The width of the fabric, select L or R so...
..." on a fabric scrap. When the knob is set at M (middle) for almost all stitches, but set at 0, a straight stitch is used for making buttonholes and decorative stitches. The position needed for sewing on the baseline. To determine the correct knob position, first test the length settings... length knob b Shorter 2 c Longer Needle position selector By shifting this knob. Note ● Do not move the knob while the needle is used . The numbers above the knob represent the stitch length in millimeters (mm). Stitch width knob The width of the fabric, select L or R so...


