
Users Manual - English
Page 2
... persons without supervision. 1 Keep the ventilation openings of the sewing machine and foot controller free from the electrical outlet immediately after using and before cleaning. 2. Never drop or insert any object into water. The sewing machine should always be followed, including the ...the symbol "O" position which represents off , symbol "O" position when making any openings. 6. Always unplug this manual. 3. Always unplug before using." Return the sewing machine to the off , then remove plug from all instructions before changing the light bulb. To unplug, grasp the ...
... persons without supervision. 1 Keep the ventilation openings of the sewing machine and foot controller free from the electrical outlet immediately after using and before cleaning. 2. Never drop or insert any object into water. The sewing machine should always be followed, including the ...the symbol "O" position which represents off , symbol "O" position when making any openings. 6. Always unplug this manual. 3. Always unplug before using." Return the sewing machine to the off , then remove plug from all instructions before changing the light bulb. To unplug, grasp the ...

Users Manual - English
Page 3
... occurs or adjustment is required, first follow the troubleshooting table in the back of replacing the plug fuse, use a fuse approved by ASTA to keep your local authorized Brother dealer. Remember to clean the case. For a longer service life 1. For additional product information and updates,... visit our web site at www.brother.com The contents of this manual and specifications of the appliance by persons (including children) with this equipment, you study the manual before using the machine. Do not store anything on plug. •...
... occurs or adjustment is required, first follow the troubleshooting table in the back of replacing the plug fuse, use a fuse approved by ASTA to keep your local authorized Brother dealer. Remember to clean the case. For a longer service life 1. For additional product information and updates,... visit our web site at www.brother.com The contents of this manual and specifications of the appliance by persons (including children) with this equipment, you study the manual before using the machine. Do not store anything on plug. •...

Users Manual - English
Page 4
...OF MACHINE PARTS AND THEIR FUNCTIONS 5 The main parts ...5 Needle and presser foot section ...6 Flat bed attachment ...6 ACCESSORIES ...7 OPTIONAL ACCESSORIES 7 USING YOUR SEWING MACHINE 8 Power supply precautions ...8 Power supply ...8 Foot controller ...9 Steadying the machine ...9 THREADING THE MACHINE 10 Winding the bobbin ......22 Stitch length knob ...22 Needle position selector ...22 Starting to sew ...23 Sewing in reverse ...23 Thread tension ...24 USEFUL SEWING TIPS ...25 Trial sewing ...25 Changing the sewing direction ...25 Sewing curves ...25 Sewing thick fabrics ...25 Sewing thin...
...OF MACHINE PARTS AND THEIR FUNCTIONS 5 The main parts ...5 Needle and presser foot section ...6 Flat bed attachment ...6 ACCESSORIES ...7 OPTIONAL ACCESSORIES 7 USING YOUR SEWING MACHINE 8 Power supply precautions ...8 Power supply ...8 Foot controller ...9 Steadying the machine ...9 THREADING THE MACHINE 10 Winding the bobbin ......22 Stitch length knob ...22 Needle position selector ...22 Starting to sew ...23 Sewing in reverse ...23 Thread tension ...24 USEFUL SEWING TIPS ...25 Trial sewing ...25 Changing the sewing direction ...25 Sewing curves ...25 Sewing thick fabrics ...25 Sewing thin...

Users Manual - English
Page 5
... race ...39 Cleaning the feed dogs ...40 Bobbin case tension adjustment ...41 TROUBLESHOOTING ...42 When the thread is entangled ...45 INDEX ...46 4 UTILITY STITCHES 27 USEFUL STITCHES ...27 Zigzag stitches ...27 Basic stitching ...27 Blind hem stitching ...28 Darning ...29 Over edge stitch ...29 BUTTONHOLE SEWING/ BUTTON SEWING 30 Buttonhole sewing...
... race ...39 Cleaning the feed dogs ...40 Bobbin case tension adjustment ...41 TROUBLESHOOTING ...42 When the thread is entangled ...45 INDEX ...46 4 UTILITY STITCHES 27 USEFUL STITCHES ...27 Zigzag stitches ...27 Basic stitching ...27 Blind hem stitching ...28 Darning ...29 Over edge stitch ...29 BUTTONHOLE SEWING/ BUTTON SEWING 30 Buttonhole sewing...
Users Manual - English
Page 6
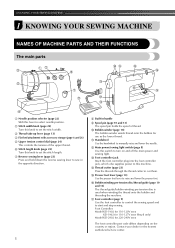
... controller plug into the foot controller jack, which also supplies power to this switch to turn on the country or region. q Foot controller (page 9) Use the foot controller to control the sewing speed and to sew in the opposite direction. 5 h Built-in handle i Spool pin (page 10 and 13...the thread cutter to raise and lower the presser foot. f Stitch length knob (page 22) Turn this knob to set the stitch width. k Handwheel Use the handwheel to select needle position. Contact your dealer or the nearest authorized service center. b Stitch width knob (page 22) Turn this lever to ...
... controller plug into the foot controller jack, which also supplies power to this switch to turn on the country or region. q Foot controller (page 9) Use the foot controller to control the sewing speed and to sew in the opposite direction. 5 h Built-in handle i Spool pin (page 10 and 13...the thread cutter to raise and lower the presser foot. f Stitch length knob (page 22) Turn this knob to set the stitch width. k Handwheel Use the handwheel to select needle position. Contact your dealer or the nearest authorized service center. b Stitch width knob (page 22) Turn this lever to ...
Users Manual - English
Page 7
.... If the accessories are stored in a compartment inside the compartment. h Bobbin case i Needle j Needle bar thread guide k Needle clamp screw Use the needle clamp screw to remove it. b Presser foot screw Use the presser foot screw to set the bobbin. e Needle plate The needle plate is installed onto the presser foot holder...
.... If the accessories are stored in a compartment inside the compartment. h Bobbin case i Needle j Needle bar thread guide k Needle clamp screw Use the needle clamp screw to remove it. b Presser foot screw Use the presser foot screw to set the bobbin. e Needle plate The needle plate is installed onto the presser foot holder...

Users Manual - English
Page 8
...Americas) SFB: SABOBBIN (U.S.A. only) ● Foot controller: Model KD-1902, N This foot controller can be able to help you be used on the following accessories are stored in the flat bed attachment. Note (For U.S.A. Part Name 1 Extra spool pin 2 Twin needle Part Code...Others No. only) XA5539-151 XE7064-001 OPTIONAL ACCESSORIES 1. 2. KNOWING YOUR SEWING MACHINE ACCESSORIES The following machine models: LS-2000/LS2250PRW/LS2300PRW/LS2350. ● The screw of the presser foot holder is available through your authorized dealer. (Part code: 132730-122) ● A ...
...Americas) SFB: SABOBBIN (U.S.A. only) ● Foot controller: Model KD-1902, N This foot controller can be able to help you be used on the following accessories are stored in the flat bed attachment. Note (For U.S.A. Part Name 1 Extra spool pin 2 Twin needle Part Code...Others No. only) XA5539-151 XE7064-001 OPTIONAL ACCESSORIES 1. 2. KNOWING YOUR SEWING MACHINE ACCESSORIES The following machine models: LS-2000/LS2250PRW/LS2300PRW/LS2350. ● The screw of the presser foot holder is available through your authorized dealer. (Part code: 132730-122) ● A ...

Users Manual - English
Page 9
... objects on . 1 a Foot controller plug 8 If the cord or plug is damaged, take the machine to your authorized dealer for repairs before continuing use extension cords or multi-plug adapters with wet hands. These things may result. b Insert the foot controller plug, located a between the foot controller and... is turned on the cord. Then, insert the power supply plug into the jack on the cord may result in to them. USING YOUR SEWING MACHINE Power supply precautions 1 Be sure to observe the following circumstances: • When you are away from the outlet. WARNING &#...
... objects on . 1 a Foot controller plug 8 If the cord or plug is damaged, take the machine to your authorized dealer for repairs before continuing use extension cords or multi-plug adapters with wet hands. These things may result. b Insert the foot controller plug, located a between the foot controller and... is turned on the cord. Then, insert the power supply plug into the jack on the cord may result in to them. USING YOUR SEWING MACHINE Power supply precautions 1 Be sure to observe the following circumstances: • When you are away from the outlet. WARNING &#...

Users Manual - English
Page 10
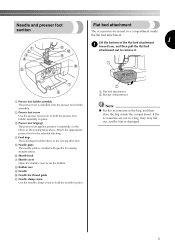
... the right-front corner of the base plate to adjust its height until the sewing machine is not in use for a long period of time should make sure that has not been in use . To reduce the risk of electric shock, this plug is being started. X The sewing lamp goes off when...
... the right-front corner of the base plate to adjust its height until the sewing machine is not in use for a long period of time should make sure that has not been in use . To reduce the risk of electric shock, this plug is being started. X The sewing lamp goes off when...

Users Manual - English
Page 11
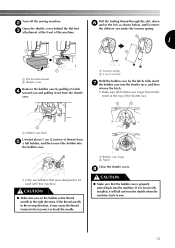
CAUTION a Pre-tension disk b Bobbin winder shaft c Bobbin ● We designed the bobbin that comes with this machine. Only use bobbins from the inside of the bobbin. Actual size This model a 11.5 mm (7/16 inches) Pull up the spool pin as far as possible. b Click! e ... Turn on the shaft. Other models Put the bobbin onto the bobbin winder shaft and d slide the bobbin winder shaft to the right. If you use the bobbin that comes with this pin. Pass the end of the bobbin. • Align the notch on bobbin to the spring on the sewing...
CAUTION a Pre-tension disk b Bobbin winder shaft c Bobbin ● We designed the bobbin that comes with this machine. Only use bobbins from the inside of the bobbin. Actual size This model a 11.5 mm (7/16 inches) Pull up the spool pin as far as possible. b Click! e ... Turn on the shaft. Other models Put the bobbin onto the bobbin winder shaft and d slide the bobbin winder shaft to the right. If you use the bobbin that comes with this pin. Pass the end of the bobbin. • Align the notch on bobbin to the spring on the sewing...
Users Manual - English
Page 13
... bobbin case into the shuttle race, and then release the latch. • Make sure the bobbin case finger fits into the bobbin case. • Only use bobbins that the bobbin case is incorrectly installed, it may cause the thread tension to be incorrect or break the needle. If the thread unrolls... bobbin, and then insert the bobbin into the notch at the front of the shuttle race. h CAUTION ● Make sure that were designed to be used with this machine.
... bobbin case into the shuttle race, and then release the latch. • Make sure the bobbin case finger fits into the bobbin case. • Only use bobbins that the bobbin case is incorrectly installed, it may cause the thread tension to be incorrect or break the needle. If the thread unrolls... bobbin, and then insert the bobbin into the notch at the front of the shuttle race. h CAUTION ● Make sure that were designed to be used with this machine.

Users Manual - English
Page 14
... 13 Otherwise, the thread could tangle and break the needle. While holding the thread from the right to its highest position. a Raise the presser foot using the presser foot lever. b CAUTION ● If the spool of thread on this pin. Pull up the thread check spring.
... 13 Otherwise, the thread could tangle and break the needle. While holding the thread from the right to its highest position. a Raise the presser foot using the presser foot lever. b CAUTION ● If the spool of thread on this pin. Pull up the thread check spring.
Users Manual - English
Page 16
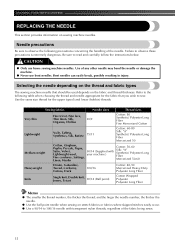
... YOUR SEWING MACHINE REPLACING THE NEEDLE This section provides information on stretch fabrics or fabrics where skipped stitches easily occur. ● Use a 90/14 to sew. Needle precautions Be sure to the following precautions concerning the handling of the needle. Sewing fabrics Needle...Muslin 90/14 (Supplied with transparent nylon threads, regardless of any other needle may bend the needle or damage the machine. ● Never use home sewing machine needles. Refer to observe the following table when choosing the thread and needle appropriate for the upper (spool) and lower (...
... YOUR SEWING MACHINE REPLACING THE NEEDLE This section provides information on stretch fabrics or fabrics where skipped stitches easily occur. ● Use a 90/14 to sew. Needle precautions Be sure to the following precautions concerning the handling of the needle. Sewing fabrics Needle...Muslin 90/14 (Supplied with transparent nylon threads, regardless of any other needle may bend the needle or damage the machine. ● Never use home sewing machine needles. Refer to observe the following table when choosing the thread and needle appropriate for the upper (spool) and lower (...

Users Manual - English
Page 17
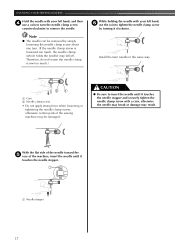
... needle Replace the needle as 65/9 to 75/11), the needle may break while the machine is accidentally pressed and the machine starts sewing. Use a coin and a needle that has been determined to the instructions in the table on a flat surface and check that the distance between the...the flat surface is not even, the needle is bent. a Flat side b Needle type marking ■ Correct needle Lower the presser foot lever. Do not use a bent needle. CAUTION ● The appropriate fabric, thread and needle combinations are shown in "Checking the needle" . 1 Turn off the sewing machine, ...
... needle Replace the needle as 65/9 to 75/11), the needle may break while the machine is accidentally pressed and the machine starts sewing. Use a coin and a needle that has been determined to the instructions in the table on a flat surface and check that the distance between the...the flat surface is not even, the needle is bent. a Flat side b Needle type marking ■ Correct needle Lower the presser foot lever. Do not use a bent needle. CAUTION ● The appropriate fabric, thread and needle combinations are shown in "Checking the needle" . 1 Turn off the sewing machine, ...
Users Manual - English
Page 18
.... CAUTION ● Be sure to insert the needle until it touches the needle stopper and securely tighten the needle clamp screw with your left hand, f use a coin to turn . (If the needle clamp screw is loosened too much .) Install the twin needle in the same way. KNOWING YOUR SEWING MACHINE... Hold the needle with your left hand, and then d use the coin to tighten the needle clamp screw by simply loosening the needle clamp screw about one turn the needle clamp screw counterclockwise to remove...
.... CAUTION ● Be sure to insert the needle until it touches the needle stopper and securely tighten the needle clamp screw with your left hand, f use a coin to turn . (If the needle clamp screw is loosened too much .) Install the twin needle in the same way. KNOWING YOUR SEWING MACHINE... Hold the needle with your left hand, and then d use the coin to tighten the needle clamp screw by simply loosening the needle clamp screw about one turn the needle clamp screw counterclockwise to remove...
Users Manual - English
Page 19
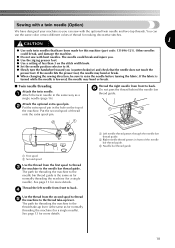
... position selector to raise the needle before turning the fabric. Put the second spool of the needle bar thread guide. a First spool b Second spool Use the thread from front to the needle bar thread guide. See page 13 for more details. See page 13 for more details. Sewing with a twin...We have been made for this machine (part code: 131096-121). You can sew with bent needles. Other needles could break and injure you can use the same color or two different colors of the machine. If the needle hits the presser foot, the needle may bend or break. ■ Twin...
... position selector to raise the needle before turning the fabric. Put the second spool of the needle bar thread guide. a First spool b Second spool Use the thread from front to the needle bar thread guide. See page 13 for more details. See page 13 for more details. Sewing with a twin...We have been made for this machine (part code: 131096-121). You can sew with bent needles. Other needles could break and injure you can use the same color or two different colors of the machine. If the needle hits the presser foot, the needle may bend or break. ■ Twin...

Users Manual - English
Page 20
...so that the f presser foot pin snaps into the shank in the holder. Using other any presser feet may occur if the foot controller is positioned to be sure to be injured. ● Always... use the correct presser foot for the stitch pattern you have been designed to turn off ...the presser foot. If you leave the power on and step on , a turn off the power before you use presser feet that the presser foot pin is attached. Raise the presser foot lever. KNOWING YOUR SEWING MACHINE REPLACING...
...so that the f presser foot pin snaps into the shank in the holder. Using other any presser feet may occur if the foot controller is positioned to be sure to be injured. ● Always... use the correct presser foot for the stitch pattern you have been designed to turn off ...the presser foot. If you leave the power on and step on , a turn off the power before you use presser feet that the presser foot pin is attached. Raise the presser foot lever. KNOWING YOUR SEWING MACHINE REPLACING...

Users Manual - English
Page 21
..., refer to loosen the presser foot holder b screw. Raise the presser foot lever to check that does not use the presser foot holder. a left hand. Use a coin to "Replacing the presser foot" (page 19). Use a coin to remove the presser foot holder. ■ Removing the presser foot holder Remove the presser foot. a Coin... foot holder is securely attached. ■ Attaching the presser foot holder Align the presser foot holder with b your right hand, and then tighten the screw using a coin in place with the lower-
..., refer to loosen the presser foot holder b screw. Raise the presser foot lever to check that does not use the presser foot holder. a left hand. Use a coin to "Replacing the presser foot" (page 19). Use a coin to remove the presser foot holder. ■ Removing the presser foot holder Remove the presser foot. a Coin... foot holder is securely attached. ■ Attaching the presser foot holder Align the presser foot holder with b your right hand, and then tighten the screw using a coin in place with the lower-

Users Manual - English
Page 22
... the machine. When sewing is in injuries. ● Make sure that the needle does not strike basting pins, otherwise the needle may break. ● Never use bent needles. For details on turning on replacing the presser foot, refer to "Stitch width knob" (page 22). ↓ 3 Attach the presser foot. Attach the...
... the machine. When sewing is in injuries. ● Make sure that the needle does not strike basting pins, otherwise the needle may break. ● Never use bent needles. For details on turning on replacing the presser foot, refer to "Stitch width knob" (page 22). ↓ 3 Attach the presser foot. Attach the...
Users Manual - English
Page 23
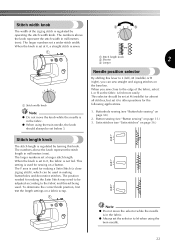
...for making buttonholes and decorative stitches. a Stitch length knob b Shorter 2 c Longer Needle position selector By shifting this knob. This selector should always be used for sewing on a fabric scrap. Button sewing (see "Buttonhole sewing" on page 30.) 2. The numbers above the knob represent the stitch length in ...Note ● Do not move the knob while the needle is set at M (middle) for almost all stitches, but set it to M when using the twin needle, the knob should be set at 0, a straight stitch is in the fabric. ● Always set the selector to other positions ...
...for making buttonholes and decorative stitches. a Stitch length knob b Shorter 2 c Longer Needle position selector By shifting this knob. This selector should always be used for sewing on a fabric scrap. Button sewing (see "Buttonhole sewing" on page 30.) 2. The numbers above the knob represent the stitch length in ...Note ● Do not move the knob while the needle is set at M (middle) for almost all stitches, but set it to M when using the twin needle, the knob should be set at 0, a straight stitch is in the fabric. ● Always set the selector to other positions ...


