Quick Setup Guide - English
Page 1
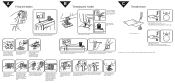
Hold the bobbin case as shown, insert the bobbin with the top opening around the bobbin winder thread guide. 2 3 4 4 Raise the presser foot lifter. 5 * Raise the thread takeup lever to back and pull out about 2" of the thread, depress the foot ... by turning the balance hand wheel. The latch should hold the bobbin case in place. While holding the end of thread. Cut the thread, slide the winding shaft to the left side of the opening of the shuttle race , insert the case into the shuttle race and release the latch. Guide the...
Hold the bobbin case as shown, insert the bobbin with the top opening around the bobbin winder thread guide. 2 3 4 4 Raise the presser foot lifter. 5 * Raise the thread takeup lever to back and pull out about 2" of the thread, depress the foot ... by turning the balance hand wheel. The latch should hold the bobbin case in place. While holding the end of thread. Cut the thread, slide the winding shaft to the left side of the opening of the shuttle race , insert the case into the shuttle race and release the latch. Guide the...

Quick Setup Guide - English
Page 2
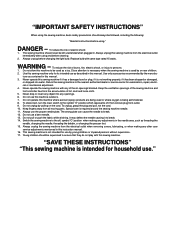
... accumulated lint and thread with a brush. TO REPACK: FOLLOW DIAGRAM BELOW =REPACKING= 1 2 3 4 5 6 XA8545-021 PRINTED IN CHINA D Cleaning bobbin case 1 CAUTION Troubleshooting ∗Do not pull or push fabric while stitching. Cut the entangled thread with small scissors above the needle plate and then... gently remove the thread and fabric. 3 4 Perform steps 1 through 8 of the hook, match the hook position opposite the driver and insert. Push the latch levers into the sewing position. ***READ ME FIRST*** Should you still need assistance, call 1-901-379-1010 for entangled ...
... accumulated lint and thread with a brush. TO REPACK: FOLLOW DIAGRAM BELOW =REPACKING= 1 2 3 4 5 6 XA8545-021 PRINTED IN CHINA D Cleaning bobbin case 1 CAUTION Troubleshooting ∗Do not pull or push fabric while stitching. Cut the entangled thread with small scissors above the needle plate and then... gently remove the thread and fabric. 3 4 Perform steps 1 through 8 of the hook, match the hook position opposite the driver and insert. Push the latch levers into the sewing position. ***READ ME FIRST*** Should you still need assistance, call 1-901-379-1010 for entangled ...
Users Manual - English
Page 2
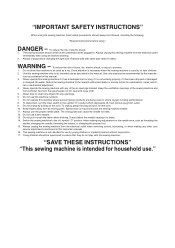
... (spray) products are being used or where oxygen is intended for examination, repair, electrical or mechanical adjustment. 4. Never drop or insert any object into water. The wrong plate can cause the needle to the nearest authorized dealer or service center for household use by ... should always be left unattended when plugged in. Always unplug this manual. 3. turer as threading the needle, changing the needle, threading the bobbin, or changing the presser foot. 15. Do not unplug by the manufac- Use only accessories recommended by pulling on the cord. WARNING -...
... (spray) products are being used or where oxygen is intended for examination, repair, electrical or mechanical adjustment. 4. Never drop or insert any object into water. The wrong plate can cause the needle to the nearest authorized dealer or service center for household use by ... should always be left unattended when plugged in. Always unplug this manual. 3. turer as threading the needle, changing the needle, threading the bobbin, or changing the presser foot. 15. Do not unplug by the manufac- Use only accessories recommended by pulling on the cord. WARNING -...
Users Manual - English
Page 7
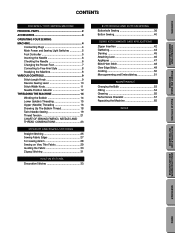
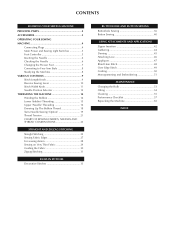
... YOUR SEWING MACHINE PRINCIPAL PARTS 2 ACCESSORIES 3 OPERATING YOUR SEWING MACHINE 4 Connecting Plugs 4 Main Power and Sewing Light Switches 5 Foot Controller 5 Inserting the Needle 6 Checking the Needle 6 Changing the Presser Foot 7 Converting to Free-Arm Style 8 Steadying the Machine 8 VARIOUS CONTROLS 9 Stitch ...10 Stitch Width Knob 11 Needle Position Selector 12 THREADING THE MACHINE 14 Winding the Bobbin 14 Lower (bobbin) Threading 15 Upper (Needle) Threading 16 Drawing Up The Bobbin Thread 18 Twin-Needle Sewing 19 Thread Tension 21 CHART OF SEWING FABRICS, NEEDLES AND...
... YOUR SEWING MACHINE PRINCIPAL PARTS 2 ACCESSORIES 3 OPERATING YOUR SEWING MACHINE 4 Connecting Plugs 4 Main Power and Sewing Light Switches 5 Foot Controller 5 Inserting the Needle 6 Checking the Needle 6 Changing the Presser Foot 7 Converting to Free-Arm Style 8 Steadying the Machine 8 VARIOUS CONTROLS 9 Stitch ...10 Stitch Width Knob 11 Needle Position Selector 12 THREADING THE MACHINE 14 Winding the Bobbin 14 Lower (bobbin) Threading 15 Upper (Needle) Threading 16 Drawing Up The Bobbin Thread 18 Twin-Needle Sewing 19 Thread Tension 21 CHART OF SEWING FABRICS, NEEDLES AND...
Users Manual - English
Page 67
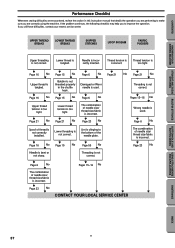
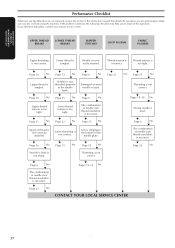
...incorrect. w Page 21 No w Spool of needle size/ thread size/fabric is too tight. w Page 23 No w w Page 15 No w Bobbin is not correctly installed. w Page 15 No w Lower thread tension is incorrect. w Page 6 No w The combination of thread is not threaded ...sewing difficulties are encountered, review the section in the shuttle hook. Needle is tangled. w Page 16 No w Upper thread is incorrectly inserted. UPPER THREAD BREAKS LOWER THREAD BREAKS SKIPPED STITCHES LOOP IN SEAM FABRIC PUCKERS Upper threading is used . w Page 6 No w Damaged...
...incorrect. w Page 21 No w Spool of needle size/ thread size/fabric is too tight. w Page 23 No w w Page 15 No w Bobbin is not correctly installed. w Page 15 No w Lower thread tension is incorrect. w Page 6 No w The combination of thread is not threaded ...sewing difficulties are encountered, review the section in the shuttle hook. Needle is tangled. w Page 16 No w Upper thread is incorrectly inserted. UPPER THREAD BREAKS LOWER THREAD BREAKS SKIPPED STITCHES LOOP IN SEAM FABRIC PUCKERS Upper threading is used . w Page 6 No w Damaged...
Users Manual - English
Page 68
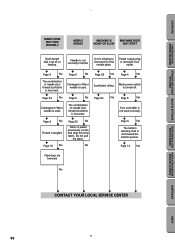
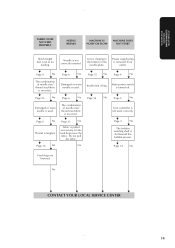
...No w The combination of the needle plate. Do not pull the fabric. w Page 5 No w Foot controller is slid toward the bobbin presser. w Page 5 No w The bobbin winding shaft is not used correctly. Power supply plug is pulled excessively. w Page 23 No w Fabric is removed from outlet. w ...of needle size/ thread size/fabric is incorrect. w Page 16 No w w Page 6 No w Damaged or Worn needle is not correctly inserted. No w Page 55 No w Insufficient oiling. Needle is used . Let the feed dogs move the fabric. CONTENTS KNOWING YOUR SEWING MACHINE STRAIGHT...
...No w The combination of the needle plate. Do not pull the fabric. w Page 5 No w Foot controller is slid toward the bobbin presser. w Page 5 No w The bobbin winding shaft is not used correctly. Power supply plug is pulled excessively. w Page 23 No w Fabric is removed from outlet. w ...of needle size/ thread size/fabric is incorrect. w Page 16 No w w Page 6 No w Damaged or Worn needle is not correctly inserted. No w Page 55 No w Insufficient oiling. Needle is used . Let the feed dogs move the fabric. CONTENTS KNOWING YOUR SEWING MACHINE STRAIGHT...
Users Manual - English
Page 76
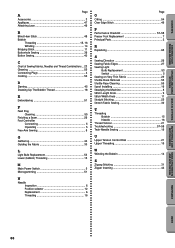
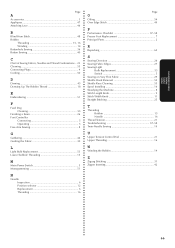
...Appliques 47 Attaching Lace 46 B Blind Hem Stitch 48 Bobbin Threading 15, 16 Winding 14 Bridging Stitch 11 Buttonhole ... 23 Cleaning 55 Connecting Plugs 4 Cording 50 D Darning 45 Drawing Up The Bobbin Thread 18 E Embroidering 51 F Feed Dog Cleaning 55 Finishing a Seam 26 ... Sewing 8 G Gathering 44 Guiding the Fabric 30 L Light Bulb Replacement 53 Lower (bobbin) Threading 15 M Main Power Switch 5 Monogramming 51 N Needle Inspection 6 Position selector... Stitching 25 Stretch Fabric Sewing 30 T Threading Bobbin 15 Needle 16 Thread Tension 21 Troubleshooting 57-58 Twin-...
...Appliques 47 Attaching Lace 46 B Blind Hem Stitch 48 Bobbin Threading 15, 16 Winding 14 Bridging Stitch 11 Buttonhole ... 23 Cleaning 55 Connecting Plugs 4 Cording 50 D Darning 45 Drawing Up The Bobbin Thread 18 E Embroidering 51 F Feed Dog Cleaning 55 Finishing a Seam 26 ... Sewing 8 G Gathering 44 Guiding the Fabric 30 L Light Bulb Replacement 53 Lower (bobbin) Threading 15 M Main Power Switch 5 Monogramming 51 N Needle Inspection 6 Position selector... Stitching 25 Stretch Fabric Sewing 30 T Threading Bobbin 15 Needle 16 Thread Tension 21 Troubleshooting 57-58 Twin-...
User Manual - French
Page 2
... properly, if it to ensure that they do not play with this instruction manual. 16. Never operate this manual. Never drop or insert any adjustments in the needle area, such as contained in this sewing machine. Do not pull or push the fabric while stitching. It... use as a toy. Always unplug this machine outdoors. 7. Always unplug before using." turer as threading the needle, changing the needle, threading the bobbin, or changing the presser foot. 15. Keep the ventilation openings of the sewing machine and foot controller free from the accumulation of electric shock: ...
... properly, if it to ensure that they do not play with this instruction manual. 16. Never operate this manual. Never drop or insert any adjustments in the needle area, such as contained in this sewing machine. Do not pull or push the fabric while stitching. It... use as a toy. Always unplug this machine outdoors. 7. Always unplug before using." turer as threading the needle, changing the needle, threading the bobbin, or changing the presser foot. 15. Keep the ventilation openings of the sewing machine and foot controller free from the accumulation of electric shock: ...
User Manual - French
Page 7
... Sewing Lever 10 Stitch Width Knob 11 Needle Position Selector 12 THREADING THE MACHINE 14 Winding the Bobbin 14 Lower (bobbin) Threading 15 Upper (Needle) Threading 16 Drawing Up The Bobbin Thread 18 Twin-Needle Sewing (Option 19 Thread Tension 21 CHART OF SEWING FABRICS, NEEDLES AND ... 31 BUILT-IN STITCHES Decorative Stitches 33 BUTTONHOLE AND BUTTON SEWING Buttonhole Sewing 36 Button Sewing 40 USING ATTACHMENTS AND APPLICATIONS Zipper Insertion 42 Gathering 44 Darning 45 Attaching Lace 46 Appliques 47 Blind Hem Stitch 48 Over Edge Stitch 49 Cording 50 Monogramming and...
... Sewing Lever 10 Stitch Width Knob 11 Needle Position Selector 12 THREADING THE MACHINE 14 Winding the Bobbin 14 Lower (bobbin) Threading 15 Upper (Needle) Threading 16 Drawing Up The Bobbin Thread 18 Twin-Needle Sewing (Option 19 Thread Tension 21 CHART OF SEWING FABRICS, NEEDLES AND ... 31 BUILT-IN STITCHES Decorative Stitches 33 BUTTONHOLE AND BUTTON SEWING Buttonhole Sewing 36 Button Sewing 40 USING ATTACHMENTS AND APPLICATIONS Zipper Insertion 42 Gathering 44 Darning 45 Attaching Lace 46 Appliques 47 Blind Hem Stitch 48 Over Edge Stitch 49 Cording 50 Monogramming and...
User Manual - French
Page 67
...too tight. Thread tension is too tight. M Page 16 No M Upper thread tension is too tight. M Page 23 No M M Page 15 No M Bobbin is used . M Page 6 No M The combination of needle size/ thread size/fabric is incorrect. M Page 6 No M Damaged or worn needle is... THREAD BREAKS SKIPPED STITCHES LOOP IN SEAM FABRIC PUCKERS Upper threading is not correct. Needle is tangled. M Page 16 No M Upper thread is incorrectly inserted. M Page 22 No M Lower threading is incorrect. M Page 6 No M The combination of needle size/ thread size/fabric is not correct. ...
...too tight. Thread tension is too tight. M Page 16 No M Upper thread tension is too tight. M Page 23 No M M Page 15 No M Bobbin is used . M Page 6 No M The combination of needle size/ thread size/fabric is incorrect. M Page 6 No M Damaged or worn needle is... THREAD BREAKS SKIPPED STITCHES LOOP IN SEAM FABRIC PUCKERS Upper threading is not correct. Needle is tangled. M Page 16 No M Upper thread is incorrectly inserted. M Page 22 No M Lower threading is incorrect. M Page 6 No M The combination of needle size/ thread size/fabric is not correct. ...
User Manual - French
Page 68
...M Page 54 M No Page 5 No M Foot controller is incorrect. M Page 16 No M M Page 6 No M Damaged or worn needle is not correctly inserted. No M M M M CONTACT YOUR LOCAL SERVICE CENTER 58 Needle is used . M Page 23 No M Damaged or worn needle is pulled excessively. M Page ...Page 55 No M M Page 4 No M Insufficient oiling. M Page 14 No Feed dogs are lowered. Lint is slid toward the bobbin presser. Do not pull the fabric. MAINTENANCE ENTRETIEN MANTENIMIENTO MANUTENÇÃO FABRIC DOES NOT FEED PROPERLY NEEDLE BREAKS MACHINE IS NOISY OR ...
...M Page 54 M No Page 5 No M Foot controller is incorrect. M Page 16 No M M Page 6 No M Damaged or worn needle is not correctly inserted. No M M M M CONTACT YOUR LOCAL SERVICE CENTER 58 Needle is used . M Page 23 No M Damaged or worn needle is pulled excessively. M Page ...Page 55 No M M Page 4 No M Insufficient oiling. M Page 14 No Feed dogs are lowered. Lint is slid toward the bobbin presser. Do not pull the fabric. MAINTENANCE ENTRETIEN MANTENIMIENTO MANUTENÇÃO FABRIC DOES NOT FEED PROPERLY NEEDLE BREAKS MACHINE IS NOISY OR ...
User Manual - French
Page 76
...and Thread Combinations ... 23 Cleaning 55 Connecting Plugs 4 Cording 50 D Darning 45 Drawing Up The Bobbin Thread 18 E Embroidering 51 F Feed Dog Cleaning 55 Finishing a Seam 26 Foot Controller Connecting ... 5 Free-Arm Sewing 8 G Gathering 44 Guiding the Fabric 30 L Light Bulb Replacement 53 Lower (bobbin) Threading 15 M Main Power Switch 5 Monogramming 51 N Needle Inspection 6 Position selector 12 Replacement 6 ...Length Knob 9 Stitch Width Knob 11 Straight Stitching 25 T Threading Bobbin 15 Needle 16 Thread Tension 21 Troubleshooting 57-58 Twin-Needle Sewing 19 ...
...and Thread Combinations ... 23 Cleaning 55 Connecting Plugs 4 Cording 50 D Darning 45 Drawing Up The Bobbin Thread 18 E Embroidering 51 F Feed Dog Cleaning 55 Finishing a Seam 26 Foot Controller Connecting ... 5 Free-Arm Sewing 8 G Gathering 44 Guiding the Fabric 30 L Light Bulb Replacement 53 Lower (bobbin) Threading 15 M Main Power Switch 5 Monogramming 51 N Needle Inspection 6 Position selector 12 Replacement 6 ...Length Knob 9 Stitch Width Knob 11 Straight Stitching 25 T Threading Bobbin 15 Needle 16 Thread Tension 21 Troubleshooting 57-58 Twin-Needle Sewing 19 ...


