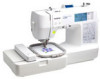
Users Manual - English
Page 2
... the Bobbin Thread...4 CREATING BOBBIN WORK ...8 Positioning the Fabric and Sewing...8 Finishing the thread ends...10 Bobbin Work Free-Motion Sewing ...11 Templates for sewing bobbin work. This manual describes the procedures for Free-Motion Sewing ...12 ADJUSTING THE THREAD TENSION...13 Adjusting the Upper Thread Tension ...13 Adjusting the Tension of the Bobbin Thread ...13 TROUBLESHOOTING...14 1 BEFORE YOU START Thank you for sewing (utility stitches, decorative stitches or free-motion sewing). For specific details on operating the machine, refer to the Operation Manual provided...
... the Bobbin Thread...4 CREATING BOBBIN WORK ...8 Positioning the Fabric and Sewing...8 Finishing the thread ends...10 Bobbin Work Free-Motion Sewing ...11 Templates for sewing bobbin work. This manual describes the procedures for Free-Motion Sewing ...12 ADJUSTING THE THREAD TENSION...13 Adjusting the Upper Thread Tension ...13 Adjusting the Tension of the Bobbin Thread ...13 TROUBLESHOOTING...14 1 BEFORE YOU START Thank you for sewing (utility stitches, decorative stitches or free-motion sewing). For specific details on operating the machine, refer to the Operation Manual provided...

Users Manual - English
Page 10
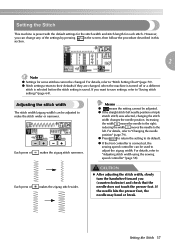
... start sewing. Raise the needle and presser foot. 9 Select a stitch. We recommend selecting a simple stitch and sewing trial stitches to feed the needle into the punched hole again, and then lower the presser foot lever. Examples of the machine. Threads can be difficult to pull the bobbin thread up to change the stitch length and stitch width settings. l Note • Before sewing, check that is enough thread in the bobbin. p CAUTION • Before sewing, make sure the automatic thread cutting and automatic reinforcement/reverse stitching...
... start sewing. Raise the needle and presser foot. 9 Select a stitch. We recommend selecting a simple stitch and sewing trial stitches to feed the needle into the punched hole again, and then lower the presser foot lever. Examples of the machine. Threads can be difficult to pull the bobbin thread up to change the stitch length and stitch width settings. l Note • Before sewing, check that is enough thread in the bobbin. p CAUTION • Before sewing, make sure the automatic thread cutting and automatic reinforcement/reverse stitching...
Operation Manual
Page 4
... to break. 6 This machine is not a toy: • Your close attention to the needle. • Never drop or insert any object into any opening. • Do not operate where aerosol (spray) products are subject to change without notice. Special care is required around the machine needle. • Switch the sewing machine to the symbol "O" position to turn it off when making any assemblies, the presser feet, needle, or...
... to break. 6 This machine is not a toy: • Your close attention to the needle. • Never drop or insert any object into any opening. • Do not operate where aerosol (spray) products are subject to change without notice. Special care is required around the machine needle. • Switch the sewing machine to the symbol "O" position to turn it off when making any assemblies, the presser feet, needle, or...
Operation Manual
Page 11
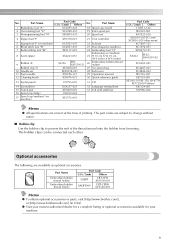
... machine. 9 Part Name Embroidery bobbin thread (white) Embroidery bobbin thread (black) Part Code U.S.A. / Canada Others SAEBT EBT-CEN X81164-001 SAEBT999 EBT-CEBN XC5520-001 Memo z To obtain optional accessories or parts, visit [http://www.brother.com/], or [http://www.brothermall.com] (in USA). No. Part Name 18 Spool cap (small) 19 Extra spool pin 20 Spool net 4 Zipper foot "I" X59370-021 21 Foot controller 5 Zigzag foot "J" (on machine) 6 Blind stitch foot "R" 7 Button fitting foot "M" 8 Seam ripper 9 Bobbin (4) Bobbin clip (3) 10 Needle set 11 Twin needle 12 Cleaning...
... machine. 9 Part Name Embroidery bobbin thread (white) Embroidery bobbin thread (black) Part Code U.S.A. / Canada Others SAEBT EBT-CEN X81164-001 SAEBT999 EBT-CEBN XC5520-001 Memo z To obtain optional accessories or parts, visit [http://www.brother.com/], or [http://www.brothermall.com] (in USA). No. Part Name 18 Spool cap (small) 19 Extra spool pin 20 Spool net 4 Zipper foot "I" X59370-021 21 Foot controller 5 Zigzag foot "J" (on machine) 6 Blind stitch foot "R" 7 Button fitting foot "M" 8 Seam ripper 9 Bobbin (4) Bobbin clip (3) 10 Needle set 11 Twin needle 12 Cleaning...
Operation Manual
Page 12
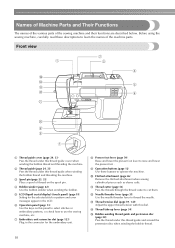
... attachment (page 46) Remove the flat bed attachment when sewing cylindrical pieces such as sleeve cuffs. m Thread tension dial (page 59, 145) Adjust the upper thread tension with this thread guide cover when winding the bobbin thread and threading the machine. g Embroidery unit connector slot (page 123) Plug in the connector for the selected stitch or pattern and error messages appear in the LCD. l Needle threader lever (page 35) Use the needle threader lever to raise and lower the presser foot . Front view a Thread guide cover...
... attachment (page 46) Remove the flat bed attachment when sewing cylindrical pieces such as sleeve cuffs. m Thread tension dial (page 59, 145) Adjust the upper thread tension with this thread guide cover when winding the bobbin thread and threading the machine. g Embroidery unit connector slot (page 123) Plug in the connector for the selected stitch or pattern and error messages appear in the LCD. l Needle threader lever (page 35) Use the needle threader lever to raise and lower the presser foot . Front view a Thread guide cover...

Operation Manual
Page 13
... stitching. h Drop feed lever (page 88) Use the drop feed lever to be exchanged. b Thread guide disk (page 34) Pass the thread through the thread guide disk when using the needle threader to clean the bobbin case and race. Memo z Refer to pages 10 through the needle bar thread guide. c Needle bar thread guide (page 34) Pass the upper thread through 13 while you (counterclockwise) to raise and lower the needle to use your machine. 11 Attach the appropriate presser foot for sewing straight seams. e Needle plate cover (page 152) Remove the needle plate cover to thread...
... stitching. h Drop feed lever (page 88) Use the drop feed lever to be exchanged. b Thread guide disk (page 34) Pass the thread through the thread guide disk when using the needle threader to clean the bobbin case and race. Memo z Refer to pages 10 through the needle bar thread guide. c Needle bar thread guide (page 34) Pass the upper thread through 13 while you (counterclockwise) to raise and lower the needle to use your machine. 11 Attach the appropriate presser foot for sewing straight seams. e Needle plate cover (page 152) Remove the needle plate cover to thread...

Operation Manual
Page 14
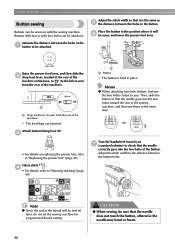
...machine operations. Operation buttons The operation buttons help you to "Using the thread cutter" (page 56). For details, refer to "Starting to raise or lower the needle. b Needle position button Press the needle position button to sew" (page 51). Reinforcement stitches are sewn by sewing 3 to start or stop sewing. a Start/stop button Press the start/stop button to 5 stitches on the side of sewing while the button is plugged in the opposite direction. e Sewing speed controller Slide the sewing speed controller to sew reverse stitches or reinforcement stitches. d Thread...
...machine operations. Operation buttons The operation buttons help you to "Using the thread cutter" (page 56). For details, refer to "Starting to raise or lower the needle. b Needle position button Press the needle position button to sew" (page 51). Reinforcement stitches are sewn by sewing 3 to start or stop sewing. a Start/stop button Press the start/stop button to 5 stitches on the side of sewing while the button is plugged in the opposite direction. e Sewing speed controller Slide the sewing speed controller to sew reverse stitches or reinforcement stitches. d Thread...
Operation Manual
Page 23
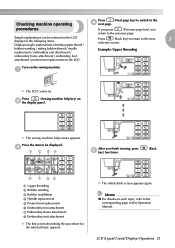
... the procedure for the following items. Displays simple explanations of setting upper thread / Press (Back key) to return to the previous page. bobbin winding / setting bobbin thread / needle replacement / embroidery unit attachment / Example: Upper threading embroidery frame attachment / embroidery foot attachment / presser foot replacement on each topic, refer to the d next page. LCD (Liquid Crystal Display) Operation 21 a X The LCD comes on the sewing machine. X The sewing machine help key) on the LCD display for the selected topic appears...
... the procedure for the following items. Displays simple explanations of setting upper thread / Press (Back key) to return to the previous page. bobbin winding / setting bobbin thread / needle replacement / embroidery unit attachment / Example: Upper threading embroidery frame attachment / embroidery foot attachment / presser foot replacement on each topic, refer to the d next page. LCD (Liquid Crystal Display) Operation 21 a X The LCD comes on the sewing machine. X The sewing machine help key) on the LCD display for the selected topic appears...
Operation Manual
Page 51
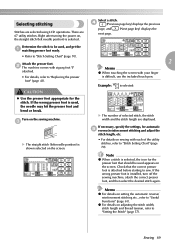
... z For details on adjusting the stitch width, stitch length and thread tension, refer to "Useful Functions" (page 61). z For details on setting the automatic reverse/ reinforcement stitching etc., refer to "Setting the Stitch" (page 57). Sewing 49 b The machine comes with your finger is selected. If the wrong presser foot is installed, turn off the sewing machine, attach the correct presser foot, and then select the desired stitch again. Determine the stitch to "Replacing the presser foot" (page 43...
... z For details on adjusting the stitch width, stitch length and thread tension, refer to "Useful Functions" (page 61). z For details on setting the automatic reverse/ reinforcement stitching etc., refer to "Setting the Stitch" (page 57). Sewing 49 b The machine comes with your finger is selected. If the wrong presser foot is installed, turn off the sewing machine, attach the correct presser foot, and then select the desired stitch again. Determine the stitch to "Replacing the presser foot" (page 43...
Operation Manual
Page 54
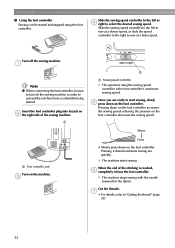
... starts sewing too quickly. Turn off the sewing machine in the fabric). Slower a Foot controller jack Turn on b the right side of the stitching is the foot controller's maximum sewing speed. g • For details, refer to select the desired sewing speed. X The machine stops sewing with the needle lowered (in order to sew at a faster speed. Slide the sewing speed controller to the left or d right to "Cutting the thread" (page 55). 52 a a a Sewing speed controller X The speed set using the foot controller...
... starts sewing too quickly. Turn off the sewing machine in the fabric). Slower a Foot controller jack Turn on b the right side of the stitching is the foot controller's maximum sewing speed. g • For details, refer to select the desired sewing speed. X The machine stops sewing with the needle lowered (in order to sew at a faster speed. Slide the sewing speed controller to the left or d right to "Cutting the thread" (page 55). 52 a a a Sewing speed controller X The speed set using the foot controller...
Operation Manual
Page 59
... the presser foot, the needle may bend or break. Adjusting the stitch width The stitch width (zigzag width) can be adjusted. z Press to return the setting to the right; Each press of makes the zigzag stitch wider. z If the straight stitch (left . reducing the width moves the needle to "Adjusting stitch width using the sewing speed controller" (page 58). For details, refer to the left needle position or triple stretch stitch) was selected, changing the stitch width changes the needle position...
... the presser foot, the needle may bend or break. Adjusting the stitch width The stitch width (zigzag width) can be adjusted. z Press to return the setting to the right; Each press of makes the zigzag stitch wider. z If the straight stitch (left . reducing the width moves the needle to "Adjusting stitch width using the sewing speed controller" (page 58). For details, refer to the left needle position or triple stretch stitch) was selected, changing the stitch width changes the needle position...
Operation Manual
Page 87
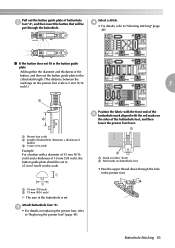
... (3/8 inch), the button guide plate should be put through the buttonhole. a A b a Mark on fabric (front) b Red marks on buttonhole foot • Pass the upper thread down through the hole in the button guide plate Add together the diameter and thickness of the button, and then set the button guide plate to the calculated length. (The distance between the markings on the sides of the buttonhole foot, and then lower the presser foot lever. d • For...
... (3/8 inch), the button guide plate should be put through the buttonhole. a A b a Mark on fabric (front) b Red marks on buttonhole foot • Pass the upper thread down through the hole in the button guide plate Add together the diameter and thickness of the button, and then set the button guide plate to the calculated length. (The distance between the markings on the sides of the buttonhole foot, and then lower the presser foot lever. d • For...
Operation Manual
Page 90
... or break. 88 Attach button-fitting foot "M". Adjust the stitch width to "Selecting stitching" (page 49). CAUTION ● When sewing, be sure that it is held in the position where it will be attached. Buttons with two or with the sewing machine. c • For details on replacing the presser foot, refer to be sewn, and lower the presser foot lever. Measure the distance between the holes in the a button to "Replacing the presser foot" (page...
... or break. 88 Attach button-fitting foot "M". Adjust the stitch width to "Selecting stitching" (page 49). CAUTION ● When sewing, be sure that it is held in the position where it will be attached. Buttons with two or with the sewing machine. c • For details on replacing the presser foot, refer to be sewn, and lower the presser foot lever. Measure the distance between the holes in the a button to "Replacing the presser foot" (page...
Operation Manual
Page 104
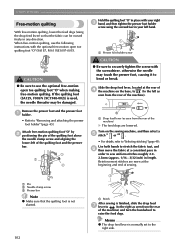
... or break. Memo z The drop feed lever is used, the needle threader may touch the presser foot, causing it to "Selecting stitching" (page 49). Slide the drop feed lever, located at the beginning and end of the machine). a Pin b Needle clamp screw c Presser bar Note z Make sure that the fabric can be damaged. otherwise the needle may be moved freely in any direction. Remove the presser foot and the presser foot a holder. • Refer to the right side. Reinforcement stitches are lowered...
... or break. Memo z The drop feed lever is used, the needle threader may touch the presser foot, causing it to "Selecting stitching" (page 49). Slide the drop feed lever, located at the beginning and end of the machine). a Pin b Needle clamp screw c Presser bar Note z Make sure that the fabric can be damaged. otherwise the needle may be moved freely in any direction. Remove the presser foot and the presser foot a holder. • Refer to the right side. Reinforcement stitches are lowered...
Operation Manual
Page 120
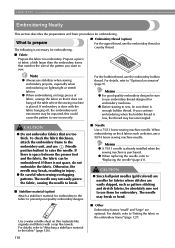
... off the table where the sewing machine is space between the presser foot and the fabric, the fabric can be absolutely sure not to use the embroidery thread or country thread. ■ Fabric Prepare the fabric for embroidery. For details, refer to "Attaching a stabilizer material to "Optional accessories" (page 9). Memo z A 75/11 needle is already installed when the sewing machine is necessary for embroidering. ■ Embroidery thread (option) For the upper thread, use embroidery thread designed for embroidering. EMBROIDERY Embroidering Neatly This...
... off the table where the sewing machine is space between the presser foot and the fabric, the fabric can be absolutely sure not to use the embroidery thread or country thread. ■ Fabric Prepare the fabric for embroidery. For details, refer to "Attaching a stabilizer material to "Optional accessories" (page 9). Memo z A 75/11 needle is already installed when the sewing machine is necessary for embroidering. ■ Embroidery thread (option) For the upper thread, use embroidery thread designed for embroidering. EMBROIDERY Embroidering Neatly This...
Operation Manual
Page 156
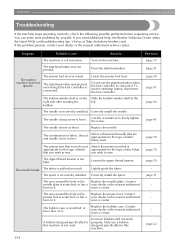
... presser foot lever. The bobbin winder shaft is raised. The needle breaks. The fabric is scratched, or has a burr on the Slide the bobbin winder shaft to sew. The area around the hole in the Replace the needle plate. The area around the hole in the Replace the presser foot. The bobbin case is pulled too much. A bobbin designed specifically for this machine. Incorrect bobbins will not work properly. Only use a bobbin designed specifically for this machine is appropriate for the type of stitch...
... presser foot lever. The bobbin winder shaft is raised. The needle breaks. The fabric is scratched, or has a burr on the Slide the bobbin winder shaft to sew. The area around the hole in the Replace the needle plate. The area around the hole in the Replace the presser foot. The bobbin case is pulled too much. A bobbin designed specifically for this machine. Incorrect bobbins will not work properly. Only use a bobbin designed specifically for this machine is appropriate for the type of stitch...
Operation Manual
Page 157
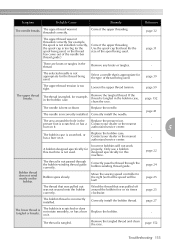
... Replace the presser foot. Incorrect bobbins will be fast). Correctly install the bobbin thread. authorized service center. 5 The bobbin case is appropriate for this machine is not used . Wind the thread that is scratched, or has a burr on it . Only use a bobbin designed specifically for the type of thread being used . The thread is tangled or breaks. Correctly pass the thread through the bobbin-winding thread guide correctly. Correct the upper threading. Select a needle that was not threaded correctly. Remove the tangled thread. Correctly install...
... Replace the presser foot. Incorrect bobbins will be fast). Correctly install the bobbin thread. authorized service center. 5 The bobbin case is appropriate for this machine is not used . Wind the thread that is scratched, or has a burr on it . Only use a bobbin designed specifically for the type of thread being used . The thread is tangled or breaks. Correctly pass the thread through the bobbin-winding thread guide correctly. Correct the upper threading. Select a needle that was not threaded correctly. Remove the tangled thread. Correctly install...
Operation Manual
Page 159
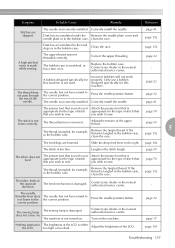
... correct position. direction. The needle threader lever does The needle has not been raised to not lower to sew. Press the needle position button. Contact your dealer or the nearest authorized service center. - page 17 Nothing appears in the bobbin case. Dust has accumulated under the Remove the needle plate cover and needle plate or in the bobbin case. page 32 - Only use a bobbin designed specifically for the type of the needle. you wish to sew. page 59 The thread...
... correct position. direction. The needle threader lever does The needle has not been raised to not lower to sew. Press the needle position button. Contact your dealer or the nearest authorized service center. - page 17 Nothing appears in the bobbin case. Dust has accumulated under the Remove the needle plate cover and needle plate or in the bobbin case. page 32 - Only use a bobbin designed specifically for the type of the needle. you wish to sew. page 59 The thread...

Operation Manual
Page 167
...pin 9, 36 bobbin winding 22 bobbin-winding thread guide 10, 24 eyelet punch 9, 86, 108 eyelet stitching 108 button sewing 88 buttonhole lever 11 F buttonhole sewing 84 buttonhole stitching 83 fabric positioning 50 buzzer 163 fagoting 110 fagoting stitch 109 C care 152 feed dogs 11 flat bed attachment 10 foot controller 9, 52 changing sewing direction 65 foot controller jack 11 checking needle 40 frame pattern selection 137 cleaning bobbin case 152 fraying, preventing 74 cleaning brush 9 free-arm sewing 46 cleaning machine surface 152 free-motion...
...pin 9, 36 bobbin winding 22 bobbin-winding thread guide 10, 24 eyelet punch 9, 86, 108 eyelet stitching 108 button sewing 88 buttonhole lever 11 F buttonhole sewing 84 buttonhole stitching 83 fabric positioning 50 buzzer 163 fagoting 110 fagoting stitch 109 C care 152 feed dogs 11 flat bed attachment 10 foot controller 9, 52 changing sewing direction 65 foot controller jack 11 checking needle 40 frame pattern selection 137 cleaning bobbin case 152 fraying, preventing 74 cleaning brush 9 free-arm sewing 46 cleaning machine surface 152 free-motion...
Operation Manual
Page 168
... 114 help key 13 hook-and-loop fastener 66 I installing bobbin 27 J joining 114 joining stitch 97, 109 L layout adjustment 143 LCD 18, 133 LCD button 134 LCD messages 159 LCD operation 18 M machine surface cleaning 152 main power switch 11 maintenance 152 manual needle threading 36 memory key 13 mirroring stitches 63 N needle bar thread guide 11 needle condition 40 needle plate 11 needle plate cover 11 needle plate marking 67 needle position button 12 needle position, changing 79 needle replacement 41 needle set 9 needle threader lever 10 needle threading 31 needles...
... 114 help key 13 hook-and-loop fastener 66 I installing bobbin 27 J joining 114 joining stitch 97, 109 L layout adjustment 143 LCD 18, 133 LCD button 134 LCD messages 159 LCD operation 18 M machine surface cleaning 152 main power switch 11 maintenance 152 manual needle threading 36 memory key 13 mirroring stitches 63 N needle bar thread guide 11 needle condition 40 needle plate 11 needle plate cover 11 needle plate marking 67 needle position button 12 needle position, changing 79 needle replacement 41 needle set 9 needle threader lever 10 needle threading 31 needles...


