Users Manual - English
Page 4
.... For additional product information and updates, visit our web site at www.brother.com 2 Use accessories recommended by or near children. • The plastic bag that you do not deflect the needle and cause it must be replaced ...by authorized dealer. • In the event a malfunction occurs or adjustment is used by the manufacturer as contained in this sewing machine was supplied in injuries. 5 Special care is being used . • Always consult the operation manual when replacing or installing any assemblies, the presser feet, needle, or other...
.... For additional product information and updates, visit our web site at www.brother.com 2 Use accessories recommended by or near children. • The plastic bag that you do not deflect the needle and cause it must be replaced ...by authorized dealer. • In the event a malfunction occurs or adjustment is used by the manufacturer as contained in this sewing machine was supplied in injuries. 5 Special care is being used . • Always consult the operation manual when replacing or installing any assemblies, the presser feet, needle, or other...
Users Manual - English
Page 5
..., you should contact your authorized dealer to BS 1362, i.e. FOR USERS IN AUSTRALIA AND NEW ZEALAND This sewing machine is not suitable for the plug supplied with a disability. 3
..., you should contact your authorized dealer to BS 1362, i.e. FOR USERS IN AUSTRALIA AND NEW ZEALAND This sewing machine is not suitable for the plug supplied with a disability. 3
Users Manual - English
Page 6
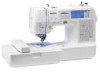
... presser foot section ...11 Right-side/rear view ...11 Operation buttons ...12 Operation panel ...13 GETTING READY 15 Turning the Machine On/Off 16 Power supply precautions ...16 Turning on the machine ...17 Turning off the machine ...17 LCD (Liquid Crystal Display) Operation 18 Viewing the LCD ...18 Changing the machine...
... presser foot section ...11 Right-side/rear view ...11 Operation buttons ...12 Operation panel ...13 GETTING READY 15 Turning the Machine On/Off 16 Power supply precautions ...16 Turning on the machine ...17 Turning off the machine ...17 LCD (Liquid Crystal Display) Operation 18 Viewing the LCD ...18 Changing the machine...

Users Manual - English
Page 13
... the bobbin cover, and then insert the bobbin into the foot controller jack. f Foot controller jack (page 52) Insert the plug on and off. g Power supply jack (page 17) Insert the plug on the fabric as the sewing takes place. Memo z Refer to pages 10 through 13 while you (counterclockwise) to... the end of the foot controller cable into the bobbin case. h Presser foot (page 43, 50) The presser foot applies pressure consistently on the power supply cord into the power...
... the bobbin cover, and then insert the bobbin into the foot controller jack. f Foot controller jack (page 52) Insert the plug on and off. g Power supply jack (page 17) Insert the plug on the fabric as the sewing takes place. Memo z Refer to pages 10 through 13 while you (counterclockwise) to... the end of the foot controller cable into the bobbin case. h Presser foot (page 43, 50) The presser foot applies pressure consistently on the power supply cord into the power...
Users Manual - English
Page 18
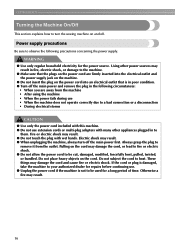
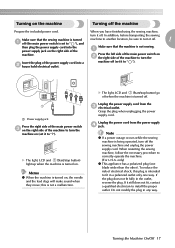
...adapters with this machine. ● Do not use . ● Unplug the power cord if the machine is in the following precautions concerning the power supply. Using other appliances plugged in fire, electric shock, or damage to the machine. ● Make sure that the plugs on the cord may result.... included with many other power sources may damage the cord and cause fire or electric shock. These things may result in to them. Power supply precautions Be sure to observe the following circumstances: • When you are firmly inserted into an electrical outlet that is not to be cut...
...adapters with this machine. ● Do not use . ● Unplug the power cord if the machine is in the following precautions concerning the power supply. Using other appliances plugged in fire, electric shock, or damage to the machine. ● Make sure that the plugs on the cord may result.... included with many other power sources may damage the cord and cause fire or electric shock. These things may result in to them. Power supply precautions Be sure to observe the following circumstances: • When you are firmly inserted into an electrical outlet that is not to be cut...
Users Manual - English
Page 19
...modify the plug in the outlet, reverse the plug. If it still does not fit, contact a qualified electrician to " "), and then plug the power supply cord into a b house hold electrical outlet. In addition, before transporting the sewing Make sure that the machine is not sewing. only) z This appliance ... off . X The light, LCD and (Start/stop button) go off when the machine is turned off the sewing machine and unplug the power supply cord. Memo z When the machine is turned on (set to install the proper outlet. Unplug the power cord from the c electrical outlet. Turning...
...modify the plug in the outlet, reverse the plug. If it still does not fit, contact a qualified electrician to " "), and then plug the power supply cord into a b house hold electrical outlet. In addition, before transporting the sewing Make sure that the machine is not sewing. only) z This appliance ... off . X The light, LCD and (Start/stop button) go off when the machine is turned off the sewing machine and unplug the power supply cord. Memo z When the machine is turned on (set to install the proper outlet. Unplug the power cord from the c electrical outlet. Turning...
Users Manual - English
Page 154
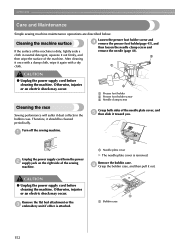
Grasp both sides of the machine. CAUTION ● Unplug the power supply cord before cleaning the machine. a a Bobbin case 152 a Unplug the power supply cord from the power b supply jack on the right side of the machine is dirty, lightly soak a cloth in the bobbin case. Therefore, it toward you. Turn ... sewing machine maintenance operations are described below. After cleaning it once with a damp cloth, wipe it out. c a CAUTION ● Unplug the power supply cord before cleaning the machine. a a Needle plate cover X The needle plate cover is attached.
Grasp both sides of the machine. CAUTION ● Unplug the power supply cord before cleaning the machine. a a Bobbin case 152 a Unplug the power supply cord from the power b supply jack on the right side of the machine is dirty, lightly soak a cloth in the bobbin case. Therefore, it toward you. Turn ... sewing machine maintenance operations are described below. After cleaning it once with a damp cloth, wipe it out. c a CAUTION ● Unplug the power supply cord before cleaning the machine. a a Needle plate cover X The needle plate cover is attached.
Users Manual - English
Page 168
... parallel stitches 36 patchwork 99 166 pattern embroidery 139 pattern retrieving 150 piecing 99 piecing straight stitch 97 plug 17 positioning fabric 50 power supply cord 17 power supply jack 11, 17 power switch 11, 17 preparations for embroidering 118 presser foot 11 presser foot holder 11, 45 presser foot holder installation...
... parallel stitches 36 patchwork 99 166 pattern embroidery 139 pattern retrieving 150 piecing 99 piecing straight stitch 97 plug 17 positioning fabric 50 power supply cord 17 power supply jack 11, 17 power switch 11, 17 preparations for embroidering 118 presser foot 11 presser foot holder 11, 45 presser foot holder installation...


