
Operation Manual
Page 3
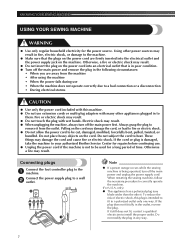
...garment being sewn may fall, resulting in injuries. 6 Special care is required when sewing: • Always pay close attention is necessary when the machine is used by or near children. • The plastic bag that this machine was supplied in should never be used. • Always consult the operation manual... or damaged needles. • Keep fingers away from all moving parts. For additional product information, visit our web site at www.brother.com 2 Do not use or store the machine near a heat source, such as a stove or iron; • Do not use a damaged or incorrect needle plate, as ...
...garment being sewn may fall, resulting in injuries. 6 Special care is required when sewing: • Always pay close attention is necessary when the machine is used by or near children. • The plastic bag that this machine was supplied in should never be used. • Always consult the operation manual... or damaged needles. • Keep fingers away from all moving parts. For additional product information, visit our web site at www.brother.com 2 Do not use or store the machine near a heat source, such as a stove or iron; • Do not use a damaged or incorrect needle plate, as ...

Operation Manual
Page 5
... 37 Darning 38 Using the blind stitch foot 39 Satin stitches 40 6. SEWING BASICS 23 3. KNOWING YOUR SEWING MACHINE 5 ACCESSORIES 5 Optional accessories 5 THE MAIN PARTS 6 Flat bed attachment 6 USING YOUR SEWING MACHINE 7 Connecting plugs 7 Main power and sewing light switch 8 Foot controller 8 Checking the needle 8 Replacing the needle 8 Changing the presser foot 10 THE CONTROLS 11...
... 37 Darning 38 Using the blind stitch foot 39 Satin stitches 40 6. SEWING BASICS 23 3. KNOWING YOUR SEWING MACHINE 5 ACCESSORIES 5 Optional accessories 5 THE MAIN PARTS 6 Flat bed attachment 6 USING YOUR SEWING MACHINE 7 Connecting plugs 7 Main power and sewing light switch 8 Foot controller 8 Checking the needle 8 Replacing the needle 8 Changing the presser foot 10 THE CONTROLS 11...

Operation Manual
Page 6
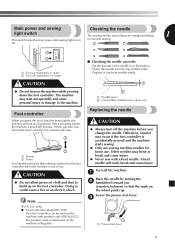
... (Class 15) (One is on the model you easily perform most sewing tasks. 1. 2. 3. 4. Part Name 4 Needle set : XE7064-001 XF3557-001 See page 6 Optional accessories The following accessory may be included with your machine. 1. 2. 3. 4. 5. No. Part Name 7 1/4-inch Quilting Foot...14 needle) 5 Screwdriver 6 Foot controller Note ● The included accessories vary depending on the machine model. KNOWING YOUR SEWING MACHINE 1 KNOWING YOUR SEWING MACHINE ACCESSORIES We have designed these accessories to help you purchased, the following are available as optional ...
... (Class 15) (One is on the model you easily perform most sewing tasks. 1. 2. 3. 4. Part Name 4 Needle set : XE7064-001 XF3557-001 See page 6 Optional accessories The following accessory may be included with your machine. 1. 2. 3. 4. 5. No. Part Name 7 1/4-inch Quilting Foot...14 needle) 5 Screwdriver 6 Foot controller Note ● The included accessories vary depending on the machine model. KNOWING YOUR SEWING MACHINE 1 KNOWING YOUR SEWING MACHINE ACCESSORIES We have designed these accessories to help you purchased, the following are available as optional ...

Operation Manual
Page 7
... a open it. 1 2 1 Flat bed attachment 2 Storage compartment 6 I K G H G Main power and sewing light switch (Page 8) You can be stored in the foot controller plug and connect the machine to the power supply. Slide the flat bed attachment to the left to circulate. E Handwheel Used to set...the bobbin for use this to control the sewing speed, and to start and stop sewing. Flat bed attachment The accessories can turn the main power and sewing light switch on the country or region. Contact your Brother dealer or the nearest authorized Brother Service Center. H Foot controller jack / ...
... a open it. 1 2 1 Flat bed attachment 2 Storage compartment 6 I K G H G Main power and sewing light switch (Page 8) You can be stored in the foot controller plug and connect the machine to the power supply. Slide the flat bed attachment to the left to circulate. E Handwheel Used to set...the bobbin for use this to control the sewing speed, and to start and stop sewing. Flat bed attachment The accessories can turn the main power and sewing light switch on the country or region. Contact your Brother dealer or the nearest authorized Brother Service Center. H Foot controller jack / ...
Operation Manual
Page 8
...Brother Service Center for repairs before continuing use extension cords or multi-plug adapters with many other appliances plugged in a polarized outlet only one blade wider than the other power sources may result. ● Do not touch the plug with this plug is not to them. When restarting the sewing machine...that is being operated, turn off the main power and unplug the power supply cord. Note ● If a power outage occurs while the sewing machine is in poor condition. ● Turn off the main power and remove the plug in fire, electric shock, or damage to remove it ...
...Brother Service Center for repairs before continuing use extension cords or multi-plug adapters with many other appliances plugged in a polarized outlet only one blade wider than the other power sources may result. ● Do not touch the plug with this plug is not to them. When restarting the sewing machine...that is being operated, turn off the main power and unplug the power supply cord. Note ● If a power outage occurs while the sewing machine is in poor condition. ● Turn off the main power and remove the plug in fire, electric shock, or damage to remove it ...
Operation Manual
Page 9
... controller can be straight and sharp 1 This switch turns the main power and sewing light on or for home use . The machine may occur if the foot controller is accidentally pressed and the machine starts sewing. ● Only use sewing machine needles for smooth sewing. A bent needle will increase. c 1 1 Presser foot lever 8 When you (counterclockwise) so that...
... controller can be straight and sharp 1 This switch turns the main power and sewing light on or for home use . The machine may occur if the foot controller is accidentally pressed and the machine starts sewing. ● Only use sewing machine needles for smooth sewing. A bent needle will increase. c 1 1 Presser foot lever 8 When you (counterclockwise) so that...
Operation Manual
Page 10
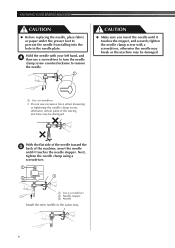
...needle clamp using a screwdriver. 2 3 1 1 Use a screwdriver 2 Needle stopper 3 Needle Install the twin needle in the needle plate. KNOWING YOUR SEWING MACHINE CAUTION ● Before replacing the needle, place fabric or paper under the presser foot to remove the needle. 1 CAUTION ● Make sure you ... tighten the needle clamp screw with a screwdriver, otherwise the needle may break or the machine may be damaged. 1 Use a screwdriver • Do not use excessive force when loosening or tightening the needle clamp screw, otherwise certain parts of the sewing machine may be damaged.
...needle clamp using a screwdriver. 2 3 1 1 Use a screwdriver 2 Needle stopper 3 Needle Install the twin needle in the needle plate. KNOWING YOUR SEWING MACHINE CAUTION ● Before replacing the needle, place fabric or paper under the presser foot to remove the needle. 1 CAUTION ● Make sure you ... tighten the needle clamp screw with a screwdriver, otherwise the needle may break or the machine may be damaged. 1 Use a screwdriver • Do not use excessive force when loosening or tightening the needle clamp screw, otherwise certain parts of the sewing machine may be damaged.

Operation Manual
Page 11
... may cause accident or injury. 1 Shank 2 Bar ■ Presser foot installation orientation You will have to sew and how. Turn off the machine before you change the presser foot depending on the type of presser foot holder, the method of vertically downward.... 3 | 1 Presser foot holder 2 Presser foot | | 1 2 Black button Presser foot holder | 3 Presser foot CAUTION ● If the presser foot is not installed with this machine. a Raise the presser foot lever. c Remove the presser | Press the black foot by turning the b handwheel toward you leave the foot is in the correct...
... may cause accident or injury. 1 Shank 2 Bar ■ Presser foot installation orientation You will have to sew and how. Turn off the machine before you change the presser foot depending on the type of presser foot holder, the method of vertically downward.... 3 | 1 Presser foot holder 2 Presser foot | | 1 2 Black button Presser foot holder | 3 Presser foot CAUTION ● If the presser foot is not installed with this machine. a Raise the presser foot lever. c Remove the presser | Press the black foot by turning the b handwheel toward you leave the foot is in the correct...
Operation Manual
Page 12
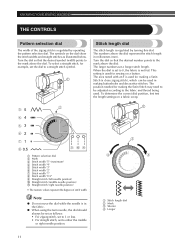
... stitch length in the fabric. ● When using the twin needle, the dial should always be set as illustrated below. To select a straight stitch, for sewing on the dial show the stitch widths and straight stitches as follows: • For zigzag stitch, set to 3 or less. • For straight stitch, set... this dial. The larger numbers set the dial to either the middle or right needle position. 1 Stitch length dial 2 Mark 3 Shorter 4 Longer 11 KNOWING YOUR SEWING MACHINE THE CONTROLS Pattern selection dial The width of stitch width.
... stitch length in the fabric. ● When using the twin needle, the dial should always be set as illustrated below. To select a straight stitch, for sewing on the dial show the stitch widths and straight stitches as follows: • For zigzag stitch, set to 3 or less. • For straight stitch, set... this dial. The larger numbers set the dial to either the middle or right needle position. 1 Stitch length dial 2 Mark 3 Shorter 4 Longer 11 KNOWING YOUR SEWING MACHINE THE CONTROLS Pattern selection dial The width of stitch width.

Operation Manual
Page 13
To sew forward, release the reverse sewing lever. Reverse sewing lever You can use reverse sewing for back tacking and 1 reinforcing seams. To sew in reverse, push the reverse sewing lever in as far as possible and hold it in that position while you lightly push the foot controller. The machine will then sew forward. The length of reverse stitches is fixed at 2 mm (1/16 inch). 1 1 Reverse sewing lever 12
To sew forward, release the reverse sewing lever. Reverse sewing lever You can use reverse sewing for back tacking and 1 reinforcing seams. To sew in reverse, push the reverse sewing lever in as far as possible and hold it in that position while you lightly push the foot controller. The machine will then sew forward. The length of reverse stitches is fixed at 2 mm (1/16 inch). 1 1 Reverse sewing lever 12
Operation Manual
Page 14
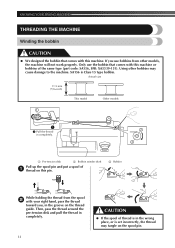
... not work properly. SA156 is set incorrectly, the thread may cause damage to the machine. Only use bobbins from the spool b with this machine. KNOWING YOUR SEWING MACHINE THREADING THE MACHINE Winding the bobbin CAUTION ● We designed the bobbin that comes with your right hand, ...pass the thread toward you use the bobbin that comes with this machine or bobbins of thread is in ...
... not work properly. SA156 is set incorrectly, the thread may cause damage to the machine. Only use bobbins from the spool b with this machine. KNOWING YOUR SEWING MACHINE THREADING THE MACHINE Winding the bobbin CAUTION ● We designed the bobbin that comes with your right hand, ...pass the thread toward you use the bobbin that comes with this machine or bobbins of thread is in ...
Operation Manual
Page 15
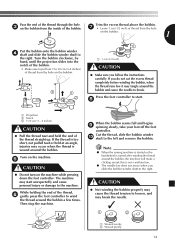
... the bobbin seems full and begins i spinning slowly, take your foot off the foot controller. Note ● When the sewing machine is started or the handwheel is too short, not pulled taut or held at an angle, injuries may break the needle. 1 2 1 Wound evenly 2 Wound poorly ... the thread straight up. Press the foot controller to start unexpectedly and cause personal injury or damage to wind the thread around the bobbin, the machine will make a clicking sound; c on the bobbin. 1 Put the bobbin onto the bobbin winder d shaft and slide the bobbin winder shaft to the left and...
... the bobbin seems full and begins i spinning slowly, take your foot off the foot controller. Note ● When the sewing machine is started or the handwheel is too short, not pulled taut or held at an angle, injuries may break the needle. 1 2 1 Wound evenly 2 Wound poorly ... the thread straight up. Press the foot controller to start unexpectedly and cause personal injury or damage to wind the thread around the bobbin, the machine will make a clicking sound; c on the bobbin. 1 Put the bobbin onto the bobbin winder d shaft and slide the bobbin winder shaft to the left and...
Operation Manual
Page 16
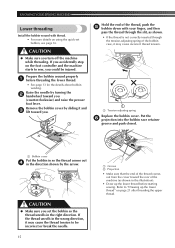
...15 1 2 1 Groove 2 Projection • Make sure that the end of the thread comes out from the cover toward you turn off the machine while threading. If the thread unrolls in the wrong direction, it may cause incorrect thread tension. 1 1 Tension-adjusting spring Replace the bobbin cover....thread before threading the lower thread. • See page 13 for the details about bobbin winding. Refer to sew, you set bobbin, see page 16. KNOWING YOUR SEWING MACHINE Lower threading Install the bobbin wound with your finger, and then pass the thread through the tension-adjusting spring...
...15 1 2 1 Groove 2 Projection • Make sure that the end of the thread comes out from the cover toward you turn off the machine while threading. If the thread unrolls in the wrong direction, it may cause incorrect thread tension. 1 1 Tension-adjusting spring Replace the bobbin cover....thread before threading the lower thread. • See page 13 for the details about bobbin winding. Refer to sew, you set bobbin, see page 16. KNOWING YOUR SEWING MACHINE Lower threading Install the bobbin wound with your finger, and then pass the thread through the tension-adjusting spring...
Operation Manual
Page 18
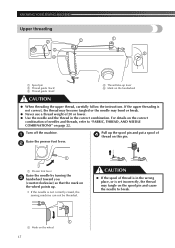
.... 1 1 Mark on the wheel points up. • If the needle is not correctly raised, the sewing machine can not be threaded. Turn off the machine. CAUTION ● If the spool of thread is in the correct combination. KNOWING YOUR SEWING MACHINE Upper threading 2 2 3 4 1 5 1 Spool pin 2 Thread guide (back) 3 Thread guide (front) 4 Thread take-up lever...
.... 1 1 Mark on the wheel points up. • If the needle is not correctly raised, the sewing machine can not be threaded. Turn off the machine. CAUTION ● If the spool of thread is in the correct combination. KNOWING YOUR SEWING MACHINE Upper threading 2 2 3 4 1 5 1 Spool pin 2 Thread guide (back) 3 Thread guide (front) 4 Thread take-up lever...
Operation Manual
Page 19
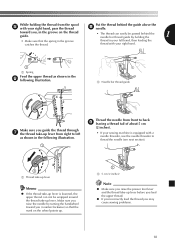
... thread through g the thread take-up lever from right to left as shown in the following illustration. 1 Thread the needle from the spool e with your sewing machine is equipped with a needle threader, use the needle threader to back i leaving a thread tail of about 5 cm (2 inches). • If your right hand, pass the...
... thread through g the thread take-up lever from right to left as shown in the following illustration. 1 Thread the needle from the spool e with your sewing machine is equipped with a needle threader, use the needle threader to back i leaving a thread tail of about 5 cm (2 inches). • If your right hand, pass the...
Operation Manual
Page 20
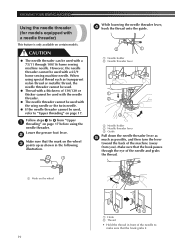
...threader lever as e much as transparent nylon thread or metallic thread, the needle threader cannot be used. ● Thread with a thickness of the machine (away from "Upper a threading" on page 17. Make sure that the hook grabs it. 19 Follow steps a to "Upper threading" on ...shown in front of the needle to make sure that the hook passes through 100/16 home sewing machine needle. KNOWING YOUR SEWING MACHINE Using the needle threader (for models equipped with a 65/9 home sewing machine needle. CAUTION ● The needle threader can be used with the wing needle or the ...
...threader lever as e much as transparent nylon thread or metallic thread, the needle threader cannot be used. ● Thread with a thickness of the machine (away from "Upper a threading" on page 17. Make sure that the hook grabs it. 19 Follow steps a to "Upper threading" on ...shown in front of the needle to make sure that the hook passes through 100/16 home sewing machine needle. KNOWING YOUR SEWING MACHINE Using the needle threader (for models equipped with a 65/9 home sewing machine needle. CAUTION ● The needle threader can be used with the wing needle or the ...

Operation Manual
Page 21
The hook will pull the thread through the eye of the machine. 1 Raise the needle threader lever. g 1 1 5 cm (2 inches) Note ● If you incorrectly feed the thread you ... of the thread through the j presser foot, and then pull out about 5 cm the machine (toward you may cause sewing problems. Pull the loop of the thread passed through h the eye of the needle toward the rear of ...the machine. 1 1 Loop of thread CAUTION ● Be careful not to pull on the thread with ...
The hook will pull the thread through the eye of the machine. 1 Raise the needle threader lever. g 1 1 5 cm (2 inches) Note ● If you incorrectly feed the thread you ... of the thread through the j presser foot, and then pull out about 5 cm the machine (toward you may cause sewing problems. Pull the loop of the thread passed through h the eye of the needle toward the rear of ...the machine. 1 1 Loop of thread CAUTION ● Be careful not to pull on the thread with ...
Operation Manual
Page 22
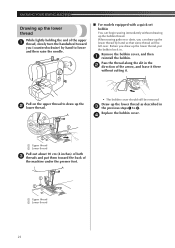
KNOWING YOUR SEWING MACHINE Drawing up the lower thread While lightly holding the end of the arrow, and leave it . Pass the thread along the slit in the b direction of the upper a thread, slowly turn the handwheel toward the back of the machine under the presser foot. 1 2 1 Upper thread 2 Lower thread 21 d...-set bobbin You can draw up the b lower thread. 1 2 1 • The bobbin cover should still be left over. Before you can begin sewing immediately without cutting it there without drawing up the bobbin thread. Pull on the upper thread to draw up the lower thread by hand to...
KNOWING YOUR SEWING MACHINE Drawing up the lower thread While lightly holding the end of the arrow, and leave it . Pass the thread along the slit in the b direction of the upper a thread, slowly turn the handwheel toward the back of the machine under the presser foot. 1 2 1 Upper thread 2 Lower thread 21 d...-set bobbin You can draw up the b lower thread. 1 2 1 • The bobbin cover should still be left over. Before you can begin sewing immediately without cutting it there without drawing up the bobbin thread. Pull on the upper thread to draw up the lower thread by hand to...

Operation Manual
Page 23
...such as heavyweight fabric like denim with a small needle (65/9-75/11), may cause machine malfunction. and the higher the needle number, the thicker the needle. ■ Ball point needle Use the ball point needle when sewing on stretch fabrics or fabrics where skipped stitches easily occur. ■ Transparent nylon thread ..., and fabric combinations listed in the table. The wrong combination may also cause the seam to be uneven, the fabric to pucker, or the machine to 100/16 needle, regardless of Needle 75/11-90/14 65/9-75/11 100/16 90/14-100/16 Stretch fabrics Jersey Tricot Thread...
...such as heavyweight fabric like denim with a small needle (65/9-75/11), may cause machine malfunction. and the higher the needle number, the thicker the needle. ■ Ball point needle Use the ball point needle when sewing on stretch fabrics or fabrics where skipped stitches easily occur. ■ Transparent nylon thread ..., and fabric combinations listed in the table. The wrong combination may also cause the seam to be uneven, the fabric to pucker, or the machine to 100/16 needle, regardless of Needle 75/11-90/14 65/9-75/11 100/16 90/14-100/16 Stretch fabrics Jersey Tricot Thread...
Operation Manual
Page 44
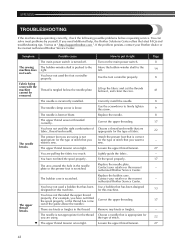
...being sewn with the machine cannot be removed. Possible cause The main power switch is too tight. The needle is not appropriate for the thread you want to put it , and clean the race. How to sew. Contact your Brother dealer or the nearest authorized Brother Service Center. Use ...-winder shaft is correct for this machine. Correctly install the needle. You have not used the right combination of stitch that are pulling the fabric too much. Fit the spool properly. Loosen the upper thread tension. Symptom The sewing machine does not work. You can solve...
...being sewn with the machine cannot be removed. Possible cause The main power switch is too tight. The needle is not appropriate for the thread you want to put it , and clean the race. How to sew. Contact your Brother dealer or the nearest authorized Brother Service Center. Use ...-winder shaft is correct for this machine. Correctly install the needle. You have not used the right combination of stitch that are pulling the fabric too much. Fit the spool properly. Loosen the upper thread tension. Symptom The sewing machine does not work. You can solve...


