
Operation Manual
Page 11
... 19 Setting Your Machine for the First Time 20 LCD SCREEN 22 Using the Machine Setting Mode Key 25 Using the Sewing Machine Help Key 30 Using the Operation Guide Function 31 Using the Sewing Guide Function 32 Using the Pattern Explanation Function 33 LOWER THREADING 34 Winding the Bobbin 34 Setting the Bobbin 39 Pulling Up the Bobbin Thread 41 UPPER THREADING 42 Upper Threading 42 Using the Twin Needle Mode 45 Using Threads that Unwind Quickly 47 CHANGING THE PRESSER FOOT 49 Removing the Presser Foot 49 Attaching the Presser Foot 49 Attaching the Presser Foot...
... 19 Setting Your Machine for the First Time 20 LCD SCREEN 22 Using the Machine Setting Mode Key 25 Using the Sewing Machine Help Key 30 Using the Operation Guide Function 31 Using the Sewing Guide Function 32 Using the Pattern Explanation Function 33 LOWER THREADING 34 Winding the Bobbin 34 Setting the Bobbin 39 Pulling Up the Bobbin Thread 41 UPPER THREADING 42 Upper Threading 42 Using the Twin Needle Mode 45 Using Threads that Unwind Quickly 47 CHANGING THE PRESSER FOOT 49 Removing the Presser Foot 49 Attaching the Presser Foot 49 Attaching the Presser Foot...

Operation Manual
Page 12
... MY CUSTOM STITCH 102 DESIGNING A STITCH 103 ENTERING STITCH DATA 105 USING STORED CUSTOM STITCHES 110 Storing Custom Stitches in Your List 110 Retrieving Stored Stitches 111 A Appendix Chapter1 How to Create Bobbin Work 2 ABOUT BOBBIN WORK 3 PREPARING FOR BOBBIN WORK 3 Required Materials 3 Upper Threading 4 Preparing the Bobbin Thread 5 CREATING BOBBIN WORK 9 Positioning the Fabric and Sewing 9 Bobbin Work Free Motion Sewing 11 ADJUSTING THE THREAD TENSION 12 TROUBLESHOOTING 13 Chapter2 Maintenance and Troubleshooting 14 CARE AND MAINTENANCE 15 Restrictions on oiling 15...
... MY CUSTOM STITCH 102 DESIGNING A STITCH 103 ENTERING STITCH DATA 105 USING STORED CUSTOM STITCHES 110 Storing Custom Stitches in Your List 110 Retrieving Stored Stitches 111 A Appendix Chapter1 How to Create Bobbin Work 2 ABOUT BOBBIN WORK 3 PREPARING FOR BOBBIN WORK 3 Required Materials 3 Upper Threading 4 Preparing the Bobbin Thread 5 CREATING BOBBIN WORK 9 Positioning the Fabric and Sewing 9 Bobbin Work Free Motion Sewing 11 ADJUSTING THE THREAD TENSION 12 TROUBLESHOOTING 13 Chapter2 Maintenance and Troubleshooting 14 CARE AND MAINTENANCE 15 Restrictions on oiling 15...

Operation Manual
Page 13
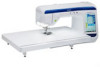
... pre-tension disk when winding the bobbin thread. (page B-34) c Thread guide for the selected stitch and error messages appear in the LCD. (page B-22) i Speaker j Knee lifter Use the knee lifter to raise and lower the presser foot. (page S-15) k Knee lifter slot Insert the knee lifter into the slot. (page S-15) l Operation buttons (7 buttons) and sewing speed controller Use these descriptions to operate the sewing machine. (page B-13) m Flat bed attachment with accessory...
... pre-tension disk when winding the bobbin thread. (page B-34) c Thread guide for the selected stitch and error messages appear in the LCD. (page B-22) i Speaker j Knee lifter Use the knee lifter to raise and lower the presser foot. (page S-15) k Knee lifter slot Insert the knee lifter into the slot. (page S-15) l Operation buttons (7 buttons) and sewing speed controller Use these descriptions to operate the sewing machine. (page B-13) m Flat bed attachment with accessory...

Operation Manual
Page 15
... attachment. e "Thread Cutter" button Press this button to open the front or back accessory compartments. g Sewing Speed controller Use this button when changing sewing direction or for optional presser feet, such as the vertical stitch alignment foot "V". Beginners should sew at higher speeds. CAUTION • Do not press the thread cutter button after sewing to the machine's operation mode. A presser foot storage tray is stopped. (see page S-5) c "Reinforcement Stitch" button Use this button after the threads have been cut. Press the button again to adjust the sewing speed...
... attachment. e "Thread Cutter" button Press this button to open the front or back accessory compartments. g Sewing Speed controller Use this button when changing sewing direction or for optional presser feet, such as the vertical stitch alignment foot "V". Beginners should sew at higher speeds. CAUTION • Do not press the thread cutter button after sewing to the machine's operation mode. A presser foot storage tray is stopped. (see page S-5) c "Reinforcement Stitch" button Use this button after the threads have been cut. Press the button again to adjust the sewing speed...
Operation Manual
Page 17
... 5 Buttonhole foot "A" X57789-251 6 Blind stitch foot "R" X56409-051 7 Button fitting foot "M" 130489-001 8 Straight stitch foot SA167 F042N: XC1973-052 9 Free motion quilting foot "C" XF4737-001 10 Free motion echo quilting foot "E" XE0766-001 11 1/4" quilting foot with product code 882-D00. NAMES OF MACHINE PARTS AND THEIR FUNCTIONS No. Part Name Part Code Americas Others 1 Zigzag foot "J" (on bobbins helps prevent the thread from unwinding from rolling around if they are dropped. • Included accessories may vary depending on the machine with guide...
... 5 Buttonhole foot "A" X57789-251 6 Blind stitch foot "R" X56409-051 7 Button fitting foot "M" 130489-001 8 Straight stitch foot SA167 F042N: XC1973-052 9 Free motion quilting foot "C" XF4737-001 10 Free motion echo quilting foot "E" XE0766-001 11 1/4" quilting foot with product code 882-D00. NAMES OF MACHINE PARTS AND THEIR FUNCTIONS No. Part Name Part Code Americas Others 1 Zigzag foot "J" (on bobbins helps prevent the thread from unwinding from rolling around if they are dropped. • Included accessories may vary depending on the machine with guide...

Operation Manual
Page 26
... to set to adjust the zigzag width and stitch length settings. s Free motion mode Press this key to use the plus and minus keys to the down position. key The presser foot is raised to use the machine. For additional operational information, refer to enter free motion sewing mode. q Automatic thread Press this setting before sewing, the machine will automatically sew stitch key reverse stitches or reinforcement stitches depending on how to an appropriate height and the feed dog is light gray...
... to set to adjust the zigzag width and stitch length settings. s Free motion mode Press this key to use the plus and minus keys to the down position. key The presser foot is raised to use the machine. For additional operational information, refer to enter free motion sewing mode. q Automatic thread Press this setting before sewing, the machine will automatically sew stitch key reverse stitches or reinforcement stitches depending on how to an appropriate height and the feed dog is light gray...

Operation Manual
Page 27
... dual feed foot (see pages S-8 and S-17). l Adjust the guideline marker position and brightness (see page S-39). Getting Ready a f i g j b k c l d h e m m m a Select whether to use the sewing speed controller to "ON", the thickness of the presser foot when the presser foot is automatically detected by an internal sensor while sewing. Set the pressure at "3" for normal sewing.) (see page S-17) If the dual feed foot is installed and its roller is lowered, the pressure setting is fixed...
... dual feed foot (see pages S-8 and S-17). l Adjust the guideline marker position and brightness (see page S-39). Getting Ready a f i g j b k c l d h e m m m a Select whether to use the sewing speed controller to "ON", the thickness of the presser foot when the presser foot is automatically detected by an internal sensor while sewing. Set the pressure at "3" for normal sewing.) (see page S-17) If the dual feed foot is installed and its roller is lowered, the pressure setting is fixed...

Operation Manual
Page 41
... the machine starts sewing. d Cut the thread near the bobbin and hold the thread end with your right hand as shown below to automatically lower the presser foot? a Press and then to the right, and then raise the bobbin at least 10 cm (4 inches) from other button is Class 15 type bobbin. Note • Make sure that has been correctly wound. a Pre-tension disk c Push the bobbin winder...
... the machine starts sewing. d Cut the thread near the bobbin and hold the thread end with your right hand as shown below to automatically lower the presser foot? a Press and then to the right, and then raise the bobbin at least 10 cm (4 inches) from other button is Class 15 type bobbin. Note • Make sure that has been correctly wound. a Pre-tension disk c Push the bobbin winder...
Operation Manual
Page 68
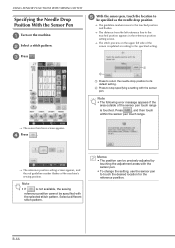
... the adjustment areas with the selected stitch pattern. Note • The following error message appears if the area outside of the screen is updated according to touch the desired location for the reference position. b Select a stitch pattern. B-66 d Press . The reference position setting screen appears, and the red guideline marker flashes at the machine's sewing position. USING SENSOR FUNCTIONS WITH SEWING STITCH Specifying the Needle Drop Position With...
... the adjustment areas with the selected stitch pattern. Note • The following error message appears if the area outside of the screen is updated according to touch the desired location for the reference position. b Select a stitch pattern. B-66 d Press . The reference position setting screen appears, and the red guideline marker flashes at the machine's sewing position. USING SENSOR FUNCTIONS WITH SEWING STITCH Specifying the Needle Drop Position With...

Operation Manual
Page 74
...Sewing Basics SEWING 3 Sewing a Stitch 3 ■ Using the Foot Controller 4 Sewing Reinforcement Stitches 5 Automatic Reinforcement Stitching 5 Sewing Curves 7 Changing Sewing Direction 7 ■ Sewing a Seam Allowance of 0.5 cm or Less 7 Sewing Heavyweight Fabrics 7 ■ If the Fabric does not Fit under the Presser Foot 8 ■ If the Fabric does not Feed 8 Sewing Hook-and-Loop Fastener 8 Sewing Lightweight Fabrics 9 Sewing Stretch Fabrics 9 STITCH SETTINGS 10 Setting the Stitch Width 10 Setting the Stitch Length 10 Setting the "L/R SHIFT 11 Setting the Thread Tension...
...Sewing Basics SEWING 3 Sewing a Stitch 3 ■ Using the Foot Controller 4 Sewing Reinforcement Stitches 5 Automatic Reinforcement Stitching 5 Sewing Curves 7 Changing Sewing Direction 7 ■ Sewing a Seam Allowance of 0.5 cm or Less 7 Sewing Heavyweight Fabrics 7 ■ If the Fabric does not Fit under the Presser Foot 8 ■ If the Fabric does not Feed 8 Sewing Hook-and-Loop Fastener 8 Sewing Lightweight Fabrics 9 Sewing Stretch Fabrics 9 STITCH SETTINGS 10 Setting the Stitch Width 10 Setting the Stitch Length 10 Setting the "L/R SHIFT 11 Setting the Thread Tension...

Operation Manual
Page 92
...a Zigzag Stitch 32 ■ Cord Guide Bobbin Cover (Using a Zigzag Stitch 32 Elastic Zigzag Stitches 33 ■ Tape Attaching 33 ■ Overcasting 33 Overcasting 33 ■ Overcasting Using Presser Foot "G 33 ■ Overcasting Using Presser Foot "J 34 Quilting 35 ■ Piecing 36 ■ Piecing Using the 1/4" Quilting Foot with Guide (optional with some models 37 ■ Appliqu 38 ■ Quilting with Satin Stitches 39 ■ Free Motion Quilting 40 ■ Echo Quilting Using the Free Motion Echo Quilting Foot "E" (optional with some models 43 Blind Hem Stitches 45...
...a Zigzag Stitch 32 ■ Cord Guide Bobbin Cover (Using a Zigzag Stitch 32 Elastic Zigzag Stitches 33 ■ Tape Attaching 33 ■ Overcasting 33 Overcasting 33 ■ Overcasting Using Presser Foot "G 33 ■ Overcasting Using Presser Foot "J 34 Quilting 35 ■ Piecing 36 ■ Piecing Using the 1/4" Quilting Foot with Guide (optional with some models 37 ■ Appliqu 38 ■ Quilting with Satin Stitches 39 ■ Free Motion Quilting 40 ■ Echo Quilting Using the Free Motion Echo Quilting Foot "E" (optional with some models 43 Blind Hem Stitches 45...

Operation Manual
Page 112
... internal sensor detects the thickness of the fabric, and the quilting foot is raised to display "Free Motion Foot Height" of the fabric to free motion sewing mode. c Remove the presser foot holder. Press to the height specified in any direction. Free motion open toe quilting foot "O". CAUTION • With free motion quilting, control the feeding speed of the settings screen. If the fabric is moved faster than the sewing speed, the needle may break or other damage may be necessary to adjust the upper thread tension...
... internal sensor detects the thickness of the fabric, and the quilting foot is raised to display "Free Motion Foot Height" of the fabric to free motion sewing mode. c Remove the presser foot holder. Press to the height specified in any direction. Free motion open toe quilting foot "O". CAUTION • With free motion quilting, control the feeding speed of the settings screen. If the fabric is moved faster than the sewing speed, the needle may break or other damage may be necessary to adjust the upper thread tension...

Operation Manual
Page 113
...) needle position. d Attach free motion "O" by pressing , for free motion sewing. The technique requires practice. Memo • When starting to sew, the internal sensor detects the thickness of the fabric, and the quilting foot is moved to sew uniform stitches roughly 2.0 mm - 2.5 mm (approx. 1/16 inch - 3/32 inch) in the machine settings screen. Press to the height specified in length. a Presser foot holder screw CAUTION • Be sure to use the straight stitch needle plate and sew with straight stitch needle plate for...
...) needle position. d Attach free motion "O" by pressing , for free motion sewing. The technique requires practice. Memo • When starting to sew, the internal sensor detects the thickness of the fabric, and the quilting foot is moved to sew uniform stitches roughly 2.0 mm - 2.5 mm (approx. 1/16 inch - 3/32 inch) in the machine settings screen. Press to the height specified in length. a Presser foot holder screw CAUTION • Be sure to use the straight stitch needle plate and sew with straight stitch needle plate for...

Operation Manual
Page 133
... to level the buttonhole foot and allow for example, because it is too thick), increase the stitch length setting. See page S-67 for the detailed information of stitches. a Select . The feed dogs are sewn. Button Sewing Buttons with 2 or 4 holes can be attached, using the machine. e Gently hold the end start sewing, both threads are automatically cut the threads. The needle may break and cause injury. Sewing S-61 SEWING THE STITCHES c Attach button button sewing foot "M", slide the along...
... to level the buttonhole foot and allow for example, because it is too thick), increase the stitch length setting. See page S-67 for the detailed information of stitches. a Select . The feed dogs are sewn. Button Sewing Buttons with 2 or 4 holes can be attached, using the machine. e Gently hold the end start sewing, both threads are automatically cut the threads. The needle may break and cause injury. Sewing S-61 SEWING THE STITCHES c Attach button button sewing foot "M", slide the along...

Operation Manual
Page 188
.... or above) that bobbin case tension not be used in the project. c Thread the machine with and without bobbin case tension being applied to see which includes the same threads and fabric as the lower thread. ■ Needle Use a needle appropriate for bobbin work . ■ Presser foot Utility stitches or decorative stitches: Monogramming foot "N" No.5 or finer hand embroidery thread or decorative thread Flexible woven ribbon Free motion sewing: Free motion quilting foot "C", Free motion echo quilting foot "E or Free motion open toe quilting foot "O" Fine embroidery ribbon (silk or...
.... or above) that bobbin case tension not be used in the project. c Thread the machine with and without bobbin case tension being applied to see which includes the same threads and fabric as the lower thread. ■ Needle Use a needle appropriate for bobbin work . ■ Presser foot Utility stitches or decorative stitches: Monogramming foot "N" No.5 or finer hand embroidery thread or decorative thread Flexible woven ribbon Free motion sewing: Free motion quilting foot "C", Free motion echo quilting foot "E or Free motion open toe quilting foot "O" Fine embroidery ribbon (silk or...

Operation Manual
Page 210
... selected fabric. Replace the bobbin case, or consult your plate. Upper thread tension is incorrectly installed. Using improper needle or thread for this machine Incorrect bobbins will not work properly. Needle is twisted. Reset the bobbin thread correctly. There are scratches near the hole of the needle Replace the needle plate, or consult your authorized dealer. too tight. lower the presser foot. Thread is installed incorrectly. Thread is tangled on the bobbin case. to Lifter" button. Correctly pass the thread through the bobbin not wind neatly...
... selected fabric. Replace the bobbin case, or consult your plate. Upper thread tension is incorrectly installed. Using improper needle or thread for this machine Incorrect bobbins will not work properly. Needle is twisted. Reset the bobbin thread correctly. There are scratches near the hole of the needle Replace the needle plate, or consult your authorized dealer. too tight. lower the presser foot. Thread is installed incorrectly. Thread is tangled on the bobbin case. to Lifter" button. Correctly pass the thread through the bobbin not wind neatly...

Operation Manual
Page 211
... when sewing thin fabrics. Needle is set incorrectly. Replace the needle. Check the steps for threading the machine and rethread it from the race. Reset the bobbin thread correctly. Attach the presser foot correctly. Screw of thin paper under the needle plate. Securely tighten the screw of the presser foot. Cut the entangled thread and remove it correctly. Thread tension is defective. Adjust the thread tension. Stitches are scratches on the bobbin case. Needle is turned, bent or the point is loose...
... when sewing thin fabrics. Needle is set incorrectly. Replace the needle. Check the steps for threading the machine and rethread it from the race. Reset the bobbin thread correctly. Attach the presser foot correctly. Screw of thin paper under the needle plate. Securely tighten the screw of the presser foot. Cut the entangled thread and remove it correctly. Thread tension is defective. Adjust the thread tension. Stitches are scratches on the bobbin case. Needle is turned, bent or the point is loose...
Operation Manual
Page 212
There are caught in the race. A bobbin designed specifically for threading the machine and rethread the machine. Revise the pattern adjustment settings. or stretch fabrics. Fabric was pulled, pushed or fed at an angle Sew while guiding the fabric with the foot Remove the foot controller, or use the foot controller attached. Lower the presser foot. Press buttons. When using the sensor pen for the sewing speed controller to control the zigzag stitch width. B-62 B-62 CAUTION • This machine is equipped with The sensor pen...
There are caught in the race. A bobbin designed specifically for threading the machine and rethread the machine. Revise the pattern adjustment settings. or stretch fabrics. Fabric was pulled, pushed or fed at an angle Sew while guiding the fabric with the foot Remove the foot controller, or use the foot controller attached. Lower the presser foot. Press buttons. When using the sensor pen for the sewing speed controller to control the zigzag stitch width. B-62 B-62 CAUTION • This machine is equipped with The sensor pen...

Operation Manual
Page 215
... you press the "Automatic presser foot. When the speed controller is set to control the zigzag stitch width, the "Start/Stop" button does not operate. USB media is incompatible. Appendix A-31 Remove the fabric, and then press the "Automatic Threading" button again. Select other than a middle needle position stitch while the single-hole needle plate is installed. This USB media is not loaded. Transmitting by USB This message is displayed while the USB media is needle and press the...
... you press the "Automatic presser foot. When the speed controller is set to control the zigzag stitch width, the "Start/Stop" button does not operate. USB media is incompatible. Appendix A-31 Remove the fabric, and then press the "Automatic Threading" button again. Select other than a middle needle position stitch while the single-hole needle plate is installed. This USB media is not loaded. Transmitting by USB This message is displayed while the USB media is needle and press the...

Operation Manual
Page 218
...motion open toe quilting foot "O S-40 free motion quilting foot "C S-41 Free motion sewing mode S-40 G Gathering S-29 Grid direction key S-106 Guideline marker S-14 H Handle B-11 Handwheel B-11 Heirloom S-53 Hemstitching daisy stitch S-53 drawn work A-2 Button sewing S-61 4 hole buttons S-62 Bustthoannhkol.e...l.e.v..e..r...B..-.1..2..,....S..-.5..6..,.. S-13 B-42 B Back to beginning key S-87 Bar tacks S-60 Basting S-28 Blind hem stitches S-45 Block move key S-108 Bobbin pulling up the bobbin thread B-41 setting B-39 winding B-34 Bobbin case cleaning...
...motion open toe quilting foot "O S-40 free motion quilting foot "C S-41 Free motion sewing mode S-40 G Gathering S-29 Grid direction key S-106 Guideline marker S-14 H Handle B-11 Handwheel B-11 Heirloom S-53 Hemstitching daisy stitch S-53 drawn work A-2 Button sewing S-61 4 hole buttons S-62 Bustthoannhkol.e...l.e.v..e..r...B..-.1..2..,....S..-.5..6..,.. S-13 B-42 B Back to beginning key S-87 Bar tacks S-60 Basting S-28 Blind hem stitches S-45 Block move key S-108 Bobbin pulling up the bobbin thread B-41 setting B-39 winding B-34 Bobbin case cleaning...


