
Operation Manual
Page 1
Operation Manual Embroidery Machine Product Code: 888-G90 Be sure to read this document nearby for future reference. We recommend that you keep this document before using the machine.
Operation Manual Embroidery Machine Product Code: 888-G90 Be sure to read this document nearby for future reference. We recommend that you keep this document before using the machine.

Operation Manual
Page 7
... of this machine. A Appendix This section provides important information for embroidering and basic embroidering operations E Embroidering This section provides instruction on editing embroidery patterns and recalling stored embroidery patterns. Page A-2 v Chapter 1 EMBROIDERY Page E-2 Embroider artistically; WHAT YOU CAN DO WITH THIS MACHINE WHAT YOU CAN DO WITH THIS MACHINE B Basic operations After purchasing...
... of this machine. A Appendix This section provides important information for embroidering and basic embroidering operations E Embroidering This section provides instruction on editing embroidery patterns and recalling stored embroidery patterns. Page A-2 v Chapter 1 EMBROIDERY Page E-2 Embroider artistically; WHAT YOU CAN DO WITH THIS MACHINE WHAT YOU CAN DO WITH THIS MACHINE B Basic operations After purchasing...
Operation Manual
Page 8
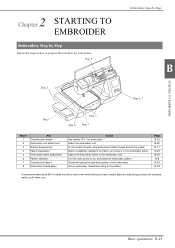
... Checking the needle 23 Replacing the needle 23 Chapter 2 STARTING TO EMBROIDER 25 Embroidery Step by Step 25 Attaching the Embroidery Unit 26 Embroidery Attractive Finishes 28 Preparing the Fabric 29 Attaching iron-on stabilizers (backing) to...the selected pattern 35 Embroidering 36 Embroidering a pattern 36 Changing the thread color display 37 E Embroidering Chapter 1 EMBROIDERY 2 Selecting Patterns 2 Selecting embroidery patterns/Brother "Exclusives"/floral alphabet patterns 2 Selecting character patterns 2 Selecting frame patterns 4 Editing Patterns 5 Moving the pattern ...
... Checking the needle 23 Replacing the needle 23 Chapter 2 STARTING TO EMBROIDER 25 Embroidery Step by Step 25 Attaching the Embroidery Unit 26 Embroidery Attractive Finishes 28 Preparing the Fabric 29 Attaching iron-on stabilizers (backing) to...the selected pattern 35 Embroidering 36 Embroidering a pattern 36 Changing the thread color display 37 E Embroidering Chapter 1 EMBROIDERY 2 Selecting Patterns 2 Selecting embroidery patterns/Brother "Exclusives"/floral alphabet patterns 2 Selecting character patterns 2 Selecting frame patterns 4 Editing Patterns 5 Moving the pattern ...

Operation Manual
Page 9
A Appendix Chapter 1 MAINTENANCE AND TROUBLESHOOTING 2 Care and Maintenance 2 Restrictions on oiling 2 Precautions on storing the machine 2 Cleaning the LCD Screen 2 Cleaning the machine surface 2 Cleaning the race 2 About the maintenance message 4 Touch panel is malfunctioning 4 Operation beep 4 Replacing the embroidery foot 5 Troubleshooting 6 List of symptoms 6 Error messages 10 Specifications 12 Upgrading your machine's software using USB flash drive 13 Index 14 CONTENTS vii
A Appendix Chapter 1 MAINTENANCE AND TROUBLESHOOTING 2 Care and Maintenance 2 Restrictions on oiling 2 Precautions on storing the machine 2 Cleaning the LCD Screen 2 Cleaning the machine surface 2 Cleaning the race 2 About the maintenance message 4 Touch panel is malfunctioning 4 Operation beep 4 Replacing the embroidery foot 5 Troubleshooting 6 List of symptoms 6 Error messages 10 Specifications 12 Upgrading your machine's software using USB flash drive 13 Index 14 CONTENTS vii

Operation Manual
Page 12
... air vent while the machine is being used. 7 USB port (for using the machine, carefully read these buttons to operate the machine. (page B-4) 0 Embroidery unit Attach embroidery unit to embroider. (page B-26) A Thread cutter Pass the threads through the thread cutter to cut them. B-2 g c f d e 1 Handwheel Turn... Spool cap Use the spool cap to hold the spool of thread in the LCD. (page B-9) 8 Operation panel From the operation panel, embroidery patterns can be selected and edited, and operations for a USB flash drive) In order to circulate. Names of Machine Parts and Their Functions ...
... air vent while the machine is being used. 7 USB port (for using the machine, carefully read these buttons to operate the machine. (page B-4) 0 Embroidery unit Attach embroidery unit to embroider. (page B-26) A Thread cutter Pass the threads through the thread cutter to cut them. B-2 g c f d e 1 Handwheel Turn... Spool cap Use the spool cap to hold the spool of thread in the LCD. (page B-9) 8 Operation panel From the operation panel, embroidery patterns can be selected and edited, and operations for a USB flash drive) In order to circulate. Names of Machine Parts and Their Functions ...

Operation Manual
Page 13
... lever Press the frame-securing lever down to secure the embroidery frame. (page B-33) 3 Embroidery unit connection Insert the embroidery unit connection into the bobbin case. 5 Embroidery foot The embroidery foot helps control fabric flexibility for better stitch consistency. 6 Embroidery foot screw Use the embroidery foot screw to OFF. • After the embroidery frame is set in place.
... lever Press the frame-securing lever down to secure the embroidery frame. (page B-33) 3 Embroidery unit connection Insert the embroidery unit connection into the bobbin case. 5 Embroidery foot The embroidery foot helps control fabric flexibility for better stitch consistency. 6 Embroidery foot screw Use the embroidery foot screw to OFF. • After the embroidery frame is set in place.

Operation Manual
Page 14
... this key before changing the needle, the presser foot, etc. Green: The machine is ready to embroider or is 8 mm or more . 6 Embroidery key Press this key to sew embroidery. 7 Back key Press to return to the previous screen. 8 Presser foot/Needle exchange key Press this machine are not displayed on the...
... this key before changing the needle, the presser foot, etc. Green: The machine is ready to embroider or is 8 mm or more . 6 Embroidery key Press this key to sew embroidery. 7 Back key Press to return to the previous screen. 8 Presser foot/Needle exchange key Press this machine are not displayed on the...
Operation Manual
Page 15
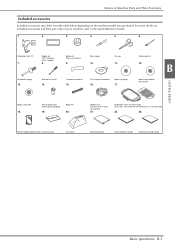
...Their Functions Included accessories Included accessories may differ from the table below depending on the machine model you purchased. U Embroidery foot "U" 7. Thread spool insert (mini king thread spool) 19. Poly 90 weight bobbin thread Accessory bag Dust cover ...Bobbin (4) One is on machine) 21. Screwdriver (small) 14. Spool cap (medium) On machine B GETTING READY Spool cap (small) 18. Seam ripper 10. Embroidery frame set 75/11 3 needles 90/14 1 needle 8. L-shaped screwdriver 15. Names of your machine, refer to the Quick Reference Guide. 1. 2. 3. 4. ...
...Their Functions Included accessories Included accessories may differ from the table below depending on the machine model you purchased. U Embroidery foot "U" 7. Thread spool insert (mini king thread spool) 19. Poly 90 weight bobbin thread Accessory bag Dust cover ...Bobbin (4) One is on machine) 21. Screwdriver (small) 14. Spool cap (medium) On machine B GETTING READY Spool cap (small) 18. Seam ripper 10. Embroidery frame set 75/11 3 needles 90/14 1 needle 8. L-shaped screwdriver 15. Names of your machine, refer to the Quick Reference Guide. 1. 2. 3. 4. ...

Operation Manual
Page 16
... soluble stabilizer Memo • To obtain optional accessories or parts, contact your authorized Brother dealer. • All specifications are available as optional accessories to the Quick Reference Guide. 1. 2. 3. Border embroidery frame set (large) 18 cm (H) × 13 cm (W) (7 inches (H) × 5 inches (W)) 4. For more optional accessories and their part codes, refer to be...
... soluble stabilizer Memo • To obtain optional accessories or parts, contact your authorized Brother dealer. • All specifications are available as optional accessories to the Quick Reference Guide. 1. 2. 3. Border embroidery frame set (large) 18 cm (H) × 13 cm (W) (7 inches (H) × 5 inches (W)) 4. For more optional accessories and their part codes, refer to be...

Operation Manual
Page 19
a b B c e f h d g GETTING READY 1 Embroidery patterns 2 Brother "Exclusives" 3 Floral alphabet patterns 4 Character patterns 5 Frame patterns 6 Press this key to select an operation indicated on . When the opening movie may be displayed if you touch the LCD with your finger. Press a key with your finger to select the embroidery pattern, to select a machine function, or to position...
a b B c e f h d g GETTING READY 1 Embroidery patterns 2 Brother "Exclusives" 3 Floral alphabet patterns 4 Character patterns 5 Frame patterns 6 Press this key to select an operation indicated on . When the opening movie may be displayed if you touch the LCD with your finger. Press a key with your finger to select the embroidery pattern, to select a machine function, or to position...

Operation Manual
Page 20
... "Selecting/displaying patterns according to "Changing the background colors of the embroidery patterns" in the "Embroidering" section. 3 Change the thread color display on the "Embroidery" screen; For details, refer to the embroidery frame size" in the "Embroidering" section. 9 Change the color...number "#123" is selected, select from six thread brands. (page B-37). 5 Adjust the maximum embroidery speed setting. For details, refer to "Changing the background colors of the embroidery patterns" in the "Embroidering" section. 6 Adjust the upper thread tension for the thumbnail area. For...
... "Selecting/displaying patterns according to "Changing the background colors of the embroidery patterns" in the "Embroidering" section. 3 Change the thread color display on the "Embroidery" screen; For details, refer to the embroidery frame size" in the "Embroidering" section. 9 Change the color...number "#123" is selected, select from six thread brands. (page B-37). 5 Adjust the maximum embroidery speed setting. For details, refer to "Changing the background colors of the embroidery patterns" in the "Embroidering" section. 6 Adjust the upper thread tension for the thumbnail area. For...

Operation Manual
Page 23
... for settings screen images are saved with the name "S######.bmp" in a folder labeled "bPocket". 5 67 1 Upper threading 2 Bobbin winding 3 Bobbin installation 4 Needle replacement 5 Embroidery unit attachment 6 Embroidery frame attachment 7 Embroidery foot attachment The first screen describing the procedure for the selected topic appears. • Pressing screen. , returns you return to the next...
... for settings screen images are saved with the name "S######.bmp" in a folder labeled "bPocket". 5 67 1 Upper threading 2 Bobbin winding 3 Bobbin installation 4 Needle replacement 5 Embroidery unit attachment 6 Embroidery frame attachment 7 Embroidery foot attachment The first screen describing the procedure for the selected topic appears. • Pressing screen. , returns you return to the next...

Operation Manual
Page 24
... of any other models are used, the machine will not operate correctly. SA156 is inserted onto the spool d pin. 1 Memo • When winding bobbin for embroidery be sure to the machine. • The included bobbin was designed specifically for this machine. Remove the spool cap that the b spring on the bobbin...
... of any other models are used, the machine will not operate correctly. SA156 is inserted onto the spool d pin. 1 Memo • When winding bobbin for embroidery be sure to the machine. • The included bobbin was designed specifically for this machine. Remove the spool cap that the b spring on the bobbin...
Operation Manual
Page 33
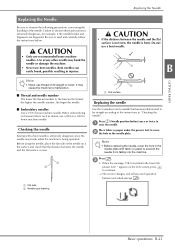
... machine is extremely dangerous, for example, if the needle breaks and fragments are locked (except ). the higher the needle number, the larger the needle. ■ Embroidery needles Use a 75/11 home machine needle. Press (Needle position button) once or twice to automatically lower the presser foot? Press . Replacing the Needle Replacing...
... machine is extremely dangerous, for example, if the needle breaks and fragments are locked (except ). the higher the needle number, the larger the needle. ■ Embroidery needles Use a 75/11 home machine needle. Press (Needle position button) once or twice to automatically lower the presser foot? Press . Replacing the Needle Replacing...
Operation Manual
Page 35
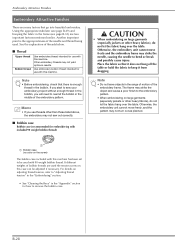
... 3 4 5 6 7 8 Aim Checking the needle Embroidery unit attachment Bobbin thread setup Fabric preparation Embroidery frame attachment Pattern selection Checking the layout Embroidery thread setup Action Use needle 75/11 for embroidery. * Attach the embroidery unit. Step 8 Step 2 Embroidery Step by Step Follow the steps below to prepare the... and adjust the size and position of the embroidery. Basic operations B-25 For the bobbin thread, wind embroidery bobbin thread and set it in place. Set up embroidery thread according to the embroidery unit. Attach a stabilizer material to on heavy...
... 3 4 5 6 7 8 Aim Checking the needle Embroidery unit attachment Bobbin thread setup Fabric preparation Embroidery frame attachment Pattern selection Checking the layout Embroidery thread setup Action Use needle 75/11 for embroidery. * Attach the embroidery unit. Step 8 Step 2 Embroidery Step by Step Follow the steps below to prepare the... and adjust the size and position of the embroidery. Basic operations B-25 For the bobbin thread, wind embroidery bobbin thread and set it in place. Set up embroidery thread according to the embroidery unit. Attach a stabilizer material to on heavy...
Operation Manual
Page 36
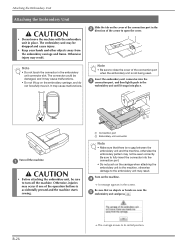
...It may be dropped and cause injury. • Keep your hands and other objects away from the embroidery carriage and frame. Otherwise injury may result. a CAUTION • Before attaching the embroidery unit, be sewn correctly. Be sure to fully insert the connector into the connection port. •... and press . B-26 The carriage moves to close the cover of the connection port in the embroidery unit until it . Attaching the Embroidery Unit Attaching the Embroidery Unit CAUTION • Do not move it snaps into the c connection port, and then lightly push in the b ...
...It may be dropped and cause injury. • Keep your hands and other objects away from the embroidery carriage and frame. Otherwise injury may result. a CAUTION • Before attaching the embroidery unit, be sewn correctly. Be sure to fully insert the connector into the connection port. •... and press . B-26 The carriage moves to close the cover of the connection port in the embroidery unit until it . Attaching the Embroidery Unit Attaching the Embroidery Unit CAUTION • Do not move it snaps into the c connection port, and then lightly push in the b ...

Operation Manual
Page 37
...the machine is turned on. It may not appear. Turn off , then on page B-33. 1 Release button CAUTION • Do not carry the embroidery unit by holding the release button compartment. c CAUTION • Always turn the machine off the machine. Note • If the machine was not ... below. Continue with pattern selection and remember to the left of a malfunction. Basic operations B-27 Otherwise, injury may result. Attaching the Embroidery Unit Press , and then press . Hold the release button on the bottom left . 1 STARTING TO EMBROIDER B • For details on the...
...the machine is turned on. It may not appear. Turn off , then on page B-33. 1 Release button CAUTION • Do not carry the embroidery unit by holding the release button compartment. c CAUTION • Always turn the machine off the machine. Note • If the machine was not ... below. Continue with pattern selection and remember to the left of a malfunction. Basic operations B-27 Otherwise, injury may result. Attaching the Embroidery Unit Press , and then press . Hold the release button on the bottom left . 1 STARTING TO EMBROIDER B • For details on the...
Operation Manual
Page 38
...use threads other heavy fabrics), do not let the fabric hang over the table. B-28 See the explanation of the embroidery frame. Otherwise, the embroidery unit cannot move freely, and the pattern may not sew out correctly. ■ Bobbin case Bobbin case (recommended for... to rewind the bobbin in the bobbin. For details on this machine. Place the fabric so that go into beautiful embroidery. Embroidery Attractive Finishes Embroidery Attractive Finishes There are two important factors mentioned earlier. Using the appropriate stabilizer (see page B-29) and hooping the ...
...use threads other heavy fabrics), do not let the fabric hang over the table. B-28 See the explanation of the embroidery frame. Otherwise, the embroidery unit cannot move freely, and the pattern may not sew out correctly. ■ Bobbin case Bobbin case (recommended for... to rewind the bobbin in the bobbin. For details on this machine. Place the fabric so that go into beautiful embroidery. Embroidery Attractive Finishes Embroidery Attractive Finishes There are two important factors mentioned earlier. Using the appropriate stabilizer (see page B-29) and hooping the ...

Operation Manual
Page 39
...Memo • When embroidering on thin fabrics such as organdy or lawn, or on stabilizers (backing) to the fabric For best results in the embroidery settings screen (see below). • In the case of thick terry cloth towels we recommend that have loops which cause pattern shrinkage. Not using... iron-on napped fabrics such as terry cloth or fabrics that you place a piece of water soluble stabilizer on stabilizer material to your authorized Brother dealer for the correct stabilizer to use and in a poor finish to the wrong side of the towel. When using a stabilizer material may...
...Memo • When embroidering on thin fabrics such as organdy or lawn, or on stabilizers (backing) to the fabric For best results in the embroidery settings screen (see below). • In the case of thick terry cloth towels we recommend that have loops which cause pattern shrinkage. Not using... iron-on napped fabrics such as terry cloth or fabrics that you place a piece of water soluble stabilizer on stabilizer material to your authorized Brother dealer for the correct stabilizer to use and in a poor finish to the wrong side of the towel. When using a stabilizer material may...
Operation Manual
Page 40
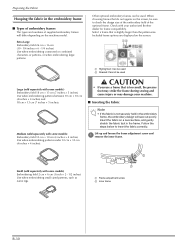
..., the presser foot may strike the frame during sewing and cause injury or may damage your authorized Brother dealer for frame compatibility. Preparing the Fabric Hooping the fabric in the embroidery frame ■ Types of embroidery frames The types and numbers of the optional frame. Insert the fabric on the screen. 12 1 Highlighted...
..., the presser foot may strike the frame during sewing and cause injury or may damage your authorized Brother dealer for frame compatibility. Preparing the Fabric Hooping the fabric in the embroidery frame ■ Types of embroidery frames The types and numbers of the optional frame. Insert the fabric on the screen. 12 1 Highlighted...


