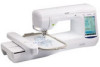
Operation Manual
Page 1
We recommend that you keep this document before using the machine. Operation Manual Embroidery Machine Product Code: 882-D80/D82 Be sure to read this document nearby for future reference.
We recommend that you keep this document before using the machine. Operation Manual Embroidery Machine Product Code: 882-D80/D82 Be sure to read this document nearby for future reference.
Operation Manual
Page 7
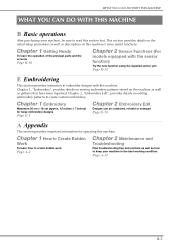
... E Embroidering This section provides instruction to keep your machine, be combined, rotated or enlarged Page E-56 A Appendix This section provides important information for large embroidery designs Page E-2 Chapter 2 Embroidery Edit Designs can be sure to create custom embroidery. Chapter 1, "Embroidery", provides details on sewing embroidery patterns stored on editing embroidery patterns to read this section first. Chapter...
... E Embroidering This section provides instruction to keep your machine, be combined, rotated or enlarged Page E-56 A Appendix This section provides important information for large embroidery designs Page E-2 Chapter 2 Embroidery Edit Designs can be sure to create custom embroidery. Chapter 1, "Embroidery", provides details on sewing embroidery patterns stored on editing embroidery patterns to read this section first. Chapter...
Operation Manual
Page 8
... INTRODUCTION 1 IMPORTANT SAFETY INSTRUCTIONS 1 WHAT YOU CAN DO WITH THIS MACHINE ..... 5 NAMES OF MACHINE PARTS AND THEIR FUNCTIONS 8 Machine 8 Needle and Presser Foot Section 9 Embroidery Unit 9 Operation Buttons 10 Included Accessories 11 Options 13 B Basic operations... the Sensor Pen 56 USING SENSOR FUNCTIONS IN "EMBROIDERY"/"EMBROIDERY EDIT" MODE ... 58 Specifying the Embroidering Position With the Sensor Pen ... 58 E Embroidering Chapter1 Embroidery 2 SELECTING PATTERNS 3 Selecting Embroidery Patterns/Brother "Exclusives"/Floral Alphabet/Bobbin Work Patterns 4 B-6 ...
... INTRODUCTION 1 IMPORTANT SAFETY INSTRUCTIONS 1 WHAT YOU CAN DO WITH THIS MACHINE ..... 5 NAMES OF MACHINE PARTS AND THEIR FUNCTIONS 8 Machine 8 Needle and Presser Foot Section 9 Embroidery Unit 9 Operation Buttons 10 Included Accessories 11 Options 13 B Basic operations... the Sensor Pen 56 USING SENSOR FUNCTIONS IN "EMBROIDERY"/"EMBROIDERY EDIT" MODE ... 58 Specifying the Embroidering Position With the Sensor Pen ... 58 E Embroidering Chapter1 Embroidery 2 SELECTING PATTERNS 3 Selecting Embroidery Patterns/Brother "Exclusives"/Floral Alphabet/Bobbin Work Patterns 4 B-6 ...
Operation Manual
Page 9
Using a Single Color 84 Basting Embroidery 84 USING THE MEMORY FUNCTION 85 A Appendix Chapter1 How to Create Bobbin Work 2 ABOUT BOBBIN WORK 3 PREPARING FOR BOBBIN WORK 3 Required Materials 3 Upper Threading 4 Preparing ... TENSION 12 TROUBLESHOOTING 13 Chapter2 Maintenance and Troubleshooting 14 CARE AND MAINTENANCE 15 Restrictions on oiling 15 Precautions on storing the machine 15 Cleaning the LCD Screen 15 Cleaning the Machine Casing 15 Cleaning the Race 15 Cleaning the Cutter in a Pattern... 66 Embroidering Linked Characters 67 Changing the Thread Color 67...
Using a Single Color 84 Basting Embroidery 84 USING THE MEMORY FUNCTION 85 A Appendix Chapter1 How to Create Bobbin Work 2 ABOUT BOBBIN WORK 3 PREPARING FOR BOBBIN WORK 3 Required Materials 3 Upper Threading 4 Preparing ... TENSION 12 TROUBLESHOOTING 13 Chapter2 Maintenance and Troubleshooting 14 CARE AND MAINTENANCE 15 Restrictions on oiling 15 Precautions on storing the machine 15 Cleaning the LCD Screen 15 Cleaning the Machine Casing 15 Cleaning the Race 15 Cleaning the Cutter in a Pattern... 66 Embroidering Linked Characters 67 Changing the Thread Color 67...
Operation Manual
Page 10
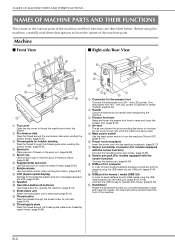
... "W+" with LED pointer. (The embroidery foot "W+" with the sensor function) Connect the sensor pen. (page B-53) i USB port for computer In order to import/export patterns between a computer and the machine, plug the USB cable into the USB port. (page B-49, E-47) j USB port for the selected pattern and... LCD (liquid crystal display) Settings for mouse / media (USB 2.0) In order to send patterns from/to raise and lower the needle. Before using the machine, carefully read these buttons to operate the machine. (page B-10) k Embroidery unit Attach the embroidery unit to hold the spool of the...
... "W+" with LED pointer. (The embroidery foot "W+" with the sensor function) Connect the sensor pen. (page B-53) i USB port for computer In order to import/export patterns between a computer and the machine, plug the USB cable into the USB port. (page B-49, E-47) j USB port for the selected pattern and... LCD (liquid crystal display) Settings for mouse / media (USB 2.0) In order to send patterns from/to raise and lower the needle. Before using the machine, carefully read these buttons to operate the machine. (page B-10) k Embroidery unit Attach the embroidery unit to hold the spool of the...
Operation Manual
Page 11
.... (page B-47) CAUTION • Before inserting or removing the embroidery unit, turn the main power to hold the embroidery foot in the frame holder, be sure the frame-securing lever is correctly lowered. Use the embroidery foot "W+" with LED pointer or embroidery foot "W" for most machine embroidering. (page B-42) c Bobbin cover Open the bobbin cover...
.... (page B-47) CAUTION • Before inserting or removing the embroidery unit, turn the main power to hold the embroidery foot in the frame holder, be sure the frame-securing lever is correctly lowered. Use the embroidery foot "W+" with LED pointer or embroidery foot "W" for most machine embroidering. (page B-42) c Bobbin cover Open the bobbin cover...
Operation Manual
Page 12
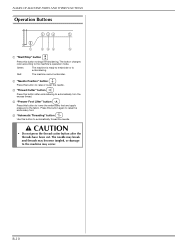
...been cut. The button changes color according to automatically thread the needle. e "Automatic Threading" button Use this button to the machine's operation mode. CAUTION • Do not press the thread cutter button after embroidering to raise or lower the needle. NAMES OF... Buttons a "Start/Stop" button Press this button to the machine may become tangled, or damage to begin embroidering. The needle may break and threads may occur. Green: The machine is embroidering. Press this button to lower the embroidery foot and apply pressure to the fabric. d "Presser Foot Lifter...
...been cut. The button changes color according to automatically thread the needle. e "Automatic Threading" button Use this button to the machine's operation mode. CAUTION • Do not press the thread cutter button after embroidering to raise or lower the needle. NAMES OF... Buttons a "Start/Stop" button Press this button to the machine may become tangled, or damage to begin embroidering. The needle may break and threads may occur. Green: The machine is embroidering. Press this button to lower the embroidery foot and apply pressure to the fabric. d "Presser Foot Lifter...
Operation Manual
Page 13
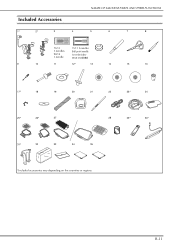
B-11 Included Accessories 1* 2* 3 4 NAMES OF MACHINE PARTS AND THEIR FUNCTIONS 5 6 7 8 75/11 3 needles 90/14 1 needle 75/11 2 needles: Ball point needle for embroidery HAX130EBBR 9 10 11 12* 13 14 15 16 17* 18 19 20 21 22 23* 24 25* 26* 27 28 29* 30* 31* 32 33 34 35 *Included accessories vary depending on the countries or regions.
B-11 Included Accessories 1* 2* 3 4 NAMES OF MACHINE PARTS AND THEIR FUNCTIONS 5 6 7 8 75/11 3 needles 90/14 1 needle 75/11 2 needles: Ball point needle for embroidery HAX130EBBR 9 10 11 12* 13 14 15 16 17* 18 19 20 21 22 23* 24 25* 26* 27 28 29* 30* 31* 32 33 34 35 *Included accessories vary depending on the countries or regions.
Operation Manual
Page 14
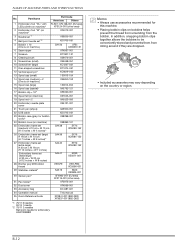
...× W 18 cm (H 12 inches × W 7 inches) SA440 EF76: XC8482-152 Embroidery frame set (extra large) H 30 cm × W 20 cm (H 12 inches × W 8 inches) SA447 EF92: XE5071-001 28 Brother poly #90 bobbin thread EBT-PE EBT-PEN: XC5996-001 29 Stabilizer material* SA519 BM3: XE0806...001 (882-D82) *1 75/11 3 needles 90/14 1 needle *2 75/11 2 needles Ball point needle for embroidery HAX130EBBR Memo • Always use accessories recommended for this machine. • Placing bobbin clips on bobbins helps prevent the thread from unwinding from rolling around if they are dropped. &#...
...× W 18 cm (H 12 inches × W 7 inches) SA440 EF76: XC8482-152 Embroidery frame set (extra large) H 30 cm × W 20 cm (H 12 inches × W 8 inches) SA447 EF92: XE5071-001 28 Brother poly #90 bobbin thread EBT-PE EBT-PEN: XC5996-001 29 Stabilizer material* SA519 BM3: XE0806...001 (882-D82) *1 75/11 3 needles 90/14 1 needle *2 75/11 2 needles Ball point needle for embroidery HAX130EBBR Memo • Always use accessories recommended for this machine. • Placing bobbin clips on bobbins helps prevent the thread from unwinding from rolling around if they are dropped. &#...
Operation Manual
Page 15
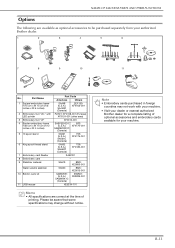
... correct at the time of optional accessories and embroidery cards available for your authorized Brother dealer. 1 2 3 4 5 6 7 8 9 10 11 No. Please be purchased separately from your machine. Note • Embroidery cards purchased in foreign countries may change without ...: XF4175-001 SA562 (U.S.A.) SA562C (Canada) TS6: XF4180-001 SAECR1 - Part Name 1 Square embroidery frame H 15 cm x W 15 cm (H 6 inches x W 6 inches) 2 Embroidery foot "W+" with your machine. • Visit your dealer or nearest authorized Brother dealer for a complete listing of printing. B-13
... correct at the time of optional accessories and embroidery cards available for your authorized Brother dealer. 1 2 3 4 5 6 7 8 9 10 11 No. Please be purchased separately from your machine. Note • Embroidery cards purchased in foreign countries may change without ...: XF4175-001 SA562 (U.S.A.) SA562C (Canada) TS6: XF4180-001 SAECR1 - Part Name 1 Square embroidery frame H 15 cm x W 15 cm (H 6 inches x W 6 inches) 2 Embroidery foot "W+" with your machine. • Visit your dealer or nearest authorized Brother dealer for a complete listing of printing. B-13
Operation Manual
Page 18
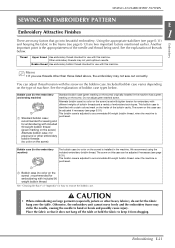
... the Display Language 26 ■ Changing the Background Colors of the Embroidery Patterns... 26 ■ Specifying the Size of Pattern Thumbnails 27 ■ Saving a Settings Screen Image to USB Media 28 Using the Machine Help Key 29 LOWER THREADING 31 Winding the Bobbin 31 ■ ... the Needle 46 BEFORE EMBROIDERING 46 Embroidery Step by Step 46 About the Embroidery Unit 47 ■ Removing the Embroidery Unit 47 ■ Attaching the Embroidery Unit 47 USING FUNCTIONS BY CONNECTING THE ACCESSORY TO THE MACHINE 49 Using USB Media or Embroidery Card Reader/USB Card Writer Module...
... the Display Language 26 ■ Changing the Background Colors of the Embroidery Patterns... 26 ■ Specifying the Size of Pattern Thumbnails 27 ■ Saving a Settings Screen Image to USB Media 28 Using the Machine Help Key 29 LOWER THREADING 31 Winding the Bobbin 31 ■ ... the Needle 46 BEFORE EMBROIDERING 46 Embroidery Step by Step 46 About the Embroidery Unit 47 ■ Removing the Embroidery Unit 47 ■ Attaching the Embroidery Unit 47 USING FUNCTIONS BY CONNECTING THE ACCESSORY TO THE MACHINE 49 Using USB Media or Embroidery Card Reader/USB Card Writer Module...
Operation Manual
Page 23
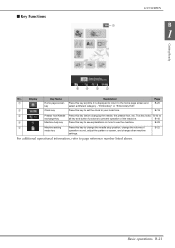
...to the home page screen and B-20 key select a different category - B-29 e Machine setting Press this key anytime it is displayed to return to change the needle stop position, change the volume of the machine. Basic operations B-21 ■ Key Functions LCD SCREEN a B 1 Getting Ready ed ... b Clock key Press this key to see explanations on how to your local time. B-45 d Machine help key Press this key to set the clock to use the machine. "Embroidery" or "Embroidery Edit". B-18 c Presser foot/Needle Press this key before changing the needle, the presser foot, ...
...to the home page screen and B-20 key select a different category - B-29 e Machine setting Press this key anytime it is displayed to return to change the needle stop position, change the volume of the machine. Basic operations B-21 ■ Key Functions LCD SCREEN a B 1 Getting Ready ed ... b Clock key Press this key to see explanations on how to your local time. B-45 d Machine help key Press this key to set the clock to use the machine. "Embroidery" or "Embroidery Edit". B-18 c Presser foot/Needle Press this key before changing the needle, the presser foot, ...
Operation Manual
Page 24
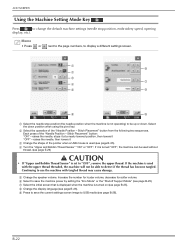
... the "Needle Position - d Turn the "Upper and Bobbin Thread Sensor" "ON" or "OFF". If it is turned "OFF", the machine can be up or down position when using the pivot key. Continuing to "OFF", remove the upper thread. f Select to change the default...the "Needle Position - LCD SCREEN Using the Machine Setting Mode Key Press to save the current settings screen image to display a different settings screen. If the machine is turned on (see page B-26). a f b c g d e h i i a Select the needle stop position, embroidery speed, opening display, etc.). Increase the number ...
... the "Needle Position - d Turn the "Upper and Bobbin Thread Sensor" "ON" or "OFF". If it is turned "OFF", the machine can be up or down position when using the pivot key. Continuing to "OFF", remove the upper thread. f Select to change the default...the "Needle Position - LCD SCREEN Using the Machine Setting Mode Key Press to save the current settings screen image to display a different settings screen. If the machine is turned on (see page B-26). a f b c g d e h i i a Select the needle stop position, embroidery speed, opening display, etc.). Increase the number ...
Operation Manual
Page 27
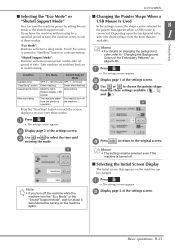
...or press the "Start/Stop" button to the original screen. the time until Note • If you leave the machine without using for a specified period of the Embroidery Patterns" on to restart sewing. a Press . The settings screen appears. b Display page 1 of ...the settings screen. d Press to return to continue sewing. Machine will enter lower power modes after set period of the settings screen...
...or press the "Start/Stop" button to the original screen. the time until Note • If you leave the machine without using for a specified period of the Embroidery Patterns" on to restart sewing. a Press . The settings screen appears. b Display page 1 of ...the settings screen. d Press to return to continue sewing. Machine will enter lower power modes after set period of the settings screen...
Operation Manual
Page 40
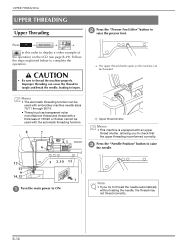
.... The upper thread shutter opens so the machine can be used with an upper thread shutter, allowing you try to thread the machine properly. Memo • The automatic threading function can be used with embroidery machine needle sizes 75/11 through 90/14. • Thread... such as transparent nylon monofilament thread and thread with a thickness of the operation on the LCD (see page B-29). a Upper thread shutter Memo • This machine is performed correctly. Position" ...
.... The upper thread shutter opens so the machine can be used with an upper thread shutter, allowing you try to thread the machine properly. Memo • The automatic threading function can be used with embroidery machine needle sizes 75/11 through 90/14. • Thread... such as transparent nylon monofilament thread and thread with a thickness of the operation on the LCD (see page B-29). a Upper thread shutter Memo • This machine is performed correctly. Position" ...
Operation Manual
Page 47
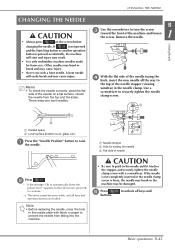
...is loose, the needle may break or the machine may cause injury. a Parallel space b Level surface (bobbin cover, glass, etc.) a Press the "Needle the needle. Other needles may bend or break and may result. • Use only embroidery machine needles made for setting the needle c Flat side... of the turn the screw machine and loosen 1 the screw. Memo • To check the needle correctly, place the flat side of...
...is loose, the needle may break or the machine may cause injury. a Parallel space b Level surface (bobbin cover, glass, etc.) a Press the "Needle the needle. Other needles may bend or break and may result. • Use only embroidery machine needles made for setting the needle c Flat side... of the turn the screw machine and loosen 1 the screw. Memo • To check the needle correctly, place the flat side of...
Operation Manual
Page 85
...recommended for embroidering with different weights of bobbin threads and a variety of machine. Bobbin thread Use embroidery bobbin thread intended for how to accommodate 90 weight bobbin thread, when the machine is installed in the machine has a green marking on large garments (especially jackets or other than... screw. The screw on the screw) is purchased. recommended for sewing and for the embroidery machine) The bobbin case (no color on the screw) Bobbin case (for embroidering with this machine. a Bobbin case (no color on the screw) is identified with the screw on ...
...recommended for embroidering with different weights of bobbin threads and a variety of machine. Bobbin thread Use embroidery bobbin thread intended for how to accommodate 90 weight bobbin thread, when the machine is installed in the machine has a green marking on large garments (especially jackets or other than... screw. The screw on the screw) is purchased. recommended for sewing and for the embroidery machine) The bobbin case (no color on the screw) Bobbin case (for embroidering with this machine. a Bobbin case (no color on the screw) is identified with the screw on ...
Operation Manual
Page 108
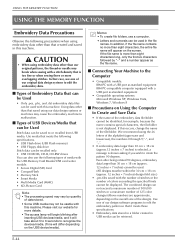
...the file name is not displayed. Use media that created and saved in this machine. Memo • To create file folders, use a computer. • Letters and numerals can also use one of our design software programs to edit the embroidery pattern so that can be Used • Only .pes, .phc, and ... the pattern 90 degrees. In addition, if the file name contains no more than our original patterns, the thread or needle may cause the embroidery machine to malfunction. ■ Types of USB Devices/Media that is shown asking if you wish to Create and Save Data • If the ...
...the file name is not displayed. Use media that created and saved in this machine. Memo • To create file folders, use a computer. • Letters and numerals can also use one of our design software programs to edit the embroidery pattern so that can be Used • Only .pes, .phc, and ... the pattern 90 degrees. In addition, if the file name contains no more than our original patterns, the thread or needle may cause the embroidery machine to malfunction. ■ Types of USB Devices/Media that is shown asking if you wish to Create and Save Data • If the ...
Operation Manual
Page 111
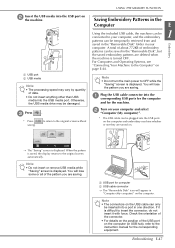
... . The "Saving" screen is difficult to the original screen without Saving Embroidery Patterns in the "Removable Disk", but the saved embroidery patterns are saving. Note • Do not turn the main power to the Computer" on the computer and embroidery machine whether or not they are saving. a Plug the USB cable connector into...
... . The "Saving" screen is difficult to the original screen without Saving Embroidery Patterns in the "Removable Disk", but the saved embroidery patterns are saving. Note • Do not turn the main power to the Computer" on the computer and embroidery machine whether or not they are saving. a Plug the USB cable connector into...
Operation Manual
Page 175
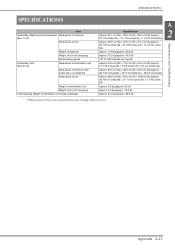
Maintenance and Troubleshooting A 2 Appendix A-25 SPECIFICATIONS SPECIFICATIONS Item Embroidery Machine and Accessories Dimensions of machine (Box 1 of 2) Dimensions of box Embroidery Unit (Box 2 of 2) Weight of machine Weight of box (for shipping) Embroidering speed Dimensions of embroidery unit Dimensions of machine with embroidery unit attached Dimensions of box Weight of embroidery unit Weight of box (for shipping) Total Shipping Weight...
Maintenance and Troubleshooting A 2 Appendix A-25 SPECIFICATIONS SPECIFICATIONS Item Embroidery Machine and Accessories Dimensions of machine (Box 1 of 2) Dimensions of box Embroidery Unit (Box 2 of 2) Weight of machine Weight of box (for shipping) Embroidering speed Dimensions of embroidery unit Dimensions of machine with embroidery unit attached Dimensions of box Weight of embroidery unit Weight of box (for shipping) Total Shipping Weight...


