

Users Manual - English
Page 2
...Cleaning brush X59476-051 28 Grid sheet set : on machine 1set: in carton) 5 Zigzag foot "J" (on this machine model 500D/500, HE-120. Part Name Part Code U.S.A. Others XC1154-021 SA250 TC1:XC4716-023 XC4551-020 XC6369-121 XC6375-021 XA5752-021 XC3829-021 SA432 EF62:XA6628-002...SA527 GS4:XC4549-051 XC1807-121 500D XC4530-023 500 XC3839-023 500D XC5370-023 500 XC5370-024 Cover A Others No. Included Accessories After opening the box, check that the following accessories are included. If any item is available through your retailer. Part Name 1 Buttonhole foot "A" XC2691...
...Cleaning brush X59476-051 28 Grid sheet set : on machine 1set: in carton) 5 Zigzag foot "J" (on this machine model 500D/500, HE-120. Part Name Part Code U.S.A. Others XC1154-021 SA250 TC1:XC4716-023 XC4551-020 XC6369-121 XC6375-021 XA5752-021 XC3829-021 SA432 EF62:XA6628-002...SA527 GS4:XC4549-051 XC1807-121 500D XC4530-023 500 XC3839-023 500D XC5370-023 500 XC5370-024 Cover A Others No. Included Accessories After opening the box, check that the following accessories are included. If any item is available through your retailer. Part Name 1 Buttonhole foot "A" XC2691...

Users Manual - English
Page 3
... functions are described below. f Arm Plug in the connector for the embroidery unit. m Bobbin thread spool pin Place the spool of the machine parts. i Sliding leg Pull out the sliding leg during free-arm sewing. o Bobbin winder cover Open this compartment. d Thread tension dial Use the...eject the installed thread cassette. SE-BrotherE_sgml.book Page B Monday, June 30, 2003 3:44 PM Names of Machine Parts and Their Functions The names of the various parts of the upper thread. Before using the sewing machine, carefully read these descriptions to sew cylindrical pieces such as ...
... functions are described below. f Arm Plug in the connector for the embroidery unit. m Bobbin thread spool pin Place the spool of the machine parts. i Sliding leg Pull out the sliding leg during free-arm sewing. o Bobbin winder cover Open this compartment. d Thread tension dial Use the...eject the installed thread cassette. SE-BrotherE_sgml.book Page B Monday, June 30, 2003 3:44 PM Names of Machine Parts and Their Functions The names of the various parts of the upper thread. Before using the sewing machine, carefully read these descriptions to sew cylindrical pieces such as ...
Users Manual - English
Page 7
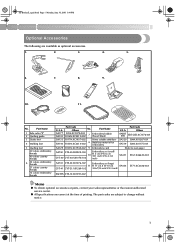
... EF61:XA6630-002 SA741 ETS-22:X81276-102 Embroidery set (small) H 2 cm X W 6 cm (H 1 inch X W 2-1/2 inch) Part Code U.S.A. Part Name 1 Side cutter "S" 2 Quilting guide 3 Guide foot 4 Walking foot 5 Quilting foot 40 colors embroidery threads 40 colors country threads 6 22... colors embroidery threads 21 colors country threads 12 colors embroidery threads Part Code U.S.A. SE-BrotherE_sgml.book Page 1 Monday, June 30, 2003 3:44 PM Optional Accessories Optional Accessories The following are correct ...
... EF61:XA6630-002 SA741 ETS-22:X81276-102 Embroidery set (small) H 2 cm X W 6 cm (H 1 inch X W 2-1/2 inch) Part Code U.S.A. Part Name 1 Side cutter "S" 2 Quilting guide 3 Guide foot 4 Walking foot 5 Quilting foot 40 colors embroidery threads 40 colors country threads 6 22... colors embroidery threads 21 colors country threads 12 colors embroidery threads Part Code U.S.A. SE-BrotherE_sgml.book Page 1 Monday, June 30, 2003 3:44 PM Optional Accessories Optional Accessories The following are correct ...

Users Manual - English
Page 8
... 61 Blouse Embellishment 62 Zodiac Signs 63 Bunny 64 Grand Mom 65 Red Work 66 Pop Mix Part Code U.S.A. SE-BrotherE_sgml.book Page 2 Monday, June 30, 2003 3:44 PM ■ List of Embroidery Cards No. Part Name 1 Alphabet 2 Flower 3 Dinosaur 6 Moskowitz's World 7 Country Life 8 Holiday 9 Hobby Craft 10 ...SA303 SA304 SA305 SA306 SA307 SA311 SA312 SA313 SA314 SA315 SA316 SA319 SA320 SA321 SA325 SA327 SA328 SA329 SA330 SA331 SA332 SA333 SA335 SA336 Part Code Others X58317-001 X58321-001 X58362-001 X58497-001 X59322-001 X59357-001 X59511-001 X59567-001 XA0257-001 XA0275-001 XA0517-...
... 61 Blouse Embellishment 62 Zodiac Signs 63 Bunny 64 Grand Mom 65 Red Work 66 Pop Mix Part Code U.S.A. SE-BrotherE_sgml.book Page 2 Monday, June 30, 2003 3:44 PM ■ List of Embroidery Cards No. Part Name 1 Alphabet 2 Flower 3 Dinosaur 6 Moskowitz's World 7 Country Life 8 Holiday 9 Hobby Craft 10 ...SA303 SA304 SA305 SA306 SA307 SA311 SA312 SA313 SA314 SA315 SA316 SA319 SA320 SA321 SA325 SA327 SA328 SA329 SA330 SA331 SA332 SA333 SA335 SA336 Part Code Others X58317-001 X58321-001 X58362-001 X58497-001 X59322-001 X59357-001 X59511-001 X59567-001 XA0257-001 XA0275-001 XA0517-...

Users Manual - English
Page 10
SE-BrotherE_sgml.book Page 4 Monday, June 30, 2003 3:44 PM Contents Included Accessories Cover A Accessories ...Cover A Names of Machine Parts and Their Functions Cover B Front view ...Cover B Needle and presser foot section ...Cover C Right-side/rear view ...Cover C Operation buttons ...Cover D Operation panel...Cover E Optional ...
SE-BrotherE_sgml.book Page 4 Monday, June 30, 2003 3:44 PM Contents Included Accessories Cover A Accessories ...Cover A Names of Machine Parts and Their Functions Cover B Front view ...Cover B Needle and presser foot section ...Cover C Right-side/rear view ...Cover C Operation buttons ...Cover D Operation panel...Cover E Optional ...

Users Manual - English
Page 14
... from the electrical outlet immediately after using and before using this machine, basic safety precautions should always be taken, including the following: Read all moving parts. To disconnect, turn the main switch to the nearest authorized dealer or service center for its intended use outdoors. 7. Do not unplug by or near...
... from the electrical outlet immediately after using and before using this machine, basic safety precautions should always be taken, including the following: Read all moving parts. To disconnect, turn the main switch to the nearest authorized dealer or service center for its intended use outdoors. 7. Do not unplug by or near...

Users Manual - English
Page 16
...the operation manual to inspect and adjust the machine yourself. For additional product information and updates, visit our web site at www.brother.com 10 Use only neutral soaps or detergents to assure correct installation. Be sure to keep your local authorized... and unplug the cord when: • Operation is completed • Replacing or removing the needle or any assemblies, the presser feet, needle, or other parts • A power failure occurs during use • Maintaining the machine • Leaving the machine unattended 3. Benzene, thinner, and scouring powders can damage ...
...the operation manual to inspect and adjust the machine yourself. For additional product information and updates, visit our web site at www.brother.com 10 Use only neutral soaps or detergents to assure correct installation. Be sure to keep your local authorized... and unplug the cord when: • Operation is completed • Replacing or removing the needle or any assemblies, the presser feet, needle, or other parts • A power failure occurs during use • Maintaining the machine • Leaving the machine unattended 3. Benzene, thinner, and scouring powders can damage ...

Users Manual - English
Page 24
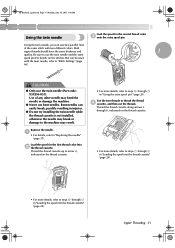
...spool pin. Bobbin precautions Winding the bobbin Be sure to prepare the bobbin thread. Use only the included bobbin or bobbins of the same type (part code: SA156, SFB:XA5539-151). 11.5 mm (7/16 inch) Actual size This model Older model Wind the thread around the bobbin to observe ...Raise until it stops with a click. a Open the bobbin winder cover at the top on the sewing machine. CAUTION ● Only use the Bobbin (part code: SA156, SFB:XA5539-151) designed specifically for this sewing machine. SE-BrotherE_sgml.book Page 18 Monday, June 30, 2003 3:44 PM GETTING READY Winding...
...spool pin. Bobbin precautions Winding the bobbin Be sure to prepare the bobbin thread. Use only the included bobbin or bobbins of the same type (part code: SA156, SFB:XA5539-151). 11.5 mm (7/16 inch) Actual size This model Older model Wind the thread around the bobbin to observe ...Raise until it stops with a click. a Open the bobbin winder cover at the top on the sewing machine. CAUTION ● Only use the Bobbin (part code: SA156, SFB:XA5539-151) designed specifically for this sewing machine. SE-BrotherE_sgml.book Page 18 Monday, June 30, 2003 3:44 PM GETTING READY Winding...

Users Manual - English
Page 27
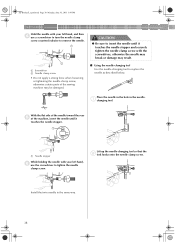
... bobbin thread spool pin, close r the bobbin winder cover, and then slide the sewing speed controller back to cut the end of the same type (part code: SA156, SFB:XA5539151). 11.5 mm (7/16 inch) Actual size This model Older model Slide the bobbin cover latch to the left. this sewing machine...
... bobbin thread spool pin, close r the bobbin winder cover, and then slide the sewing speed controller back to cut the end of the same type (part code: SA156, SFB:XA5539151). 11.5 mm (7/16 inch) Actual size This model Older model Slide the bobbin cover latch to the left. this sewing machine...
Users Manual - English
Page 37
... the same stitch with the twin needle, refer to the machine may bend the needle or damage the machine. ● Never use the twin needle (Part code : X59296-051). Using the twin needle, you can easily break, possibly resulting in "Using the extra spool pin" (page 29).
... the same stitch with the twin needle, refer to the machine may bend the needle or damage the machine. ● Never use the twin needle (Part code : X59296-051). Using the twin needle, you can easily break, possibly resulting in "Using the extra spool pin" (page 29).
Users Manual - English
Page 44
... counterclockwise to remove the needle. 1 2 a Screwdriver b Needle clamp screw • Do not apply a strong force when loosening or tightening the needle clamp screw, otherwise certain parts of the machine, insert the needle until it touches the needle stopper and securely tighten the needle clamp screw with your left hand, f use the...
... counterclockwise to remove the needle. 1 2 a Screwdriver b Needle clamp screw • Do not apply a strong force when loosening or tightening the needle clamp screw, otherwise certain parts of the machine, insert the needle until it touches the needle stopper and securely tighten the needle clamp screw with your left hand, f use the...
Users Manual - English
Page 49
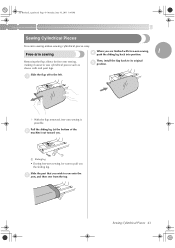
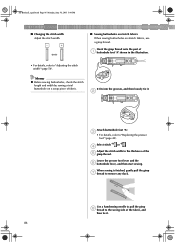
... back into position. Free-arm sewing When you . 1 a Sliding leg • During free-arm sewing, be sure to pull out the sliding leg. Slide the part that you wish to the left.
... back into position. Free-arm sewing When you . 1 a Sliding leg • During free-arm sewing, be sure to pull out the sliding leg. Slide the part that you wish to the left.
Users Manual - English
Page 52
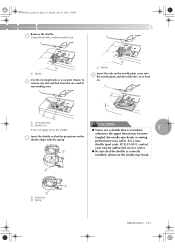
... on positioning the fabric, refer to "Replacing the presser foot" (page 40). ↓ 4 Position the fabric.. In addition, keep your hands away from all moving parts such as the needle and balance wheel, otherwise injuries may occur. ● Do not pull or push the fabric too hard while sewing, otherwise injuries...
... on positioning the fabric, refer to "Replacing the presser foot" (page 40). ↓ 4 Position the fabric.. In addition, keep your hands away from all moving parts such as the needle and balance wheel, otherwise injuries may occur. ● Do not pull or push the fabric too hard while sewing, otherwise injuries...
Users Manual - English
Page 89
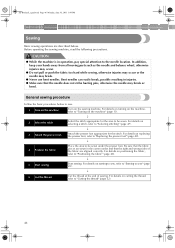
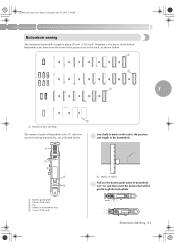
... Monday, June 30, 2003 3:44 PM Buttonhole sewing The maximum buttonhole length is used for sewing buttonholes, are indicated below . 1 1 1 3 1 a Reinforcement stitching The names of parts of buttonhole b foot "A", and then insert the button that will be put through the buttonhole.
... Monday, June 30, 2003 3:44 PM Buttonhole sewing The maximum buttonhole length is used for sewing buttonholes, are indicated below . 1 1 1 3 1 a Reinforcement stitching The names of parts of buttonhole b foot "A", and then insert the button that will be put through the buttonhole.
Users Manual - English
Page 92
... 46 or 47 . When sewing is finished, gently pull the gimp g thread to "Adjusting the stitch width" (page 56). Hook the gimp thread onto the part of a buttonhole foot "A" shown in the illustration. • For details, refer to remove any slack. c • For details, refer to the wrong side of the...
... 46 or 47 . When sewing is finished, gently pull the gimp g thread to "Adjusting the stitch width" (page 56). Hook the gimp thread onto the part of a buttonhole foot "A" shown in the illustration. • For details, refer to remove any slack. c • For details, refer to the wrong side of the...
Users Manual - English
Page 124
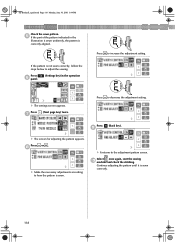
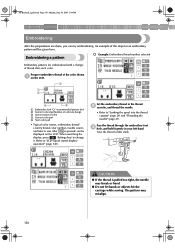
.... 118 SE-BrotherE_sgml.book Page 118 Monday, June 30, 2003 3:44 PM UTILITY STITCHES Check the sewn pattern. Press g (Next page key) twice. e If the part of the pattern indicated in the operation X The settings screen appears. Continue adjusting the pattern until it is sewn. Press or . h X Make the necessary adjustments...
.... 118 SE-BrotherE_sgml.book Page 118 Monday, June 30, 2003 3:44 PM UTILITY STITCHES Check the sewn pattern. Press g (Next page key) twice. e If the part of the pattern indicated in the operation X The settings screen appears. Continue adjusting the pattern until it is sewn. Press or . h X Make the necessary adjustments...
Users Manual - English
Page 149
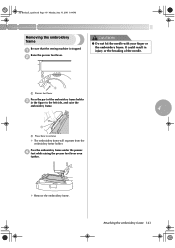
... the embroidery frame 143 a Raise the presser foot lever. It could result in injury or the breaking of the needle. 1 a Presser foot lever Press the part of the embroidery frame holder c in the figure to the left side, and raise the embroidery frame. 4 1 a Press here to remove X The embroidery frame will...
... the embroidery frame 143 a Raise the presser foot lever. It could result in injury or the breaking of the needle. 1 a Presser foot lever Press the part of the embroidery frame holder c in the figure to the left side, and raise the embroidery frame. 4 1 a Press here to remove X The embroidery frame will...
Users Manual - English
Page 156
... number selected Embroidery patterns are done, you can be given here. When switching the display, press (Settings key) to change of color d Current color part e Next color part • Typical color names, embroidery thread/ country thread color number, needle count , and time to sew (after each color. SE-BrotherE_sgml.book Page 150...
... number selected Embroidery patterns are done, you can be given here. When switching the display, press (Settings key) to change of color d Current color part e Next color part • Typical color names, embroidery thread/ country thread color number, needle count , and time to sew (after each color. SE-BrotherE_sgml.book Page 150...
Users Manual - English
Page 169
For a new shuttle (part code: XC3153-051), contact your nearest authorized service center. 1 ● Be sure that the projection on . 1 2 a Cleaning brush b Shuttle race • Do not apply oil ...
For a new shuttle (part code: XC3153-051), contact your nearest authorized service center. 1 ● Be sure that the projection on . 1 2 a Cleaning brush b Shuttle race • Do not apply oil ...

Users Manual - English
Page 181
... A operation panel Cover B operation problems 164 operations 17 optional accessories 1 overcasting stitches 74 P J 5 pant legs 43 joining 112 , joining stitch 96 108 parallel stitches 31 part names & functions Cover B , patchwork 96 98 L pattern combinations 119 pattern embroidery 150 layout adjustment 154 pattern realignment 117 LCD Cover E pattern recall 121 LCD button...
... A operation panel Cover B operation problems 164 operations 17 optional accessories 1 overcasting stitches 74 P J 5 pant legs 43 joining 112 , joining stitch 96 108 parallel stitches 31 part names & functions Cover B , patchwork 96 98 L pattern combinations 119 pattern embroidery 150 layout adjustment 154 pattern realignment 117 LCD Cover E pattern recall 121 LCD button...


