Users Manual - English
Page 11
.../reverse stitches or use an awl to pull up the bobbin thread. Otherwise, use a "Thread Cutter" button (if so equipped) at the ends, use a ribbon embroidery needle to pull the thread up to the wrong side of the fabric. a Wrong side of fabric b Surface of fabric Note • To ensure threads... cm (approx. 4 inches) of thread at the end of the stitching; In addition the threads may become tangled or the needle may break possibly causing machine damage.
.../reverse stitches or use an awl to pull up the bobbin thread. Otherwise, use a "Thread Cutter" button (if so equipped) at the ends, use a ribbon embroidery needle to pull the thread up to the wrong side of the fabric. a Wrong side of fabric b Surface of fabric Note • To ensure threads... cm (approx. 4 inches) of thread at the end of the stitching; In addition the threads may become tangled or the needle may break possibly causing machine damage.

Software Users Manual/4.0 Operation Manual - English
Page 3
... basting function has been added for embroidering fabric that cannot have stabilizer material affixed with the upgrade to version 4.0. • A border embroidery frame is included, allowing the fabric to easily be rehooped when embroidering repeated patterns. • 150 decorative stitch patterns have been added. ...( or ) 2 The machine can then be freely adjusted. ( ) • Two additional small fonts have been added. ( or ) • Two Cyrillic fonts ...
... basting function has been added for embroidering fabric that cannot have stabilizer material affixed with the upgrade to version 4.0. • A border embroidery frame is included, allowing the fabric to easily be rehooped when embroidering repeated patterns. • 150 decorative stitch patterns have been added. ...( or ) 2 The machine can then be freely adjusted. ( ) • Two additional small fonts have been added. ( or ) • Two Cyrillic fonts ...

Software Users Manual/4.0 Operation Manual - English
Page 4
... as curtains, chair covers, bed covers, tablecloths and blankets. d Press , and then recall the pattern from the CDROM to the sewing machine. a Copy the embroidery pattern from the USB media or computer to the computer. An added feature of this example, we will select an... embroidery pattern available on the sewing machine. CAUTION • Do not leave the border embroidery frame within the reach of the Operation Manual for embroidering repeated patterns while sliding the fabric. Memo &#...
... as curtains, chair covers, bed covers, tablecloths and blankets. d Press , and then recall the pattern from the CDROM to the sewing machine. a Copy the embroidery pattern from the USB media or computer to the computer. An added feature of this example, we will select an... embroidery pattern available on the sewing machine. CAUTION • Do not leave the border embroidery frame within the reach of the Operation Manual for embroidering repeated patterns while sliding the fabric. Memo &#...
Software Users Manual/4.0 Operation Manual - English
Page 9
... on the type of fabric and pattern that the embroidery unit carriage has moved to its initial position, even after the thread is cut, turn off the machine, manually move the carriage, and then remove the border embroidery frame. • Only move to its initial position.... a Raise the frame-securing lever and pull the border embroidery frame toward you. b Thread the machine, and then start embroidering. CAUTION • Do not touch the border embroidery frame while embroidering. → When embroidering is finished, the thread mark is used. ...
... on the type of fabric and pattern that the embroidery unit carriage has moved to its initial position, even after the thread is cut, turn off the machine, manually move the carriage, and then remove the border embroidery frame. • Only move to its initial position.... a Raise the frame-securing lever and pull the border embroidery frame toward you. b Thread the machine, and then start embroidering. CAUTION • Do not touch the border embroidery frame while embroidering. → When embroidering is finished, the thread mark is used. ...

Software Users Manual/4.0 Operation Manual - English
Page 11
CAUTION • If the sewing machine is turned off, then turned on again with the point of the thread mark. If the border embroidery frame is not fully removed from the Utility Stitch screen or the Character/Decorative Stitch screen while the border embroidery frame is moved. When the ...following message appears. Otherwise, the thread mark stitching may be combined with "Removing the Border Embroidery Frame". Note • Remove the thread mark before starting with the pattern stitching. 10 a a Needle position Note • After turning...
CAUTION • If the sewing machine is turned off, then turned on again with the point of the thread mark. If the border embroidery frame is not fully removed from the Utility Stitch screen or the Character/Decorative Stitch screen while the border embroidery frame is moved. When the ...following message appears. Otherwise, the thread mark stitching may be combined with "Removing the Border Embroidery Frame". Note • Remove the thread mark before starting with the pattern stitching. 10 a a Needle position Note • After turning...

Software Users Manual/4.0 Operation Manual - English
Page 12
...with thread. ■ If the Bobbin Runs Out of Thread If the bobbin runs out of the Operation Manual for the sewing machine. The following procedure describes how to replace the bobbin thread. Follow the procedure described below to select a pattern in chapter 5 of... thread while embroidering, the machine stops and a message appears. Memo • For details, refer to the embroidery unit. a Press . c Press the key of this guide. a Press . e Press , and then attach ...
...with thread. ■ If the Bobbin Runs Out of Thread If the bobbin runs out of the Operation Manual for the sewing machine. The following procedure describes how to replace the bobbin thread. Follow the procedure described below to select a pattern in chapter 5 of... thread while embroidering, the machine stops and a message appears. Memo • For details, refer to the embroidery unit. a Press . c Press the key of this guide. a Press . e Press , and then attach ...
Software Users Manual/4.0 Operation Manual - English
Page 15
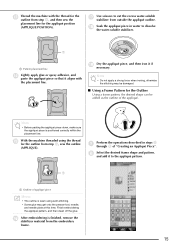
...with the placement line. To reduce shrinkage of the pattern, we recommend using thread for the cutting line that is embroidered, thread the machine with the thread for embroidering. h Fuse or stick a piece of stabilizer to remove the stabilizer material after sewing the appliqué ... area, the entire appliqué pattern may be misaligned with their sticky sides together, and then hoop them in the embroidery frame, attach the embroidery frame to be shrinking of water-soluble stabilizer, otherwise the stabilizer material may tear during embroidering. 14 After cutting, carefully...
...with the placement line. To reduce shrinkage of the pattern, we recommend using thread for the cutting line that is embroidered, thread the machine with the thread for embroidering. h Fuse or stick a piece of stabilizer to remove the stabilizer material after sewing the appliqué ... area, the entire appliqué pattern may be misaligned with their sticky sides together, and then hoop them in the embroidery frame, attach the embroidery frame to be shrinking of water-soluble stabilizer, otherwise the stabilizer material may tear during embroidering. 14 After cutting, carefully...
Software Users Manual/4.0 Operation Manual - English
Page 16
... the stabilizer material from outside the appliqué outline. s Dry the appliqué piece, and then iron it to the appliqué pattern. o With the machine threaded using satin stitching. • Some glue may be damaged. ■ Using a Frame Pattern for the Outline Using a frame pattern, the desired shape can be... thread for the outline from step m, sew the outline (APPLIQUE). a Perform the operations described in water to cut the excess water-soluble stabilizer from the embroidery frame. 15 m Thread the machine with the placement line.
... the stabilizer material from outside the appliqué outline. s Dry the appliqué piece, and then iron it to the appliqué pattern. o With the machine threaded using satin stitching. • Some glue may be damaged. ■ Using a Frame Pattern for the Outline Using a frame pattern, the desired shape can be... thread for the outline from step m, sew the outline (APPLIQUE). a Perform the operations described in water to cut the excess water-soluble stabilizer from the embroidery frame. 15 m Thread the machine with the placement line.

Software Users Manual/4.0 Operation Manual - English
Page 18
c Use to the previous screen. Memo • The setting remains selected even if the machine is connected. a Press . c Display P. 6 of the settings screen. b Display P. 3 of the settings screen. a Press or . Different background colors can be selected for...turned off. 17 b Press . Changing the Pointer Shape When a USB Mouse Is Used In the settings screen, the shape can be selected for the embroidery pattern and pattern thumbnails. d Press to return to select the pointer shape from the three settings available ( , and ). Changing the Background Colors of...
c Use to the previous screen. Memo • The setting remains selected even if the machine is connected. a Press . c Display P. 6 of the settings screen. b Display P. 3 of the settings screen. a Press or . Different background colors can be selected for...turned off. 17 b Press . Changing the Pointer Shape When a USB Mouse Is Used In the settings screen, the shape can be selected for the embroidery pattern and pattern thumbnails. d Press to return to select the pointer shape from the three settings available ( , and ). Changing the Background Colors of...
Software Users Manual/4.0 Operation Manual - English
Page 19
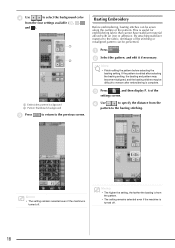
... the pattern. • The setting remains selected even if the machine is turned off . 18 By attaching stabilizer material to the fabric, shrinkage of the stitching or misaligned pattern can be prevented. a b a Embroidery pattern background b Pattern thumbnails background e Press to return to the... and then display P. 6 of the pattern. Basting Embroidery Before embroidering, basting stitches can be sewn along the outline of the settings screen. This is complete. Memo • The setting remains selected even if the machine is turned off . d Use to select the background...
... the pattern. • The setting remains selected even if the machine is turned off . 18 By attaching stabilizer material to the fabric, shrinkage of the stitching or misaligned pattern can be prevented. a b a Embroidery pattern background b Pattern thumbnails background e Press to return to the... and then display P. 6 of the pattern. Basting Embroidery Before embroidering, basting stitches can be sewn along the outline of the settings screen. This is complete. Memo • The setting remains selected even if the machine is turned off . d Use to select the background...

4.0 Installation Manual - English
Page 4
...application for version 4.0 • Update application for version 2.03 or later * For the newest version of 2.03 or later, visit www.brother.com. • Update application for version 3.10 or later * For the newest version of the patterns on the CD-ROM are provided.... is the color change table for the embroidery patterns on the CD-ROM. In the procedure area, indicates operations performed with the sewing machine and indicates operations performed with the computer. • Embroidery sheet This embroidery sheet is for the border embroidery frame. Accessories Check that the following .)...
...application for version 4.0 • Update application for version 2.03 or later * For the newest version of 2.03 or later, visit www.brother.com. • Update application for version 3.10 or later * For the newest version of the patterns on the CD-ROM are provided.... is the color change table for the embroidery patterns on the CD-ROM. In the procedure area, indicates operations performed with the sewing machine and indicates operations performed with the computer. • Embroidery sheet This embroidery sheet is for the border embroidery frame. Accessories Check that the following .)...
Operation manual of Alternate Bobbin Case
Page 1
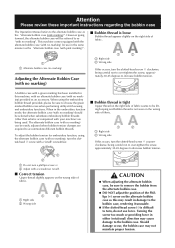
This machine comes equipped with the alternate bobbin case (with no marking) for embroidery function, using the embroidery bobbin thread provided, please be referred to as an accessory. When using the alternate bobbin case (with no marking". To adjust the bobbin ... marking) Adjusting the Alternate Bobbin Case (with no marking) ■ Bobbin thread is loose Bobbin thread appears slightly on the alternate bobbin case as this machine, with an alternate bobbin case (with no marking) provided as "with no marking), turn the slotted-head (-) screw with a (small) screwdriver. ■ ...
This machine comes equipped with the alternate bobbin case (with no marking) for embroidery function, using the embroidery bobbin thread provided, please be referred to as an accessory. When using the alternate bobbin case (with no marking". To adjust the bobbin ... marking) Adjusting the Alternate Bobbin Case (with no marking) ■ Bobbin thread is loose Bobbin thread appears slightly on the alternate bobbin case as this machine, with an alternate bobbin case (with no marking) provided as "with no marking), turn the slotted-head (-) screw with a (small) screwdriver. ■ ...

Operation Manual
Page 1
Computerized Sewing and Embroidery Machine Operation Manual Getting Ready Sewing Basics Utility Stitches Character/ Decorative Stitches Embroidery Embroidery Edit My Custom Stitch Appendix Please visit us at http://solutions.brother.com when you can get product support and answers to frequently asked questions (FAQs).
Computerized Sewing and Embroidery Machine Operation Manual Getting Ready Sewing Basics Utility Stitches Character/ Decorative Stitches Embroidery Embroidery Edit My Custom Stitch Appendix Please visit us at http://solutions.brother.com when you can get product support and answers to frequently asked questions (FAQs).
Operation Manual
Page 6
...the foot controller. 4. For additional product information and updates, visit our web site at www.brother.com The contents of this product are subject to play with this machine. Do not place or store the machine near a space heater, iron, halogen lamp, or other parts to malfunction. 6. The ...cord or plug, if it is not working properly, if it has been dropped or damaged, or water is the most advanced computerized household embroidery and sewing machine. Do not touch the handwheel, thread take-up, needle, or other parts • A power failure occurs during use extension cords. 5....
...the foot controller. 4. For additional product information and updates, visit our web site at www.brother.com The contents of this product are subject to play with this machine. Do not place or store the machine near a space heater, iron, halogen lamp, or other parts to malfunction. 6. The ...cord or plug, if it is not working properly, if it has been dropped or damaged, or water is the most advanced computerized household embroidery and sewing machine. Do not touch the handwheel, thread take-up, needle, or other parts • A power failure occurs during use extension cords. 5....
Operation Manual
Page 8
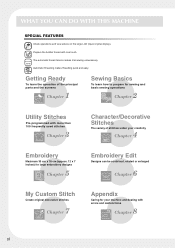
... automatic thread tension makes trial sewing unnecessary. Automatic threading makes threading quick and easy. WHAT YOU CAN DO WITH THIS MACHINE SPECIAL FEATURES Check operations and view advice on the large LCD (liquid crystal display). Getting Ready To learn the operation ...18 cm (approx. 12 x 7 inches) for large embroidery designs 5 Chapter Page 143 My Custom Stitch Create original decorative stitches 7 Chapter Page 225 Embroidery Edit Designs can be combined, rotated or enlarged 6 Chapter Page 197 Appendix Caring for your machine and dealing with one touch. Prepare the bobbin thread ...
... automatic thread tension makes trial sewing unnecessary. Automatic threading makes threading quick and easy. WHAT YOU CAN DO WITH THIS MACHINE SPECIAL FEATURES Check operations and view advice on the large LCD (liquid crystal display). Getting Ready To learn the operation ...18 cm (approx. 12 x 7 inches) for large embroidery designs 5 Chapter Page 143 My Custom Stitch Create original decorative stitches 7 Chapter Page 225 Embroidery Edit Designs can be combined, rotated or enlarged 6 Chapter Page 197 Appendix Caring for your machine and dealing with one touch. Prepare the bobbin thread ...
Operation Manual
Page 9
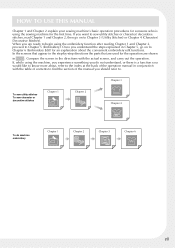
When you are shown in Chapter 5, go on to Chapter 6 (Embroidery Edit) for the first time. If, while using the machine, you experience something you do machine embroidery Chapter 1 Chapter 2 Chapter 5 Chapter 6 vii Once you understand the steps explained in . Compare the screen...Stitches). HOW TO USE THIS MANUAL Chapter 1 and Chapter 2 explain your sewing machine's basic operation procedures for someone who is a function you would like to know more about the convenient embroidery edit functions. In the screens that appear in conjunction with the actual screen, and...
When you are shown in Chapter 5, go on to Chapter 6 (Embroidery Edit) for the first time. If, while using the machine, you experience something you do machine embroidery Chapter 1 Chapter 2 Chapter 5 Chapter 6 vii Once you understand the steps explained in . Compare the screen...Stitches). HOW TO USE THIS MANUAL Chapter 1 and Chapter 2 explain your sewing machine's basic operation procedures for someone who is a function you would like to know more about the convenient embroidery edit functions. In the screens that appear in conjunction with the actual screen, and...
Operation Manual
Page 10
... in the Computer 139 Retrieving Stitch Patterns from the Machine's Memory ........140 Recalling from USB Media 141 Recalling from the Computer 142 Chapter 5 Embroidery 143 BEFORE EMBROIDERING 144 Embroidery Step by Step 144 Attaching Embroidery Foot "W 145 Attaching the Embroidery Unit 146 SELECTING PATTERNS 149 Selecting Embroidery Patterns/Heirloom Patterns/Border Patterns/Cross stitch Patterns/Floral...
... in the Computer 139 Retrieving Stitch Patterns from the Machine's Memory ........140 Recalling from USB Media 141 Recalling from the Computer 142 Chapter 5 Embroidery 143 BEFORE EMBROIDERING 144 Embroidery Step by Step 144 Attaching Embroidery Foot "W 145 Attaching the Embroidery Unit 146 SELECTING PATTERNS 149 Selecting Embroidery Patterns/Heirloom Patterns/Border Patterns/Cross stitch Patterns/Floral...
Operation Manual
Page 11
...Function (JUMP STITCH TRIM 175 Adjusting the Embroidery Speed 176 CARE AND MAINTENANCE 236 Cleaning the LCD Screen 236 Cleaning the Machine Casing 236 Cleaning the Race 236 3 Precautions on Storing the Machine 237 ADJUSTING THE SCREEN 238 Screen Visibility ...184 USING THE MEMORY FUNCTION 185 Embroidery Data Precautions 185 6 Saving Embroidery Patterns in the Machine's Memory ........187 Saving Embroidery Patterns to USB Media (Commercially Available 189 Saving Embroidery Patterns in the Computer 190 Retrieving Patterns from the Machine's Memory 191 Recalling from USB...
...Function (JUMP STITCH TRIM 175 Adjusting the Embroidery Speed 176 CARE AND MAINTENANCE 236 Cleaning the LCD Screen 236 Cleaning the Machine Casing 236 Cleaning the Race 236 3 Precautions on Storing the Machine 237 ADJUSTING THE SCREEN 238 Screen Visibility ...184 USING THE MEMORY FUNCTION 185 Embroidery Data Precautions 185 6 Saving Embroidery Patterns in the Machine's Memory ........187 Saving Embroidery Patterns to USB Media (Commercially Available 189 Saving Embroidery Patterns in the Computer 190 Retrieving Patterns from the Machine's Memory 191 Recalling from USB...
Operation Manual
Page 197
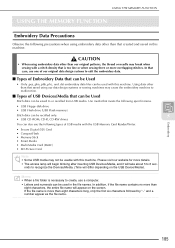
...followed by "~" and a number appear as the file name. 185 I Types of USB media with this machine. Stitch data can be recalled only. 5 • USB CD-ROM, CD-R, CD-RW drives Embroidery You can be usable with the USB Memory Card Reader/Writer. • Secure Digital (SD) Card ... Memory Stick • Smart Media • Multi Media Card (MMC) • XD-Picture Card Note • Some USB media may cause the embroidery machine to malfunction. In addition, if the file name contains no more overlapping stitches. Use media that can be Used • Only .pes,.pha,.phb,.phc...
...followed by "~" and a number appear as the file name. 185 I Types of USB media with this machine. Stitch data can be recalled only. 5 • USB CD-ROM, CD-R, CD-RW drives Embroidery You can be usable with the USB Memory Card Reader/Writer. • Secure Digital (SD) Card ... Memory Stick • Smart Media • Multi Media Card (MMC) • XD-Picture Card Note • Some USB media may cause the embroidery machine to malfunction. In addition, if the file name contains no more overlapping stitches. Use media that can be Used • Only .pes,.pha,.phb,.phc...

Operation Manual
Page 202
...8594; The "Removable Disk" icon will lose the pattern you want to your computer. Note • The connectors on the computer and embroidery machine whether or not they are saving. a USB port connector for the corresponding equipment. → The pattern will be temporarily retrieved from and ...the .phc file in "My Computer" on . USING THE MEMORY FUNCTION Saving Embroidery Patterns in the Computer b Press when the pattern you are turned on the computer. Using the included USB cable, the machine can only be plugged into a connector in the sewing screen. Note •...
...8594; The "Removable Disk" icon will lose the pattern you want to your computer. Note • The connectors on the computer and embroidery machine whether or not they are saving. a USB port connector for the corresponding equipment. → The pattern will be temporarily retrieved from and ...the .phc file in "My Computer" on . USING THE MEMORY FUNCTION Saving Embroidery Patterns in the Computer b Press when the pattern you are turned on the computer. Using the included USB cable, the machine can only be plugged into a connector in the sewing screen. Note •...


