
Users Manual - English
Page 10
... We recommend an upper thread tension that there is equipped with automatic thread cutting turned on adjusting the stitch length and stitch width, refer to the machine's Operation Manual. h Align the upper thread and bobbin thread, and then pass them under the presser foot toward the rear of simple stitches: , , n Select a low speed, gently hold the threads behind the presser foot and start sewing. Select a stitch. p CAUTION • Before sewing, make sure the automatic thread cutting and automatic reinforcement/reverse stitching have been...
... We recommend an upper thread tension that there is equipped with automatic thread cutting turned on adjusting the stitch length and stitch width, refer to the machine's Operation Manual. h Align the upper thread and bobbin thread, and then pass them under the presser foot toward the rear of simple stitches: , , n Select a low speed, gently hold the threads behind the presser foot and start sewing. Select a stitch. p CAUTION • Before sewing, make sure the automatic thread cutting and automatic reinforcement/reverse stitching have been...

Software Users Manual/4.0 Operation Manual - English
Page 3
... perform the upgrade according to easily be rehooped when embroidering repeated patterns. • 150 decorative stitch patterns have been added as described in the Operation Manual. New machine features and benefits are described in the Installation Guide. Before You Start It is used as border patterns. ( or ) • Appliqué pieces can be created. ( ) • The pointer that the character spacing can be freely adjusted. ( ) •...
... perform the upgrade according to easily be rehooped when embroidering repeated patterns. • 150 decorative stitch patterns have been added as described in the Operation Manual. New machine features and benefits are described in the Installation Guide. Before You Start It is used as border patterns. ( or ) • Appliqué pieces can be created. ( ) • The pointer that the character spacing can be freely adjusted. ( ) •...

Software Users Manual/3.0 Operation Manual - English
Page 11
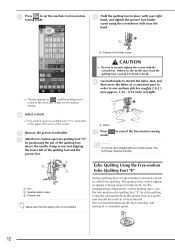
... middle (center) needle position. Memo • When starting to sew, the internal sensor detects the thickness of the machine's Operation Manual to attach the straight stitch needle plate. 1 a Single hole Memo Notice that this mode, the presser foot is raised to the necessary height for freemotion sewing using free-motion quilting foot "C", be necessary to adjust the upper thread tension. Test with the speed control slide on page 55 through 56 of the fabric, and the quilting foot is used for free-motion sewing. •...
... middle (center) needle position. Memo • When starting to sew, the internal sensor detects the thickness of the machine's Operation Manual to attach the straight stitch needle plate. 1 a Single hole Memo Notice that this mode, the presser foot is raised to the necessary height for freemotion sewing using free-motion quilting foot "C", be necessary to adjust the upper thread tension. Test with the speed control slide on page 55 through 56 of the fabric, and the quilting foot is used for free-motion sewing. •...
Software Users Manual/3.0 Operation Manual - English
Page 12
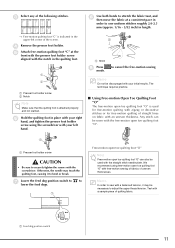
...a Feed dog position switch 11 a Presser foot holder screw CAUTION • Be sure to lower the feed dogs. d Remove the presser foot holder. The technique requires practice. ■ Using Free-motion Open Toe Quilting Foot "O" The free-motion open toe quilting foot "O" is attached properly and not slanted. to a Free-motion open toe quilting foot "O" Note Free-motion open toe quilting foot "O" can be necessary to cancel the free-motion sewing Memo Do not be used for free-motion quilting with zigzag or decorative stitches or for free-motion quilting of straight lines on fabric...
...a Feed dog position switch 11 a Presser foot holder screw CAUTION • Be sure to lower the feed dogs. d Remove the presser foot holder. The technique requires practice. ■ Using Free-motion Open Toe Quilting Foot "O" The free-motion open toe quilting foot "O" is attached properly and not slanted. to a Free-motion open toe quilting foot "O" Note Free-motion open toe quilting foot "O" can be necessary to cancel the free-motion sewing Memo Do not be used for free-motion quilting with zigzag or decorative stitches or for free-motion quilting of straight lines on fabric...
Software Users Manual/3.0 Operation Manual - English
Page 13
.... e Hold the quilting foot in the upper-left of the quilting foot and the presser bar. a Press to set the machine to the necessary height for echo quilting. a Presser foot holder screw → The key appears as a guide, sew around a motif is not slanted. c Remove the presser foot holder. We recommend attaching the foot controller and sewing at a fixed interval. b Select a stitch. → Free-motion open toe quilting foot "O" by positioning the pin of the quilting foot above the needle clamp screw and aligning the lower-left corner of...
.... e Hold the quilting foot in the upper-left of the quilting foot and the presser bar. a Press to set the machine to the necessary height for echo quilting. a Presser foot holder screw → The key appears as a guide, sew around a motif is not slanted. c Remove the presser foot holder. We recommend attaching the foot controller and sewing at a fixed interval. b Select a stitch. → Free-motion open toe quilting foot "O" by positioning the pin of the quilting foot above the needle clamp screw and aligning the lower-left corner of...
3.0 Installation Manual - English
Page 4
... the sewing machine and indicates operations performed with the computer. • Free-motion open toe quilting foot "O" This presser foot is finished, the sewing machine automatically restarts. 2 Installation Overview In addition, three presser feet, which are useful for freemotion quilting, and a bobbin cover with a scale for version 3.0 on fabric with an uneven thickness. • Echo quilting foot "E" This presser foot is a reference for straight stitches with the needle in the middle (center) position. [Step 1] Make a note of the machine number (NO.). [Step 2] Insert...
... the sewing machine and indicates operations performed with the computer. • Free-motion open toe quilting foot "O" This presser foot is finished, the sewing machine automatically restarts. 2 Installation Overview In addition, three presser feet, which are useful for freemotion quilting, and a bobbin cover with a scale for version 3.0 on fabric with an uneven thickness. • Echo quilting foot "E" This presser foot is a reference for straight stitches with the needle in the middle (center) position. [Step 1] Make a note of the machine number (NO.). [Step 2] Insert...
Operation Manual
Page 9
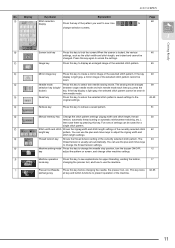
... Accessories 3 Options 6 Chapter 1 Getting Ready 7 TURNING THE MACHINE ON/OFF 8 LCD SCREEN 9 Using the Machine Setting Mode Key 12 Using the Machine Operation Mode Key 17 Using the Pattern Explanation Key 18 LOWER THREADING 19 Winding the Bobbin 19 Setting the Bobbin 22 Pulling Up the Bobbin Thread 23 UPPER THREADING 25 Threading Using the "Automatic Threading" Button 25 Threading Manually 27 Using the Twin Needle Mode 29 Using Threads that Unwind Quickly 31 CHANGING THE PRESSER FOOT 32 Removing the Presser Foot 32 Attaching the Presser Foot 32 Attaching the Walking Foot...
... Accessories 3 Options 6 Chapter 1 Getting Ready 7 TURNING THE MACHINE ON/OFF 8 LCD SCREEN 9 Using the Machine Setting Mode Key 12 Using the Machine Operation Mode Key 17 Using the Pattern Explanation Key 18 LOWER THREADING 19 Winding the Bobbin 19 Setting the Bobbin 22 Pulling Up the Bobbin Thread 23 UPPER THREADING 25 Threading Using the "Automatic Threading" Button 25 Threading Manually 27 Using the Twin Needle Mode 29 Using Threads that Unwind Quickly 31 CHANGING THE PRESSER FOOT 32 Removing the Presser Foot 32 Attaching the Presser Foot 32 Attaching the Walking Foot...
Operation Manual
Page 10
... MAKING EMBROIDERY ADJUSTMENTS .........154 TROUBLESHOOTING 214 Adjusting Thread Tension 154 Using the Automatic Thread Cutting Function (END COLOR TRIM 155 Using the Thread Trimming Function (JUMP STITCH TRIM) 155 Adjusting the Embroidery Speed 156 Changing the Thread Color Display 157 ERROR MESSAGES 217 SPECIFICATIONS 223 UPGRADING YOUR MACHINE'S SOFTWARE. 224 3 Upgrade Procedure Using USB Media 224 Upgrade Procedure Using Computer 224 Changing the Embroidery Frame Display 158 REVISING THE PATTERN 159 Changing the Pattern Position 159 Aligning the Pattern and the Needle...
... MAKING EMBROIDERY ADJUSTMENTS .........154 TROUBLESHOOTING 214 Adjusting Thread Tension 154 Using the Automatic Thread Cutting Function (END COLOR TRIM 155 Using the Thread Trimming Function (JUMP STITCH TRIM) 155 Adjusting the Embroidery Speed 156 Changing the Thread Color Display 157 ERROR MESSAGES 217 SPECIFICATIONS 223 UPGRADING YOUR MACHINE'S SOFTWARE. 224 3 Upgrade Procedure Using USB Media 224 Upgrade Procedure Using Computer 224 Changing the Embroidery Frame Display 158 REVISING THE PATTERN 159 Changing the Pattern Position 159 Aligning the Pattern and the Needle...
Operation Manual
Page 12
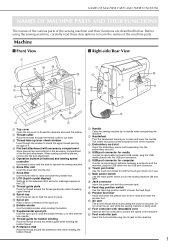
... thread the machine and wind the bobbin. c Thread take-up lever check window Look through the thread cutter to raise and lower the presser foot. Do not cover the air vent while the sewing machine is being used. h Jack connector Insert the power cord into the USB port connector. l Bobbin winder Use the bobbin winder when winding the bobbin. o Pretension disk Pass the thread around the thread guide plate when threading upper thread. j Presser foot lever Raise and lower the presser foot lever to lower the feed dogs. n Thread guide for computer In order to USB...
... thread the machine and wind the bobbin. c Thread take-up lever check window Look through the thread cutter to raise and lower the presser foot. Do not cover the air vent while the sewing machine is being used. h Jack connector Insert the power cord into the USB port connector. l Bobbin winder Use the bobbin winder when winding the bobbin. o Pretension disk Pass the thread around the thread guide plate when threading upper thread. j Presser foot lever Raise and lower the presser foot lever to lower the feed dogs. n Thread guide for computer In order to USB...

Operation Manual
Page 13
.... d Bobbin cover Open the bobbin cover to remove the embroidery unit. e Needle clamp screw Use the needle clamp screw to raise and lower the feed dogs while the embroidery unit is located at right when embroidering. • You can also sew utility/decorative stitches with the one-step buttonhole foot to create buttonholes. NAMES OF MACHINE PARTS AND THEIR FUNCTIONS Needle and Presser Foot Section Embroidery Unit f i a b e g d e f h c d b a c a Presser foot holder The presser foot is used with the embroidery unit attached. g Needle bar thread guides Pass the upper thread...
.... d Bobbin cover Open the bobbin cover to remove the embroidery unit. e Needle clamp screw Use the needle clamp screw to raise and lower the feed dogs while the embroidery unit is located at right when embroidering. • You can also sew utility/decorative stitches with the one-step buttonhole foot to create buttonholes. NAMES OF MACHINE PARTS AND THEIR FUNCTIONS Needle and Presser Foot Section Embroidery Unit f i a b e g d e f h c d b a c a Presser foot holder The presser foot is used with the embroidery unit attached. g Needle bar thread guides Pass the upper thread...

Operation Manual
Page 14
... this button to lower the presser foot and apply pressure to sew reinforcement stitches at the beginning and end of sewing. Otherwise, the needle may break, the threads may occur. Beginners should sew at the speed set by the sewing speed controller. d "Thread Cutter" button Press this button and the machine will sew reverse stitches at higher speeds. a a Latches 3 Operation Buttons NAMES OF MACHINE PARTS AND THEIR FUNCTIONS Included Accessories Pull the top of the flat bed attachment to automatically trim the excess thread. c "Needle Position" button Use...
... this button to lower the presser foot and apply pressure to sew reinforcement stitches at the beginning and end of sewing. Otherwise, the needle may break, the threads may occur. Beginners should sew at the speed set by the sewing speed controller. d "Thread Cutter" button Press this button and the machine will sew reverse stitches at higher speeds. a a Latches 3 Operation Buttons NAMES OF MACHINE PARTS AND THEIR FUNCTIONS Included Accessories Pull the top of the flat bed attachment to automatically trim the excess thread. c "Needle Position" button Use...
Operation Manual
Page 16
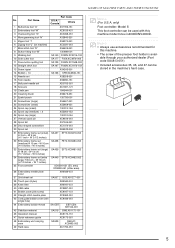
... screw) XC8167-151 42 Straight stitch needle plate XC8362-051 43 Cord guide bobbin cover (with this machine. • The screw of the presser foot holder is avail- Memo • Always use accessories recommended for this machine model Innov-ís4000D/NV4000D. able through your authorized dealer (Part code XA4813-051). • Included accessories 35, 46, and 47 can be stored in the machine's hard case. 5 NAMES OF MACHINE PARTS AND THEIR FUNCTIONS Part Code No. only) Foot controller: Model S This foot controller...
... screw) XC8167-151 42 Straight stitch needle plate XC8362-051 43 Cord guide bobbin cover (with this machine. • The screw of the presser foot holder is avail- Memo • Always use accessories recommended for this machine model Innov-ís4000D/NV4000D. able through your authorized dealer (Part code XA4813-051). • Included accessories 35, 46, and 47 can be stored in the machine's hard case. 5 NAMES OF MACHINE PARTS AND THEIR FUNCTIONS Part Code No. only) Foot controller: Model S This foot controller...
Operation Manual
Page 22
... twin needle sewing mode. s Machine setting mode Press this key to change the thread tension settings. If the key display is locked, the various 46 settings, such as the stitch width and stitch length, are locked and cannot be sewn in twin needle mode. Five sets of the selected stitch pattern cannot be saved for upper threading, winding the bobbin, 17 mode key changing the presser foot, and how to use the plus and minus keys to change the needle...
... twin needle sewing mode. s Machine setting mode Press this key to change the thread tension settings. If the key display is locked, the various 46 settings, such as the stitch width and stitch length, are locked and cannot be sewn in twin needle mode. Five sets of the selected stitch pattern cannot be saved for upper threading, winding the bobbin, 17 mode key changing the presser foot, and how to use the plus and minus keys to change the needle...

Operation Manual
Page 51
... lower the presser foot and start Sewing Curves Sew slowly while keeping the seam parallel with model Innov-ís 4000D/NV4000D Sewing Reinforcement Stitches Changing Sewing Direction Stop the machine. Using the needle as a pivot, turn the fabric so that you guide the fabric around the curve. Reverse/reinforcement stitches are generally necessary at the corner point. You can sew in the fabric, and press the "Presser Foot Lifter" button to raise the presser foot. When edge stitching a short stitch length close to sew, sew a basting thread...
... lower the presser foot and start Sewing Curves Sew slowly while keeping the seam parallel with model Innov-ís 4000D/NV4000D Sewing Reinforcement Stitches Changing Sewing Direction Stop the machine. Using the needle as a pivot, turn the fabric so that you guide the fabric around the curve. Reverse/reinforcement stitches are generally necessary at the corner point. You can sew in the fabric, and press the "Presser Foot Lifter" button to raise the presser foot. When edge stitching a short stitch length close to sew, sew a basting thread...
Operation Manual
Page 67
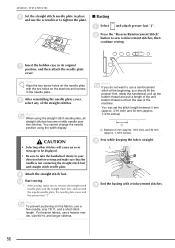
...Insert the bobbin case in your direction before sewing and make sure to turn the handwheel slowly in position, and then attach its original the needle plate cover. i Attach the straight stitch foot. b Press the "Reverse/Reinforcement Stitch" button to use a fine needle, size 75/11, and a short stitch length. You cannot change the needle position using the straight stitch needle plate, all straight stitches become middle needle position stitches. d End the basting with the two holes on the machine and screws in place the plate. ■ Basting a Select and attach presser...
...Insert the bobbin case in your direction before sewing and make sure to turn the handwheel slowly in position, and then attach its original the needle plate cover. i Attach the straight stitch foot. b Press the "Reverse/Reinforcement Stitch" button to use a fine needle, size 75/11, and a short stitch length. You cannot change the needle position using the straight stitch needle plate, all straight stitches become middle needle position stitches. d End the basting with the two holes on the machine and screws in place the plate. ■ Basting a Select and attach presser...
Operation Manual
Page 225
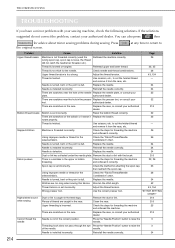
... Upper thread breaks Machine is not threaded correctly (used the Rethread the machine correctly. 25 wrong spool cap, spool cap is loose, the thread did not catch the needle bar threader, etc.) Thread is twisted. and remove it from the race, etc. Replace the needle. 34 Needle is installed incorrectly. There are scratches near the hole in the presser Replace the presser foot, or consult your authorized 210 dealer. Combination" chart. Adjust the thread tension. 43, 154 Wrong presser foot. needle...
... Upper thread breaks Machine is not threaded correctly (used the Rethread the machine correctly. 25 wrong spool cap, spool cap is loose, the thread did not catch the needle bar threader, etc.) Thread is twisted. and remove it from the race, etc. Replace the needle. 34 Needle is installed incorrectly. There are scratches near the hole in the presser Replace the presser foot, or consult your authorized 210 dealer. Combination" chart. Adjust the thread tension. 43, 154 Wrong presser foot. needle...
Operation Manual
Page 226
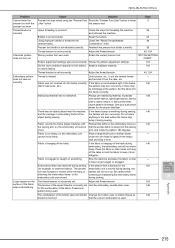
... table during sewing. Adjust the thread tension. 43, 154 Embroidery pattern Thread is snagged or caught on thin fabrics Attach a stabilizer material. 102 or stretch fabrics. Reset the bobbin. 22 Using improper needle or thread for threading the machine 25 and rethread the machine. Adjust the thread tension. 43, 154 Character pattern does not turn out poorly or there may turn out Wrong presser foot was moved. presser foot lever Thread tension is incorrect Upper threading is used . the pattern may be shrinkage of the bobbin case...
... table during sewing. Adjust the thread tension. 43, 154 Embroidery pattern Thread is snagged or caught on thin fabrics Attach a stabilizer material. 102 or stretch fabrics. Reset the bobbin. 22 Using improper needle or thread for threading the machine 25 and rethread the machine. Adjust the thread tension. 43, 154 Character pattern does not turn out poorly or there may turn out Wrong presser foot was moved. presser foot lever Thread tension is incorrect Upper threading is used . the pattern may be shrinkage of the bobbin case...
Operation Manual
Page 227
... not operate Main power switch is pressed The screen has been locked. Reattach the embroidery unit correctly. 128 Embroidery frame was not pushed. to control the zigzag Use the foot controller instead of the "Start/ 39 stitch width. Replace the needle. 34 Fabric does not feed Feed dogs are scratches around the hole(s) in the down position. Use the feed dog position lever to operate the machine. TROUBLESHOOTING Problem Cause Solution Page Needle breaks Needle is defective. Combination" chart. Adjust the thread tension setting. 43, 154 Fabric...
... not operate Main power switch is pressed The screen has been locked. Reattach the embroidery unit correctly. 128 Embroidery frame was not pushed. to control the zigzag Use the foot controller instead of the "Start/ 39 stitch width. Replace the needle. 34 Fabric does not feed Feed dogs are scratches around the hole(s) in the down position. Use the feed dog position lever to operate the machine. TROUBLESHOOTING Problem Cause Solution Page Needle breaks Needle is defective. Combination" chart. Adjust the thread tension setting. 43, 154 Fabric...
Operation Manual
Page 245
... 99 Cleaning LCD screen 210 machine casing 210 race 210 Combining Patterns 234 character/decorative stitches 110 embroidery edit 195 Cord guide bobbin cover 61 Crazy quilt 61 , Custom Thread Table 188 189 Cut/Tension key 154 D Darning 86 Dart seam 57 Density key 162 E Edit end key 194 Editing character/decorative stitches 105 embroidery 159 embroidery edit 181 MY CUSTOM STITCH 202 Elastic zigzag stitches 62 Elongation key 107 Embroidery adjusting the speed 156 automatic thread cutting...
... 99 Cleaning LCD screen 210 machine casing 210 race 210 Combining Patterns 234 character/decorative stitches 110 embroidery edit 195 Cord guide bobbin cover 61 Crazy quilt 61 , Custom Thread Table 188 189 Cut/Tension key 154 D Darning 86 Dart seam 57 Density key 162 E Edit end key 194 Editing character/decorative stitches 105 embroidery 159 embroidery edit 181 MY CUSTOM STITCH 202 Elastic zigzag stitches 62 Elongation key 107 Embroidery adjusting the speed 156 automatic thread cutting...

Operation Manual
Page 246
...-directional sewing 93 MY CUSTOM STITCH designing 200 entering data 202 key functions 202 retrieving 208 saving 207 storing in your list 207 N Needle changing the needle 34 changing the needle position 55 fabric/thread/needle combinations 36 mode 9 twin needle 29 Needle bar thread guides 2 28, 29 Needle clamp screw 2 Needle mode selection key 29 Needle plate 2 Needle position 55 Needle Position button 3 O , Operation buttons 1 3 Overcasting 60 62, 63 P Patchwork 61 Piecing 68 Pintuck 59 Point delete key 204 Power cord 8 Presser foot attaching 32 removing 32 types...
...-directional sewing 93 MY CUSTOM STITCH designing 200 entering data 202 key functions 202 retrieving 208 saving 207 storing in your list 207 N Needle changing the needle 34 changing the needle position 55 fabric/thread/needle combinations 36 mode 9 twin needle 29 Needle bar thread guides 2 28, 29 Needle clamp screw 2 Needle mode selection key 29 Needle plate 2 Needle position 55 Needle Position button 3 O , Operation buttons 1 3 Overcasting 60 62, 63 P Patchwork 61 Piecing 68 Pintuck 59 Point delete key 204 Power cord 8 Presser foot attaching 32 removing 32 types...


