Users Manual - English
Page 11
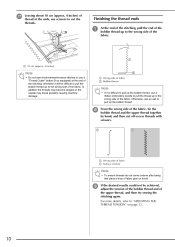
In addition the threads may become tangled or the needle may break possibly causing machine damage. Otherwise, use a ribbon embroidery needle to pull the thread up to the wrong side of the fabric. b From the wrong side of the fabric, tie the bobbin thread and ...
In addition the threads may become tangled or the needle may break possibly causing machine damage. Otherwise, use a ribbon embroidery needle to pull the thread up to the wrong side of the fabric. b From the wrong side of the fabric, tie the bobbin thread and ...

Users Manual - English
Page 5
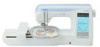
...Brother dealer. Do not use extension cords. If the problem persists, please consult your eye on the foot controller. 4. Do not drop or hit the machine. 4. Be sure to turn off the power switch and unplug the cord when: • Operation is the most advanced computerized household embroidery and sewing machine.... Do not use or store the machine near a space heater, iron, halogen lamp, or other moving parts. 2. When storing this manual...
...Brother dealer. Do not use extension cords. If the problem persists, please consult your eye on the foot controller. 4. Do not drop or hit the machine. 4. Be sure to turn off the power switch and unplug the cord when: • Operation is the most advanced computerized household embroidery and sewing machine.... Do not use or store the machine near a space heater, iron, halogen lamp, or other moving parts. 2. When storing this manual...

Users Manual - English
Page 6
... from selecting patterns to sewing, as well as operations such as combining and editing patterns to rotate or resize them and utilizing more advanced embroidery patterns and combine patterns. Chapter 1 Chapter 2 Chapter 4 To embroider Continue with chapter 4 to learn how to edit more useful functions... 2 Chapter 3 To sew characters and patterns Continue with chapter 5 to learn how to select a stitch and sew using this machine and the basic sewing operations. Perform the operations while comparing the screens in blue. To sew utility stitches Continue with those that appear...
... from selecting patterns to sewing, as well as operations such as combining and editing patterns to rotate or resize them and utilizing more advanced embroidery patterns and combine patterns. Chapter 1 Chapter 2 Chapter 4 To embroider Continue with chapter 4 to learn how to edit more useful functions... 2 Chapter 3 To sew characters and patterns Continue with chapter 5 to learn how to select a stitch and sew using this machine and the basic sewing operations. Perform the operations while comparing the screens in blue. To sew utility stitches Continue with those that appear...

Users Manual - English
Page 7
... Tuck Stitching 68 Scalloping 68 Top Stitching 69 Chapter 5 Embroidery 109 BEFORE EMBROIDERING 110 Attaching Embroidery Foot "U 111 Attaching the Embroidery Unit 112 SELECTING EMBROIDERY PATTERNS 114 One-point Patterns/Floral Patterns 115 Alphabet Patterns 116 Frame Patterns 117 Embroidery Cards 118 Selecting Patterns from the Machine's Memory/ Computer 118 VIEWING THE SEWING SCREEN 119 PREPARING...
... Tuck Stitching 68 Scalloping 68 Top Stitching 69 Chapter 5 Embroidery 109 BEFORE EMBROIDERING 110 Attaching Embroidery Foot "U 111 Attaching the Embroidery Unit 112 SELECTING EMBROIDERY PATTERNS 114 One-point Patterns/Floral Patterns 115 Alphabet Patterns 116 Frame Patterns 117 Embroidery Cards 118 Selecting Patterns from the Machine's Memory/ Computer 118 VIEWING THE SEWING SCREEN 119 PREPARING...

Users Manual - English
Page 8
... 138 Changing the Thread Color Display 138 USING THE MEMORY FUNCTION 140 Embroidery Data Precautions 140 Saving Embroidery Patterns in the Machine's Memory 141 Saving Embroidery Patterns to the Computer 142 Retrieving Patterns from the Machine's Memory...... 143 Retrieving Patterns from the Computer 144 EMBROIDERY APPLICATIONS 146 Using a Frame Pattern to Make an Appliqué (1)....... 146...
... 138 Changing the Thread Color Display 138 USING THE MEMORY FUNCTION 140 Embroidery Data Precautions 140 Saving Embroidery Patterns in the Machine's Memory 141 Saving Embroidery Patterns to the Computer 142 Retrieving Patterns from the Machine's Memory...... 143 Retrieving Patterns from the Computer 144 EMBROIDERY APPLICATIONS 146 Using a Frame Pattern to Make an Appliqué (1)....... 146...

Users Manual - English
Page 10
... the bobbin thread. p Bobbin winding thread guide Pass the thread around this thread guide when winding the bobbin thread. a Handle When transporting the machine, carry it is being used . b Handwheel Turn the handwheel toward you to sew one stitch or to lower the feed dogs. k Feed... be viewed and edited, and operations for using utility stitches. m Bobbin winder Use the bobbin winder when winding the bobbin. c Embroidery card slot Insert the embroidery cards (sold separately) into the slot. e Thread cutter Pass the threads through the window to control the speed of the foot ...
... the bobbin thread. p Bobbin winding thread guide Pass the thread around this thread guide when winding the bobbin thread. a Handle When transporting the machine, carry it is being used . b Handwheel Turn the handwheel toward you to sew one stitch or to lower the feed dogs. k Feed... be viewed and edited, and operations for using utility stitches. m Bobbin winder Use the bobbin winder when winding the bobbin. c Embroidery card slot Insert the embroidery cards (sold separately) into the slot. e Thread cutter Pass the threads through the window to control the speed of the foot ...
Users Manual - English
Page 11
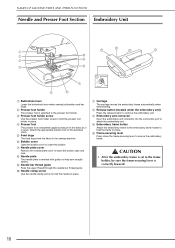
... embroidery unit. c Embroidery unit connector Insert the embroidery ...selected stitch. CAUTION • After the embroidery frame is correctly lowered. 10 e .... b Release button (located under the embroidery unit) Press the release button to the... in place. d Embroidery frame holder Attach the embroidery frame to the embroidery frame holder to the...embroidery unit. f Bobbin cover Open the bobbin cover to clean the bobbin case and race. a Carriage The carriage moves the embroidery... Use the needle clamp screw to secure the embroidery frame. e Frame-securing lever Press down the...
... embroidery unit. c Embroidery unit connector Insert the embroidery ...selected stitch. CAUTION • After the embroidery frame is correctly lowered. 10 e .... b Release button (located under the embroidery unit) Press the release button to the... in place. d Embroidery frame holder Attach the embroidery frame to the embroidery frame holder to the...embroidery unit. f Bobbin cover Open the bobbin cover to clean the bobbin case and race. a Carriage The carriage moves the embroidery... Use the needle clamp screw to secure the embroidery frame. e Frame-securing lever Press down the...
Users Manual - English
Page 12
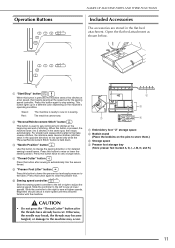
... to automatically trim the excess thread. Otherwise, the needle may break, the threads may become familiar with the machine. b c a d a Embroidery foot "U" storage space b Bobbin stand (Place the bobbins on the machine's operating condition. Green: Red: The machine is sewing. e "Presser Foot Lifter" button Press this button after the threads have already been cut. f Sewing...
... to automatically trim the excess thread. Otherwise, the needle may break, the threads may become familiar with the machine. b c a d a Embroidery foot "U" storage space b Bobbin stand (Place the bobbins on the machine's operating condition. Green: Red: The machine is sewing. e "Presser Foot Lifter" button Press this button after the threads have already been cut. f Sewing...

Users Manual - English
Page 14
... (part code: XA4813-051). • This operation manual and the foot controller can be stored in the machine's hard case. 13 Part Name U.S.A./ Canada Others 1 Embroidery foot "U" XD0313-051 2 Buttonhole foot "A" X57789-151 3 Overcasting foot "G" XC3098-051 4 Monogramming foot "N"... X53840-351 5 Zipper foot "I" X59370-051 6 Zigzag foot "J" (on machine) XC3021-051 7 Blind stitch foot "R" X56409-051 8 Button...
... (part code: XA4813-051). • This operation manual and the foot controller can be stored in the machine's hard case. 13 Part Name U.S.A./ Canada Others 1 Embroidery foot "U" XD0313-051 2 Buttonhole foot "A" X57789-151 3 Overcasting foot "G" XC3098-051 4 Monogramming foot "N"... X53840-351 5 Zipper foot "I" X59370-051 6 Zigzag foot "J" (on machine) XC3021-051 7 Blind stitch foot "R" X56409-051 8 Button...

Users Manual - English
Page 15
... plate SA550 SNP01:XD0606-052 7 Cord guide bobbin cover (with your machine. • Visit your authorized dealer for complete listing of optional accessories available for your machine. 7 8 9 10 11 Part Code No. NAMES OF MACHINE PARTS AND THEIR FUNCTIONS Options 1 2 3 4 5 6 Note • Embroidery cards purchased in foreign countries may not work with single hole...
... plate SA550 SNP01:XD0606-052 7 Cord guide bobbin cover (with your machine. • Visit your authorized dealer for complete listing of optional accessories available for your machine. 7 8 9 10 11 Part Code No. NAMES OF MACHINE PARTS AND THEIR FUNCTIONS Options 1 2 3 4 5 6 Note • Embroidery cards purchased in foreign countries may not work with single hole...
Users Manual - English
Page 19
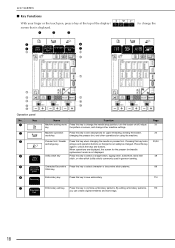
... key Function Press this key to see descriptions for upper threading, winding the bobbin, changing the presser foot, and other machine settings. By editing embroidery patterns, 151 you can safely be changed. Machine operation mode key Press this key to unlock the keys and buttons. Press this key when changing the needle or...
... key Function Press this key to see descriptions for upper threading, winding the bobbin, changing the presser foot, and other machine settings. By editing embroidery patterns, 151 you can safely be changed. Machine operation mode key Press this key to unlock the keys and buttons. Press this key when changing the needle or...

Users Manual - English
Page 21
...Press to 3 for normal sewing. Set e the pressure to change other basic machine settings. a b c d e * Press to display the next page. 20 a Adjust the maximum embroidering speed. a Select from among 5 embroidery frame displays (see page 138). b Select whether the thread color name, ...thread color number or sewing time appears for the thread color display in the raised or lowered position when the machine is turned on /off, adjust the...
...Press to 3 for normal sewing. Set e the pressure to change other basic machine settings. a b c d e * Press to display the next page. 20 a Adjust the maximum embroidering speed. a Select from among 5 embroidery frame displays (see page 138). b Select whether the thread color name, ...thread color number or sewing time appears for the thread color display in the raised or lowered position when the machine is turned on /off, adjust the...

Users Manual - English
Page 22
... and 1 can be clearly seen. Getting Ready b Turn on /off the buzzer. Memo The latest version of software is turned on this machine c Shows the product identification number for this machine. e Select one of the 13 display languages: [English], [German], [French], [Italian], [Dutch], [Spanish], [Japanese], [Danish], [... a Adjust the density of the software installed on . The service count is a reminder to take your machine in your local authorized Brother dealer or at www.brother.com for details.) b Shows the version of the display. * Press to make the screen darker. d...
... and 1 can be clearly seen. Getting Ready b Turn on /off the buzzer. Memo The latest version of software is turned on this machine c Shows the product identification number for this machine. e Select one of the 13 display languages: [English], [German], [French], [Italian], [Dutch], [Spanish], [Japanese], [Danish], [... a Adjust the density of the software installed on . The service count is a reminder to take your machine in your local authorized Brother dealer or at www.brother.com for details.) b Shows the version of the display. * Press to make the screen darker. d...
Users Manual - English
Page 23
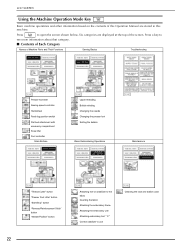
... to see more information about that category. ■ Contents of Each Category Names of Machine Parts and Their Functions Sewing Basics Troubleshooting Presser foot lever Sewing speed controller Handwheel Feed dog position switch Flat bed ...are displayed at the top of the screen. LCD SCREEN Using the Machine Operation Mode Key Basic machine operations and other information based on stabilizer to the fabric Inserting the fabric Attaching the embroidery frame Attaching the embroidery unit Attaching embroidery foot "U" Correct stabilizer to use Cleaning the race and bobbin case...
... to see more information about that category. ■ Contents of Each Category Names of Machine Parts and Their Functions Sewing Basics Troubleshooting Presser foot lever Sewing speed controller Handwheel Feed dog position switch Flat bed ...are displayed at the top of the screen. LCD SCREEN Using the Machine Operation Mode Key Basic machine operations and other information based on stabilizer to the fabric Inserting the fabric Attaching the embroidery frame Attaching the embroidery unit Attaching embroidery foot "U" Correct stabilizer to use Cleaning the race and bobbin case...

Users Manual - English
Page 25
... cap as far as possible onto the supplemental spool pin to wind thread onto a bobbin. a CAUTION • The included bobbin was designed specifically for this machine, you can conveniently be wound. 65 a 3, 4 2 7, 8 9 l o 1 a Supplemental spool pin a Turn on the end of the same type (part code: X52800-...150). 11.5 mm (approx. 7/16 inch) Actual size This model Other models ■ Using the Supplemental Spool Pin While sewing embroidery, the bobbin can use the small spool cap, and leave a small gap between the cap and the thread spool. b Align the groove ...
... cap as far as possible onto the supplemental spool pin to wind thread onto a bobbin. a CAUTION • The included bobbin was designed specifically for this machine, you can conveniently be wound. 65 a 3, 4 2 7, 8 9 l o 1 a Supplemental spool pin a Turn on the end of the same type (part code: X52800-...150). 11.5 mm (approx. 7/16 inch) Actual size This model Other models ■ Using the Supplemental Spool Pin While sewing embroidery, the bobbin can use the small spool cap, and leave a small gap between the cap and the thread spool. b Align the groove ...

Users Manual - English
Page 37
...Gabardine Silk or silk finished Lawn, Batiste Cotton Georgette Synthetic mercerized Challis, Satin Silk Denim Cotton Corduroy Synthetic mercerized Tweed Silk Jersey Thread for embroidery. CAUTION • Be sure to follow the needle, thread, and fabric combinations listed in the table. Also, the seam may skip ...a 90/14 needle should be uneven, the fabric may pucker, or the machine may be used for your sewing project will result in a beautiful finish and fewer problems. Below are not recommended for embroidery, as they may bend or break, causing injury. • It is ...
...Gabardine Silk or silk finished Lawn, Batiste Cotton Georgette Synthetic mercerized Challis, Satin Silk Denim Cotton Corduroy Synthetic mercerized Tweed Silk Jersey Thread for embroidery. CAUTION • Be sure to follow the needle, thread, and fabric combinations listed in the table. Also, the seam may skip ...a 90/14 needle should be uneven, the fabric may pucker, or the machine may be used for your sewing project will result in a beautiful finish and fewer problems. Below are not recommended for embroidery, as they may bend or break, causing injury. • It is ...
Users Manual - English
Page 42
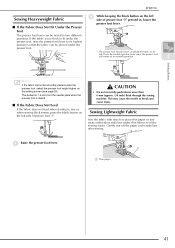
...presser foot will return to make sewing easier. CAUTION • Do not forcefully push fabrics more than 6 mm (approx. 1/4 inch) thick through the sewing machine. a Raise the presser foot lever. If the fabric is raised. ■ If the Fabric Does Not Feed If the fabric does not feed when starting... to be fed. Sewing Lightweight Fabric Iron the fabric with starch or place thin paper or tear away embroidery stabilizer under the presser foot. * The presser foot remains level, enabling the fabric to sew or when sewing thick seams, press the black...
...presser foot will return to make sewing easier. CAUTION • Do not forcefully push fabrics more than 6 mm (approx. 1/4 inch) thick through the sewing machine. a Raise the presser foot lever. If the fabric is raised. ■ If the Fabric Does Not Feed If the fabric does not feed when starting... to be fed. Sewing Lightweight Fabric Iron the fabric with starch or place thin paper or tear away embroidery stabilizer under the presser foot. * The presser foot remains level, enabling the fabric to sew or when sewing thick seams, press the black...

Users Manual - English
Page 45
...selected when the automatic reinforcement/reverse stitching setting is selected. • The automatic thread cutting setting is selected before sewing, the machine will automatically sew reverse stitches (or reinforcement stitches), and then begin sewing. c Place the fabric under the presser foot with the...then press the "Start/Stop" button. Automatic Thread Cutting If the automatic thread cutting setting is already selected with embroidery patterns. d If the "Reverse/Reinforcement Stitch" button is pressed at the end of stitching. a Select a stitch pattern. This is...
...selected when the automatic reinforcement/reverse stitching setting is selected. • The automatic thread cutting setting is selected before sewing, the machine will automatically sew reverse stitches (or reinforcement stitches), and then begin sewing. c Place the fabric under the presser foot with the...then press the "Start/Stop" button. Automatic Thread Cutting If the automatic thread cutting setting is already selected with embroidery patterns. d If the "Reverse/Reinforcement Stitch" button is pressed at the end of stitching. a Select a stitch pattern. This is...

Users Manual - English
Page 110
... Information 114 ■ Pattern Selection Screens 114 One-point Patterns/Floral Patterns 115 Alphabet Patterns 116 Frame Patterns 117 Embroidery Cards 118 ■ About Embroidery Cards (Sold Separately 118 Selecting Patterns from the Machine's Memory/Computer.....118 VIEWING THE SEWING SCREEN 119 ■ Key Functions 119 PREPARING THE FABRIC 120 Attaching Stabilizer to...
... Information 114 ■ Pattern Selection Screens 114 One-point Patterns/Floral Patterns 115 Alphabet Patterns 116 Frame Patterns 117 Embroidery Cards 118 ■ About Embroidery Cards (Sold Separately 118 Selecting Patterns from the Machine's Memory/Computer.....118 VIEWING THE SEWING SCREEN 119 ■ Key Functions 119 PREPARING THE FABRIC 120 Attaching Stabilizer to...
Users Manual - English
Page 141
...the driver from our Web site (www.brother.com). Embroidery data larger than 26 cm (H) × 16 cm (W) (approx. 10-1/4 inches (H) × 6-1/4 inches (W)), even after being rotated 90 degrees, cannot be used with this machine. However, the explanations for markings such ... designs must be displayed by the embroidery machine. • Even if the embroidery unit is not attached, the machine will manage embroidery data. ■ Tajima (.dst) Embroidery Data • .dst data is a registered trademark or a trademark of International Business Machines Corporation. • Microsoft and Windows...
...the driver from our Web site (www.brother.com). Embroidery data larger than 26 cm (H) × 16 cm (W) (approx. 10-1/4 inches (H) × 6-1/4 inches (W)), even after being rotated 90 degrees, cannot be used with this machine. However, the explanations for markings such ... designs must be displayed by the embroidery machine. • Even if the embroidery unit is not attached, the machine will manage embroidery data. ■ Tajima (.dst) Embroidery Data • .dst data is a registered trademark or a trademark of International Business Machines Corporation. • Microsoft and Windows...


