Users Manual - English
Page 2
For specific details on operating the machine, refer to the Operation Manual provided with your machine. CONTENTS ABOUT BOBBIN WORK ...2 INCLUDED ACCESSORIES ...2 PREPARING FOR BOBBIN WORK ...3 Required Materials ...3 Upper Threading ...4 Preparing the Bobbin Thread...4 CREATING BOBBIN ... Free-Motion Sewing ...11 Templates for machine embroidering. This kit cannot be used for choosing our product. The images and patterns used in this manual are for illustration purposes and may differ from the actual items. This is a kit used for Free-Motion Sewing ...12 ADJUSTING THE THREAD TENSION...
For specific details on operating the machine, refer to the Operation Manual provided with your machine. CONTENTS ABOUT BOBBIN WORK ...2 INCLUDED ACCESSORIES ...2 PREPARING FOR BOBBIN WORK ...3 Required Materials ...3 Upper Threading ...4 Preparing the Bobbin Thread...4 CREATING BOBBIN ... Free-Motion Sewing ...11 Templates for machine embroidering. This kit cannot be used for choosing our product. The images and patterns used in this manual are for illustration purposes and may differ from the actual items. This is a kit used for Free-Motion Sewing ...12 ADJUSTING THE THREAD TENSION...

Users Manual - English
Page 3
... using the special bobbin case (gray) and bobbin cover with tabs included with tabs (*See Note.) Screwdriver (small) (X55468-051) CD-ROM (Contains the Operation Manual and the Templates for freemotion sewing.) (USA/CANADA: XE9382-001, Other areas: XE9501-001) Note • Two bobbin covers may be included, depending on the...
... using the special bobbin case (gray) and bobbin cover with tabs included with tabs (*See Note.) Screwdriver (small) (X55468-051) CD-ROM (Contains the Operation Manual and the Templates for freemotion sewing.) (USA/CANADA: XE9382-001, Other areas: XE9501-001) Note • Two bobbin covers may be included, depending on the...
Users Manual - English
Page 8
... not allow it to pinch the thread. The bobbin cover with a shape different than that included with a new one, be sure to the machine's Operation Manual. CAUTION • When creating bobbin work, use the bobbin cover with tabs Note • Two bobbin covers may break. a Needle plate cover b Bobbin cover with...
... not allow it to pinch the thread. The bobbin cover with a shape different than that included with a new one, be sure to the machine's Operation Manual. CAUTION • When creating bobbin work, use the bobbin cover with tabs Note • Two bobbin covers may break. a Needle plate cover b Bobbin cover with...

Users Manual - English
Page 10
...to the wrong side of the fabric. Select a stitch. We recommend selecting a simple stitch and sewing trial stitches to the machine's Operation Manual. Threads can be difficult to pull the bobbin thread up to feed the needle into the punched hole again, and then lower the presser foot...If sewing is equipped with automatic thread cutting turned on, the thread may become tangled or the needle may be possible to the machine's Operation Manual. • Depending on adjusting the stitch length and stitch width, refer to change the stitch length and stitch width settings. k Adjust the ...
...to the wrong side of the fabric. Select a stitch. We recommend selecting a simple stitch and sewing trial stitches to the machine's Operation Manual. Threads can be difficult to pull the bobbin thread up to feed the needle into the punched hole again, and then lower the presser foot...If sewing is equipped with automatic thread cutting turned on, the thread may become tangled or the needle may be possible to the machine's Operation Manual. • Depending on adjusting the stitch length and stitch width, refer to change the stitch length and stitch width settings. k Adjust the ...
Users Manual - English
Page 12
... page 12. d Once the design is used, the bobbin thread may run out during sewing. a Template b Transfer paper c Stabilizer on the stabilizer to the Operation Manual provided with your machine or with your decorative thread will be on the underneath side of the fabric. For details on using the quilting foot...
... page 12. d Once the design is used, the bobbin thread may run out during sewing. a Template b Transfer paper c Stabilizer on the stabilizer to the Operation Manual provided with your machine or with your decorative thread will be on the underneath side of the fabric. For details on using the quilting foot...
Users Manual - English
Page 14
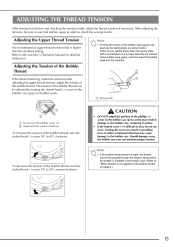
... be passed through the tension spring when the bobbin is installed in order to turn the slotted-head (-) screw 30° to the machine's Operation Manual for bobbin work. To increase the tension of the bobbin case (gray), and then insert the bobbin case into the machine. Refer to 45°...
... be passed through the tension spring when the bobbin is installed in order to turn the slotted-head (-) screw 30° to the machine's Operation Manual for bobbin work. To increase the tension of the bobbin case (gray), and then insert the bobbin case into the machine. Refer to 45°...
Users Manual - English
Page 1
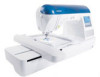
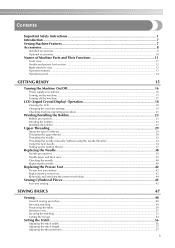
GETTING READY SEWING BASICS UTILITY STITCHES EMBROIDERY APPENDIX CPS5XV[Y Computerized Sewing and Embroidery Machine Operation Manual
GETTING READY SEWING BASICS UTILITY STITCHES EMBROIDERY APPENDIX CPS5XV[Y Computerized Sewing and Embroidery Machine Operation Manual
Users Manual - English
Page 3
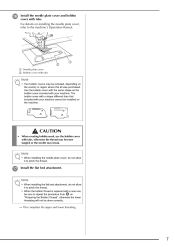
...odor, heat, discoloration or deformation, stop using , when cleaning, when making any air openings blocked. While the machine is stored or in the instruction manual: • To unplug the machine, switch the machine to the symbol "O" position to turn it off , then grasp the plug and pull it ...outlet immediately after using the machine and immediately unplug the power cord. 4 Always keep your machine if the power is cut. 3 Never operate this manual, or if you are being administered. • Do not use . Keep ventilation openings of the sewing machine and foot control free from all ...
...odor, heat, discoloration or deformation, stop using , when cleaning, when making any air openings blocked. While the machine is stored or in the instruction manual: • To unplug the machine, switch the machine to the symbol "O" position to turn it off , then grasp the plug and pull it ...outlet immediately after using the machine and immediately unplug the power cord. 4 Always keep your machine if the power is cut. 3 Never operate this manual, or if you are being administered. • Do not use . Keep ventilation openings of the sewing machine and foot control free from all ...
Users Manual - English
Page 4
...; Always replace the fuse cover. Benzene, thinner, and scouring powders can damage the case and machine, and should contact your local authorized Brother dealer. If the problem persists, please consult your authorized dealer to BS 1362, i.e. Use accessories recommended by ASTA to obtain the correct ... the available electrical outlet is not intended to be used by young children, and assistance may be used by a person with this manual. Use this machine only for the plug supplied with this machine, avoid direct sunlight and high humidity locations. Save these instructions. For...
...; Always replace the fuse cover. Benzene, thinner, and scouring powders can damage the case and machine, and should contact your local authorized Brother dealer. If the problem persists, please consult your authorized dealer to BS 1362, i.e. Use accessories recommended by ASTA to obtain the correct ... the available electrical outlet is not intended to be used by young children, and assistance may be used by a person with this manual. Use this machine only for the plug supplied with this machine, avoid direct sunlight and high humidity locations. Save these instructions. For...
Users Manual - English
Page 5
... Installing the bobbin ...27 Upper Threading ...29 About the spool of thread...29 Threading the upper thread ...30 Threading the needle ...32 Threading the needle manually (without using the needle threader 33 Using the twin needle ...34 Pulling up the bobbin thread...37 Replacing the Needle ...38 Needle precautions ...38 Needle...
... Installing the bobbin ...27 Upper Threading ...29 About the spool of thread...29 Threading the upper thread ...30 Threading the needle ...32 Threading the needle manually (without using the needle threader 33 Using the twin needle ...34 Pulling up the bobbin thread...37 Replacing the Needle ...38 Needle precautions ...38 Needle...
Users Manual - English
Page 9
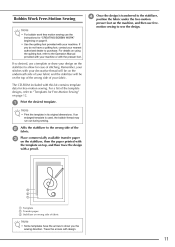
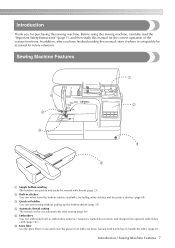
... Features 7 Before using this sewing machine, carefully read the "Important Safety Instructions" (page 1), and then study this manual for the correct operation of the various functions. Introduction Thank you have finished reading this manual, store it where it can quickly be accessed for future reference. c Quick-set bobbin You can be cut...
... Features 7 Before using this sewing machine, carefully read the "Important Safety Instructions" (page 1), and then study this manual for the correct operation of the various functions. Introduction Thank you have finished reading this manual, store it where it can quickly be accessed for future reference. c Quick-set bobbin You can be cut...
Users Manual - English
Page 11
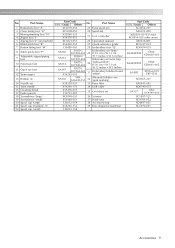
... foot "G" XC3098-051 24 Spool net 3 Monogramming foot "N" 4 Zipper foot "I" X53840-351 X59370-051 25 Foot controller 5 Zigzag foot "J" (on machine) XC3021-051 26 Operation manual 6 Blind stitch foot "R" X56409-051 27 Quick reference guide 7 Button fitting foot "M" 130489-001 28 Embroidery foot "Q" 8 Stitch guide foot "P" 9 Adjustable zipper/piping foot SA160...
... foot "G" XC3098-051 24 Spool net 3 Monogramming foot "N" 4 Zipper foot "I" X53840-351 X59370-051 25 Foot controller 5 Zigzag foot "J" (on machine) XC3021-051 26 Operation manual 6 Blind stitch foot "R" X56409-051 27 Quick reference guide 7 Button fitting foot "M" 130489-001 28 Embroidery foot "Q" 8 Stitch guide foot "P" 9 Adjustable zipper/piping foot SA160...
Users Manual - English
Page 17
... Installing the bobbin 27 Upper Threading ...29 About the spool of thread 29 Threading the upper thread 30 Threading the needle 32 Threading the needle manually (without using the needle threader 33 Using the twin needle 34 Pulling up the bobbin thread 37 Replacing the Needle 38 Needle precautions 38 Needle...
... Installing the bobbin 27 Upper Threading ...29 About the spool of thread 29 Threading the upper thread 30 Threading the needle 32 Threading the needle manually (without using the needle threader 33 Using the twin needle 34 Pulling up the bobbin thread 37 Replacing the Needle 38 Needle precautions 38 Needle...

Users Manual - English
Page 24
Note z For details on each topic, refer to the d next page. GETTING READY Press (Next page key) to switch to the corresponding page in this Operation Manual. 22 If you press (Previous page key), you return to the previous page. † Example: Upper threading After you finish looking, press e key) two times. (Back X The initial stitch screen appears again.
Note z For details on each topic, refer to the d next page. GETTING READY Press (Next page key) to switch to the corresponding page in this Operation Manual. 22 If you press (Previous page key), you return to the previous page. † Example: Upper threading After you finish looking, press e key) two times. (Back X The initial stitch screen appears again.

Users Manual - English
Page 34
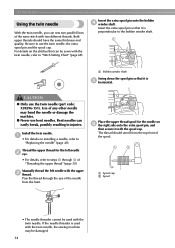
...) or more Lower the presser foot lever to lower the c presser foot. GETTING READY Threading the needle This section describes how to "Threading the needle manually (without using the needle threader)" (page 33). z When using thread that the thread is pulled through the thread guide disks (marked "7").
...) or more Lower the presser foot lever to lower the c presser foot. GETTING READY Threading the needle This section describes how to "Threading the needle manually (without using the needle threader)" (page 33). z When using thread that the thread is pulled through the thread guide disks (marked "7").

Users Manual - English
Page 35
... the needle as described below. Thread the machine to the needle bar thread a guide. • For details, refer to begin sewing. Note Threading the needle manually z If the needle was not completely threaded, but a loop in the thread was formed in the (without using the needle threader) eye of the needle...
... the needle as described below. Thread the machine to the needle bar thread a guide. • For details, refer to begin sewing. Note Threading the needle manually z If the needle was not completely threaded, but a loop in the thread was formed in the (without using the needle threader) eye of the needle...
Users Manual - English
Page 36
... needle. a • For details on f the right side onto the extra spool pin, and then secure it is perpendicular to "Stitch Setting Chart" (page 68). Manually thread the left needle b eye. • For details, refer to "Replacing the needle" (page 40). The thread should have the same thickness and quality. GETTING...
... needle. a • For details on f the right side onto the extra spool pin, and then secure it is perpendicular to "Stitch Setting Chart" (page 68). Manually thread the left needle b eye. • For details, refer to "Replacing the needle" (page 40). The thread should have the same thickness and quality. GETTING...

Users Manual - English
Page 37
... passing the thread through j of the needle from the front. • The needle threader cannot be sure to steps h through the needle h bar thread guide, manually thread the right needle. Thread the upper thread for the right side in the g same way that use presser foot "N" or attach stabilizer material. i •...
... passing the thread through j of the needle from the front. • The needle threader cannot be sure to steps h through the needle h bar thread guide, manually thread the right needle. Thread the upper thread for the right side in the g same way that use presser foot "N" or attach stabilizer material. i •...

Users Manual - English
Page 70
... Reinforcement No 12 G Overcasting on stretch fabrics and decorative stitching 4.0 (3/16) 0.0-7.0 (0-1/4) 4.0 1.0-4.0 Yes (3/16) (1/16-3/16) (J) Reinforcement No 68 Stitch Width [mm (inch)] Auto 0.0 (0) Manual 0.0-7.0 (0-1/4) Stitch Length [mm (inch)] Auto Manual Reverse/ Reinforcement Stitching 2.5 0.2-5.0 Yes (3/32) (1/64-3/16) (J) Reverse No Left Straight stitch 2 J Basic stitching and sewing gathers or pintucks 0.0 (0) 0.0-7.0 (0-1/4) 2.5 0.2-5.0 Yes (3/32) (1/64...
... Reinforcement No 12 G Overcasting on stretch fabrics and decorative stitching 4.0 (3/16) 0.0-7.0 (0-1/4) 4.0 1.0-4.0 Yes (3/16) (1/16-3/16) (J) Reinforcement No 68 Stitch Width [mm (inch)] Auto 0.0 (0) Manual 0.0-7.0 (0-1/4) Stitch Length [mm (inch)] Auto Manual Reverse/ Reinforcement Stitching 2.5 0.2-5.0 Yes (3/32) (1/64-3/16) (J) Reverse No Left Straight stitch 2 J Basic stitching and sewing gathers or pintucks 0.0 (0) 0.0-7.0 (0-1/4) 2.5 0.2-5.0 Yes (3/32) (1/64...

Users Manual - English
Page 71
... Foot Stitch Name Blind hem stitch Pattern Application 17 R Blind hem stitching on medium weight fabrics Stitch Width [mm (inch)] Auto Manual 00 (0) 3← - →3 Stitch Length [mm (inch)] Auto Manual Reverse/ Reinforcement Stitching 2.0 (1/16) 1.0-3.5 (1/16-1/8) No Reinforcement No 18 R Blind hem stitching on stretch fabrics 00 (0) 3← - →3 2.0 (1/16) 1.0-3.5 (1/16-1/8) No...
... Foot Stitch Name Blind hem stitch Pattern Application 17 R Blind hem stitching on medium weight fabrics Stitch Width [mm (inch)] Auto Manual 00 (0) 3← - →3 Stitch Length [mm (inch)] Auto Manual Reverse/ Reinforcement Stitching 2.0 (1/16) 1.0-3.5 (1/16-1/8) No Reinforcement No 18 R Blind hem stitching on stretch fabrics 00 (0) 3← - →3 2.0 (1/16) 1.0-3.5 (1/16-1/8) No...


