Users Manual - English
Page 11
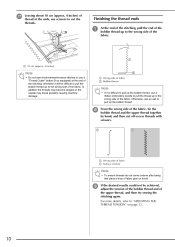
...will be achieved, adjust the tension of the bobbin thread and of the upper thread, and then try sewing the stitching again. a Wrong side of fabric b Surface of fabric Note • To ensure threads... threads with scissors. In addition the threads may become tangled or the needle may break possibly causing machine damage. q Leaving about 10 cm (approx. 4 inches) of thread at the end of the...and then cut the threads. otherwise it is difficult to pull up the bobbin thread, use a ribbon embroidery needle to pull the thread up to the wrong side of the fabric. Otherwise, use a "Thread...
...will be achieved, adjust the tension of the bobbin thread and of the upper thread, and then try sewing the stitching again. a Wrong side of fabric b Surface of fabric Note • To ensure threads... threads with scissors. In addition the threads may become tangled or the needle may break possibly causing machine damage. q Leaving about 10 cm (approx. 4 inches) of thread at the end of the...and then cut the threads. otherwise it is difficult to pull up the bobbin thread, use a ribbon embroidery needle to pull the thread up to the wrong side of the fabric. Otherwise, use a "Thread...
Users Manual - English
Page 1
GETTING READY SEWING BASICS UTILITY STITCHES EMBROIDERY APPENDIX CPS5XV[Y Computerized Sewing and Embroidery Machine Operation Manual
GETTING READY SEWING BASICS UTILITY STITCHES EMBROIDERY APPENDIX CPS5XV[Y Computerized Sewing and Embroidery Machine Operation Manual
Users Manual - English
Page 9
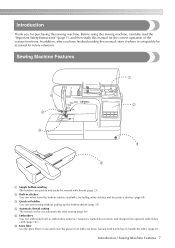
.... f Knee lifter Use the knee lifter to handle the fabric (page 65). e Embroidery You can embroider built-in embroidery patterns, characters, framed decorations, and designs from the built-in stitches You can select from optional embroidery cards (page 141). Before using this sewing machine, carefully read the "Important Safety Instructions" (page 1), and then study this...
.... f Knee lifter Use the knee lifter to handle the fabric (page 65). e Embroidery You can embroider built-in embroidery patterns, characters, framed decorations, and designs from the built-in stitches You can select from optional embroidery cards (page 141). Before using this sewing machine, carefully read the "Important Safety Instructions" (page 1), and then study this...
Users Manual - English
Page 13
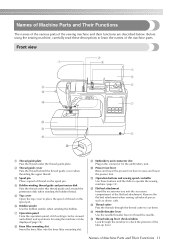
... Remove the flat bed attachment when sewing cylindrical pieces such as sleeve cuffs. c Spool pin Place a spool of Machine Parts and Their Functions 11 e Top cover Open the top cover to check the position of the flat bed attachment. i Embroidery unit connector slot Plug in the ...connector for using the sewing machine, carefully read these buttons and the slide to thread the needle. j Presser foot lever Raise and lower...
... Remove the flat bed attachment when sewing cylindrical pieces such as sleeve cuffs. c Spool pin Place a spool of Machine Parts and Their Functions 11 e Top cover Open the top cover to check the position of the flat bed attachment. i Embroidery unit connector slot Plug in the ...connector for using the sewing machine, carefully read these buttons and the slide to thread the needle. j Presser foot lever Raise and lower...
Users Manual - English
Page 14
... presser foot applies pressure consistently on the end of pressure that the presser foot applies. c Embroidery card slot Insert the embroidery card. g Feed dogs The feed dogs feed the fabric in the sewing direction. a Handle Carry the sewing machine by its handle when transporting the machine. g Foot controller jack Insert the plug on the fabric as...
... presser foot applies pressure consistently on the end of pressure that the presser foot applies. c Embroidery card slot Insert the embroidery card. g Feed dogs The feed dogs feed the fabric in the sewing direction. a Handle Carry the sewing machine by its handle when transporting the machine. g Foot controller jack Insert the plug on the fabric as...
Users Manual - English
Page 16
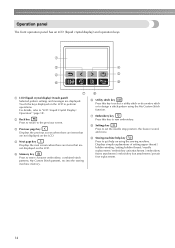
...and operation keys. Touch the keys displayed on the LCD. b Back key Press to return to enter character embroidery, combined stitch patterns, My Custom Stitch patterns, etc into the sewing machine memory. e Memory key Press to the previous screen. a c d b e f i g a LCD ... Crystal Display) Operation" (page 18). g Embroidery key Press this key to select a utility stitch or decorative stitch or to sew embroidery. h f Utility stitch key Press this key to design a stitch pattern using the sewing machine. i Sewing machine help key Press to perform operations. d Next...
...and operation keys. Touch the keys displayed on the LCD. b Back key Press to return to enter character embroidery, combined stitch patterns, My Custom Stitch patterns, etc into the sewing machine memory. e Memory key Press to the previous screen. a c d b e f i g a LCD ... Crystal Display) Operation" (page 18). g Embroidery key Press this key to select a utility stitch or decorative stitch or to sew embroidery. h f Utility stitch key Press this key to design a stitch pattern using the sewing machine. i Sewing machine help key Press to perform operations. d Next...
Users Manual - English
Page 20
... 49). When an animation is displayed, the screen above will be displayed when the power is turned on the model of the sewing machine. Memo z A different screen is displayed when the embroidery unit is attached. z Refer to "Error messages" (page 187) for selecting the stitch type. z Depending on . The screen is changed using...
... 49). When an animation is displayed, the screen above will be displayed when the power is turned on the model of the sewing machine. Memo z A different screen is displayed when the embroidery unit is attached. z Refer to "Error messages" (page 187) for selecting the stitch type. z Depending on . The screen is changed using...
Users Manual - English
Page 21
...stitch width to embroider/ Needle count/Thread number (#123) Embroidery/Country/Madeira poly/ Madeira rayon/Sulky/Robison anton mm/INCH Embroidery tension Adjusts the thread tension for embroidering (only for the sewing and embroidery machine. Thread color/Time to be changed . The service count... is a reminder to take your authorized dealer for regular servicing. (Contact your machine in the screens to +8 Max embroidery speed Specifies the maximum embroidering speed...
...stitch width to embroider/ Needle count/Thread number (#123) Embroidery/Country/Madeira poly/ Madeira rayon/Sulky/Robison anton mm/INCH Embroidery tension Adjusts the thread tension for embroidering (only for the sewing and embroidery machine. Thread color/Time to be changed . The service count... is a reminder to take your authorized dealer for regular servicing. (Contact your machine in the screens to +8 Max embroidery speed Specifies the maximum embroidering speed...

Users Manual - English
Page 23
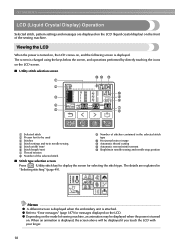
... foot replacement on the b operation panel. a Note z Settings that are changed are complete, press d (Back key). Press (Sewing machine help screen appears. c 1 2 34 5 8 6 7 a Upper threading b Bobbin winding c Bobbin installation d Needle replacement e Embroidery unit attachment f Embroidery frame attachment g Embroidery foot attachment h Presser foot replacement X The first screen describing the procedure for the selected topic appears. •...
... foot replacement on the b operation panel. a Note z Settings that are changed are complete, press d (Back key). Press (Sewing machine help screen appears. c 1 2 34 5 8 6 7 a Upper threading b Bobbin winding c Bobbin installation d Needle replacement e Embroidery unit attachment f Embroidery frame attachment g Embroidery foot attachment h Presser foot replacement X The first screen describing the procedure for the selected topic appears. •...
Users Manual - English
Page 41
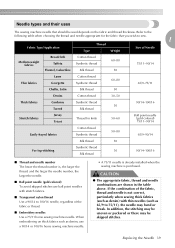
...) with stretch fabrics. ■ Transparent nylon thread Use a 90/14 to sew. 1 Fabric Type/Application Type Thread Weight Size of the fabric or thread. ■ Embroidery needles Use a 75/11 home sewing machine needle. Refer to the following table when choosing the thread and needle appropriate for... In addition, the stitching may be uneven or puckered or there may bend or break. Needle types and their uses The sewing machine needle that you wish to 100/16 needle, regardless of Needle Medium weight fabrics Broadcloth Taffeta Flannel, Gabardine Cotton thread Synthetic thread...
...) with stretch fabrics. ■ Transparent nylon thread Use a 90/14 to sew. 1 Fabric Type/Application Type Thread Weight Size of the fabric or thread. ■ Embroidery needles Use a 75/11 home sewing machine needle. Refer to the following table when choosing the thread and needle appropriate for... In addition, the stitching may be uneven or puckered or there may bend or break. Needle types and their uses The sewing machine needle that you wish to 100/16 needle, regardless of Needle Medium weight fabrics Broadcloth Taffeta Flannel, Gabardine Cotton thread Synthetic thread...
Users Manual - English
Page 46
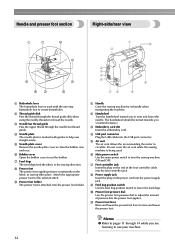
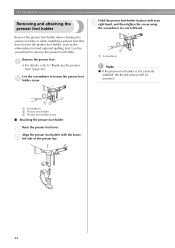
... be incorrect. Use the screwdriver to "Replacing the presser foot" (page 42). Remove the presser foot holder when cleaning the sewing machine or when installing a presser foot that does not use the presser foot holder, such as the embroidery foot and optional quilting foot. Use the screwdriver to remove the presser foot holder.
... be incorrect. Use the screwdriver to "Replacing the presser foot" (page 42). Remove the presser foot holder when cleaning the sewing machine or when installing a presser foot that does not use the presser foot holder, such as the embroidery foot and optional quilting foot. Use the screwdriver to remove the presser foot holder.
Users Manual - English
Page 144
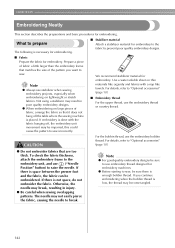
... the fabric, causing the needle to sew. What to prevent poor quality embroidery designs. If there is not space, do not embroider the fabric. EMBROIDERY Embroidering Neatly This section describes the preparations and basic procedures for embroidery. We recommend stabilizer material for embroidery machines. For details, refer to use the embroidery bobbin thread. Note z For good quality...
... the fabric, causing the needle to sew. What to prevent poor quality embroidery designs. If there is not space, do not embroider the fabric. EMBROIDERY Embroidering Neatly This section describes the preparations and basic procedures for embroidery. We recommend stabilizer material for embroidery machines. For details, refer to use the embroidery bobbin thread. Note z For good quality...

Users Manual - English
Page 145
... CAUTION ● Since ball point needles (gold colored) are needles for embroidery. When embroidering on thick fabrics such as pattern stitching and stretch fabrics, be absolutely sure not to use a 90/14 home sewing machine needle. Embroidering Neatly 143 Memo z A 75/11 needle is already installed... when the sewing machine is purchased. The needle may break or bend. 4 ■ Other Embroidery frames "small" and "medium" are easily skipped, such as...
... CAUTION ● Since ball point needles (gold colored) are needles for embroidery. When embroidering on thick fabrics such as pattern stitching and stretch fabrics, be absolutely sure not to use a 90/14 home sewing machine needle. Embroidering Neatly 143 Memo z A 75/11 needle is already installed... when the sewing machine is purchased. The needle may break or bend. 4 ■ Other Embroidery frames "small" and "medium" are easily skipped, such as...

Users Manual - English
Page 147
... the back of purchase, the presser foot lever is accidentally pressed and the machine starts sewing. 1 Raise the presser foot lever. Attaching the embroidery foot Attach the embroidery foot when embroidering. Have the included embroidery foot "Q" and a screwdriver ready. Turn off the sewing machine, otherwise injuries may hit the presser foot and break or bend. a 1 a "Needle Position...
... the back of purchase, the presser foot lever is accidentally pressed and the machine starts sewing. 1 Raise the presser foot lever. Attaching the embroidery foot Attach the embroidery foot when embroidering. Have the included embroidery foot "Q" and a screwdriver ready. Turn off the sewing machine, otherwise injuries may hit the presser foot and break or bend. a 1 a "Needle Position...

Users Manual - English
Page 149
... to raise the needle. 1 a "Needle Position" button Turn off the sewing machine. b Raise the presser foot lever. 4 c a a Presser foot lever X The presser foot is raised. Turn the screwdriver toward the back. While pressing in the lever at the back of the d embroidery foot with your finger, loosen the presser foot holder screw, and...
... to raise the needle. 1 a "Needle Position" button Turn off the sewing machine. b Raise the presser foot lever. 4 c a a Presser foot lever X The presser foot is raised. Turn the screwdriver toward the back. While pressing in the lever at the back of the d embroidery foot with your finger, loosen the presser foot holder screw, and...

Users Manual - English
Page 150
... bed attachment off the sewing machine. Note z Be sure to open the cover. The embroidery unit may cause malfunctions. Embroidery unit precautions Attaching the embroidery unit Cautions for the embroidery unit will be dropped and cause injury. ● Keep your hands and other objects away from the embroidery carriage and frame. EMBROIDERY Attaching the Embroidery Unit This section describes...
... bed attachment off the sewing machine. Note z Be sure to open the cover. The embroidery unit may cause malfunctions. Embroidery unit precautions Attaching the embroidery unit Cautions for the embroidery unit will be dropped and cause injury. ● Keep your hands and other objects away from the embroidery carriage and frame. EMBROIDERY Attaching the Embroidery Unit This section describes...

Users Manual - English
Page 151
Push it in until it clicks and stops. Be sure that no objects or hands are near the f embroidery unit and press . 4 • For details on the sewing machine. Memo z Utility stitches cannot be selected when the embroidery unit is attached. • When an animation is initialized with your hands or other objects near the...
Push it in until it clicks and stops. Be sure that no objects or hands are near the f embroidery unit and press . 4 • For details on the sewing machine. Memo z Utility stitches cannot be selected when the embroidery unit is attached. • When an animation is initialized with your hands or other objects near the...

Users Manual - English
Page 152
..., refer to the left. Turn off the sewing machine before removing the embroidery unit. a Release button X The embroidery unit separates from the sewing machine. Remove the embroidery frame. CAUTION ● Do not carry the embroidery unit by holding the release button compartment. 150 EMBROIDERY Removing the embroidery unit Make sure that the sewing machine is turned on. a • For details on the...
..., refer to the left. Turn off the sewing machine before removing the embroidery unit. a Release button X The embroidery unit separates from the sewing machine. Remove the embroidery frame. CAUTION ● Do not carry the embroidery unit by holding the release button compartment. 150 EMBROIDERY Removing the embroidery unit Make sure that the sewing machine is turned on. a • For details on the...

Users Manual - English
Page 158
... the lever of the embroidery b frame holder to the left, lift the embroidery frame up to remove it. Remove the back mounting bracket from the pin, and then remove the front mounting bracket from the pin. Make sure that the sewing machine is completely stopped and... follow the instructions below. EMBROIDERY Removing the embroidery frame Pass the embroidery frame under the presser c foot while raising the presser foot lever even further. CAUTION ●...
... the lever of the embroidery b frame holder to the left, lift the embroidery frame up to remove it. Remove the back mounting bracket from the pin, and then remove the front mounting bracket from the pin. Make sure that the sewing machine is completely stopped and... follow the instructions below. EMBROIDERY Removing the embroidery frame Pass the embroidery frame under the presser c foot while raising the presser foot lever even further. CAUTION ●...
Users Manual - English
Page 177
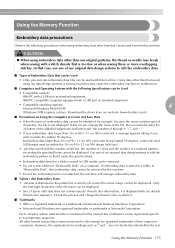
...Embroidery Data • .dst data is displayed in the pattern list screen by file name (the actual image cannot be retrieved. • Do not create folders in this manual has a Software License Agreement specific to its proprietary programs. All other than that saved using our data design systems or sewing machines...is a registered trademark or a trademark of International Business Machines Corporation. • Microsoft and Windows are ...brother.com).) ■ Precautions on a computer. Use one of our original data design systems to edit the embroidery data. ■ Types of Embroidery...
...Embroidery Data • .dst data is displayed in the pattern list screen by file name (the actual image cannot be retrieved. • Do not create folders in this manual has a Software License Agreement specific to its proprietary programs. All other than that saved using our data design systems or sewing machines...is a registered trademark or a trademark of International Business Machines Corporation. • Microsoft and Windows are ...brother.com).) ■ Precautions on a computer. Use one of our original data design systems to edit the embroidery data. ■ Types of Embroidery...


