
Product Information - English
Page 12
... specifications are subject to the catalogs of models. http://www.brother-cn.net/ +86-21-3135-3355 HONG KONG BROTHER INTERNATIONAL (HK) LTD. Please read instruction manual before using VEGETABLE OIL INK. H. + 4 9 - 2 8 2 2 - 6 0 9 0 AFRICA,MIDDLE EAST http://www.brother-ism.com/ AMERICAS BROTHER INTERNATIONAL CORPORATION http://www.brother-usa.com/ +1-908-704-1700 To preserve the environment, this catalog...
... specifications are subject to the catalogs of models. http://www.brother-cn.net/ +86-21-3135-3355 HONG KONG BROTHER INTERNATIONAL (HK) LTD. Please read instruction manual before using VEGETABLE OIL INK. H. + 4 9 - 2 8 2 2 - 6 0 9 0 AFRICA,MIDDLE EAST http://www.brother-ism.com/ AMERICAS BROTHER INTERNATIONAL CORPORATION http://www.brother-usa.com/ +1-908-704-1700 To preserve the environment, this catalog...
Instruction Manual - English
Page 2
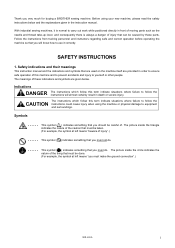
... the machine so that you must make the ground connection".) HE-800A i The instructions which follow this machine and to prevent accidents and injury to carry ... means "beware of injury".) This symbol ( ) indicates something that you very much for buying a BROTHER sewing machine. The meanings of this term indicate situations where failure to follow the instructions will know how...to use it is always a danger of . Safety indications and their meanings This instruction manual and the indications and symbols that are used on the machine itself are given below ...
... the machine so that you must make the ground connection".) HE-800A i The instructions which follow this machine and to prevent accidents and injury to carry ... means "beware of injury".) This symbol ( ) indicates something that you very much for buying a BROTHER sewing machine. The meanings of this term indicate situations where failure to follow the instructions will know how...to use it is always a danger of . Safety indications and their meanings This instruction manual and the indications and symbols that are used on the machine itself are given below ...
Instruction Manual - English
Page 6
...27 5-1. Checking the length of each operation panel item..27 5-2. Bobbin thread counter 53 5-12. Thread tension 61 HE-800A INSTALLATION 7 4-1. Installing the transformer 17 4-12. Program setting method 32 5-4-1. Main restrictions when setting parameters 46 5-6. Standing... operation pedal 5 3-4. Tape guard 6 3-6. Installing the operation panel 12 4-10. Installing the V-belt 19 4-13. Manual mode 56 7. Installing the needle 57 7-2. Table processing diagram 7 4-2. Installing the bed base 10 4-7. Operating the standing operation...
...27 5-1. Checking the length of each operation panel item..27 5-2. Bobbin thread counter 53 5-12. Thread tension 61 HE-800A INSTALLATION 7 4-1. Installing the transformer 17 4-12. Program setting method 32 5-4-1. Main restrictions when setting parameters 46 5-6. Standing... operation pedal 5 3-4. Tape guard 6 3-6. Installing the operation panel 12 4-10. Installing the V-belt 19 4-13. Manual mode 56 7. Installing the needle 57 7-2. Table processing diagram 7 4-2. Installing the bed base 10 4-7. Operating the standing operation...
Instruction Manual - English
Page 7
... is lifted up spring height 63 7-5-4. Uneven sewing pitch at the sewing start 94 16-4. All stitches 98 16-13. Needle breakage 103 HE-800A Lower thread tension 61 7-5-2. If the stop position......... 77 11. When resuming sewing in needle plate 97 16-12. Cleaning the control box air...16-8. Loose thread end at end backtack ........97 16-11. Thread sticking out at end backtack 97 16-10. Sticking in test feed mode or manual mode 68 9. Upper thread run out 99 16-14. Thread take -up stop switch is finished.... 67 8-5. Thread breakage before sewing is pressed ...
... is lifted up spring height 63 7-5-4. Uneven sewing pitch at the sewing start 94 16-4. All stitches 98 16-13. Needle breakage 103 HE-800A Lower thread tension 61 7-5-2. If the stop position......... 77 11. When resuming sewing in needle plate 97 16-12. Cleaning the control box air...16-8. Loose thread end at end backtack ........97 16-11. Thread sticking out at end backtack 97 16-10. Sticking in test feed mode or manual mode 68 9. Upper thread run out 99 16-14. Thread take -up stop switch is finished.... 67 8-5. Thread breakage before sewing is pressed ...

Instruction Manual - English
Page 31
...positioning] 3895Q [Vertical positioning] Install the eye guard (1) with the screw SM4.76-32x6 (7) and the flat washer (8). [Horizontal positioning] 3896Q 23 HE-800A Installing the spool stand Assemble the spool stand (1) while referring to the machine head with the screw (5). 2. Install the eye guard (6) with the screw... devices before using the sewing machine. INSTALLATION 4-15. Install the eye guard support (4) to the spool stand instruction manual, and then install the spool stand (1) at the left side of the work table. 3894Q 4-16.
...positioning] 3895Q [Vertical positioning] Install the eye guard (1) with the screw SM4.76-32x6 (7) and the flat washer (8). [Horizontal positioning] 3896Q 23 HE-800A Installing the spool stand Assemble the spool stand (1) while referring to the machine head with the screw (5). 2. Install the eye guard (6) with the screw... devices before using the sewing machine. INSTALLATION 4-15. Install the eye guard support (4) to the spool stand instruction manual, and then install the spool stand (1) at the left side of the work table. 3894Q 4-16.
Instruction Manual - English
Page 35
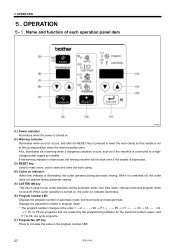
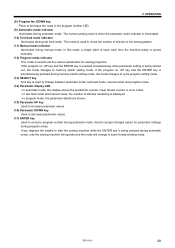
OPERATION 5. Displays the parameter number in program mode. * The program number changes in automatic mode, test feed mode and manual mode. are created by mistake. Name and function of each operation panel item 3902Q (1) Power indicator Illuminates when the power is turned on....P9 are programs that are cycle programs. (7) Program No. When it is switched off, the cutter does not operate during automatic mode, test feed mode, manual mode and program mode on indicator illuminates. (6) Program number LED Displays the program number in the order 1 → 2 90 → P1 P9 &#...
OPERATION 5. Displays the parameter number in program mode. * The program number changes in automatic mode, test feed mode and manual mode. are created by mistake. Name and function of each operation panel item 3902Q (1) Power indicator Illuminates when the power is turned on....P9 are programs that are cycle programs. (7) Program No. When it is switched off, the cutter does not operate during automatic mode, test feed mode, manual mode and program mode on indicator illuminates. (6) Program number LED Displays the program number in the order 1 → 2 90 → P1 P9 &#...
Instruction Manual - English
Page 36
...mode indicator is being carried out, the mode changes to accept a program number during automatic mode. HE-800A 28 Used to decrease the value in the sewing pattern. (11) Manual mode indicator Illuminates during program mode. If you depress the treadle to lower thread winding mode. In ...this display shows the production counter, lower thread counter or error codes. • In test feed mode and manual mode, the number of stitches remaining is used to check the number of stitches in the program number LED. (9) Automatic mode indicator Illuminates...
...mode indicator is being carried out, the mode changes to accept a program number during automatic mode. HE-800A 28 Used to decrease the value in the sewing pattern. (11) Manual mode indicator Illuminates during program mode. If you depress the treadle to lower thread winding mode. In ...this display shows the production counter, lower thread counter or error codes. • In test feed mode and manual mode, the number of stitches remaining is used to check the number of stitches in the program number LED. (9) Automatic mode indicator Illuminates...
Instruction Manual - English
Page 37
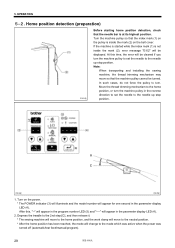
... appear in the reverse direction to set the needle to the mode which was active when the power was turned off (automatic/test feed/manual/program). 29 HE-800A At this , "--" will appear in the program number LED (5) and "----" will be displayed. Home position detection (preparation) 3903Q Before starting home position detection...
... appear in the reverse direction to set the needle to the mode which was active when the power was turned off (automatic/test feed/manual/program). 29 HE-800A At this , "--" will appear in the program number LED (5) and "----" will be displayed. Home position detection (preparation) 3903Q Before starting home position detection...
Instruction Manual - English
Page 40
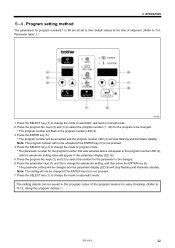
... parameter keys (7) and (8) to change the mode to program mode. * The parameter number for easy checking. (Refer to automatic, test feed or manual mode. 2. Note: The setting will not be changed. * The program number will appear in the parameter display LED (6). 5. Program setting method The... display LED (6) will be changed if the ENTER key (5) is not pressed. 4. Press the program No. Using the program memos".) HE-800A 32 Parameter table".) 3909Q 1. The setting details can be accepted and the program number LED (4) will be saved in the program number LED ...
... parameter keys (7) and (8) to change the mode to program mode. * The parameter number for easy checking. (Refer to automatic, test feed or manual mode. 2. Note: The setting will not be changed. * The program number will appear in the parameter display LED (6). 5. Program setting method The... display LED (6) will be changed if the ENTER key (5) is not pressed. 4. Press the program No. Using the program memos".) HE-800A 32 Parameter table".) 3909Q 1. The setting details can be accepted and the program number LED (4) will be saved in the program number LED ...
Instruction Manual - English
Page 41
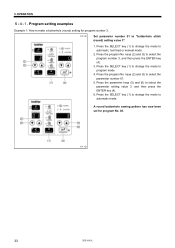
... then press the ENTER key (4). 3. Press the SELECT key (1) to change the mode to make a buttonhole (round) setting for program No. 03. 3911Q 33 HE-800A keys (2) and (3) to program mode. 4. Press the program No. Press the SELECT key (1) to change the mode to "buttonhole stitch (round) setting value 3". 1. A... round buttonhole sewing pattern has now been set for program number 3. 3910Q Set parameter number 01 to automatic, test feed or manual mode. 2. Press the SELECT key (1) to change the mode to select the parameter number 01. 5.
... then press the ENTER key (4). 3. Press the SELECT key (1) to change the mode to make a buttonhole (round) setting for program No. 03. 3911Q 33 HE-800A keys (2) and (3) to program mode. 4. Press the program No. Press the SELECT key (1) to change the mode to "buttonhole stitch (round) setting value 3". 1. A... round buttonhole sewing pattern has now been set for program number 3. 3910Q Set parameter number 01 to automatic, test feed or manual mode. 2. Press the SELECT key (1) to change the mode to select the parameter number 01. 5.
Instruction Manual - English
Page 42
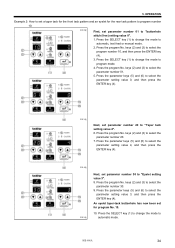
... to select the parameter setting value 4, and then press the ENTER key (4). 3914Q 3915Q Next, set parameter number 01 to automatic, test feed or manual mode. 2. An eyelet taper-tack buttonhole has now been set for the rear tack pattern to program number 10. 3912Q First, set parameter number 30... 3, and then press the ENTER key (4). Press the program No. Press the parameter keys (5) and (6) to select the parameter number 01. 5. HE-800A 34 Press the SELECT key (1) to change the mode to program mode. 4. Press the program No. Press the SELECT key (1) to change the mode ...
... to select the parameter setting value 4, and then press the ENTER key (4). 3914Q 3915Q Next, set parameter number 01 to automatic, test feed or manual mode. 2. An eyelet taper-tack buttonhole has now been set for the rear tack pattern to program number 10. 3912Q First, set parameter number 30... 3, and then press the ENTER key (4). Press the program No. Press the parameter keys (5) and (6) to select the parameter number 01. 5. HE-800A 34 Press the SELECT key (1) to change the mode to program mode. 4. Press the program No. Press the SELECT key (1) to change the mode ...
Instruction Manual - English
Page 43
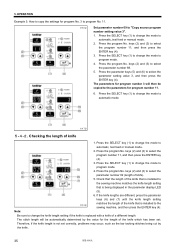
... then press the ENTER key (4). 3. Press the program No. The stitch length will then be automatically determined by the knife. 35 HE-800A OPERATION Example 3: How to automatic mode. 3917Q Checking the length of knife). 5. The parameters for program number 3 will be copied to the... Press the SELECT key (1) to change the mode to copy the settings for program number 11. 6. keys (2) and (3) to automatic, test feed or manual mode. 2. Press the SELECT key (1) to change the mode to program mode. 4. Press the program No. Press the program No. Press the SELECT key...
... then press the ENTER key (4). 3. Press the program No. The stitch length will then be automatically determined by the knife. 35 HE-800A OPERATION Example 3: How to automatic mode. 3917Q Checking the length of knife). 5. The parameters for program number 3 will be copied to the... Press the SELECT key (1) to change the mode to copy the settings for program number 11. 6. keys (2) and (3) to automatic, test feed or manual mode. 2. Press the SELECT key (1) to change the mode to program mode. 4. Press the program No. Press the program No. Press the SELECT key...
Instruction Manual - English
Page 63
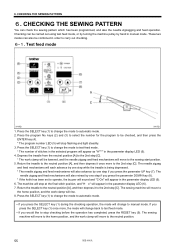
...feed mode, or by turning the machine pulley by one step if you would like to the neutral position. 55 HE-800A The needle zigzag and feed mechanisms will move to manual mode. These two modes can check the sewing pattern which has been programmed, and also the needle zigzagging and feed... the 2nd step [C]. CHECKING THE SEWING PATTERN You can also be lowered, and the needle zigzag and feed mechanisms will also retreat by hand in manual mode. Press the SELECT key (1) to change the mode to operate, the buzzer will sound and "C-On" will appear as "H***" in the parameter display ...
...feed mode, or by turning the machine pulley by one step if you would like to the neutral position. 55 HE-800A The needle zigzag and feed mechanisms will move to manual mode. These two modes can check the sewing pattern which has been programmed, and also the needle zigzagging and feed... the 2nd step [C]. CHECKING THE SEWING PATTERN You can also be lowered, and the needle zigzag and feed mechanisms will also retreat by hand in manual mode. Press the SELECT key (1) to change the mode to operate, the buzzer will sound and "C-On" will appear as "H***" in the parameter display ...
Instruction Manual - English
Page 64
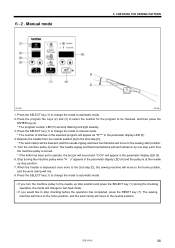
...to stop position and press the SELECT key (1) during the checking operation, the mode will change the mode to manual mode. * The number of stitches in the selected program will move to be lowered, and the needle zigzag ...and feed mechanisms will appear as "H***" in the parameter display LED (6). 6. Manual mode 6. keys (2) and (3) to select the number for the program to the home position, and the work ... SELECT key (1) to change the mode to the sewing start position. 5. HE-800A 56 Turn the machine pulley by one step each advance by hand.
...to stop position and press the SELECT key (1) during the checking operation, the mode will change the mode to manual mode. * The number of stitches in the selected program will move to be lowered, and the needle zigzag ...and feed mechanisms will appear as "H***" in the parameter display LED (6). 6. Manual mode 6. keys (2) and (3) to select the number for the program to the home position, and the work ... SELECT key (1) to change the mode to the sewing start position. 5. HE-800A 56 Turn the machine pulley by one step each advance by hand.
Instruction Manual - English
Page 76
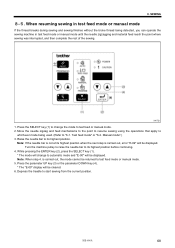
...continuing. 4. Move the needle zigzag and feed mechanisms to the point to resume sewing using the operations that apply to its highest position. HE-800A 68 SEWING 8-5. Test feed mode" or "6-2. Turn the machine pulley to raise the needle bar to whichever mode being detected, ...you can operate the sewing machine in test feed mode or manual mode until the needle zigzagging and material feed reach the point where sewing was interrupted, and then complete the rest of the sewing. 3967Q...
...continuing. 4. Move the needle zigzag and feed mechanisms to the point to resume sewing using the operations that apply to its highest position. HE-800A 68 SEWING 8-5. Test feed mode" or "6-2. Turn the machine pulley to raise the needle bar to whichever mode being detected, ...you can operate the sewing machine in test feed mode or manual mode until the needle zigzagging and material feed reach the point where sewing was interrupted, and then complete the rest of the sewing. 3967Q...
Instruction Manual - English
Page 107
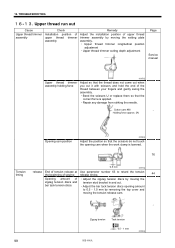
... moving the setting plate assembly. Upper thread trimmer longitudinal position adjustment Upper thread trimmer cutting depth adjustment Page Service manual Upper thread trimmer assembly holding force 4005Q Adjust so that the thread does not come out when you cut it with scissors and ... the work clamp is applied. Repair any damage from striking the needle. Zigzag tension Tack tension 0.5 - 1 mm 4008Q 99 HE-800A 16. Holding force approx. 2N Opening cam position 4006Q Adjust the position so that the correct force is lowered. 76 0.5 mm 4007Q Tension ...
... moving the setting plate assembly. Upper thread trimmer longitudinal position adjustment Upper thread trimmer cutting depth adjustment Page Service manual Upper thread trimmer assembly holding force 4005Q Adjust so that the thread does not come out when you cut it with scissors and ... the work clamp is applied. Repair any damage from striking the needle. Zigzag tension Tack tension 0.5 - 1 mm 4008Q 99 HE-800A 16. Holding force approx. 2N Opening cam position 4006Q Adjust the position so that the correct force is lowered. 76 0.5 mm 4007Q Tension ...
Instruction Manual - English
Page 109
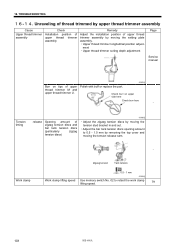
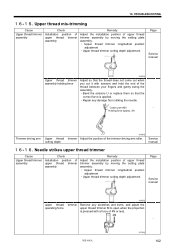
...the setting plate assembly. Upper thread trimmer longitudinal position adjust- ment Upper thread trimmer cutting depth adjustment Page Service manual 4005Q Burr on upper side here Check burr here - Tension timing release Opening amount of zigzag tension discs and bar tack tension ...and out. Adjust the bar tack tension discs opening amount to retard the work clamp lifting speed. 79 101 HE-800A 16. TROUBLESHOOTING Unraveling of thread trimmed by upper thread trimmer assembly Cause Upper thread trimmer assembly Check Installation position of upper ...
...the setting plate assembly. Upper thread trimmer longitudinal position adjust- ment Upper thread trimmer cutting depth adjustment Page Service manual 4005Q Burr on upper side here Check burr here - Tension timing release Opening amount of zigzag tension discs and bar tack tension ...and out. Adjust the bar tack tension discs opening amount to retard the work clamp lifting speed. 79 101 HE-800A 16. TROUBLESHOOTING Unraveling of thread trimmed by upper thread trimmer assembly Cause Upper thread trimmer assembly Check Installation position of upper ...
Instruction Manual - English
Page 110
...moving the setting plate assembly. Upper thread trimmer longitudinal position adjustment Upper thread trimmer cutting depth adjustment Page Service manual upper thread operating force 4005Q trimmer Remove any scratches and burrs, and adjust the upper thread trimmer M to open when the... projection is applied. Repair any damage from striking the needle. HE-800A 4010Q 102 TROUBLESHOOTING Upper thread mis-trimming Cause Upper thread trimmer assembly Check Installation position of upper thread trimmer assembly Remedy Adjust...
...moving the setting plate assembly. Upper thread trimmer longitudinal position adjustment Upper thread trimmer cutting depth adjustment Page Service manual upper thread operating force 4005Q trimmer Remove any scratches and burrs, and adjust the upper thread trimmer M to open when the... projection is applied. Repair any damage from striking the needle. HE-800A 4010Q 102 TROUBLESHOOTING Upper thread mis-trimming Cause Upper thread trimmer assembly Check Installation position of upper thread trimmer assembly Remedy Adjust...
Instruction Manual - English
Page 118
INSTRUCTION MANUAL □ http://www.brother.com/ HE-800A SA2978-001 2003.12.B(2)
INSTRUCTION MANUAL □ http://www.brother.com/ HE-800A SA2978-001 2003.12.B(2)
Instruction Manual - Spanish
Page 122
MANUAL DE INSTRUCCIONES □ http://www.brother.com/ HE-800A SA9162-001 2007.11.B(1)
MANUAL DE INSTRUCCIONES □ http://www.brother.com/ HE-800A SA9162-001 2007.11.B(1)


