Users Manual - English
Page 2
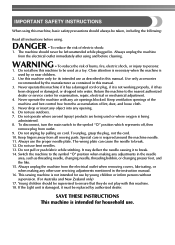
...bobbin, or changing presser foot, and the like. 15. Use only accessories recommended by the manufacturer as described in this machine to the symbol "{" position when making any air openings blocked. Keep ventilation openings of the machine and foot control free...electrical outlet when removing covers, lubricating, or when making any opening. 6. Do not use . Do not pull or push fabric while stitching. WARNING - Young...and loose cloth. 5. This sewing machine is used or where oxygen is damaged, it to persons: 1. Use this machine only for examination, repair, electrical or...
...bobbin, or changing presser foot, and the like. 15. Use only accessories recommended by the manufacturer as described in this machine to the symbol "{" position when making any air openings blocked. Keep ventilation openings of the machine and foot control free...electrical outlet when removing covers, lubricating, or when making any opening. 6. Do not use . Do not pull or push fabric while stitching. WARNING - Young...and loose cloth. 5. This sewing machine is used or where oxygen is damaged, it to persons: 1. Use this machine only for examination, repair, electrical or...
Users Manual - English
Page 8
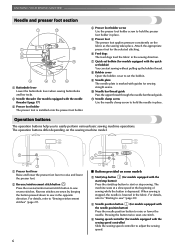
.... h Bobbin cover Open the bobbin cover to raise and lower the presser foot. a Presser foot lever Raise and lower the presser foot lever to set bobbin (for models equipped with the start/stop button) Press the start/stop button to "Sewing reinforcement stitches" (page... 29). ■ Buttons provided on some models c Start/stop sewing. b Reverse/reinforcement stitch button Press the reverse/reinforcement stitch button to easily perform various basic sewing machine...
.... h Bobbin cover Open the bobbin cover to raise and lower the presser foot. a Presser foot lever Raise and lower the presser foot lever to set bobbin (for models equipped with the start/stop button) Press the start/stop button to "Sewing reinforcement stitches" (page... 29). ■ Buttons provided on some models c Start/stop sewing. b Reverse/reinforcement stitch button Press the reverse/reinforcement stitch button to easily perform various basic sewing machine...

Users Manual - English
Page 16
...controller and the machine starts to sew, you slide the bobbin winding shaft to the right. this sewing machine. Hold the end of the thread, push the bobbin d down with the needle position button), and raise the presser foot lever. 14 1 a Tension-adjusting spring Replace the bobbin cover. If you... turn the power off while threading the machine. Actual size 11.5 ...
...controller and the machine starts to sew, you slide the bobbin winding shaft to the right. this sewing machine. Hold the end of the thread, push the bobbin d down with the needle position button), and raise the presser foot lever. 14 1 a Tension-adjusting spring Replace the bobbin cover. If you... turn the power off while threading the machine. Actual size 11.5 ...
Users Manual - English
Page 17
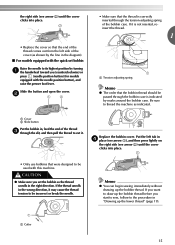
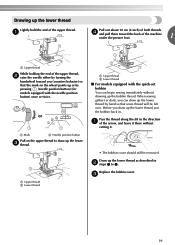
... turning a the handwheel toward you start to sew, follow to the procedure in "Drawing up the bobbin thread. If you want to draw up the bobbin thread before you (counterclockwise) or press (needle position button) (for models equipped with this machine. the right side (see arrow b) until the cover clicks into place. • Replace the...
... turning a the handwheel toward you start to sew, follow to the procedure in "Drawing up the bobbin thread. If you want to draw up the bobbin thread before you (counterclockwise) or press (needle position button) (for models equipped with this machine. the right side (see arrow b) until the cover clicks into place. • Replace the...
Users Manual - English
Page 21
... that some thread will be removed. Replace the bobbin cover. When sewing gathers or darts, you can begin sewing immediately without cutting it. • The bobbin cover should still be left over. Draw up the lower thread as described in b steps 1 to draw up the bobbin thread. a Upper thread b Lower thread a... Upper thread b Lower thread ■ For models equipped with the needle position button) once or twice. or a Mark b Needle position button Pull on the wheel points up or by turning the handwheel toward the back of the machine ...
... that some thread will be removed. Replace the bobbin cover. When sewing gathers or darts, you can begin sewing immediately without cutting it. • The bobbin cover should still be left over. Draw up the lower thread as described in b steps 1 to draw up the bobbin thread. a Upper thread b Lower thread a... Upper thread b Lower thread ■ For models equipped with the needle position button) once or twice. or a Mark b Needle position button Pull on the wheel points up or by turning the handwheel toward the back of the machine ...
Users Manual - English
Page 59
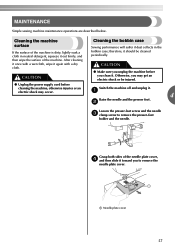
...sewing machine maintenance operations are described below. CAUTION Sewing performance will suffer if dust collects in neutral detergent, squeeze it out firmly, and then wipe the surface of the needle plate cover, d and then slide it toward you clean it should be cleaned periodically. Otherwise, you unplug the machine before cleaning the machine... CAUTION ● Make sure you may occur. Cleaning the machine Cleaning the bobbin case surface If the surface of the machine is dirty, lightly soak a cloth in the bobbin case; electric shock may get an electric shock or be ...
...sewing machine maintenance operations are described below. CAUTION Sewing performance will suffer if dust collects in neutral detergent, squeeze it out firmly, and then wipe the surface of the needle plate cover, d and then slide it toward you clean it should be cleaned periodically. Otherwise, you unplug the machine before cleaning the machine... CAUTION ● Make sure you may occur. Cleaning the machine Cleaning the bobbin case surface If the surface of the machine is dirty, lightly soak a cloth in the bobbin case; electric shock may get an electric shock or be ...
Users Manual - English
Page 60
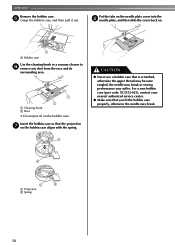
...out. a Cleaning brush b Race • Do not put oil on . 1 a Bobbin case Use the cleaning brush or a vacuum cleaner to f remove any dust from the race and its surrounding area. For a new bobbin case (part code: XC3152-021), contact your nearest authorized service center. ● Make ...sure that is scratched, otherwise the upper thread may become tangled, the needle may break or sewing performance may break. 2 1 2 a Projection b Spring 58 APPENDIX Remove the bobbin case. Put the tabs on the needle plate cover into the h needle plate, and then slide the...
...out. a Cleaning brush b Race • Do not put oil on . 1 a Bobbin case Use the cleaning brush or a vacuum cleaner to f remove any dust from the race and its surrounding area. For a new bobbin case (part code: XC3152-021), contact your nearest authorized service center. ● Make ...sure that is scratched, otherwise the upper thread may become tangled, the needle may break or sewing performance may break. 2 1 2 a Projection b Spring 58 APPENDIX Remove the bobbin case. Put the tabs on the needle plate cover into the h needle plate, and then slide the...
Users Manual - English
Page 63
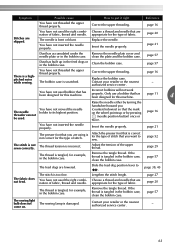
... 20 page 21 Dust has accumulated under the Remove the needle plate cover and needle plate or in the bobbin case. Replace the bobbin case. Attach the presser foot that are using is tangled, for the type of stitch. You have not used the right combination of fabric. Insert the...If the thread is too fine. The needle is correct for this machine. Lengthen the stitch length. Slide the feed dog position lever to sew. come on the wheel points up in the feed dogs or in the bobbin case. You have not threaded the upper thread properly. Replace the ...
... 20 page 21 Dust has accumulated under the Remove the needle plate cover and needle plate or in the bobbin case. Replace the bobbin case. Attach the presser foot that are using is tangled, for the type of stitch. You have not used the right combination of fabric. Insert the...If the thread is too fine. The needle is correct for this machine. Lengthen the stitch length. Slide the feed dog position lever to sew. come on the wheel points up in the feed dogs or in the bobbin case. You have not threaded the upper thread properly. Replace the ...
Users Manual - English
Page 65
...23 eyelet punch 37 F fagoting 49 fast bobbin winding 12 feed dog position lever 45 feed dogs 6, 45 flat bed attachment 7, 31 foot controller 8, 28 free-arm style 31 free-motion quilting 45 P patchwork stitching 43 piecing 43 pocket corners 46 presser ... 11 Q quick-set bobbin 6, 15 quilting 44 quilting foot 45 quilting guide 44 R reinforcement stitching 46 reverse/reinforcement stitch button 6 H handwheel 5 heirloom stitching 51 J joining 51 joining stitch 42, 48 L LCD 7 S scallop stitching 49 seam ripper 37 sewing machine needles 20 sewing speed controller 6 sleeve...
...23 eyelet punch 37 F fagoting 49 fast bobbin winding 12 feed dog position lever 45 feed dogs 6, 45 flat bed attachment 7, 31 foot controller 8, 28 free-arm style 31 free-motion quilting 45 P patchwork stitching 43 piecing 43 pocket corners 46 presser ... 11 Q quick-set bobbin 6, 15 quilting 44 quilting foot 45 quilting guide 44 R reinforcement stitching 46 reverse/reinforcement stitch button 6 H handwheel 5 heirloom stitching 51 J joining 51 joining stitch 42, 48 L LCD 7 S scallop stitching 49 seam ripper 37 sewing machine needles 20 sewing speed controller 6 sleeve...


