Users Manual - English
Page 2
...the following: Read all moving parts. Return the machine to break. 12. Keep ventilation openings of the machine and foot control free from the electrical outlet when removing covers, lubricating,... plugged in this machine, basic safety precautions should always be replaced by authorized dealer. This sewing machine is intended for its intended use outdoors. 7. The machine should be supervised ... or push fabric while stitching. Do not use as threading needle, changing needle, threading bobbin, or changing presser foot, and the like. 15. Switch the machine to break. 14. ...
...the following: Read all moving parts. Return the machine to break. 12. Keep ventilation openings of the machine and foot control free from the electrical outlet when removing covers, lubricating,... plugged in this machine, basic safety precautions should always be replaced by authorized dealer. This sewing machine is intended for its intended use outdoors. 7. The machine should be supervised ... or push fabric while stitching. Do not use as threading needle, changing needle, threading bobbin, or changing presser foot, and the like. 15. Switch the machine to break. 14. ...
Users Manual - English
Page 5
... FUNCTIONS 5 The main parts ...5 Needle and presser foot section ...6 Operation buttons ...6 Operation panel ...7 Flat bed attachment ...7 ACCESSORIES ...8 Optional accessories ...8 USING YOUR SEWING MACHINE 9 Power supply precautions ...9 Power supply ...9 Foot controller ...10 Sewing speed controller (for models equipped with the start/stop button 10 Changing the needle stop position ...10 THREADING THE MACHINE 11 Winding the bobbin...
... FUNCTIONS 5 The main parts ...5 Needle and presser foot section ...6 Operation buttons ...6 Operation panel ...7 Flat bed attachment ...7 ACCESSORIES ...8 Optional accessories ...8 USING YOUR SEWING MACHINE 9 Power supply precautions ...9 Power supply ...9 Foot controller ...10 Sewing speed controller (for models equipped with the start/stop button 10 Changing the needle stop position ...10 THREADING THE MACHINE 11 Winding the bobbin...
Users Manual - English
Page 6
APPENDIX ...52 STITCH SETTINGS ...52 Utility stitches ...52 MAINTENANCE ...57 Cleaning the machine surface ...57 Cleaning the bobbin case ...57 TROUBLESHOOTING ...59 ERROR MESSAGES ...62 Operation beep (for models equipped with the operation beep 62 INDEX ...63 4 UTILITY STITCHES 32 OVERCASTING STITCHES 32 BASIC STITCHING ...33 Basic stitching ...33 BLIND HEM STITCHING 34 BUTTONHOLE SEWING 35 Button sewing ...38 ZIPPER INSERTION ...40...
APPENDIX ...52 STITCH SETTINGS ...52 Utility stitches ...52 MAINTENANCE ...57 Cleaning the machine surface ...57 Cleaning the bobbin case ...57 TROUBLESHOOTING ...59 ERROR MESSAGES ...62 Operation beep (for models equipped with the operation beep 62 INDEX ...63 4 UTILITY STITCHES 32 OVERCASTING STITCHES 32 BASIC STITCHING ...33 Basic stitching ...33 BLIND HEM STITCHING 34 BUTTONHOLE SEWING 35 Button sewing ...38 ZIPPER INSERTION ...40...
Users Manual - English
Page 7
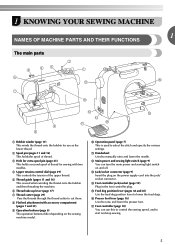
.../socket connector (page 9) Insert the plug on the sewing machine model. l Main power and sewing light switch (page 9) You can use as the lower thread. 1 KNOWING YOUR SEWING MACHINE 1 NAMES OF MACHINE PARTS AND THEIR FUNCTIONS The main parts a Bobbin winder (page 11) This winds the thread onto the bobbin for sewing with accessory compartment (pages 7 and 31) i Operation buttons...
.../socket connector (page 9) Insert the plug on the sewing machine model. l Main power and sewing light switch (page 9) You can use as the lower thread. 1 KNOWING YOUR SEWING MACHINE 1 NAMES OF MACHINE PARTS AND THEIR FUNCTIONS The main parts a Bobbin winder (page 11) This winds the thread onto the bobbin for sewing with accessory compartment (pages 7 and 31) i Operation buttons...
Users Manual - English
Page 8
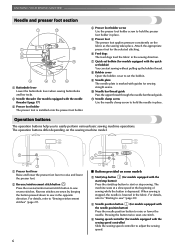
... details, refer to "Starting to sew reverse stitches. KNOWING YOUR SEWING MACHINE Needle and presser foot section a Buttonhole lever Lower the buttonhole lever when sewing buttonholes and bar tacks. e Presser foot The presser foot applies pressure consistently on the sewing machine model. k Needle clamp screw Use the needle clamp screw to set bobbin (for sewing straight seams. j Needle bar...
... details, refer to "Starting to sew reverse stitches. KNOWING YOUR SEWING MACHINE Needle and presser foot section a Buttonhole lever Lower the buttonhole lever when sewing buttonholes and bar tacks. e Presser foot The presser foot applies pressure consistently on the sewing machine model. k Needle clamp screw Use the needle clamp screw to set bobbin (for sewing straight seams. j Needle bar...
Users Manual - English
Page 10
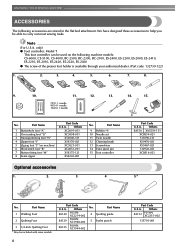
...Part Code U.S.A. only) ● Foot controller: Model T This foot controller can be used on machine) 6 Blind stitch foot "R" 7 Button fitting foot "M" 8 Seam ripper Part Code U.S.A. Others SA140 F033N: XC2214-002...Bobbin (4) 10 Needle set 11 Twin needle 12 Cleaning brush 13 Screwdriver 14 Extra spool pin 15 Foot controller Optional accessories 1. 2. 3. 4 Part Code U.S.A. Others SA132 F016N: XC2215-002 135793-001 Note (For U.S.A. We have designed these accessories to help you be included with some models. KNOWING YOUR SEWING MACHINE ACCESSORIES The following machine...
...Part Code U.S.A. only) ● Foot controller: Model T This foot controller can be used on machine) 6 Blind stitch foot "R" 7 Button fitting foot "M" 8 Seam ripper Part Code U.S.A. Others SA140 F033N: XC2214-002...Bobbin (4) 10 Needle set 11 Twin needle 12 Cleaning brush 13 Screwdriver 14 Extra spool pin 15 Foot controller Optional accessories 1. 2. 3. 4 Part Code U.S.A. Others SA132 F016N: XC2215-002 135793-001 Note (For U.S.A. We have designed these accessories to help you be included with some models. KNOWING YOUR SEWING MACHINE ACCESSORIES The following machine...

Users Manual - English
Page 13
... spring on the shaft slides into the groove of the bobbin. 1 2 a Spring on the shaft b Groove of the bobbin. THREADING THE MACHINE Winding the bobbin 1 This section describes how to wind the thread onto the bobbin. • For details on the sewing machine. b CAUTION ● If the spool of thread is... not in the right place, the thread may cause damage to the machine. ● We designed the bobbin that comes with this sewing machine. Pass the end of thread on this machine or bobbins of the same type (part code: SA156, SFB: XA5539-151). e 11 Actual size...
... spring on the shaft slides into the groove of the bobbin. 1 2 a Spring on the shaft b Groove of the bobbin. THREADING THE MACHINE Winding the bobbin 1 This section describes how to wind the thread onto the bobbin. • For details on the sewing machine. b CAUTION ● If the spool of thread is... not in the right place, the thread may cause damage to the machine. ● We designed the bobbin that comes with this sewing machine. Pass the end of thread on this machine or bobbins of the same type (part code: SA156, SFB: XA5539-151). e 11 Actual size...
Users Manual - English
Page 14
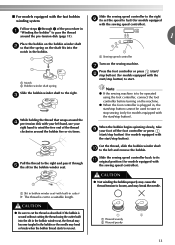
... you do not cut the thread completely, and the bobbin is plugged in, the start . Slide the sewing speed controller to the right h (to set the speed to fast). (For models equipped with the sewing speed controller.) Memo ● When the sewing machine is started or the handwheel is not a malfunction. ...● The needle bar does not move when you slide the bobbin winding shaft to start /stop button) to the right. If ...
... you do not cut the thread completely, and the bobbin is plugged in, the start . Slide the sewing speed controller to the right h (to set the speed to fast). (For models equipped with the sewing speed controller.) Memo ● When the sewing machine is started or the handwheel is not a malfunction. ...● The needle bar does not move when you slide the bobbin winding shaft to start /stop button) to the right. If ...
Users Manual - English
Page 15
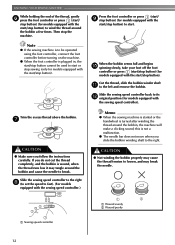
...thread that the spring on the bobbin winder shaft b so that wraps around the bobbin five or six times. Note ● If the sewing machine is to be operated using the cutter built into the notch in a "Winding the bobbin" to pass the thread around the...bobbin winder shaft to wind the free end of the procedure in the bobbin. g Press the foot controller or press (start/ h stop button) (for models equipped with the start/stop button) to start. If the bobbin is wound without cutting the thread using the foot controller, connect the foot controller before turning on the sewing machine...
...thread that the spring on the bobbin winder shaft b so that wraps around the bobbin five or six times. Note ● If the sewing machine is to be operated using the cutter built into the notch in a "Winding the bobbin" to pass the thread around the...bobbin winder shaft to wind the free end of the procedure in the bobbin. g Press the foot controller or press (start/ h stop button) (for models equipped with the start/stop button) to start. If the bobbin is wound without cutting the thread using the foot controller, connect the foot controller before turning on the sewing machine...

Users Manual - English
Page 16
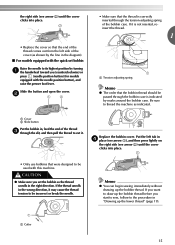
... be injured. Use only the enclosed bobbin or bobbins of the thread, push the bobbin d down with thread. • For more details on KNOWING YOUR SEWING MACHINE Memo ● When the sewing machine is started or the handwheel is turned after winding the thread around the bobbin, the machine will not operate correctly. this sewing machine. Actual size 11.5 mm (7/16...
... be injured. Use only the enclosed bobbin or bobbins of the thread, push the bobbin d down with thread. • For more details on KNOWING YOUR SEWING MACHINE Memo ● When the sewing machine is started or the handwheel is turned after winding the thread around the bobbin, the machine will not operate correctly. this sewing machine. Actual size 11.5 mm (7/16...
Users Manual - English
Page 17
... Memo ● The order that the bobbin thread should be passed through the bobbin case is correctly inserted through the tension-adjusting spring of the bobbin case. CAUTION ● Make sure you start to sew, follow to the procedure in the right direction. Be sure to thread the machine as shown by turning a the handwheel...
... Memo ● The order that the bobbin thread should be passed through the bobbin case is correctly inserted through the tension-adjusting spring of the bobbin case. CAUTION ● Make sure you start to sew, follow to the procedure in the right direction. Be sure to thread the machine as shown by turning a the handwheel...
Users Manual - English
Page 21
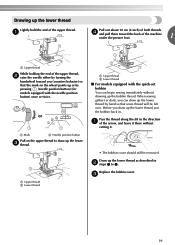
... the lower thread by hand so that the mark on the upper thread to draw up the lower thread, put the bobbin back in the direction a of the upper thread. When sewing gathers or darts, you draw up the lower c thread. c 19 a Pull out about 10 cm (4 inch) of both threads d and... pull them toward the back of the machine under the presser foot. 1 a Upper thread While holding the end of the upper thread, b raise the needle either by pressing (needle position button) (for models equipped with the quick-set bobbin You can draw up the lower thread Lightly hold the...
... the lower thread by hand so that the mark on the upper thread to draw up the lower thread, put the bobbin back in the direction a of the upper thread. When sewing gathers or darts, you draw up the lower c thread. c 19 a Pull out about 10 cm (4 inch) of both threads d and... pull them toward the back of the machine under the presser foot. 1 a Upper thread While holding the end of the upper thread, b raise the needle either by pressing (needle position button) (for models equipped with the quick-set bobbin You can draw up the lower thread Lightly hold the...
Users Manual - English
Page 41
...the button. Adjust the stitch width to the distance between the button holes. • When attaching four-hole buttons, first sew the two holes closest to you h (counterclockwise) to cut the upper thread and the bobbin thread at the beginning of the sewing machine, and then sew them in the button.... Then, slide the button so that the needle correctly goes into the two holes toward you . Start sewing. Pull the upper thread at low speed, press (reverse/reinforcement stitch button) to...
...the button. Adjust the stitch width to the distance between the button holes. • When attaching four-hole buttons, first sew the two holes closest to you h (counterclockwise) to cut the upper thread and the bobbin thread at the beginning of the sewing machine, and then sew them in the button.... Then, slide the button so that the needle correctly goes into the two holes toward you . Start sewing. Pull the upper thread at low speed, press (reverse/reinforcement stitch button) to...
Users Manual - English
Page 52
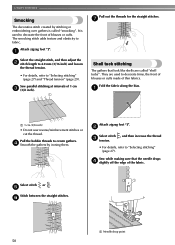
... point 50 Fold the fabric along the bias. Attach zigzag foot "J". Pull the bobbin threads to "Selecting stitching" (page 27) and "Thread tension" (page 29). b Select stitch , and then increase the thread c tension. • For details, refer to fabric. Sew while making sure that look like shells are used to decorate trims, the front...
... point 50 Fold the fabric along the bias. Attach zigzag foot "J". Pull the bobbin threads to "Selecting stitching" (page 27) and "Thread tension" (page 29). b Select stitch , and then increase the thread c tension. • For details, refer to fabric. Sew while making sure that look like shells are used to decorate trims, the front...
Users Manual - English
Page 59
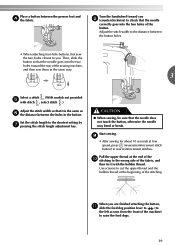
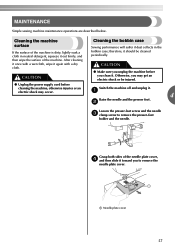
MAINTENANCE Simple sewing machine maintenance operations are described below. CAUTION ● Make sure you clean it should be cleaned periodically. Grasp both sides of the machine. a Needle plate cover 57 therefore, it . a 4 Raise the needle and the presser foot. electric shock may ...machine is dirty, lightly soak a cloth in the bobbin case; After cleaning it once with a dry cloth. b Loosen the presser-foot screw and the needle c clamp screw to remove the needle plate cover. Otherwise, you to remove the presser-foot holder and the needle. CAUTION Sewing...
MAINTENANCE Simple sewing machine maintenance operations are described below. CAUTION ● Make sure you clean it should be cleaned periodically. Grasp both sides of the machine. a Needle plate cover 57 therefore, it . a 4 Raise the needle and the presser foot. electric shock may ...machine is dirty, lightly soak a cloth in the bobbin case; After cleaning it once with a dry cloth. b Loosen the presser-foot screw and the needle c clamp screw to remove the needle plate cover. Otherwise, you to remove the presser-foot holder and the needle. CAUTION Sewing...
Users Manual - English
Page 60
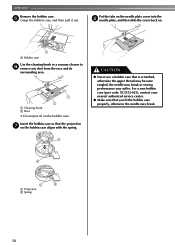
... APPENDIX Remove the bobbin case. e Grasp the bobbin case, and then pull it out. For a new bobbin case (part code: XC3152-021), contact your nearest authorized service center. ● Make sure that is scratched, otherwise the upper thread may become tangled, the needle may break or sewing performance may break.... 2 1 2 a Projection b Spring 58 Put the tabs on the needle plate cover into the h needle plate, and then slide the cover back on the bobbin case.
... APPENDIX Remove the bobbin case. e Grasp the bobbin case, and then pull it out. For a new bobbin case (part code: XC3152-021), contact your nearest authorized service center. ● Make sure that is scratched, otherwise the upper thread may become tangled, the needle may break or sewing performance may break.... 2 1 2 a Projection b Spring 58 Put the tabs on the needle plate cover into the h needle plate, and then slide the cover back on the bobbin case.
Users Manual - English
Page 61
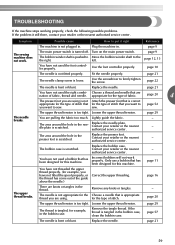
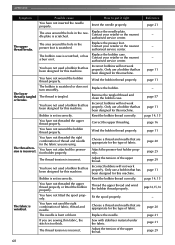
...the following possible problems. If the problem it right Reference The machine is not plugged in. Use the foot controller properly. appropriate for the type of stitch. - Loosen the upper thread tension. breaks. Replace the bobbin case. page 16 The upper thread breaks. Choose a needle ...bent or blunt. page 9 page 12, 13 You have not used a bobbin that are nation of the guide above the needle.) Correct the upper threading. The bobbin case is correct appropriate for the type of stitch that you want to sew. page 9 The sewing machine does not work properly...
...the following possible problems. If the problem it right Reference The machine is not plugged in. Use the foot controller properly. appropriate for the type of stitch. - Loosen the upper thread tension. breaks. Replace the bobbin case. page 16 The upper thread breaks. Choose a needle ...bent or blunt. page 9 page 12, 13 You have not used a bobbin that are nation of the guide above the needle.) Correct the upper threading. The bobbin case is correct appropriate for the type of stitch that you want to sew. page 9 The sewing machine does not work properly...
Users Manual - English
Page 62
... machine. Wind the bobbin thread properly. You have not used a bobbin that has been designed for this machine. Reset the bobbin thread correctly. You have not attached the presserfoot holder properly. You have not wound the bobbin thread properly. The thread tension is tangled. Incorrect bobbins will not work properly. Only use a bobbin that are sewing thin fabric, the stitch...
... machine. Wind the bobbin thread properly. You have not used a bobbin that has been designed for this machine. Reset the bobbin thread correctly. You have not attached the presserfoot holder properly. You have not wound the bobbin thread properly. The thread tension is tangled. Incorrect bobbins will not work properly. Only use a bobbin that are sewing thin fabric, the stitch...
Users Manual - English
Page 63
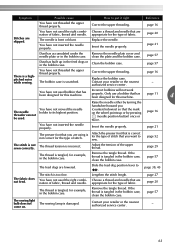
...turning the handwheel toward you want to sew. page 57 There is not sewn correctly. Only use a bobbin that are skipped. Raise the needle either by pressing (needle position button) once or twice. page 52 The stitch is a highpitched noise while sewing. You have not used the right ... a thread and needle that has been designed for this machine. page 20 page 21 Dust has accumulated under the Remove the needle plate cover and needle plate or in the bobbin case, clean the bobbin case. Clean the bobbin case. Correct the upper threading. threader can not be ...
...turning the handwheel toward you want to sew. page 57 There is not sewn correctly. Only use a bobbin that are skipped. Raise the needle either by pressing (needle position button) once or twice. page 52 The stitch is a highpitched noise while sewing. You have not used the right ... a thread and needle that has been designed for this machine. page 20 page 21 Dust has accumulated under the Remove the needle plate cover and needle plate or in the bobbin case, clean the bobbin case. Clean the bobbin case. Correct the upper threading. threader can not be ...

Users Manual - English
Page 64
... LCD while the sewing machine is lowered. The buttonhole or bar tack stitch was selected and the foot controller was pressed (or the start/stop button was pressed if the foot controller is not connected) and the reverse/reinforcement stitch button was pressed while the bobbin winder shaft is ... while the buttonhole lever is being used, the machine may be malfunctioning. If a non-functioning key is pressed or an incorrect operation is performed you will hear one beep. The motor locked up because the thread is tangled The sewing machine beeps for models equipped with the operation beep). ...
... LCD while the sewing machine is lowered. The buttonhole or bar tack stitch was selected and the foot controller was pressed (or the start/stop button was pressed if the foot controller is not connected) and the reverse/reinforcement stitch button was pressed while the bobbin winder shaft is ... while the buttonhole lever is being used, the machine may be malfunctioning. If a non-functioning key is pressed or an incorrect operation is performed you will hear one beep. The motor locked up because the thread is tangled The sewing machine beeps for models equipped with the operation beep). ...


