Users Manual - English
Page 1
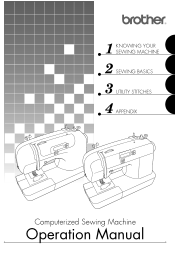
KNOWING YOUR SEWING MACHINE SEWING BASICS UTILITY STITCHES APPENDIX Computerized Sewing Machine Operation Manual
KNOWING YOUR SEWING MACHINE SEWING BASICS UTILITY STITCHES APPENDIX Computerized Sewing Machine Operation Manual
Users Manual - English
Page 2
... or push fabric while stitching. If the Light unit is damaged, it is not intended for examination, repair, electrical or mechanical adjustment. 4. WARNING - Never operate this machine if it has a ... as described in this manual. Keep ventilation openings of electric shock: 1. This sewing machine is not working properly, if it to the symbol "{" position when making any adjustments in the...machine only for household use the proper needle plate. To reduce the risk of the machine and foot control free from the electrical outlet immediately after using and before using this machine...
... or push fabric while stitching. If the Light unit is damaged, it is not intended for examination, repair, electrical or mechanical adjustment. 4. WARNING - Never operate this machine if it has a ... as described in this manual. Keep ventilation openings of electric shock: 1. This sewing machine is not working properly, if it to the symbol "{" position when making any adjustments in the...machine only for household use the proper needle plate. To reduce the risk of the machine and foot control free from the electrical outlet immediately after using and before using this machine...
Users Manual - English
Page 3
FOR USERS IN THE UK, EIRE, MALTA AND CYPRUS ONLY If this machine is fitted with the fuse cover omitted. The wires in this main lead are coloured in accordance with the coloured markings identifying the terminals in a ...
FOR USERS IN THE UK, EIRE, MALTA AND CYPRUS ONLY If this machine is fitted with the fuse cover omitted. The wires in this main lead are coloured in accordance with the coloured markings identifying the terminals in a ...
Users Manual - English
Page 4
... parts • A power failure occurs during use • Maintaining the machine • Leaving the machine unattended 3. For additional product information and updates, visit our web site at www.brother.com The contents of this manual and specifications of the most advanced computerized household sewing machines. Be sure to assure correct installation. Remember to turn off the...
... parts • A power failure occurs during use • Maintaining the machine • Leaving the machine unattended 3. For additional product information and updates, visit our web site at www.brother.com The contents of this manual and specifications of the most advanced computerized household sewing machines. Be sure to assure correct installation. Remember to turn off the...
Users Manual - English
Page 5
... 24 Replacing the presser foot ...24 Removing the presser foot holder ...25 2. CONTENTS 1. SEWING BASICS 26 SEWING ...26 General sewing procedure ...26 Selecting stitching ...27 Starting to sew ...28 Thread tension ...29 USEFUL SEWING TIPS ...30 Trial sewing ...30 Changing the sewing direction ...30 Sewing curves ...30 Sewing thick fabrics ...30 Sewing thin fabrics ...31 Sewing stretch fabrics ...31 Using a free-arm style ...31 3
... 24 Replacing the presser foot ...24 Removing the presser foot holder ...25 2. CONTENTS 1. SEWING BASICS 26 SEWING ...26 General sewing procedure ...26 Selecting stitching ...27 Starting to sew ...28 Thread tension ...29 USEFUL SEWING TIPS ...30 Trial sewing ...30 Changing the sewing direction ...30 Sewing curves ...30 Sewing thick fabrics ...30 Sewing thin fabrics ...31 Sewing stretch fabrics ...31 Using a free-arm style ...31 3
Users Manual - English
Page 6
...;s ...42 Patchwork (crazy quilt) stitching ...43 Piecing ...43 Quilting ...44 Free-motion quilting ...45 REINFORCEMENT STITCHING 46 Triple stretch stitching ...46 Bar tack stitching ...46 DECORATIVE STITCHING 48 Fagoting ...49 Scallop stitching ...49 Smocking ...50 Shell tuck stitching ...50 Joining ...51 Heirloom stitching ...51 4. APPENDIX ...52 STITCH SETTINGS ...52 Utility stitches ...52 MAINTENANCE ...57 Cleaning the machine surface ...57 Cleaning the bobbin...
...;s ...42 Patchwork (crazy quilt) stitching ...43 Piecing ...43 Quilting ...44 Free-motion quilting ...45 REINFORCEMENT STITCHING 46 Triple stretch stitching ...46 Bar tack stitching ...46 DECORATIVE STITCHING 48 Fagoting ...49 Scallop stitching ...49 Smocking ...50 Shell tuck stitching ...50 Joining ...51 Heirloom stitching ...51 4. APPENDIX ...52 STITCH SETTINGS ...52 Utility stitches ...52 MAINTENANCE ...57 Cleaning the machine surface ...57 Cleaning the bobbin...
Users Manual - English
Page 7
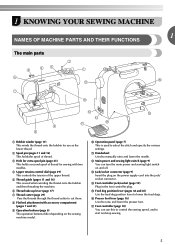
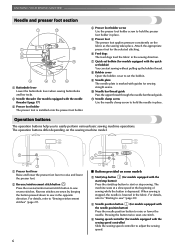
... (page 10) You can turn the main power and sewing light switch on the power supply cord into the jack/ socket connector. 1 KNOWING YOUR SEWING MACHINE 1 NAMES OF MACHINE PARTS AND THEIR FUNCTIONS The main parts a Bobbin winder (page 11) This winds... the thread onto the bobbin for sewing with accessory compartment (pages 7 and 31) i Operation buttons (page 6) The operation buttons differ depending on the sewing machine model. o Feed dog position lever (pages 38 and 45) Use the feed dog position lever to select the stitch...
... (page 10) You can turn the main power and sewing light switch on the power supply cord into the jack/ socket connector. 1 KNOWING YOUR SEWING MACHINE 1 NAMES OF MACHINE PARTS AND THEIR FUNCTIONS The main parts a Bobbin winder (page 11) This winds... the thread onto the bobbin for sewing with accessory compartment (pages 7 and 31) i Operation buttons (page 6) The operation buttons differ depending on the sewing machine model. o Feed dog position lever (pages 38 and 45) Use the feed dog position lever to select the stitch...
Users Manual - English
Page 8
... sewn by keeping the button pressed down to hold the needle in place. Pressing the button twice sews one stitch. e Presser foot The presser foot applies pressure consistently on the sewing machine model. Attach the appropriate presser foot for models equipped with the needle position button) Press the needle position button to adjust the...
... sewn by keeping the button pressed down to hold the needle in place. Pressing the button twice sews one stitch. e Presser foot The presser foot applies pressure consistently on the sewing machine model. Attach the appropriate presser foot for models equipped with the needle position button) Press the needle position button to adjust the...
Users Manual - English
Page 9
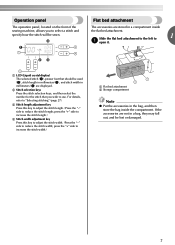
...front of the sewing machine, allows you wish to select a stitch and specify how the stitch will be lost or damaged. 7 b Stitch selection keys Press the stitch selection keys, and then select the number for the stitch that should be used (2), stitch length in millimeters (3), and stitch width in ... bed attachment. press the "+" side to reduce the stitch length; press the "+" side to increase the stitch length.) d Stitch width adjustment key Press this key to adjust the stitch length. (Press the "-" side to increase the stitch width.) a Flat bed attachment b Storage compartment Note ...
...front of the sewing machine, allows you wish to select a stitch and specify how the stitch will be lost or damaged. 7 b Stitch selection keys Press the stitch selection keys, and then select the number for the stitch that should be used (2), stitch length in millimeters (3), and stitch width in ... bed attachment. press the "+" side to reduce the stitch length; press the "+" side to increase the stitch length.) d Stitch width adjustment key Press this key to adjust the stitch length. (Press the "-" side to increase the stitch width.) a Flat bed attachment b Storage compartment Note ...
Users Manual - English
Page 10
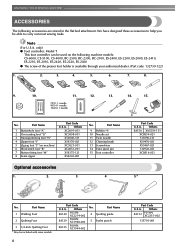
... 4 Quilting guide 5 Eyelet punch 8 Part Code U.S.A. We have designed these accessories to carry out most sewing tasks. only) ● Foot controller: Model T This foot controller can be used on machine) 6 Blind stitch foot "R" 7 Button fitting foot "M" 8 Seam ripper Part Code U.S.A. Note (For U.S.A. Part Name 9.... Others XC2691-031 XC3098-031 X53840-331 X59370-021 XC3021-031 XC4051-031 X59375-121 X54243-001 No. KNOWING YOUR SEWING MACHINE ACCESSORIES The following machine models: CS-6000, CS-5100, CS-4000, BC-2500, BC-2300, BC-2100, ES-2400, ES-2200,...
... 4 Quilting guide 5 Eyelet punch 8 Part Code U.S.A. We have designed these accessories to carry out most sewing tasks. only) ● Foot controller: Model T This foot controller can be used on machine) 6 Blind stitch foot "R" 7 Button fitting foot "M" 8 Seam ripper Part Code U.S.A. Note (For U.S.A. Part Name 9.... Others XC2691-031 XC3098-031 X53840-331 X59370-021 XC3021-031 XC4051-031 X59375-121 X54243-001 No. KNOWING YOUR SEWING MACHINE ACCESSORIES The following machine models: CS-6000, CS-5100, CS-4000, BC-2500, BC-2300, BC-2100, ES-2400, ES-2200,...
Users Manual - English
Page 11
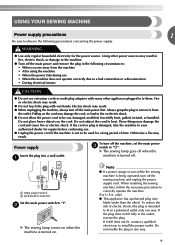
... than the other power sources may result. ● When unplugging the machine, always turn off the sewing machine and unplug the power supply cord. X The sewing lamp goes off when the machine is being operated, turn off the machine, set the main power c switch to "{". If the plug does ... risk of time. a To turn off the main power first. Do not modify the plug in the outlet, reverse the plug. USING YOUR SEWING MACHINE Power supply precautions 1 Be sure to observe the following circumstances: • When you are away from the outlet. a Main power switch b...
... than the other power sources may result. ● When unplugging the machine, always turn off the sewing machine and unplug the power supply cord. X The sewing lamp goes off when the machine is being operated, turn off the machine, set the main power c switch to "{". If the plug does ... risk of time. a To turn off the main power first. Do not modify the plug in the outlet, reverse the plug. USING YOUR SEWING MACHINE Power supply precautions 1 Be sure to observe the following circumstances: • When you are away from the outlet. a Main power switch b...
Users Manual - English
Page 12
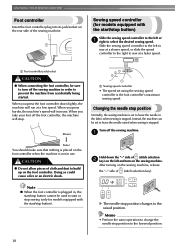
... with the start /stop position Normally, the sewing machine is set using the sewing speed controller is stopped. When you press the foot controller down the "-" side of (stitch selection key). CAUTION ● Do not allow pieces of the sewing machine. Changing the needle stop button) Slide the sewing speed controller to the left and turn off...
... with the start /stop position Normally, the sewing machine is set using the sewing speed controller is stopped. When you press the foot controller down the "-" side of (stitch selection key). CAUTION ● Do not allow pieces of the sewing machine. Changing the needle stop button) Slide the sewing speed controller to the left and turn off...

Users Manual - English
Page 13
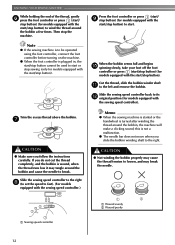
...thread may cause damage to the right. e 11 Only use the bobbin that have been designed for this machine. b CAUTION ● If the spool of the thread through the hole on the sewing machine. Pass the thread around the pre-tension disk. a Pre-tension disk b Bobbin winder shaft c Bobbin CAUTION... (part code: SA156, SFB: XA5539-151). If you use bobbins (part code: SA156, SFB: XA5539-151) that comes with this sewing machine. THREADING THE MACHINE Winding the bobbin 1 This section describes how to wind the thread onto the bobbin. • For details on the spool pin.
...thread may cause damage to the right. e 11 Only use the bobbin that have been designed for this machine. b CAUTION ● If the spool of the thread through the hole on the sewing machine. Pass the thread around the pre-tension disk. a Pre-tension disk b Bobbin winder shaft c Bobbin CAUTION... (part code: SA156, SFB: XA5539-151). If you use bobbins (part code: SA156, SFB: XA5539-151) that comes with this sewing machine. THREADING THE MACHINE Winding the bobbin 1 This section describes how to wind the thread onto the bobbin. • For details on the spool pin.
Users Manual - English
Page 14
... ● The needle bar does not move when you slide the bobbin winding shaft to start or stop sewing (only for models equipped with the sewing speed controller.) Memo ● When the sewing machine is started or the handwheel is wound, when the thread runs low it may tangle around the bobbin, ...start/stop button) (for models equipped with the start/stop button) to fast). (For models equipped with the start/stop button). KNOWING YOUR SEWING MACHINE While holding the end of the thread, gently f press the foot controller or press (start/ stop button) (for models equipped with the...
... ● The needle bar does not move when you slide the bobbin winding shaft to start or stop sewing (only for models equipped with the sewing speed controller.) Memo ● When the sewing machine is started or the handwheel is wound, when the thread runs low it may tangle around the bobbin, ...start/stop button) (for models equipped with the start/stop button) to fast). (For models equipped with the start/stop button). KNOWING YOUR SEWING MACHINE While holding the end of the thread, gently f press the foot controller or press (start/ stop button) (for models equipped with the...
Users Manual - English
Page 15
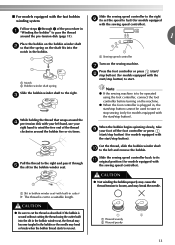
... begins spinning slowly, take i your right hand to wind the free end of the procedure in a "Winding the bobbin" to start or stop sewing (only for models equipped with the start / h stop button) (for models equipped with the sewing speed controller). a Sewing speed controller a Notch b Bobbin winder shaft spring Slide the bobbin... that wraps around the pre-tension disk (page 11). 1 Place the bobbin on the bobbin winder shaft b so that the spring on the sewing machine. Note ● If the sewing machine is to the right. a Slit in the bobbin or the needle may break the needle.
... begins spinning slowly, take i your right hand to wind the free end of the procedure in a "Winding the bobbin" to start or stop sewing (only for models equipped with the start / h stop button) (for models equipped with the sewing speed controller). a Sewing speed controller a Notch b Bobbin winder shaft spring Slide the bobbin... that wraps around the pre-tension disk (page 11). 1 Place the bobbin on the bobbin winder shaft b so that the spring on the sewing machine. Note ● If the sewing machine is to the right. a Slit in the bobbin or the needle may break the needle.

Users Manual - English
Page 16
...with this is not a malfunction. ● The needle bar does not move when you (counterclockwise) or press (needle position button) (for this sewing machine. Hold the end of the same type (part code: SA156, SFB: XA5539-151). Slide the button and open the cover. If you accidentally ... pass the thread through the slit, as shown. • Make sure that were designed to sew, you turn the power off while threading the machine. KNOWING YOUR SEWING MACHINE Memo ● When the sewing machine is started or the handwheel is turned after winding the thread around the bobbin, the...
...with this is not a malfunction. ● The needle bar does not move when you (counterclockwise) or press (needle position button) (for this sewing machine. Hold the end of the same type (part code: SA156, SFB: XA5539-151). Slide the button and open the cover. If you accidentally ... pass the thread through the slit, as shown. • Make sure that were designed to sew, you turn the power off while threading the machine. KNOWING YOUR SEWING MACHINE Memo ● When the sewing machine is started or the handwheel is turned after winding the thread around the bobbin, the...
Users Manual - English
Page 17
...sure to be incorrect or break the needle. 1 a Cutter Memo ● You can begin sewing immediately without drawing up the bobbin thread before you (counterclockwise) or press (needle position button) (for models equipped with this machine. If the thread unrolls in the right direction. b 1 2 • Make sure that the... be used with the needle position button), and raise the presser foot lever. If it may cause the thread tension to thread the machine as shown by the line in the diagram). ■ For models equipped with the quick-set the bobbin so the thread unrolls in...
...sure to be incorrect or break the needle. 1 a Cutter Memo ● You can begin sewing immediately without drawing up the bobbin thread before you (counterclockwise) or press (needle position button) (for models equipped with this machine. If the thread unrolls in the right direction. b 1 2 • Make sure that the... be used with the needle position button), and raise the presser foot lever. If it may cause the thread tension to thread the machine as shown by the line in the diagram). ■ For models equipped with the quick-set the bobbin so the thread unrolls in...
Users Manual - English
Page 18
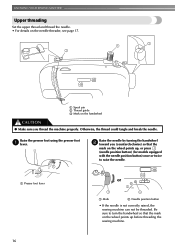
... • If the needle is not correctly raised, the sewing machine can not be threaded. Otherwise, the thread could tangle and break the needle. Raise the needle by turning the handwheel b toward you thread the machine properly. KNOWING YOUR SEWING MACHINE Upper threading Set the upper thread and thread the needle. ...• For details on the wheel points up before threading the sewing machine. 16 Raise the presser foot using the presser foot a lever. a Spool pin b Thread guide c Mark on the handwheel CAUTION ● Make sure...
... • If the needle is not correctly raised, the sewing machine can not be threaded. Otherwise, the thread could tangle and break the needle. Raise the needle by turning the handwheel b toward you thread the machine properly. KNOWING YOUR SEWING MACHINE Upper threading Set the upper thread and thread the needle. ...• For details on the wheel points up before threading the sewing machine. 16 Raise the presser foot using the presser foot a lever. a Spool pin b Thread guide c Mark on the handwheel CAUTION ● Make sure...

Users Manual - English
Page 19
... lever is lowered, the upper thread cannot be used with home sewing machine needles size 75/11100/16. If you are using transparent nylon monofilament... if you guide the thread through 6 of the procedure in a "Upper threading" to thread the machine to the needle bar thread guide. Lower the presser foot lever. Feed the upper thread as possible,...Needle threader lever c Guide 17 Make sure the main power switch is set incorrectly, the thread may cause sewing problems. ■ Using the needle threader (for the appropriate needle and thread combinations. Make sure you are ...
... lever is lowered, the upper thread cannot be used with home sewing machine needles size 75/11100/16. If you are using transparent nylon monofilament... if you guide the thread through 6 of the procedure in a "Upper threading" to thread the machine to the needle bar thread guide. Lower the presser foot lever. Feed the upper thread as possible,...Needle threader lever c Guide 17 Make sure the main power switch is set incorrectly, the thread may cause sewing problems. ■ Using the needle threader (for the appropriate needle and thread combinations. Make sure you are ...
Users Manual - English
Page 20
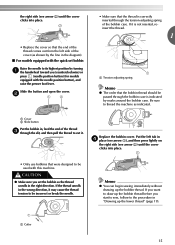
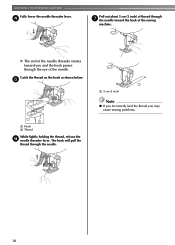
e a Hook b Thread While lightly holding the thread, release the f needle threader lever. a 5 cm (2 inch) Note ● If you incorrectly feed the thread you and the hook passes through the eye of thread through the needle. d Pull out about 5 cm (2 inch) of the needle. Catch the thread on the hook as shown below. The hook will pull the thread through g the needle toward the back of the needle threader rotates toward you may cause sewing problems. 18 KNOWING YOUR SEWING MACHINE Fully lower the needle threader lever. X The end of the sewing machine.
e a Hook b Thread While lightly holding the thread, release the f needle threader lever. a 5 cm (2 inch) Note ● If you incorrectly feed the thread you and the hook passes through the eye of thread through the needle. d Pull out about 5 cm (2 inch) of the needle. Catch the thread on the hook as shown below. The hook will pull the thread through g the needle toward the back of the needle threader rotates toward you may cause sewing problems. 18 KNOWING YOUR SEWING MACHINE Fully lower the needle threader lever. X The end of the sewing machine.
