Users Manual - English
Page 2
...children. 2. Switch the machine to the symbol "{" position which represents off, then remove plug from outlet. 9. This sewing machine is being used by ...openings of the machine and foot control free from the electrical outlet immediately after using and before using this machine, basic safety ...stitching. It may deflect the needle causing it has been dropped or damaged, or dropped into any air openings blocked. Always unplug the machine... from all instructions before cleaning. Young children should never be taken, including the following: Read all moving parts....
...children. 2. Switch the machine to the symbol "{" position which represents off, then remove plug from outlet. 9. This sewing machine is being used by ...openings of the machine and foot control free from the electrical outlet immediately after using and before using this machine, basic safety ...stitching. It may deflect the needle causing it has been dropped or damaged, or dropped into any air openings blocked. Always unplug the machine... from all instructions before cleaning. Young children should never be taken, including the following: Read all moving parts....
Users Manual - English
Page 4
... Replacing or removing the needle or any assemblies, the presser feet, needle, or other parts • A power failure occurs during use • Maintaining the machine • Leaving the machine unattended 3. When storing this product are subject to clean the case. Do not use ... a malfunction occurs or adjustment is one of this machine, avoid direct sunlight and high humidity locations. For additional product information and updates, visit our web site at www.brother.com The contents of this manual and specifications of the most advanced computerized household sewing machines.
... Replacing or removing the needle or any assemblies, the presser feet, needle, or other parts • A power failure occurs during use • Maintaining the machine • Leaving the machine unattended 3. When storing this product are subject to clean the case. Do not use ... a malfunction occurs or adjustment is one of this machine, avoid direct sunlight and high humidity locations. For additional product information and updates, visit our web site at www.brother.com The contents of this manual and specifications of the most advanced computerized household sewing machines.
Users Manual - English
Page 5
SEWING BASICS 26 SEWING ...26 General sewing procedure ...26 Selecting stitching ...27 Starting to sew ...28 Thread tension ...29 USEFUL SEWING TIPS ...30 Trial sewing ...30 Changing the sewing direction ...30 Sewing curves ...30 Sewing thick fabrics ...30 Sewing thin fabrics ...31 Sewing stretch fabrics ...31 Using a free-arm style ...31 3 KNOWING YOUR SEWING MACHINE 5 NAMES OF MACHINE PARTS AND THEIR FUNCTIONS 5 The main parts ...5 Needle and presser foot section ...6 Operation...
SEWING BASICS 26 SEWING ...26 General sewing procedure ...26 Selecting stitching ...27 Starting to sew ...28 Thread tension ...29 USEFUL SEWING TIPS ...30 Trial sewing ...30 Changing the sewing direction ...30 Sewing curves ...30 Sewing thick fabrics ...30 Sewing thin fabrics ...31 Sewing stretch fabrics ...31 Using a free-arm style ...31 3 KNOWING YOUR SEWING MACHINE 5 NAMES OF MACHINE PARTS AND THEIR FUNCTIONS 5 The main parts ...5 Needle and presser foot section ...6 Operation...
Users Manual - English
Page 7
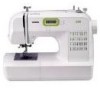
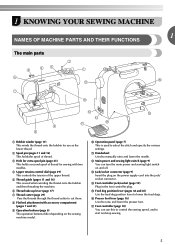
...control dial (page 29) This controls the tension of thread. 1 KNOWING YOUR SEWING MACHINE 1 NAMES OF MACHINE PARTS AND THEIR FUNCTIONS The main parts a Bobbin winder (page 11) This winds the thread onto the bobbin for sewing with accessory compartment (pages 7 and 31) i Operation buttons (page 6) The ...operation buttons differ depending on the sewing machine model. c Hole for extra spool pin (page 23) This holds a second spool of thread for use this to control the sewing speed, and to select the stitch and specify the various settings. j Operation panel (page...
...control dial (page 29) This controls the tension of thread. 1 KNOWING YOUR SEWING MACHINE 1 NAMES OF MACHINE PARTS AND THEIR FUNCTIONS The main parts a Bobbin winder (page 11) This winds the thread onto the bobbin for sewing with accessory compartment (pages 7 and 31) i Operation buttons (page 6) The ...operation buttons differ depending on the sewing machine model. c Hole for extra spool pin (page 23) This holds a second spool of thread for use this to control the sewing speed, and to select the stitch and specify the various settings. j Operation panel (page...
Users Manual - English
Page 10
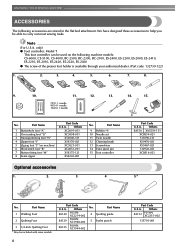
...the flat bed attachment. Part Name 1 Walking Foot 2 Quilting Foot 3 1/4-Inch Quilting Foot * May be used on machine) 6 Blind stitch foot "R" 7 Button fitting foot "M" 8 Seam ripper Part Code U.S.A. Part Code U.S.A. Others SA140 ...Part Code U.S.A. Others SA156 XA5539-151 XC8834-021 131096-121 X59476-021 X55467-021 130920-021 XC8816-021 5.* No. We have designed these accessories to help you be able to carry out most sewing tasks. Note (For U.S.A. Others SA132 F016N: XC2215-002 135793-001 KNOWING YOUR SEWING MACHINE ACCESSORIES The following machine...
...the flat bed attachment. Part Name 1 Walking Foot 2 Quilting Foot 3 1/4-Inch Quilting Foot * May be used on machine) 6 Blind stitch foot "R" 7 Button fitting foot "M" 8 Seam ripper Part Code U.S.A. Part Code U.S.A. Others SA140 ...Part Code U.S.A. Others SA156 XA5539-151 XC8834-021 131096-121 X59476-021 X55467-021 130920-021 XC8816-021 5.* No. We have designed these accessories to help you be able to carry out most sewing tasks. Note (For U.S.A. Others SA132 F016N: XC2215-002 135793-001 KNOWING YOUR SEWING MACHINE ACCESSORIES The following machine...

Users Manual - English
Page 13
... CAUTION ● Only use the bobbin that have been designed for this sewing machine. Pass the end of the thread through the hole on the sewing machine. Only use bobbins (part code: SA156, SFB: XA5539-151) that comes with this machine. Turn the bobbin clockwise, by hand, until the spring on the shaft... put a spool of thread is not in the right place, the thread may cause damage to the machine. ● We designed the bobbin that comes with this machine or bobbins of the same type (part code: SA156, SFB: XA5539-151). b CAUTION ● If the spool of thread on the fast...
... CAUTION ● Only use the bobbin that have been designed for this sewing machine. Pass the end of the thread through the hole on the sewing machine. Only use bobbins (part code: SA156, SFB: XA5539-151) that comes with this machine. Turn the bobbin clockwise, by hand, until the spring on the shaft... put a spool of thread is not in the right place, the thread may cause damage to the machine. ● We designed the bobbin that comes with this machine or bobbins of the same type (part code: SA156, SFB: XA5539-151). b CAUTION ● If the spool of thread on the fast...

Users Manual - English
Page 16
... ● When the sewing machine is started or the handwheel is not inserted, reinsert the thread. If bobbins from other models are used with your finger, and then pass the thread through the tension-adjusting spring of the same type (part code: SA156, SFB: XA5539-151). Hold the end of the... thread, push the bobbin d down with this sewing machine. CAUTION ● Winding the bobbin improperly may cause the thread tension to the right. this...
... ● When the sewing machine is started or the handwheel is not inserted, reinsert the thread. If bobbins from other models are used with your finger, and then pass the thread through the tension-adjusting spring of the same type (part code: SA156, SFB: XA5539-151). Hold the end of the... thread, push the bobbin d down with this sewing machine. CAUTION ● Winding the bobbin improperly may cause the thread tension to the right. this...

Users Manual - English
Page 24
KNOWING YOUR SEWING MACHINE Hold the needle with the screwdriver, otherwise the ...your left hand, f use a screwdriver to remove the needle. As seen from the front of the machine, insert the needle until it touches the needle stopper and securely tighten the needle clamp screw with your ...parts of the needle bar, and then tighten the needle clamp screw. Therefore, do not loosen the needle clamp screw too much , the needle clamp (which holds the needle) may be removed by turning it touches the needle stopper. While holding the needle with the end of the sewing machine...
KNOWING YOUR SEWING MACHINE Hold the needle with the screwdriver, otherwise the ...your left hand, f use a screwdriver to remove the needle. As seen from the front of the machine, insert the needle until it touches the needle stopper and securely tighten the needle clamp screw with your ...parts of the needle bar, and then tighten the needle clamp screw. Therefore, do not loosen the needle clamp screw too much , the needle clamp (which holds the needle) may be removed by turning it touches the needle stopper. While holding the needle with the end of the sewing machine...
Users Manual - English
Page 25
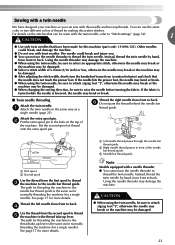
... be sewn with this machine (part code: 131096-121). Attach the extra spool pin. Instead, thread the twin needle by hand, from front to select an appropriate stitch, otherwise the needle may break or the machine may be damaged. ● Select a stitch width of the machine. If the fabric is...16 inch) or less, otherwise the needle may break or the machine may be damaged. ● When changing the sewing direction, be damaged. ● After adjusting the stitch width, slowly turn the handwheel toward you . ● You can sew with the twin needle, refer to the needle bar thread guide ...
... be sewn with this machine (part code: 131096-121). Attach the extra spool pin. Instead, thread the twin needle by hand, from front to select an appropriate stitch, otherwise the needle may break or the machine may be damaged. ● Select a stitch width of the machine. If the fabric is...16 inch) or less, otherwise the needle may break or the machine may be damaged. ● When changing the sewing direction, be damaged. ● After adjusting the stitch width, slowly turn the handwheel toward you . ● You can sew with the twin needle, refer to the needle bar thread guide ...
Users Manual - English
Page 28
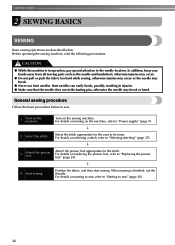
In addition, keep your hands away from all moving parts such as the needle and handwheel, otherwise injuries may occur. ● Do not pull or push the fabric too hard while sewing, otherwise injuries may occur or the needle may break or bend...Turn on starting to sew, refer to "Starting to sew" (page 28). 26 For details on the sewing machine. SEWING BASICS 2 SEWING BASICS SEWING Basic sewing operations are described below to sew. 1 Turn on selecting a stitch, refer to "Selecting stitching" (page 27). ↓ 3 Attach the presser foot. General sewing procedure Follow the basic ...
In addition, keep your hands away from all moving parts such as the needle and handwheel, otherwise injuries may occur. ● Do not pull or push the fabric too hard while sewing, otherwise injuries may occur or the needle may break or bend...Turn on starting to sew, refer to "Starting to sew" (page 28). 26 For details on the sewing machine. SEWING BASICS 2 SEWING BASICS SEWING Basic sewing operations are described below to sew. 1 Turn on selecting a stitch, refer to "Selecting stitching" (page 27). ↓ 3 Attach the presser foot. General sewing procedure Follow the basic ...
Users Manual - English
Page 38
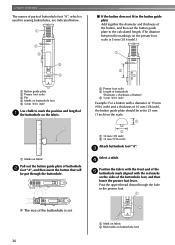
Pass the upper thread down through the buttonhole. UTILITY STITCHES The names of parts of buttonhole foot "A", which is used for sewing buttonholes, are indicated below. 1 2 5 ■ If the button does not fit in the presser foot. 1 X The size of the buttonhole is 5 mm (3/16 inch).) 1 ... set . 2 A 2 a Mark on fabric b Red marks on the scale. 1 2 a 10 mm (3/8 inch) b 15 mm (9/16 inch) Attach buttonhole foot "A". c Select a stitch. d Position the fabric with the front end of the e buttonhole mark aligned with a diameter of 15 mm (9/16 inch) and a thickness of 10 mm (3/8 inch...
Pass the upper thread down through the buttonhole. UTILITY STITCHES The names of parts of buttonhole foot "A", which is used for sewing buttonholes, are indicated below. 1 2 5 ■ If the button does not fit in the presser foot. 1 X The size of the buttonhole is 5 mm (3/16 inch).) 1 ... set . 2 A 2 a Mark on fabric b Red marks on the scale. 1 2 a 10 mm (3/8 inch) b 15 mm (9/16 inch) Attach buttonhole foot "A". c Select a stitch. d Position the fabric with the front end of the e buttonhole mark aligned with a diameter of 15 mm (9/16 inch) and a thickness of 10 mm (3/8 inch...
Users Manual - English
Page 40
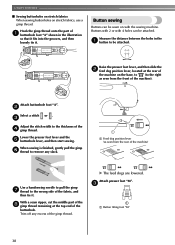
... the presser foot lever and the e buttonhole lever, and then start sewing. Attach presser foot "M". Buttons with 2 or with the sewing machine. Trim off any slack. c Adjust the stitch width to be attached. With a seam ripper, cut the middle part of the h gimp thread remaining at the rear of the buttonhole. c 1 a Button fitting foot "M" 38...
... the presser foot lever and the e buttonhole lever, and then start sewing. Attach presser foot "M". Buttons with 2 or with the sewing machine. Trim off any slack. c Adjust the stitch width to be attached. With a seam ripper, cut the middle part of the h gimp thread remaining at the rear of the buttonhole. c 1 a Button fitting foot "M" 38...
Users Manual - English
Page 60
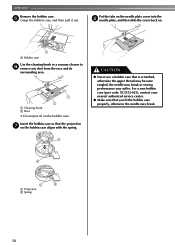
...case that you fit the bobbin case properly, otherwise the needle may suffer. APPENDIX Remove the bobbin case. For a new bobbin case (part code: XC3152-021), contact your nearest authorized service center. ● Make sure that is scratched, otherwise the upper thread may become tangled..., the needle may break or sewing performance may break. 2 1 2 a Projection b Spring 58 a Cleaning brush b Race • Do not put oil on . 1 a Bobbin case ...
...case that you fit the bobbin case properly, otherwise the needle may suffer. APPENDIX Remove the bobbin case. For a new bobbin case (part code: XC3152-021), contact your nearest authorized service center. ● Make sure that is scratched, otherwise the upper thread may become tangled..., the needle may break or sewing performance may break. 2 1 2 a Projection b Spring 58 a Cleaning brush b Race • Do not put oil on . 1 a Bobbin case ...
Users Manual - English
Page 65
...stitch 32 main parts 5 main power switch 9 A monogramming 49, 51 accessories 8 appliqués 42 N needle 20 B bar tack 46 basic stitching 33 blind hem stitching 34 bobbin 14 bobbin case 14, 57 bobbin cover 6, 14 bobbin winder 11, 59, 62 button sewing... foot controller 8, 28 free-arm style 31 free-motion quilting 45 P patchwork stitching 43 piecing 43 pocket ...stitching 46 reverse/reinforcement stitch button 6 H handwheel 5 heirloom stitching 51 J joining 51 joining stitch 42, 48 L LCD 7 S scallop stitching 49 seam ripper 37 sewing machine needles 20 sewing...
...stitch 32 main parts 5 main power switch 9 A monogramming 49, 51 accessories 8 appliqués 42 N needle 20 B bar tack 46 basic stitching 33 blind hem stitching 34 bobbin 14 bobbin case 14, 57 bobbin cover 6, 14 bobbin winder 11, 59, 62 button sewing... foot controller 8, 28 free-arm style 31 free-motion quilting 45 P patchwork stitching 43 piecing 43 pocket ...stitching 46 reverse/reinforcement stitch button 6 H handwheel 5 heirloom stitching 51 J joining 51 joining stitch 42, 48 L LCD 7 S scallop stitching 49 seam ripper 37 sewing machine needles 20 sewing...

