
Owners Manual - English
Page 1
MODELS OPERATION MANUAL VACUUM CLEANER CONTENTS PAGE • IMPORTANT SAFETY INSTRUCTIONS .... 2 • PARTS IDENTIFICATION 4 • SPECIFICATIONS 4 • OPERATING INSTRUCTIONS 6 • MAINTENANCE INSTRUCTIONS 11 • REPLACEMENT INSTRUCTIONS 13 • BEFORE REQUESTING SERVICE 19 • DESCRIPTION OF ACCESSORIES .......... 20 • SPANISH DIGEST 21 Thank you very much for buying another quality by Brother. Before using your Brother vacuum cleaner, please read this operation manual carefully to obtain the best use from your vacuum cleaner.
MODELS OPERATION MANUAL VACUUM CLEANER CONTENTS PAGE • IMPORTANT SAFETY INSTRUCTIONS .... 2 • PARTS IDENTIFICATION 4 • SPECIFICATIONS 4 • OPERATING INSTRUCTIONS 6 • MAINTENANCE INSTRUCTIONS 11 • REPLACEMENT INSTRUCTIONS 13 • BEFORE REQUESTING SERVICE 19 • DESCRIPTION OF ACCESSORIES .......... 20 • SPANISH DIGEST 21 Thank you very much for buying another quality by Brother. Before using your Brother vacuum cleaner, please read this operation manual carefully to obtain the best use from your vacuum cleaner.
Owners Manual - English
Page 2
... recommended attachments. 5 Never operate this vacuum cleaner to pick up the following : Read all openings, the agitator and any air opening . 11 Keep hair, face, fingers and loose clothing away from outlet when not in use the power cord as described in an electrical short. very fine dust: plaster, cement, cooking flour, etc... 2 flammable objects: lit cigarettes, hot ashes, lit matches or similar materials. Keep the air openings free...
... recommended attachments. 5 Never operate this vacuum cleaner to pick up the following : Read all openings, the agitator and any air opening . 11 Keep hair, face, fingers and loose clothing away from outlet when not in use the power cord as described in an electrical short. very fine dust: plaster, cement, cooking flour, etc... 2 flammable objects: lit cigarettes, hot ashes, lit matches or similar materials. Keep the air openings free...
Owners Manual - English
Page 3
... carrying handle on the hose or pull the hose forcibly. 21 Do not pick up a lot of electric shock, this happens, turn all parts to the "OFF" position. 15 Use extra caution when cleaning on stairs. 16 Never handle plug, cord or vacuum cleaner with water and check the main filter. This may cause the vacuum to maximize the motor life. It is designed to shut off to avoid overheating...
... carrying handle on the hose or pull the hose forcibly. 21 Do not pick up a lot of electric shock, this happens, turn all parts to the "OFF" position. 15 Use extra caution when cleaning on stairs. 16 Never handle plug, cord or vacuum cleaner with water and check the main filter. This may cause the vacuum to maximize the motor life. It is designed to shut off to avoid overheating...
Owners Manual - English
Page 4
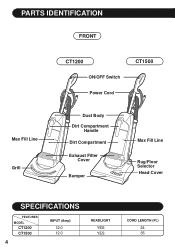
PARTS IDENTIFICATION FRONT Max Fill Line Grill CT1200 ON/OFF Switch Power Cord CT1500 Dust Body Dirt Compartment Handle Dirt Compartment Exhaust Filter Cover Bumper Max Fill Line Rug/Floor Selector Head Cover SPECIFICATIONS FEATURES MODEL CT1200 CT1500 4 INPUT (Amp) 12.0 12.0 HEADLIGHT YES YES CORD LENGTH (Ft.) 24 35
PARTS IDENTIFICATION FRONT Max Fill Line Grill CT1200 ON/OFF Switch Power Cord CT1500 Dust Body Dirt Compartment Handle Dirt Compartment Exhaust Filter Cover Bumper Max Fill Line Rug/Floor Selector Head Cover SPECIFICATIONS FEATURES MODEL CT1200 CT1500 4 INPUT (Amp) 12.0 12.0 HEADLIGHT YES YES CORD LENGTH (Ft.) 24 35
Owners Manual - English
Page 5
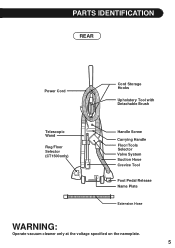
PARTS IDENTIFICATION REAR Power Cord Cord Storage Hooks Upholstery Tool with Detachable Brush Telescopic Wand Rug/Floor Selector (CT1500only) Handle Screw Carrying Handle Floor/Tools Selector Valve System Suction Hose Crevice Tool Foot Pedal Release Name Plate Extension Hose WARNING: Operate vacuum cleaner only at the voltage specified on the nameplate. 5
PARTS IDENTIFICATION REAR Power Cord Cord Storage Hooks Upholstery Tool with Detachable Brush Telescopic Wand Rug/Floor Selector (CT1500only) Handle Screw Carrying Handle Floor/Tools Selector Valve System Suction Hose Crevice Tool Foot Pedal Release Name Plate Extension Hose WARNING: Operate vacuum cleaner only at the voltage specified on the nameplate. 5
Owners Manual - English
Page 6
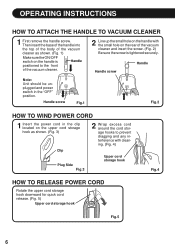
... tightened securely. OPERATING INSTRUCTIONS HOW TO ATTACH THE HANDLE TO VACUUM CLEANER 1 First remove the handle screw. Handle screw Handle Note: Unit should be unplugged and power switch in the clip located on the handle with cleaning. (Fig. 4) Upper cord storage hook Fig.4 HOW TO RELEASE POWER CORD Rotate the upper cord storage hook downward for quick cord release. (Fig. 5) Upper cord storage hook Fig.5 6 Handle screw Fig.1 Fig.2 HOW TO WIND POWER CORD 1 Insert the power cord in the...
... tightened securely. OPERATING INSTRUCTIONS HOW TO ATTACH THE HANDLE TO VACUUM CLEANER 1 First remove the handle screw. Handle screw Handle Note: Unit should be unplugged and power switch in the clip located on the handle with cleaning. (Fig. 4) Upper cord storage hook Fig.4 HOW TO RELEASE POWER CORD Rotate the upper cord storage hook downward for quick cord release. (Fig. 5) Upper cord storage hook Fig.5 6 Handle screw Fig.1 Fig.2 HOW TO WIND POWER CORD 1 Insert the power cord in the...
Owners Manual - English
Page 7
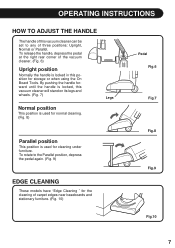
... until the handle is locked, this vacuum cleaner can be set to the Parallel position, depress the pedal again. (Fig. 9) EDGE CLEANING These models have "Edge Cleaning " for storage or when using the On Board Tools. OPERATING INSTRUCTIONS HOW TO ADJUST THE HANDLE The handle of this vacuum cleaner will stand on its legs and wheels. (Fig. 7) Normal position This position is used for normal cleaning. (Fig. 8) Legs...
... until the handle is locked, this vacuum cleaner can be set to the Parallel position, depress the pedal again. (Fig. 9) EDGE CLEANING These models have "Edge Cleaning " for storage or when using the On Board Tools. OPERATING INSTRUCTIONS HOW TO ADJUST THE HANDLE The handle of this vacuum cleaner will stand on its legs and wheels. (Fig. 7) Normal position This position is used for normal cleaning. (Fig. 8) Legs...
Owners Manual - English
Page 8
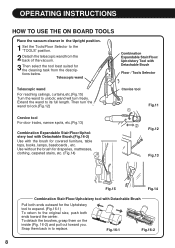
... its full length. To detach the brushes, grasp them back in the Upright position. 1 Set the Tools/Floor Selector to the "TOOLS" position. 2 Detach the telescopic wand from the back of the vacuum. 3 Then select the tool best suited for the cleaning task from the descriptions below. Then turn freely. Use without the brush for draperies, mattresses, clothing, carpeted stairs, etc. (Fig.14) Crevice...
... its full length. To detach the brushes, grasp them back in the Upright position. 1 Set the Tools/Floor Selector to the "TOOLS" position. 2 Detach the telescopic wand from the back of the vacuum. 3 Then select the tool best suited for the cleaning task from the descriptions below. Then turn freely. Use without the brush for draperies, mattresses, clothing, carpeted stairs, etc. (Fig.14) Crevice...
Owners Manual - English
Page 10
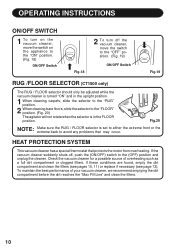
... back to avoid any problems that protects the motor from overheating. To maintain the best performance of overheating such as a full dirt compartment or clogged filters. If these conditions are found, empty the dirt compartment and clean the filters (see pages 10, 11) or replace if necessary (see page 13). OPERATING INSTRUCTIONS ON/OFF SWITCH 1 To turn on the vacuum cleaner, move the switch on the appliance to...
... back to avoid any problems that protects the motor from overheating. To maintain the best performance of overheating such as a full dirt compartment or clogged filters. If these conditions are found, empty the dirt compartment and clean the filters (see pages 10, 11) or replace if necessary (see page 13). OPERATING INSTRUCTIONS ON/OFF SWITCH 1 To turn on the vacuum cleaner, move the switch on the appliance to...
Owners Manual - English
Page 11
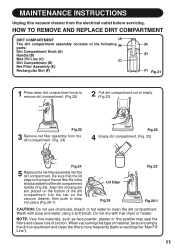
... placed behind the dirt compartment handle (Fig.26). Wash with hair dryer or heater. Be sure that the lid edge on the bottom of the dirt compartment into place (Fig.26-1). Do not dry with soap and water using a soft brush. MAINTENANCE INSTRUCTIONS Unplug this type of material, be sure to empty the dirt compartment and clean the filters more frequently (before servicing. Align the...
... placed behind the dirt compartment handle (Fig.26). Wash with hair dryer or heater. Be sure that the lid edge on the bottom of the dirt compartment into place (Fig.26-1). Do not dry with soap and water using a soft brush. MAINTENANCE INSTRUCTIONS Unplug this type of material, be sure to empty the dirt compartment and clean the filters more frequently (before servicing. Align the...
Owners Manual - English
Page 12
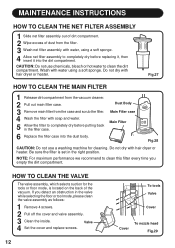
... the dirt compartment. Valve 4 Set the cover and replace screws. 12 To tools Valve TOOLS FLOOR Cover Cover To nozzle head Fig.29 Fig.27 HOW TO CLEAN THE MAIN FILTER 1 Release dirt compartment from the vacuum cleaner. 2 Pull out main filter case. 3 Remove main filter from the filter. 3 Wash net filter assembly with water, using a soft sponge. Be sure the filter is located on the back of dust from the case and scrub the filter. 4 Wash the filter...
... the dirt compartment. Valve 4 Set the cover and replace screws. 12 To tools Valve TOOLS FLOOR Cover Cover To nozzle head Fig.29 Fig.27 HOW TO CLEAN THE MAIN FILTER 1 Release dirt compartment from the vacuum cleaner. 2 Pull out main filter case. 3 Remove main filter from the filter. 3 Wash net filter assembly with water, using a soft sponge. Be sure the filter is located on the back of dust from the case and scrub the filter. 4 Wash the filter...

Owners Manual - English
Page 13
... of the nozzle head, then reset the bottom plate.(Fig. 31) 2 Fasten it gently into the grooves at the front end of the bottom plate into the socket and turning clockwise. (Fig. 33-2) Use any parts, unplug the vacuum cleaner from the electrical outlet and set and the wires are properly set the handle to the Parallel position. REPLACEMENT INSTRUCTIONS HOW TO REMOVE / AND RESET THE BOTTOM PLATE Before replacing any...
... of the nozzle head, then reset the bottom plate.(Fig. 31) 2 Fasten it gently into the grooves at the front end of the bottom plate into the socket and turning clockwise. (Fig. 33-2) Use any parts, unplug the vacuum cleaner from the electrical outlet and set and the wires are properly set the handle to the Parallel position. REPLACEMENT INSTRUCTIONS HOW TO REMOVE / AND RESET THE BOTTOM PLATE Before replacing any...
Owners Manual - English
Page 14
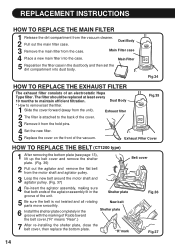
... the unit). The filter should be replaced at least every 10 months to remove/set the dirt compartment into the case. New belt 6 Install the shelter plate completely in the groove with the marking of an electrostatic Hepa Type filter. Exhaust filter 2 The filter is not twisted and all rotating parts move smoothly. Main Filter 5 Reposition the filter case in the groove of the vacuum. Dust Body Fig.35...
... the unit). The filter should be replaced at least every 10 months to remove/set the dirt compartment into the case. New belt 6 Install the shelter plate completely in the groove with the marking of an electrostatic Hepa Type filter. Exhaust filter 2 The filter is not twisted and all rotating parts move smoothly. Main Filter 5 Reposition the filter case in the groove of the vacuum. Dust Body Fig.35...
Owners Manual - English
Page 15
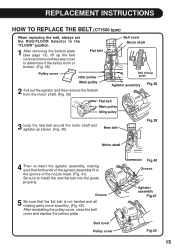
... cover, close the belt cover and replace the bottom plate. REPLACEMENT INSTRUCTIONS HOW TO REPLACE THE BELT (CT1500 type) When replacing the belt, always set the RUG/FLOOR Selector to the "FLOOR" position. 1 After removing the bottom plate (see page 13), lift up the belt cover and remove the pulley cover to install the new flat belt into the guide properly. Belt cover Pulley cover Fig.40 Groove Agitator assembly Fig.41 Fig.42...
... cover, close the belt cover and replace the bottom plate. REPLACEMENT INSTRUCTIONS HOW TO REPLACE THE BELT (CT1500 type) When replacing the belt, always set the RUG/FLOOR Selector to the "FLOOR" position. 1 After removing the bottom plate (see page 13), lift up the belt cover and remove the pulley cover to install the new flat belt into the guide properly. Belt cover Pulley cover Fig.40 Groove Agitator assembly Fig.41 Fig.42...
Owners Manual - English
Page 16
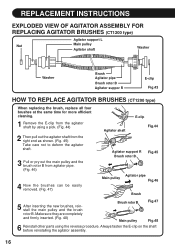
... by using the reverse procedure. REPLACEMENT INSTRUCTIONS EXPLODED VIEW OF AGITATOR ASSEMBLY FOR REPLACING AGITATOR BRUSHES (CT1200 type) Agitator support L Nut Main pulley Agitator shaft Washer Washer Brush Agitator pipe Brush rotor B Agitator suppor R E-clip Fig.43 HOW TO REPLACE AGITATOR BRUSHES (CT1200 type) When replacing the brush, replace all four brushes at the same time for more efficient cleaning. 1 Remove the E-clip from agitator pipe. (Fig. 46) 4 Now the brushes can be easily removed. (Fig. 47) Agitator shaft E-clip Fig.44 Agitator support R Brush...
... by using the reverse procedure. REPLACEMENT INSTRUCTIONS EXPLODED VIEW OF AGITATOR ASSEMBLY FOR REPLACING AGITATOR BRUSHES (CT1200 type) Agitator support L Nut Main pulley Agitator shaft Washer Washer Brush Agitator pipe Brush rotor B Agitator suppor R E-clip Fig.43 HOW TO REPLACE AGITATOR BRUSHES (CT1200 type) When replacing the brush, replace all four brushes at the same time for more efficient cleaning. 1 Remove the E-clip from agitator pipe. (Fig. 46) 4 Now the brushes can be easily removed. (Fig. 47) Agitator shaft E-clip Fig.44 Agitator support R Brush...
Owners Manual - English
Page 17
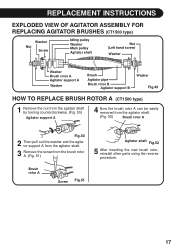
REPLACEMENT INSTRUCTIONS EXPLODED VIEW OF AGITATOR ASSEMBLY FOR REPLACING AGITATOR BRUSHES (CT1500 type) Washer Nut Screw Idling pulley Washer Main pulley Agitator shaft Nut (Left hand screw) Washer Washer Brush rotor A Agitator support A Washer Brush Agitator pipe Brush rotor B Agitator support B Washer Fig.49 HOW TO REPLACE BRUSH ROTOR A (CT1500 type) 1 Remove the nut from the agitator shaft by turning counterclockwise. (Fig. 50) Agitator support A 4 Now the brush rotor A can be easily removed from the agitator shaft. (Fig. 52) Brush rotor A Fig.50...
REPLACEMENT INSTRUCTIONS EXPLODED VIEW OF AGITATOR ASSEMBLY FOR REPLACING AGITATOR BRUSHES (CT1500 type) Washer Nut Screw Idling pulley Washer Main pulley Agitator shaft Nut (Left hand screw) Washer Washer Brush rotor A Agitator support A Washer Brush Agitator pipe Brush rotor B Agitator support B Washer Fig.49 HOW TO REPLACE BRUSH ROTOR A (CT1500 type) 1 Remove the nut from the agitator shaft by turning counterclockwise. (Fig. 50) Agitator support A 4 Now the brush rotor A can be easily removed from the agitator shaft. (Fig. 52) Brush rotor A Fig.50...
Owners Manual - English
Page 18
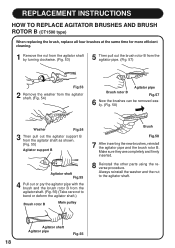
... bend or deform the agitator shaft.) Brush rotor B Main pulley Brush Fig.58 7 After inserting the new brushes, reinstall the agitator pipe and the brush rotor B. Agitator shaft Agitator pipe Fig.56 18 REPLACEMENT INSTRUCTIONS HOW TO REPLACE AGITATOR BRUSHES AND BRUSH ROTOR B (CT1500 type) When replacing the brush, replace all four brushes at the same time for more efficient cleaning. 1 Remove the nut from the agitator shaft by turning clockwise. (Fig. 53) 5 Then...
... bend or deform the agitator shaft.) Brush rotor B Main pulley Brush Fig.58 7 After inserting the new brushes, reinstall the agitator pipe and the brush rotor B. Agitator shaft Agitator pipe Fig.56 18 REPLACEMENT INSTRUCTIONS HOW TO REPLACE AGITATOR BRUSHES AND BRUSH ROTOR B (CT1500 type) When replacing the brush, replace all four brushes at the same time for more efficient cleaning. 1 Remove the nut from the agitator shaft by turning clockwise. (Fig. 53) 5 Then...
Owners Manual - English
Page 19
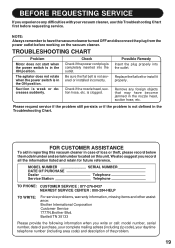
...: Brother International Corporation Customer Service 7777N.Brother Blvd. Suction is not severed or installed incorrectly. Replace the flat belt or install it properly. TROUBLESHOOTING CHART Problem Motor does not start when the power switch is completely inserted into the outlet. Check Check if the power cord plug is in the ON position. is not defined in the nozzle head, suction hose, etc. We also suggest you experience any foreign objects that may have the vacuum cleaner turned...
...: Brother International Corporation Customer Service 7777N.Brother Blvd. Suction is not severed or installed incorrectly. Replace the flat belt or install it properly. TROUBLESHOOTING CHART Problem Motor does not start when the power switch is completely inserted into the outlet. Check Check if the power cord plug is in the ON position. is not defined in the nozzle head, suction hose, etc. We also suggest you experience any foreign objects that may have the vacuum cleaner turned...
Owners Manual - English
Page 20
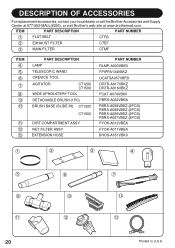
...-552-MALL(6255), or visit Brother's web site at www.brothermall.com. ITEM PART DESCRIPTION PART NUMBER 1 FLAT BELT CTFB 2 EXHAUST FILTER CTEF 3 MAIN FILTER CTMF ITEM 4 5 6 7 8 9 10 11 12 13 PART DESCRIPTION LAMP TELESCOPIC WAND CREVICE TOOL AGITATOR CT1200 CT1500 WIDE UPHOLSTERY TOOL DETACHABLE BRUSH (1PC) BRUSH BASE (SLIDE IN) CT1200 CT1500 DIRT COMPARTMENT ASSY NET FILTER ASSY EXTENSION HOSE PART NUMBER RLMP-A003VBE0 FPIPPA134VBKZ UCATSA057VBFB DRTR-A017VBKZ...
...-552-MALL(6255), or visit Brother's web site at www.brothermall.com. ITEM PART DESCRIPTION PART NUMBER 1 FLAT BELT CTFB 2 EXHAUST FILTER CTEF 3 MAIN FILTER CTMF ITEM 4 5 6 7 8 9 10 11 12 13 PART DESCRIPTION LAMP TELESCOPIC WAND CREVICE TOOL AGITATOR CT1200 CT1500 WIDE UPHOLSTERY TOOL DETACHABLE BRUSH (1PC) BRUSH BASE (SLIDE IN) CT1200 CT1500 DIRT COMPARTMENT ASSY NET FILTER ASSY EXTENSION HOSE PART NUMBER RLMP-A003VBE0 FPIPPA134VBKZ UCATSA057VBFB DRTR-A017VBKZ...

Owners Manual - English
Page 24
Brother International Corporation 100 Somerset Corporate BIvd., Bridgewater, New Jersey 08807-0911 24 Printed in U.S.A
Brother International Corporation 100 Somerset Corporate BIvd., Bridgewater, New Jersey 08807-0911 24 Printed in U.S.A
