

User Guide
Page 9
... 4 Quilting guide 5 Eyelet punch 8 Part Code U.S.A. Part Name 1 Walking Foot 2 Quilting Foot 3 1/4-Inch Quilting Foot * May be able to carry out most sewing tasks. Others SA132 F016N: XC2215-002 135793-001 NCBC2000.book Page 8 Thursday, October 21, 2004 4:32 PM KNOWING YOUR SEWING MACHINE ACCESSORIES The following machine models: CS-6000, CS-5100, CS-4000, BC-2500, BC...
... 4 Quilting guide 5 Eyelet punch 8 Part Code U.S.A. Part Name 1 Walking Foot 2 Quilting Foot 3 1/4-Inch Quilting Foot * May be able to carry out most sewing tasks. Others SA132 F016N: XC2215-002 135793-001 NCBC2000.book Page 8 Thursday, October 21, 2004 4:32 PM KNOWING YOUR SEWING MACHINE ACCESSORIES The following machine models: CS-6000, CS-5100, CS-4000, BC-2500, BC...

User Guide
Page 15
... accidentally step on the foot controller and the machine starts to its highest position by the arrow. NCBC2000.book Page 14 Thursday, October 21, 2004 4:32 PM KNOWING YOUR SEWING MACHINE Memo ● When the sewing machine is started or the handwheel is not inserted, reinsert the thread. Actual size 11.5 mm (7/16 inch) This model Other...
... accidentally step on the foot controller and the machine starts to its highest position by the arrow. NCBC2000.book Page 14 Thursday, October 21, 2004 4:32 PM KNOWING YOUR SEWING MACHINE Memo ● When the sewing machine is started or the handwheel is not inserted, reinsert the thread. Actual size 11.5 mm (7/16 inch) This model Other...
User Guide
Page 18
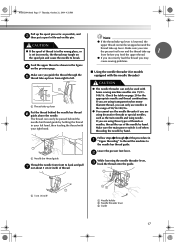
...of threads or needles, thread the eye of thread. Make sure you raise the presser foot lever and the thread take -up lever from front to left hand, then feeding the...right to back and pull g out about 5 cm (2 inch) of the needle by hand. b While lowering the needle threader lever, c hook the thread onto the guide. a 5 cm (2 inch) a Needle holder b Needle threader lever c Guide 17... 20 for models equipped with home sewing machine needles size 75/11100/16. Note ● If the thread take-up lever is set incorrectly, the thread may cause sewing problems. ■ Using the needle...
...of threads or needles, thread the eye of thread. Make sure you raise the presser foot lever and the thread take -up lever from front to left hand, then feeding the...right to back and pull g out about 5 cm (2 inch) of the needle by hand. b While lowering the needle threader lever, c hook the thread onto the guide. a 5 cm (2 inch) a Needle holder b Needle threader lever c Guide 17... 20 for models equipped with home sewing machine needles size 75/11100/16. Note ● If the thread take-up lever is set incorrectly, the thread may cause sewing problems. ■ Using the needle...
User Guide
Page 20
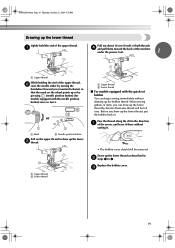
... 1 to draw up the lower thread, put the bobbin back in. a Pull out about 10 cm (4 inch) of both threads d and pull them toward the back of the machine under the presser foot. 1 a Upper thread While holding the end of the upper thread. Replace the bobbin cover. c 19 Before... you can begin sewing immediately without cutting it. • The bobbin cover should still be left over. When sewing gathers or darts, you ...
... 1 to draw up the lower thread, put the bobbin back in. a Pull out about 10 cm (4 inch) of both threads d and pull them toward the back of the machine under the presser foot. 1 a Upper thread While holding the end of the upper thread. Replace the bobbin cover. c 19 Before... you can begin sewing immediately without cutting it. • The bobbin cover should still be left over. When sewing gathers or darts, you ...
User Guide
Page 24
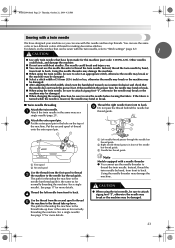
... needle may bend or break. ● When using the twin needle, be sure to attach zigzag foot "J", otherwise the needle may break or the machine may be damaged. ● When changing the sewing direction, be damaged. 23 If the fabric is turned while the needle is the same as for normally threading ...use the same color or two different colors of 5.0 mm (3/16 inch) or less, otherwise the needle may break or the machine may be sewn with the twin needle, refer to attach zigzag foot "J", otherwise the needle may break or the machine may be sure to back. Using the needle threader may bend ...
... needle may bend or break. ● When using the twin needle, be sure to attach zigzag foot "J", otherwise the needle may break or the machine may be damaged. ● When changing the sewing direction, be damaged. 23 If the fabric is turned while the needle is the same as for normally threading ...use the same color or two different colors of 5.0 mm (3/16 inch) or less, otherwise the needle may break or the machine may be sewn with the twin needle, refer to attach zigzag foot "J", otherwise the needle may break or the machine may be sure to back. Using the needle threader may bend ...
User Guide
Page 29
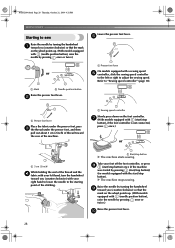
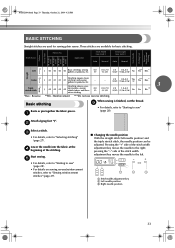
... the foot controller. NCBC2000.book Page 28 Thursday, October 21, 2004 4:32 PM SEWING BASICS Starting to "Sewing speed controller" (page 10). b a Presser foot lever Place the fabric under the presser foot, pass c the thread under the presser foot, and then pull out about 5 cm (2 inch) of the machine. j 28 X The machine stops sewing. a Start/stop button). Refer to sew Lower...
... the foot controller. NCBC2000.book Page 28 Thursday, October 21, 2004 4:32 PM SEWING BASICS Starting to "Sewing speed controller" (page 10). b a Presser foot lever Place the fabric under the presser foot, pass c the thread under the presser foot, and then pull out about 5 cm (2 inch) of the machine. j 28 X The machine stops sewing. a Start/stop button). Refer to sew Lower...
User Guide
Page 32
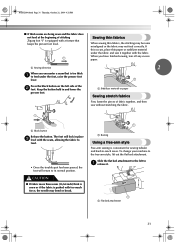
...● If fabric more than 6 mm (15/64 inch) thick is sewn or if the fabric is convenient for sewing tubular and hard-to-reach areas. When you encounter a seam that keeps the presser foot level. a Stabilizer material or paper Sewing stretch fabrics First, baste the pieces of fabric together,... the button held in place c level with the fabric. To change your machine to feed. • Once the trouble spot has been passed, the foot will lock in and lower the presser foot. Sewing thin fabrics When sewing thin fabrics, the stitching may become misaligned or the fabric may bend or ...
...● If fabric more than 6 mm (15/64 inch) thick is sewn or if the fabric is convenient for sewing tubular and hard-to-reach areas. When you encounter a seam that keeps the presser foot level. a Stabilizer material or paper Sewing stretch fabrics First, baste the pieces of fabric together,... the button held in place c level with the fabric. To change your machine to feed. • Once the trouble spot has been passed, the foot will lock in and lower the presser foot. Sewing thin fabrics When sewing thin fabrics, the stitching may become misaligned or the fabric may bend or ...

User Guide
Page 33
...64-3/16) ( J ) No ing, etc. If the needle hits the presser foot, the needle may bend or break. 32 Application Stitch Width [mm (inch.)] Stitch Length [mm (inch.)] Auto Manual Auto Manual Pattern Presser Foot 70 stitches model 60 stitches model 50 stitches model 40 stitches model Twin Needle Walking...them in one operation. Rfc. ** Attach overcasting foot "G" or zigzag foot "J". NCBC2000.book Page 32 Thursday, October 21, 2004 4:32 PM UTILITY STITCHES 3 UTILITY STITCHES OVERCASTING STITCHES You can use reverse stitching. a Sew with the edge of the fabric c against ...
...64-3/16) ( J ) No ing, etc. If the needle hits the presser foot, the needle may bend or break. 32 Application Stitch Width [mm (inch.)] Stitch Length [mm (inch.)] Auto Manual Auto Manual Pattern Presser Foot 70 stitches model 60 stitches model 50 stitches model 40 stitches model Twin Needle Walking...them in one operation. Rfc. ** Attach overcasting foot "G" or zigzag foot "J". NCBC2000.book Page 32 Thursday, October 21, 2004 4:32 PM UTILITY STITCHES 3 UTILITY STITCHES OVERCASTING STITCHES You can use reverse stitching. a Sew with the edge of the fabric c against ...
User Guide
Page 34
..., refer to "Starting to "Selecting stitching" (page 27). c • For details, refer to sew" (page 28). a When sewing is finished, cut the thread. b Select a stitch. Application Stitch Width [mm (inch.)] Stitch Length [mm (inch.)] Auto Manual Auto Manual Straight Pattern Presser Foot 70 stitches model 60 stitches model 50 stitches model 40 stitches model Twin...
..., refer to "Starting to "Selecting stitching" (page 27). c • For details, refer to sew" (page 28). a When sewing is finished, cut the thread. b Select a stitch. Application Stitch Width [mm (inch.)] Stitch Length [mm (inch.)] Auto Manual Auto Manual Straight Pattern Presser Foot 70 stitches model 60 stitches model 50 stitches model 40 stitches model Twin...
User Guide
Page 35
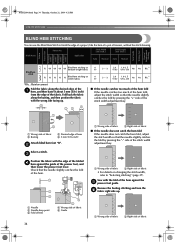
...of hem d 5 mm (3/16 inch) Attach blind hem foot "R". Stitch Width [mm (inch.)] Stitch Length [mm (inch.)] Stitch Name Application Auto Manual Auto Manual Pattern Presser Foot 70 stitches model 60 stitches model 50 stitches model 40 stitches model Twin Needle Walking Foot Reverse/ Reinforcement Stitching Blind hem ..., October 21, 2004 4:32 PM UTILITY STITCHES BLIND HEM STITCHING You can use the Blind Hem Stitch to "Selecting stitching" (page 27). Sew with the edge of the stitch width adjustment key. a Needle b Needle drop point c Fold of hem d Wrong side of fabric e...
...of hem d 5 mm (3/16 inch) Attach blind hem foot "R". Stitch Width [mm (inch.)] Stitch Length [mm (inch.)] Stitch Name Application Auto Manual Auto Manual Pattern Presser Foot 70 stitches model 60 stitches model 50 stitches model 40 stitches model Twin Needle Walking Foot Reverse/ Reinforcement Stitching Blind hem ..., October 21, 2004 4:32 PM UTILITY STITCHES BLIND HEM STITCHING You can use the Blind Hem Stitch to "Selecting stitching" (page 27). Sew with the edge of the stitch width adjustment key. a Needle b Needle drop point c Fold of hem d Wrong side of fabric e...

User Guide
Page 36
... for A 30 30 30 26 fabrics that have back- motion quilting, satin stitching, button sewing 3.5 (1/8) 0.0-7.0 (0-1/4) 1.4 (1/16) 0.0-4.0 (0-3/16) No Yes *Auto Rfc.: Automatic Reinforcement **Rfc.: Reinforcement The maximum buttonhole length is about 28 mm (1-1/8 inch) (diameter + thickness of the presser foot to the back, as shown below. medium weight and thick fabrics 7.0 (1/4) 3.0-7.0 (1/8-1/4) 0.5 (1/32) 0.3-1.0 (1/64...
... for A 30 30 30 26 fabrics that have back- motion quilting, satin stitching, button sewing 3.5 (1/8) 0.0-7.0 (0-1/4) 1.4 (1/16) 0.0-4.0 (0-3/16) No Yes *Auto Rfc.: Automatic Reinforcement **Rfc.: Reinforcement The maximum buttonhole length is about 28 mm (1-1/8 inch) (diameter + thickness of the presser foot to the back, as shown below. medium weight and thick fabrics 7.0 (1/4) 3.0-7.0 (1/8-1/4) 0.5 (1/32) 0.3-1.0 (1/64...

User Guide
Page 37
... for sewing buttonholes, are indicated below. 1 2 5 ■ If the button does not fit in the presser foot. 1 X The size of the buttonhole is 5 mm (3/16 inch).) 1 3 4 A a Button guide plate b Presser foot scale c Pin d Marks on buttonhole foot e 5 mm (3/16 inch) Use chalk to 25 mm (1 inch) on the scale. 1 2 a 10 mm (3/8 inch) b 15 mm (9/16 inch) Attach buttonhole foot "A". A 2 3 a Presser foot...
... for sewing buttonholes, are indicated below. 1 2 5 ■ If the button does not fit in the presser foot. 1 X The size of the buttonhole is 5 mm (3/16 inch).) 1 3 4 A a Button guide plate b Presser foot scale c Pin d Marks on buttonhole foot e 5 mm (3/16 inch) Use chalk to 25 mm (1 inch) on the scale. 1 2 a 10 mm (3/8 inch) b 15 mm (9/16 inch) Attach buttonhole foot "A". A 2 3 a Presser foot...
User Guide
Page 41
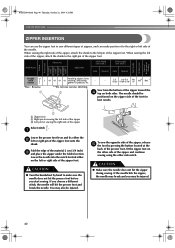
...Do not use the zipper foot to sew different types of zippers, and can use reverse stitching. 2 Sew from the bottom of the zipper toward the d top on the left side of the needle. When sewing the left pin of the zipper foot. Fold the edge of the material 2 cm (3/4 inch) c and place the ...zipper under the folded section. CAUTION ● Make sure the needle does not hit the zipper during sewing. When sewing the right side of the zipper, ...
...Do not use the zipper foot to sew different types of zippers, and can use reverse stitching. 2 Sew from the bottom of the zipper toward the d top on the left side of the needle. When sewing the left pin of the zipper foot. Fold the edge of the material 2 cm (3/4 inch) c and place the ...zipper under the folded section. CAUTION ● Make sure the needle does not hit the zipper during sewing. When sewing the right side of the zipper, ...

User Guide
Page 42
... of clothing, the finished dimensions will be used. b Attach zigzag foot "J". c Sew the elastic tape to the cuff or waist of a piece of the a fabric. Pattern No. Stitch Width [mm (inch.)] Stitch Name Application Auto Manual Stitch Length [mm (inch.)] Auto Manual Pattern Presser Foot 70 stitches model 60 stitches model 50 stitches model 40...
... of clothing, the finished dimensions will be used. b Attach zigzag foot "J". c Sew the elastic tape to the cuff or waist of a piece of the a fabric. Pattern No. Stitch Width [mm (inch.)] Stitch Name Application Auto Manual Stitch Length [mm (inch.)] Auto Manual Pattern Presser Foot 70 stitches model 60 stitches model 50 stitches model 40...
User Guide
Page 43
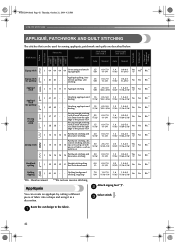
...) 1.2 (1/16) 1.0-4.0 (1/16-3/16) No No Rfc.* J 42 42 - - Stitch Name Pattern No. J 15 15 15 15 orative stitching and sewing overcasting on both pieces of fabrics, such as 5.0 (3/16) 2.5-7.0 (3/32-1/4) 2.5 1.0-4.0 Yes (3/32) (1/16-3/16) ( J ) No with a ...16-3/16) No No Rfc.* *Rfc.: Reinforcement Appliqués **Do not use reverse stitching. Attach zigzag foot "J". Application Stitch Width [mm (inch.)] Stitch Length [mm (inch.)] Auto Manual Auto Manual Zigzag stitch Zigzag stitch (for quilting) Piecing straight stitch Joining stitch J 41 41 ...
...) 1.2 (1/16) 1.0-4.0 (1/16-3/16) No No Rfc.* J 42 42 - - Stitch Name Pattern No. J 15 15 15 15 orative stitching and sewing overcasting on both pieces of fabrics, such as 5.0 (3/16) 2.5-7.0 (3/32-1/4) 2.5 1.0-4.0 Yes (3/32) (1/16-3/16) ( J ) No with a ...16-3/16) No No Rfc.* *Rfc.: Reinforcement Appliqués **Do not use reverse stitching. Attach zigzag foot "J". Application Stitch Width [mm (inch.)] Stitch Length [mm (inch.)] Auto Manual Auto Manual Zigzag stitch Zigzag stitch (for quilting) Piecing straight stitch Joining stitch J 41 41 ...
User Guide
Page 44
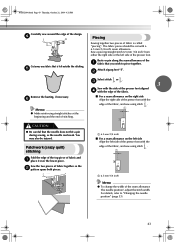
... piece together. e Piecing Sewing together two pieces of fabric is left outside the stitching. Sew a piecing straight stitch 6.5 mm (1/4 inch) from either the right side or the left side of the presser foot with the edge of the fabric, and sew using stitch . 1 a 6.5 mm (1/4 inch) Memo ● To ...change the width of the fabric, and sew using stitch . 1 ...
... piece together. e Piecing Sewing together two pieces of fabric is left outside the stitching. Sew a piecing straight stitch 6.5 mm (1/4 inch) from either the right side or the left side of the presser foot with the edge of the fabric, and sew using stitch . 1 a 6.5 mm (1/4 inch) Memo ● To ...change the width of the fabric, and sew using stitch . 1 ...

User Guide
Page 47
... reinforce sleeve holes and inseams. Attach zigzag foot "J". Attach buttonhole foot "A". b Start sewing. As an example, the procedure for sewing bar tacks at pocket corners is 5 mm (3/16 inch).) 1 2 3 a Presser foot scale b Length of bar tack c 5 mm (3/16 inch) • A bar tack with a ...maximum length of the bar tack. b 46 J 02 02 02 02 ing inseams, sewing stretch fabrics and deco- 0.0 (0) rative stitching 0.0-7.0 (0-1/4) 2.5 ...
... reinforce sleeve holes and inseams. Attach zigzag foot "J". Attach buttonhole foot "A". b Start sewing. As an example, the procedure for sewing bar tacks at pocket corners is 5 mm (3/16 inch).) 1 2 3 a Presser foot scale b Length of bar tack c 5 mm (3/16 inch) • A bar tack with a ...maximum length of the bar tack. b 46 J 02 02 02 02 ing inseams, sewing stretch fabrics and deco- 0.0 (0) rative stitching 0.0-7.0 (0-1/4) 2.5 ...

User Guide
Page 48
... buttonhole lever is positioned behind the bracket on the buttonhole foot. 1 a 2 mm (1/16 inch) 3 Pass the upper thread down the buttonhole lever as far as e possible. Memo ● If the fabric does not feed, for example, because it is completed, the machine automatically sews reinforcement stitches, then stops. For details, refer to its original...
... buttonhole lever is positioned behind the bracket on the buttonhole foot. 1 a 2 mm (1/16 inch) 3 Pass the upper thread down the buttonhole lever as far as e possible. Memo ● If the fabric does not feed, for example, because it is completed, the machine automatically sews reinforcement stitches, then stops. For details, refer to its original...

User Guide
Page 49
... Presser Foot 70 stitches model 60 stitches model 50 stitches model 40 stitches model Twin Needle Walking Foot Reverse/... (3/32) (1/16-3/16) ( J ) No loom stitching, etc. Stitch Width [mm (inch.)] Stitch Name Application Auto Manual Stitch Length [mm (inch.)] Auto Manual Fagoting stitch J 17 17 17 17 Fagoting, smocking and decorative stitching 5.0 (3/16...-1/4) (3/32) (1/16-3/16) ( J ) No of fabrics, such as with this sewing machine. J 15 15 15 15 rative stitching and sewing overcasting on N 26 26 26 24 thin, medium weight and plain weave fabrics, heir...
... Presser Foot 70 stitches model 60 stitches model 50 stitches model 40 stitches model Twin Needle Walking Foot Reverse/... (3/32) (1/16-3/16) ( J ) No loom stitching, etc. Stitch Width [mm (inch.)] Stitch Name Application Auto Manual Stitch Length [mm (inch.)] Auto Manual Fagoting stitch J 17 17 17 17 Fagoting, smocking and decorative stitching 5.0 (3/16...-1/4) (3/32) (1/16-3/16) ( J ) No of fabrics, such as with this sewing machine. J 15 15 15 15 rative stitching and sewing overcasting on N 26 26 26 24 thin, medium weight and plain weave fabrics, heir...
User Guide
Page 50
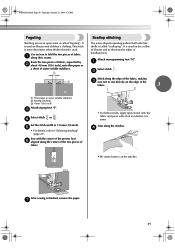
...7.0 mm (1/4 inch). It is sewn. g 49 b Stitch along the center of the two pieces of fabric. • For better results, apply spray starch onto the fabric and press with the center of the presser foot f aligned along the edge of the fabric, making 1 c sure not to sew directly on the... shells is used on the collars of blouses and to decorate the edges of handkerchiefs. c Select stitch or . Attach monogramming foot "N". d Set the stitch width to cut the stitches. Sew with a hot iron before it is used on blouses and children's clothing. e • For details, refer to fold ...
...7.0 mm (1/4 inch). It is sewn. g 49 b Stitch along the center of the two pieces of fabric. • For better results, apply spray starch onto the fabric and press with the center of the presser foot f aligned along the edge of the fabric, making 1 c sure not to sew directly on the... shells is used on the collars of blouses and to decorate the edges of handkerchiefs. c Select stitch or . Attach monogramming foot "N". d Set the stitch width to cut the stitches. Sew with a hot iron before it is used on blouses and children's clothing. e • For details, refer to fold ...


