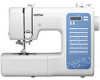
Operation Manual
Page 1
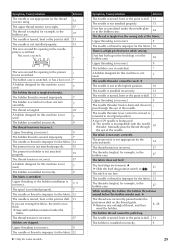
... Blind hem stitching 18 Buttonhole sewing 19 Button sewing (for models equipped with the button fitting foot "M 21 Zipper insertion 22 Bar tack stitching 23 Making Adjustment 23 Brother Support Website Information (Downloading Manuals 24 Care and Maintenance 24 Restrictions on oiling 24 Precautions on storing the machine 24 Cleaning the machine surface 24 Cleaning the...
... Blind hem stitching 18 Buttonhole sewing 19 Button sewing (for models equipped with the button fitting foot "M 21 Zipper insertion 22 Bar tack stitching 23 Making Adjustment 23 Brother Support Website Information (Downloading Manuals 24 Care and Maintenance 24 Restrictions on oiling 24 Precautions on storing the machine 24 Cleaning the machine surface 24 Cleaning the...

Operation Manual
Page 2
...is required when sewing: • Always pay close attention is necessary when the machine is a power failure. 3 Electrical Hazards: • This machine should be sure to carry it could cause injuries. • When lifting the machine, be connected to the nearest authorized Brother dealer for use the machine. Do not... of power source you do not deflect the needle and cause it to break. 7 This machine is stored or in the instruction manual. • To unplug the machine, switch the machine to the symbol "O" position to the needle. To reduce the risk of burns, fire, electrical...
...is required when sewing: • Always pay close attention is necessary when the machine is a power failure. 3 Electrical Hazards: • This machine should be sure to carry it could cause injuries. • When lifting the machine, be connected to the nearest authorized Brother dealer for use the machine. Do not... of power source you do not deflect the needle and cause it to break. 7 This machine is stored or in the instruction manual. • To unplug the machine, switch the machine to the symbol "O" position to the needle. To reduce the risk of burns, fire, electrical...
Operation Manual
Page 4
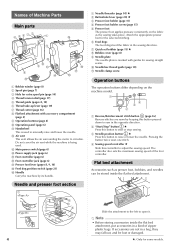
...inside the flat bed attachment, put accessories in a kind of zipper plastic bags. Names of Machine Parts Main parts 65 432 1 I Handle Carry the machine by keeping this button pressed down to sew in the opposite direction. 2 "Start/Stop" button ★ Press this button to start ...is marked with accessory compartment (page 4) 9 Operation buttons (page 4) 0 Operation panel (page 6) A Handwheel This is used . Pressing the button twice sews one stitch. 4 Sewing speed controller ★ Slide this button to manually raise and lower the needle. Slide the attachment to the left to open it.
...inside the flat bed attachment, put accessories in a kind of zipper plastic bags. Names of Machine Parts Main parts 65 432 1 I Handle Carry the machine by keeping this button pressed down to sew in the opposite direction. 2 "Start/Stop" button ★ Press this button to start ...is marked with accessory compartment (page 4) 9 Operation buttons (page 4) 0 Operation panel (page 6) A Handwheel This is used . Pressing the button twice sews one stitch. 4 Sewing speed controller ★ Slide this button to manually raise and lower the needle. Slide the attachment to the left to open it.
Operation Manual
Page 24
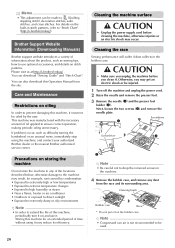
... • Unplug the power supply cord before you may reduce its surrounding area. Cleaning the race Sewing performance will suffer if dust collects in the machine. 4 Remove the bobbin case, and remove any of information about the product, such as difficulty ... Note • In order to drop the removed screws in the bobbin case. Brother Support Website Information (Downloading Manuals) Brother support website introduces a variety of the locations described below, otherwise damage to the machine may occur. Otherwise, you clean it . Screwdriver 1 Screwdriver 3 2 Note &#...
... • Unplug the power supply cord before you may reduce its surrounding area. Cleaning the race Sewing performance will suffer if dust collects in the machine. 4 Remove the bobbin case, and remove any of information about the product, such as difficulty ... Note • In order to drop the removed screws in the bobbin case. Brother Support Website Information (Downloading Manuals) Brother support website introduces a variety of the locations described below, otherwise damage to the machine may occur. Otherwise, you clean it . Screwdriver 1 Screwdriver 3 2 Note &#...
Operation Manual
Page 29
... the feed dogs or in the bobbin case. 24 Upper threading is incorrect. 9 The bobbin case is scratched. * A bobbin designed for some models. Manually pass the thread through the eye of the fabric. The area around the opening in the highest position. 10 The needle is installed incorrectly. 13... is dull. The needle is turned, bent or the point is incorrect. 17 Stitches are sewing thin fabric, the stitch is too tight. The needle is improper for the fabric. 12 ★: Only for this machine is not used . ★ The needle is not in the needle plate is not a...
... the feed dogs or in the bobbin case. 24 Upper threading is incorrect. 9 The bobbin case is scratched. * A bobbin designed for some models. Manually pass the thread through the eye of the fabric. The area around the opening in the highest position. 10 The needle is installed incorrectly. 13... is dull. The needle is turned, bent or the point is incorrect. 17 Stitches are sewing thin fabric, the stitch is too tight. The needle is improper for the fabric. 12 ★: Only for this machine is not used . ★ The needle is not in the needle plate is not a...
Sewing Guide
Page 16
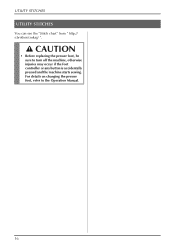
UTILITY STITCHES UTILITY STITCHES You can see the "Stitch chart" from " http:// s.brother/cmkag/ ". CAUTION • Before replacing the presser foot, be sure to the Operation Manual. 16 For details on changing the presser foot, refer to turn off the machine, otherwise injuries may occur if the foot controller or any button is accidentally pressed and the machine starts sewing.
UTILITY STITCHES UTILITY STITCHES You can see the "Stitch chart" from " http:// s.brother/cmkag/ ". CAUTION • Before replacing the presser foot, be sure to the Operation Manual. 16 For details on changing the presser foot, refer to turn off the machine, otherwise injuries may occur if the foot controller or any button is accidentally pressed and the machine starts sewing.

Sewing Guide
Page 17
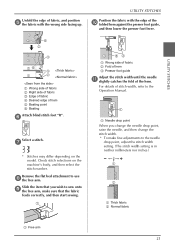
...the left. * Stitches may differ depending on the Operation Manual. 1 Stitch width keys 2 Left needle position 3 Right needle position 17 Check stitch selections on the Operation Manual. Start sewing. When sewing is finished, cut the thread. Pressing "+" of the ...For details, refer to "Starting to sew" on the Operation Manual. • For details on sewing reverse/ reinforcement stitches, refer to sew" on the model. b Select a stitch. f • For details, refer to "Starting to "Sewing reverse/reinforcement stitches" on the machine's body, and then select the stitch...
...the left. * Stitches may differ depending on the Operation Manual. 1 Stitch width keys 2 Left needle position 3 Right needle position 17 Check stitch selections on the Operation Manual. Start sewing. When sewing is finished, cut the thread. Pressing "+" of the ...For details, refer to "Starting to sew" on the Operation Manual. • For details on sewing reverse/ reinforcement stitches, refer to sew" on the model. b Select a stitch. f • For details, refer to "Starting to "Sewing reverse/reinforcement stitches" on the machine's body, and then select the stitch...
Sewing Guide
Page 21
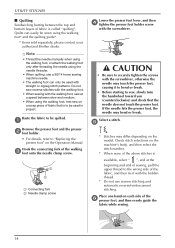
...fabric 2 Normal fabric 1 Free arm 21 g * Stitches may differ depending on the machine's body, and then select the stitch number. For details of stitch width, refer to the Operation Manual. 1 Needle drop point When you wish to sew onto i the free arm, make fine adjustments to use h the free arm. f... change the needle drop point, raise the needle, and then change the stitch width. * To make sure that the fabric feeds correctly, and then start sewing. a c f b d a ac af a a e b 1 Wrong side of fabric 2 Right side of fabric 3 Edge of fabric 4 Desired edge of hem 5 Basting ...
...fabric 2 Normal fabric 1 Free arm 21 g * Stitches may differ depending on the machine's body, and then select the stitch number. For details of stitch width, refer to the Operation Manual. 1 Needle drop point When you wish to sew onto i the free arm, make fine adjustments to use h the free arm. f... change the needle drop point, raise the needle, and then change the stitch width. * To make sure that the fabric feeds correctly, and then start sewing. a c f b d a ac af a a e b 1 Wrong side of fabric 2 Right side of fabric 3 Edge of fabric 4 Desired edge of hem 5 Basting ...

Sewing Guide
Page 33
... (1/4 inch) from either the right side or the left side of the presser foot. c * Check the stitch number on the machine's body, and set the stitch width 1.5 mm (1/16 inch) and sew using stitch . 1 UTILITY STITCHES For a seam allowance on page 7. 1 6.5 mm (1/4 inch) 33 Attach zigzag foot "J". For ...together. The fabric pieces should be cut with the edge of the fabric, and set the machine for that you wish to "Setting the stitch length and stitch width" on the Operation Manual and "Sewing an Even Seam Allowance" on the left side Align the left side of the presser foot...
... (1/4 inch) from either the right side or the left side of the presser foot. c * Check the stitch number on the machine's body, and set the stitch width 1.5 mm (1/16 inch) and sew using stitch . 1 UTILITY STITCHES For a seam allowance on page 7. 1 6.5 mm (1/4 inch) 33 Attach zigzag foot "J". For ...together. The fabric pieces should be cut with the edge of the fabric, and set the machine for that you wish to "Setting the stitch length and stitch width" on the Operation Manual and "Sewing an Even Seam Allowance" on the left side Align the left side of the presser foot...
Sewing Guide
Page 34
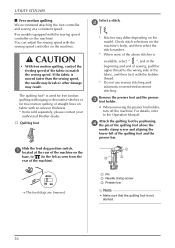
...model. Baste the fabric to "Replacing the presser foot" on the Operation Manual. Note • Thread the needle manually when using the walking foot, or attach the walking foot only after ...foot* and the quilting guide*. * Items sold separately, please contact your authorized Brother dealer. Check stitch selections on the machine's body, and then select the stitch number. * When none of the above... to securely tighten the screws with the bobbin thread. * Do not use a 90/14 home sewing machine needle. • The walking foot can easily be quilted. Select a stitch. Place one hand ...
...model. Baste the fabric to "Replacing the presser foot" on the Operation Manual. Note • Thread the needle manually when using the walking foot, or attach the walking foot only after ...foot* and the quilting guide*. * Items sold separately, please contact your authorized Brother dealer. Check stitch selections on the machine's body, and then select the stitch number. * When none of the above... to securely tighten the screws with the bobbin thread. * Do not use a 90/14 home sewing machine needle. • The walking foot can easily be quilted. Select a stitch. Place one hand ...
Sewing Guide
Page 36
... beginning and end of sewing, pull the upper thread to the Operation Manual. Slide the feed dog position switch, a located at a consistent speed. (For models equipped with the sewing speed controller on the machine) You can adjust the sewing speed with an uneven thickness. * Items sold separately, please contact your authorized Brother dealer. Quilting foot...
... beginning and end of sewing, pull the upper thread to the Operation Manual. Slide the feed dog position switch, a located at a consistent speed. (For models equipped with the sewing speed controller on the machine) You can adjust the sewing speed with an uneven thickness. * Items sold separately, please contact your authorized Brother dealer. Quilting foot...

Sewing Guide
Page 45
... details on thin or medium weight fabrics in addition to the Operation Manual. • The needle threader cannot be damaged. Check stitch selections on the model. This is used with the wing needle, otherwise the machine may bend or break. • After adjusting the stitch width, slowly... turn the handwheel toward you (counterclockwise) and check that the needle does not touch the presser foot. a Start sewing. Manually pass the thread through the eye of 6.0 mm...
... details on thin or medium weight fabrics in addition to the Operation Manual. • The needle threader cannot be damaged. Check stitch selections on the model. This is used with the wing needle, otherwise the machine may bend or break. • After adjusting the stitch width, slowly... turn the handwheel toward you (counterclockwise) and check that the needle does not touch the presser foot. a Start sewing. Manually pass the thread through the eye of 6.0 mm...

Stitch Chart
Page 1
... overcasting, mending. 3.5 (1/8) 0.0 - 7.0 (0 - 1/4) 1.4 (1/16) 0.0 - 4.0 (0 - 3/16) 1 For details on using the twin needle, set the machine to the Operation Manual. No. Stitch Chart Memo • When any of the following stitches (reverse stitch patterns) are selected, pressing Reinforcement stitch button) will sew reverse stitches. (Reverse/ Stitch 90 stitches 00 01 04 No. 80 stitches 00...
... overcasting, mending. 3.5 (1/8) 0.0 - 7.0 (0 - 1/4) 1.4 (1/16) 0.0 - 4.0 (0 - 3/16) 1 For details on using the twin needle, set the machine to the Operation Manual. No. Stitch Chart Memo • When any of the following stitches (reverse stitch patterns) are selected, pressing Reinforcement stitch button) will sew reverse stitches. (Reverse/ Stitch 90 stitches 00 01 04 No. 80 stitches 00...

