

Users Manual - English
Page 14
... Insert the plug into an electrical outlet that is turned on. only) ● This appliance has a polarized plug (one way. To reduce the risk of time. Pulling on when the machine is in poor condition. ● Turn off the main power and remove the plug in to be cut, damaged, modified...
... Insert the plug into an electrical outlet that is turned on. only) ● This appliance has a polarized plug (one way. To reduce the risk of time. Pulling on when the machine is in poor condition. ● Turn off the main power and remove the plug in to be cut, damaged, modified...

Users Manual - English
Page 16
Memo ● The specified initial needle position is maintained even after the machine is turned off. ● Perform the same operation to beep each time a key is pressed. After turning on the sewing machine, release the "+" side of (stitch width b adjustment key) and turn on . X The machine is now set ...
Memo ● The specified initial needle position is maintained even after the machine is turned off. ● Perform the same operation to beep each time a key is pressed. After turning on the sewing machine, release the "+" side of (stitch width b adjustment key) and turn on . X The machine is now set ...

Users Manual - English
Page 19
... on the bobbin. 1 a 1 cm (3/8 inch) CAUTION ● Make sure you do not cut the thread completely, and the bobbin is wound around the bobbin a few times. Note ● If the sewing machine is plugged in as far as possible. ● Pull the thread taut and hold the end of the thread...
... on the bobbin. 1 a 1 cm (3/8 inch) CAUTION ● Make sure you do not cut the thread completely, and the bobbin is wound around the bobbin a few times. Note ● If the sewing machine is plugged in as far as possible. ● Pull the thread taut and hold the end of the thread...
Users Manual - English
Page 20
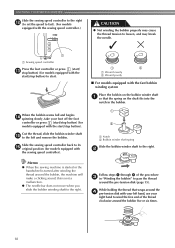
... the bobbin" to the right. a Notch b Bobbin winder shaft spring Slide the bobbin winder shaft to pass the thread around the bobbin five or six times. 18 Cut the thread, slide the bobbin winder shaft o to start. 1 2 a Wound evenly b Wound poorly ■ For models equipped with the start /stop button). When...
... the bobbin" to the right. a Notch b Bobbin winder shaft spring Slide the bobbin winder shaft to pass the thread around the bobbin five or six times. 18 Cut the thread, slide the bobbin winder shaft o to start. 1 2 a Wound evenly b Wound poorly ■ For models equipped with the start /stop button). When...

Users Manual - English
Page 24
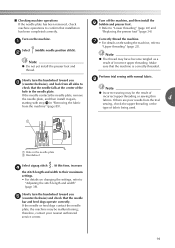
... the tension-adjusting spring of the bobbin case, it with e your right hand as shown, guide the thread through the slit (a and b). • At this time, check that the bobbin easily rotates counterclockwise. Then, pull the thread toward you start to sew, follow to the procedure in f place (see arrow a), and...
... the tension-adjusting spring of the bobbin case, it with e your right hand as shown, guide the thread through the slit (a and b). • At this time, check that the bobbin easily rotates counterclockwise. Then, pull the thread toward you start to sew, follow to the procedure in f place (see arrow a), and...
Users Manual - English
Page 82
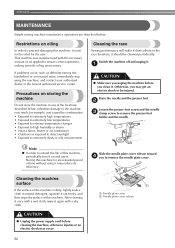
... stop using it . APPENDIX MAINTENANCE Simple sewing machine maintenance operations are described below , otherwise damage to the machine may result, for an extended period of time without using the machine, and contact your authorized dealer or the nearest authorized service center.
... stop using it . APPENDIX MAINTENANCE Simple sewing machine maintenance operations are described below , otherwise damage to the machine may result, for an extended period of time without using the machine, and contact your authorized dealer or the nearest authorized service center.
Users Manual - English
Page 93
b Note ● Do not yet install the presser foot and thread. At this time, increase d the stitch length and width to their maximum settings. • For details on the machine. therefore, contact your nearest authorized service center. 91 Correctly ...
b Note ● Do not yet install the presser foot and thread. At this time, increase d the stitch length and width to their maximum settings. • For details on the machine. therefore, contact your nearest authorized service center. 91 Correctly ...

Users Manual - English
Page 94
... or by pressing (needle position button) once or twice. While winding the bobbin, the bobbin thread was pulled off round the bobbin five or six times clockwise. The thread that was pulled out was not wound onto the bobbin correctly. (For models equipped with the needle threader lever.) You have not...
... or by pressing (needle position button) once or twice. While winding the bobbin, the bobbin thread was pulled off round the bobbin five or six times clockwise. The thread that was pulled out was not wound onto the bobbin correctly. (For models equipped with the needle threader lever.) You have not...
Users Manual - English
Page 99
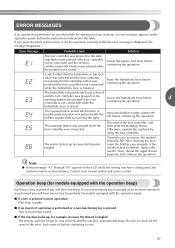
... the foot controller is not connected) while the buttonhole lever is lowered. Clean the race to check for models equipped with the operation beep) Each time a key is pressed you press the stitch selection key or do the operation correctly while the error message is displayed, the message disappears. After cleaning...
... the foot controller is not connected) while the buttonhole lever is lowered. Clean the race to check for models equipped with the operation beep) Each time a key is pressed you press the stitch selection key or do the operation correctly while the error message is displayed, the message disappears. After cleaning...
Users Manual - Multi
Page 9
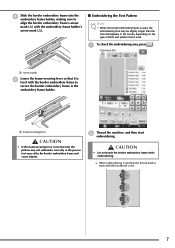
...; If the frame-securing lever is not lowered, the pattern may not embroider correctly or the presser foot may be slightly longer than the time that appears in the embroidery frame holder. b Thread the machine, and then start embroidering. d Slide the border embroidery frame into the embroidery...that it is sewn with the last thread color. 7 a a Arrow marks e Lower the frame-securing lever so that is used , the embroidering time may strike the border embroidery frame and cause injuries. a To check the embroidering area, press . CAUTION • Do not touch the border embroidery ...
...; If the frame-securing lever is not lowered, the pattern may not embroider correctly or the presser foot may be slightly longer than the time that appears in the embroidery frame holder. b Thread the machine, and then start embroidering. d Slide the border embroidery frame into the embroidery...that it is sewn with the last thread color. 7 a a Arrow marks e Lower the frame-securing lever so that is used , the embroidering time may strike the border embroidery frame and cause injuries. a To check the embroidering area, press . CAUTION • Do not touch the border embroidery ...
Users Manual - Multi
Page 12
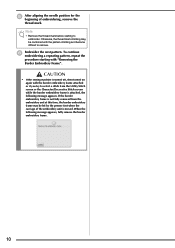
... while the border embroidery frame is moved. To continue embroidering a repeating pattern, repeat the procedure starting to select a stitch from the embroidery unit at this time, the border embroidery frame may be hit by the presser foot when the carriage of embroidering, remove the thread mark. Otherwise, the thread mark stitching...
... while the border embroidery frame is moved. To continue embroidering a repeating pattern, repeat the procedure starting to select a stitch from the embroidery unit at this time, the border embroidery frame may be hit by the presser foot when the carriage of embroidering, remove the thread mark. Otherwise, the thread mark stitching...


