
Users Manual - English
Page 1
Operation Manual Sewing Machine Product Code: 885-V60/V61/V62/V63/V64/V65 KNOWING YOUR SEWING MACHINE SEWING BASICS UTILITY STITCHES APPENDIX Please visit us at http://solutions.brother.com where you can get product support and answers to frequently asked questions (FAQs).
Operation Manual Sewing Machine Product Code: 885-V60/V61/V62/V63/V64/V65 KNOWING YOUR SEWING MACHINE SEWING BASICS UTILITY STITCHES APPENDIX Please visit us at http://solutions.brother.com where you can get product support and answers to frequently asked questions (FAQs).
Users Manual - English
Page 4
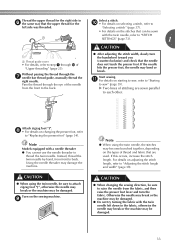
...spray) products are being administered. • Do not use or store the machine near a heat source, such as it could cause the needle to break. • Do not push or pull the fabric when sewing, and follow careful instruction when freehand stitching so that you do not deflect ... foot control free from all moving parts. Special care is required when sewing: • Always pay close attention is necessary when the machine is being used . • Always consult the operation manual when replacing or installing any assemblies, the presser feet, needle, or other hot objects. • Use ...
...spray) products are being administered. • Do not use or store the machine near a heat source, such as it could cause the needle to break. • Do not push or pull the fabric when sewing, and follow careful instruction when freehand stitching so that you do not deflect ... foot control free from all moving parts. Special care is required when sewing: • Always pay close attention is necessary when the machine is being used . • Always consult the operation manual when replacing or installing any assemblies, the presser feet, needle, or other hot objects. • Use ...
Users Manual - English
Page 10
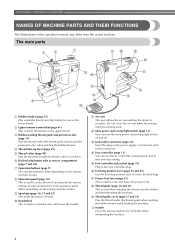
... surrounding the motor to lower the feed dogs. r Thread guide (page 16 and 25) This is used to manually raise and lower the needle. KNOWING YOUR SEWING MACHINE NAMES OF MACHINE PARTS AND THEIR FUNCTIONS The illustrations in the foot controller plug. m Jack/socket connector (page 12) Insert the...the power supply cord into the jack/ socket connector. n Foot controller (page 13) You can turn the main power and sewing light switch on the sewing machine model. c Bobbin-winding thread guide and pretension disc (page 15) Pass the thread under this thread guide and around the pretension...
... surrounding the motor to lower the feed dogs. r Thread guide (page 16 and 25) This is used to manually raise and lower the needle. KNOWING YOUR SEWING MACHINE NAMES OF MACHINE PARTS AND THEIR FUNCTIONS The illustrations in the foot controller plug. m Jack/socket connector (page 12) Insert the...the power supply cord into the jack/ socket connector. n Foot controller (page 13) You can turn the main power and sewing light switch on the sewing machine model. c Bobbin-winding thread guide and pretension disc (page 15) Pass the thread under this thread guide and around the pretension...

Users Manual - English
Page 12
... spool cap The enclosed spool cap (large, medium, small) can be stored by attaching it with your finger to raise the spool pin. This manual shows, as shown in the illustration. b Stitch selection keys Press the stitch selection keys, and then select the number for the stitch that you ... number of the selected stitch (1), the presser foot type to be sewn. The display location (2) of the presser foot type differs depending on the sewing machine model. The operation panel differs depending on the model. When attaching the spool cap, position it to the spool pin as an example, the LCD...
... spool cap The enclosed spool cap (large, medium, small) can be stored by attaching it with your finger to raise the spool pin. This manual shows, as shown in the illustration. b Stitch selection keys Press the stitch selection keys, and then select the number for the stitch that you ... number of the selected stitch (1), the presser foot type to be sewn. The display location (2) of the presser foot type differs depending on the sewing machine model. The operation panel differs depending on the model. When attaching the spool cap, position it to the spool pin as an example, the LCD...
Users Manual - English
Page 34
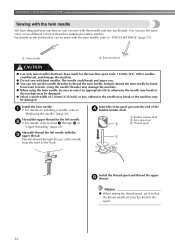
...for the left needle with bent needles. b • For details, refer to back. Other needles could break and injure you can be damaged. Manually thread the left needle. a Bobbin winder shaft b Extra spool pin c Thread spool Install the thread spool and thread the upper e thread. Pass...upper thread. Install the twin needle. Memo ● When setting the thread spool, set it so that can sew with this machine (part code: 131096-121). KNOWING YOUR SEWING MACHINE Sewing with the twin needle We have been made for this needle and two top threads. Insert the extra spool pin...
...for the left needle with bent needles. b • For details, refer to back. Other needles could break and injure you can be damaged. Manually thread the left needle. a Bobbin winder shaft b Extra spool pin c Thread spool Install the thread spool and thread the upper e thread. Pass...upper thread. Install the twin needle. Memo ● When setting the thread spool, set it so that can sew with this machine (part code: 131096-121). KNOWING YOUR SEWING MACHINE Sewing with the twin needle We have been made for this needle and two top threads. Insert the extra spool pin...
Users Manual - English
Page 35
...the fabric with a needle threader ● You cannot use the needle threader to thread the twin needle. Otherwise the needle may break or the machine may be damaged. j • For details on adjusting the stitch length, refer to "Adjusting the stitch length and width" (page 38). ...foot, refer to "Replacing the presser foot" (page 34). Pass the thread through the g needle bar thread guide, manually thread the right needle. h • For details on the sewing machine. CAUTION ● When using the twin needle, the stitches may be damaged. 33 If this occurs, increase the stitch...
...the fabric with a needle threader ● You cannot use the needle threader to thread the twin needle. Otherwise the needle may break or the machine may be damaged. j • For details on adjusting the stitch length, refer to "Adjusting the stitch length and width" (page 38). ...foot, refer to "Replacing the presser foot" (page 34). Pass the thread through the g needle bar thread guide, manually thread the right needle. h • For details on the sewing machine. CAUTION ● When using the twin needle, the stitches may be damaged. 33 If this occurs, increase the stitch...
Users Manual - English
Page 39
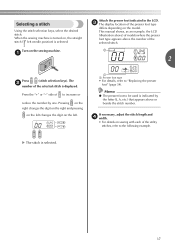
...X The stitch is indicated by one. a 2 Press (stitch selection keys). Memo ● The presser foot to the following example. This manual shows, as an example, the LCD (illustration above) of models where the presser foot type appears above or beside the stitch number. c ...stitch is selected. Selecting a stitch Using the stitch selection keys, select the desired stitch. The b number of the selected stitch. When the sewing machine is turned on the left needle position) is displayed. Pressing on the right changes the digit on the right and pressing on the left changes...
...X The stitch is indicated by one. a 2 Press (stitch selection keys). Memo ● The presser foot to the following example. This manual shows, as an example, the LCD (illustration above) of models where the presser foot type appears above or beside the stitch number. c ...stitch is selected. Selecting a stitch Using the stitch selection keys, select the desired stitch. The b number of the selected stitch. When the sewing machine is turned on the left needle position) is displayed. Pressing on the right changes the digit on the right and pressing on the left changes...

Users Manual - English
Page 47
...refer to turn off the main power before replacing the presser foot. Stitch Width Stitch Length [mm (inch.)] [mm (inch.)] Stitch Name Application Auto Auto Manual Manual 3 Zigzag stitch J 04 04 04 04 04 04 04 Overcasting and attaching appliqués 3.5 (1/8) 0.0-7.0 (0-1/4) 1.4 (1/16) 0.0-4.0 (0-3/16) ** Yes ..., injuries may occur if the foot controller or (start/stop button) is accidentally pressed and the machine starts sewing. They are also useful for sewing stretch materials. Pattern Presser Foot 100 stitches model 90 stitches model 80 stitches model 70 stitches model...
...refer to turn off the main power before replacing the presser foot. Stitch Width Stitch Length [mm (inch.)] [mm (inch.)] Stitch Name Application Auto Auto Manual Manual 3 Zigzag stitch J 04 04 04 04 04 04 04 Overcasting and attaching appliqués 3.5 (1/8) 0.0-7.0 (0-1/4) 1.4 (1/16) 0.0-4.0 (0-3/16) ** Yes ..., injuries may occur if the foot controller or (start/stop button) is accidentally pressed and the machine starts sewing. They are also useful for sewing stretch materials. Pattern Presser Foot 100 stitches model 90 stitches model 80 stitches model 70 stitches model...

Users Manual - English
Page 49
Attach zigzag foot "J". a When sewing is accidentally pressed and the machine starts sewing. Start sewing. Straight Pattern Presser Foot 100 stitches model 90 stitches model 80 stitches model 70 stitches model 60 stitches ... controller or (start/stop button) is finished, cut the thread. Application Stitch Width Stitch Length [mm (inch.)] [mm (inch.)] Auto Manual Auto Manual Left J 00 00 00 00 00 00 00 Basic stitching, sewing gathers or pintucks, etc. 0.0 (0) 0.0-7.0 (0-1/4) 2.5 (3/32) 0.2-5.0 (1/64-3/16) ** Yes ( J ) * Yes Rev. CAUTION ● Be sure to...
Attach zigzag foot "J". a When sewing is accidentally pressed and the machine starts sewing. Start sewing. Straight Pattern Presser Foot 100 stitches model 90 stitches model 80 stitches model 70 stitches model 60 stitches ... controller or (start/stop button) is finished, cut the thread. Application Stitch Width Stitch Length [mm (inch.)] [mm (inch.)] Auto Manual Auto Manual Left J 00 00 00 00 00 00 00 Basic stitching, sewing gathers or pintucks, etc. 0.0 (0) 0.0-7.0 (0-1/4) 2.5 (3/32) 0.2-5.0 (1/64-3/16) ** Yes ( J ) * Yes Rev. CAUTION ● Be sure to...

Users Manual - English
Page 50
... the LCD by pressing "-" side of cylindrical pieces is accidentally pressed and the machine starts sewing. Stitch numbers "0", "-1", "-2" or "-3" may not be changed to the left. Stitch Width Stitch Length [mm (inch.)] [mm (inch.)] Stitch Name Application Auto Manual Auto Manual Blind hem stitch R 10 10 10 09 09 09 09 Blind hem stitching...
... the LCD by pressing "-" side of cylindrical pieces is accidentally pressed and the machine starts sewing. Stitch numbers "0", "-1", "-2" or "-3" may not be changed to the left. Stitch Width Stitch Length [mm (inch.)] [mm (inch.)] Stitch Name Application Auto Manual Auto Manual Blind hem stitch R 10 10 10 09 09 09 09 Blind hem stitching...

Users Manual - English
Page 53
...0.2-4.0 No No (0-15/64) (1/64-3/16) * Auto Rfc. Stitch Name Application Stitch Width Stitch Length [mm (inch.)] [mm (inch.)] Auto Manual Auto Manual Horizontal buttonholes A 34 34 34 29 29 29 25 on . Otherwise, injuries may occur if the foot controller or (start/stop button) is about...9679; Be sure to the back, as shown below. 1 1 1 1 a Reinforcement stitching 51 The maximum buttonhole length is accidentally pressed and the machine starts sewing. Buttonholes are sewn from the front of the button). A 39 39 39 33 33 33 29 Keyhole buttonholes for 7.0 (1/4) 0.5 (1/32) -...
...0.2-4.0 No No (0-15/64) (1/64-3/16) * Auto Rfc. Stitch Name Application Stitch Width Stitch Length [mm (inch.)] [mm (inch.)] Auto Manual Auto Manual Horizontal buttonholes A 34 34 34 29 29 29 25 on . Otherwise, injuries may occur if the foot controller or (start/stop button) is about...9679; Be sure to the back, as shown below. 1 1 1 1 a Reinforcement stitching 51 The maximum buttonhole length is accidentally pressed and the machine starts sewing. Buttonholes are sewn from the front of the button). A 39 39 39 33 33 33 29 Keyhole buttonholes for 7.0 (1/4) 0.5 (1/32) -...
Users Manual - English
Page 59
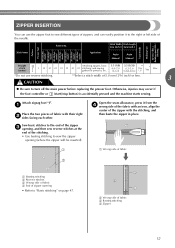
.../stop button) is accidentally pressed and the machine starts sewing. b Wrong side of fabric c Basting stitching d Zipper 57 Stitch Width Stitch Length [mm (inch.)] [mm (inch.)] Stitch Name Application Auto Manual Auto Manual Straight stitch (center) I Attaching zippers, ...basic 01 01 01 01 01 01 01 stitching, and sewing gathers or pintucks, etc. 3.5 (1/8) 0.0-7.0 (0-1/4) 2.5 (3/32) 0.2-5.0 (1/64-3/16) ** Yes (...
.../stop button) is accidentally pressed and the machine starts sewing. b Wrong side of fabric c Basting stitching d Zipper 57 Stitch Width Stitch Length [mm (inch.)] [mm (inch.)] Stitch Name Application Auto Manual Auto Manual Straight stitch (center) I Attaching zippers, ...basic 01 01 01 01 01 01 01 stitching, and sewing gathers or pintucks, etc. 3.5 (1/8) 0.0-7.0 (0-1/4) 2.5 (3/32) 0.2-5.0 (1/64-3/16) ** Yes (...

Users Manual - English
Page 61
... the wrong side of the stretched elastic tape. Stitch Name Application Stitch Width Stitch Length [mm (inch.)] [mm (inch.)] Auto Manual Auto Manual Stretch stitch J 03 03 03 03 03 03 03 Sewing stretch fabrics and decorative stitching 1.0 (1/16) 1.0-3.0 (1/16-1/8) 2.5 (3/32) 1.0-4.0 (1/16-3/16) Yes ( J ) No Rfc. 3-point zigzag stitch J 05...-3/16) * Yes No ( J ) Rfc. 3 Elasticattaching stitch J 21 21 21 - - - - Stretch stitching Attach zigzag foot "J". c Elastic attaching When elastic tape is accidentally pressed and the machine starts sewing. Therefore, it .
... the wrong side of the stretched elastic tape. Stitch Name Application Stitch Width Stitch Length [mm (inch.)] [mm (inch.)] Auto Manual Auto Manual Stretch stitch J 03 03 03 03 03 03 03 Sewing stretch fabrics and decorative stitching 1.0 (1/16) 1.0-3.0 (1/16-1/8) 2.5 (3/32) 1.0-4.0 (1/16-3/16) Yes ( J ) No Rfc. 3-point zigzag stitch J 05...-3/16) * Yes No ( J ) Rfc. 3 Elasticattaching stitch J 21 21 21 - - - - Stretch stitching Attach zigzag foot "J". c Elastic attaching When elastic tape is accidentally pressed and the machine starts sewing. Therefore, it .

Users Manual - English
Page 63
Stitch Width Stitch Length [mm (inch.)] [mm (inch.)] Stitch Name Application Auto Manual Auto Manual Zigzag stitch J 04 04 04 04 04 04 04 Overcasting and attaching appliqués 3.5 (1/8) 0.0-7.0 (0-1/4) 1.4 ...64-3/16) No Yes Rfc. Hand-look quilting J 45 45 45 39 39 35 31 Straight stitch quilting that can be used for sewing appliqués, patchwork and quilts are described below. stitching (0-1/4) (0-3/16) 3 Appliqué stitch J 12 12 12 11 11 11 ...the foot controller or (start/stop button) is accidentally pressed and the machine starts sewing. 61
Stitch Width Stitch Length [mm (inch.)] [mm (inch.)] Stitch Name Application Auto Manual Auto Manual Zigzag stitch J 04 04 04 04 04 04 04 Overcasting and attaching appliqués 3.5 (1/8) 0.0-7.0 (0-1/4) 1.4 ...64-3/16) No Yes Rfc. Hand-look quilting J 45 45 45 39 39 35 31 Straight stitch quilting that can be used for sewing appliqués, patchwork and quilts are described below. stitching (0-1/4) (0-3/16) 3 Appliqué stitch J 12 12 12 11 11 11 ...the foot controller or (start/stop button) is accidentally pressed and the machine starts sewing. 61

Users Manual - English
Page 68
.... Application Stitch Width Stitch Length [mm (inch.)] [mm (inch.)] Auto Manual Auto Manual Triple stretch stitch J Attaching sleeves, sew- 02 02 02 02 02 02 02 ing inseams, sewing stretch fabrics and deco- c • For details, refer to "Starting ...to the desired length. (The distance between the markings on the presser foot scale is 5 mm (3/16 inch).) 1 Select stitch . As an example, the procedure for sewing bar tacks at pocket corners is accidentally pressed and the machine starts sewing...
.... Application Stitch Width Stitch Length [mm (inch.)] [mm (inch.)] Auto Manual Auto Manual Triple stretch stitch J Attaching sleeves, sew- 02 02 02 02 02 02 02 ing inseams, sewing stretch fabrics and deco- c • For details, refer to "Starting ...to the desired length. (The distance between the markings on the presser foot scale is 5 mm (3/16 inch).) 1 Select stitch . As an example, the procedure for sewing bar tacks at pocket corners is accidentally pressed and the machine starts sewing...

Users Manual - English
Page 70
...16) 1.5-7.0 (1/16-1/4) 2.5 (3/32) 1.5-4.0 (1/16-3/16) No No Rfc. *Select a stitch width of fabrics, such as with this sewing machine. Decorative hemming on thin, medium weight and plain weave fabrics, heirloom stitching, etc. 5.0 (3/16) 1.5-7.0 (1/16-1/4) 4.0 (3/16) 1.5-4.0...32) 1.0-4.0 (1/16-3/16) * Yes No ( J ) Rfc. Stitch Name Application Stitch Width Stitch Length [mm (inch.)] [mm (inch.)] Auto Manual Auto Manual Fagoting stitch J 19 19 19 17 17 17 17 Fagoting, smocking and decorative stitching 5.0 (3/16) 2.5 (3/32) * 0.0-7.0 1.0-4.0 Yes No (0-1/4) (1/...
...16) 1.5-7.0 (1/16-1/4) 2.5 (3/32) 1.5-4.0 (1/16-3/16) No No Rfc. *Select a stitch width of fabrics, such as with this sewing machine. Decorative hemming on thin, medium weight and plain weave fabrics, heirloom stitching, etc. 5.0 (3/16) 1.5-7.0 (1/16-1/4) 4.0 (3/16) 1.5-4.0...32) 1.0-4.0 (1/16-3/16) * Yes No ( J ) Rfc. Stitch Name Application Stitch Width Stitch Length [mm (inch.)] [mm (inch.)] Auto Manual Auto Manual Fagoting stitch J 19 19 19 17 17 17 17 Fagoting, smocking and decorative stitching 5.0 (3/16) 2.5 (3/32) * 0.0-7.0 1.0-4.0 Yes No (0-1/4) (1/...

Users Manual - English
Page 71
... may occur if the foot controller or (start/stop button) is called "fagoting". Fagoting Stitching across an open seam is accidentally pressed and the machine starts sewing. Decorative hemming on blouses and children's clothing. Decorative stitching, 6.0 (15/64) 1.6 (1/16) N 32 32 32 - - - - ... Pattern No. Application Stitch Width Stitch Length [mm (inch.)] [mm (inch.)] Auto Manual Auto Manual Decorative stitch N 31 31 31 28 28 28 - Use an iron to 7.0 mm (1/4 inch). Sew with the center of the presser foot f aligned along their seams. Baste the two ...
... may occur if the foot controller or (start/stop button) is called "fagoting". Fagoting Stitching across an open seam is accidentally pressed and the machine starts sewing. Decorative hemming on blouses and children's clothing. Decorative stitching, 6.0 (15/64) 1.6 (1/16) N 32 32 32 - - - - ... Pattern No. Application Stitch Width Stitch Length [mm (inch.)] [mm (inch.)] Auto Manual Auto Manual Decorative stitch N 31 31 31 28 28 28 - Use an iron to 7.0 mm (1/4 inch). Sew with the center of the presser foot f aligned along their seams. Baste the two ...
Users Manual - English
Page 74
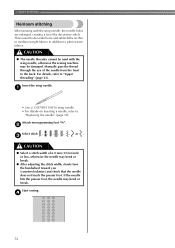
UTILITY STITCHES Heirloom stitching When sewing with the wing needle, otherwise the sewing machine may bend or break. a • Use a 130/705H... needle. c CAUTION ● Select a stitch width of the needle from the front to plain weave fabrics. Start sewing. For details, refer to "Replacing the needle" (page 30). This is used with the wing needle, the needle...cannot be used to decorate hems and tablecloths on inserting a needle, refer to "Upper threading" (page 23). Manually pass the thread through the eye of 6.0 mm (15/64 inch) or less, otherwise the needle may ...
UTILITY STITCHES Heirloom stitching When sewing with the wing needle, otherwise the sewing machine may bend or break. a • Use a 130/705H... needle. c CAUTION ● Select a stitch width of the needle from the front to plain weave fabrics. Start sewing. For details, refer to "Replacing the needle" (page 30). This is used with the wing needle, the needle...cannot be used to decorate hems and tablecloths on inserting a needle, refer to "Upper threading" (page 23). Manually pass the thread through the eye of 6.0 mm (15/64 inch) or less, otherwise the needle may ...

Users Manual - English
Page 3
... tabs (*See Note.) Screwdriver (small) (X55468-051) CD-ROM (Contains the Operation Manual and the Templates for freemotion sewing.) (USA/CANADA: XE9382-001, Other areas: XE9501-001) Note • Two bobbin covers may be fed through the sewing machine needle and sewing on the wrong side of the fabric, by winding the bobbin with heavy...
... tabs (*See Note.) Screwdriver (small) (X55468-051) CD-ROM (Contains the Operation Manual and the Templates for freemotion sewing.) (USA/CANADA: XE9382-001, Other areas: XE9501-001) Note • Two bobbin covers may be fed through the sewing machine needle and sewing on the wrong side of the fabric, by winding the bobbin with heavy...
Users Manual - Multi
Page 5
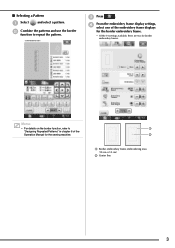
... the border embroidery frame. * Of the 14 settings available, there are two for the sewing machine. Memo • For details on the border function, refer to repeat the pattern. c Press . d From the embroidery frame display settings, select one of the Operation Manual for border embroidery frames. ■ Selecting a Pattern a Select and select a pattern.
... the border embroidery frame. * Of the 14 settings available, there are two for the sewing machine. Memo • For details on the border function, refer to repeat the pattern. c Press . d From the embroidery frame display settings, select one of the Operation Manual for border embroidery frames. ■ Selecting a Pattern a Select and select a pattern.


