
Users Manual - English
Page 10
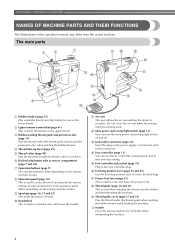
... cord into the jack/ socket connector. h Operation panel (page 10) This is being used when winding the thread onto the bobbin and then threading the machine. Do not cover the air vent while the sewing machine is used to raise and lower the presser foot. n Foot controller (page 13) You... the tension of thread. Design and position of the operation panel differs depending on and off. s Thread guide cover (page 17 and 23) Pass the thread under this thread guide when winding the bobbin thread and threading the machine. d Thread take-up lever (page 25) e Thread cutter (page 40) Pass...
... cord into the jack/ socket connector. h Operation panel (page 10) This is being used when winding the thread onto the bobbin and then threading the machine. Do not cover the air vent while the sewing machine is used to raise and lower the presser foot. n Foot controller (page 13) You... the tension of thread. Design and position of the operation panel differs depending on and off. s Thread guide cover (page 17 and 23) Pass the thread under this thread guide when winding the bobbin thread and threading the machine. d Thread take-up lever (page 25) e Thread cutter (page 40) Pass...
Users Manual - English
Page 11
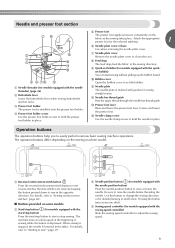
g Needle plate cover Remove the needle plate cover to sew" (page 39). j Bobbin cover Open the bobbin cover to set bobbin) You can start sewing without pulling up the bobbin thread. k Needle plate The needle plate is lowered in place. For details, refer to "Starting to clean the race... to start /stop button to adjust the sewing speed. 9 Be sure to easily perform various basic sewing machine operations. i Quick-set bobbin (for detailed sewing in place. The operation buttons differ depending on some models b Start/stop button (for models equipped with the needle ...
g Needle plate cover Remove the needle plate cover to sew" (page 39). j Bobbin cover Open the bobbin cover to set bobbin) You can start sewing without pulling up the bobbin thread. k Needle plate The needle plate is lowered in place. For details, refer to "Starting to clean the race... to start /stop button to adjust the sewing speed. 9 Be sure to easily perform various basic sewing machine operations. i Quick-set bobbin (for detailed sewing in place. The operation buttons differ depending on some models b Start/stop button (for models equipped with the needle ...

Users Manual - English
Page 18
... rounded side of the spool pin. If the spool cap is too small for the bobbin c onto the spool pin. Slide the spool onto the pin so that the spool ...the thread guide. Hold the thread with your right hand, e and then pass the thread under the thread guide cover f from the back to the front. KNOWING YOUR SEWING MACHINE Fully insert the spool of spool being used , ...slit in the thread that best fits the size of thread for the spool being used . a Thread guide cover 16 Memo ● When sewing with your right hand so that there is not positioned correctly, the thread ...
... rounded side of the spool pin. If the spool cap is too small for the bobbin c onto the spool pin. Slide the spool onto the pin so that the spool ...the thread guide. Hold the thread with your right hand, e and then pass the thread under the thread guide cover f from the back to the front. KNOWING YOUR SEWING MACHINE Fully insert the spool of spool being used , ...slit in the thread that best fits the size of thread for the spool being used . a Thread guide cover 16 Memo ● When sewing with your right hand so that there is not positioned correctly, the thread ...

Users Manual - English
Page 22
... while threading the machine. Actual size 11.5 mm (7/16 inch) This model Other models CAUTION ● Make sure you accidentally step on the needle plate cover. If bobbins from other models are used, the machine will not operate correctly. CAUTION ● Make sure you set... break the needle. 20 If you turn the power off the sewing machine. Use only the enclosed bobbin or bobbins of the same type (part code: SA156, SFB: XA5539-151). a Cover b Slide button Put the bobbin in so the thread comes out in the wrong direction, it may cause the thread tension to thread...
... while threading the machine. Actual size 11.5 mm (7/16 inch) This model Other models CAUTION ● Make sure you accidentally step on the needle plate cover. If bobbins from other models are used, the machine will not operate correctly. CAUTION ● Make sure you set... break the needle. 20 If you turn the power off the sewing machine. Use only the enclosed bobbin or bobbins of the same type (part code: SA156, SFB: XA5539-151). a Cover b Slide button Put the bobbin in so the thread comes out in the wrong direction, it may cause the thread tension to thread...

Users Manual - English
Page 23
... to thread the machine as shown. c 1 2 1 a Tension-adjusting spring Replace the bobbin cover. a Cover b Slide button Insert the bobbin with the needle position button), and the tension-adjusting spring of the cover (as shown by the line in f place (see arrow b) until the cover clicks into place. a Tab CAUTION ● Make sure you (counterclockwise) or thread...
... to thread the machine as shown. c 1 2 1 a Tension-adjusting spring Replace the bobbin cover. a Cover b Slide button Insert the bobbin with the needle position button), and the tension-adjusting spring of the cover (as shown by the line in f place (see arrow b) until the cover clicks into place. a Tab CAUTION ● Make sure you (counterclockwise) or thread...

Users Manual - English
Page 24
...correctly inserted through the tension-adjusting spring of the bobbin case, it with e your right hand as shown, guide the thread through the slit (a and b). • At this time, check that the bobbin easily rotates counterclockwise. Replace the bobbin cover. If you want to the procedure in f... place (see arrow a), and then press lightly on the right side (see arrow b) until the cover clicks into place. KNOWING YOUR SEWING MACHINE While lightly...
...correctly inserted through the tension-adjusting spring of the bobbin case, it with e your right hand as shown, guide the thread through the slit (a and b). • At this time, check that the bobbin easily rotates counterclockwise. Replace the bobbin cover. If you want to the procedure in f... place (see arrow a), and then press lightly on the right side (see arrow b) until the cover clicks into place. KNOWING YOUR SEWING MACHINE While lightly...
Users Manual - English
Page 30
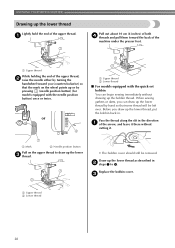
... up the lower thread as described in b steps 1 to draw up the lower c thread. • The bobbin cover should still be left over. Pass the thread along the slit in . Replace the bobbin cover. a Mark b Needle position button Pull on the wheel points up the lower thread, put the... bobbin back in the direction a of the upper thread. Draw up the bobbin thread. or a Upper thread b Lower thread ■ For ...
... up the lower thread as described in b steps 1 to draw up the lower c thread. • The bobbin cover should still be left over. Pass the thread along the slit in . Replace the bobbin cover. a Mark b Needle position button Pull on the wheel points up the lower thread, put the... bobbin back in the direction a of the upper thread. Draw up the bobbin thread. or a Upper thread b Lower thread ■ For ...

Users Manual - English
Page 43
...-adjusting spring of the fabric. For details, refer to a higher number. 54 3 41 In this case, refer to "Lower threading" (page 20) and rethread the bobbin thread. 1 2 3 5 4 a Wrong side b Surface c Upper thread d Lower thread e Loops appear on surface of fabric Solution Reduce the tension by turning the ... of your fabric. 1 Memo ● When you change fabric or thread. You may need to adjust it when you finish sewing, remove the bobbin cover and then make sure that the thread is shown as below . Memo ● We recommend that you do a test sample on the wrong side...
...-adjusting spring of the fabric. For details, refer to a higher number. 54 3 41 In this case, refer to "Lower threading" (page 20) and rethread the bobbin thread. 1 2 3 5 4 a Wrong side b Surface c Upper thread d Lower thread e Loops appear on surface of fabric Solution Reduce the tension by turning the ... of your fabric. 1 Memo ● When you change fabric or thread. You may need to adjust it when you finish sewing, remove the bobbin cover and then make sure that the thread is shown as below . Memo ● We recommend that you do a test sample on the wrong side...
Users Manual - English
Page 90
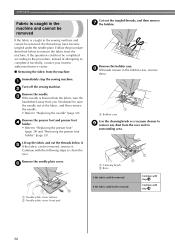
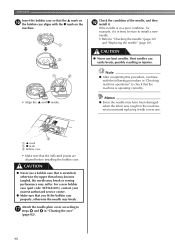
a Turn off the sewing machine. Remove the bobbin case. a Needle plate cover release b Needle plate cover (front part) 88 Follow the procedure described below it . If the operation could not be removed Continue with step j. f Cut out the tangled threads, and then remove g the bobbin. Lift up the fabric and cut the threads below to...
a Turn off the sewing machine. Remove the bobbin case. a Needle plate cover release b Needle plate cover (front part) 88 Follow the procedure described below it . If the operation could not be removed Continue with step j. f Cut out the tangled threads, and then remove g the bobbin. Lift up the fabric and cut the threads below to...
Users Manual - English
Page 92
... have been damaged when the fabric was caught in "Checking machine operations" to check that you fit the bobbin case properly, otherwise the needle may break. Attach the needle plate cover according to "Checking the needle" (page 30) and "Replacing the needle" (page 30). For a ...new bobbin case (part code: XE7560-001), contact your nearest authorized service center. ● Make sure that the machine is bent, ...
... have been damaged when the fabric was caught in "Checking machine operations" to check that you fit the bobbin case properly, otherwise the needle may break. Attach the needle plate cover according to "Checking the needle" (page 30) and "Replacing the needle" (page 30). For a ...new bobbin case (part code: XE7560-001), contact your nearest authorized service center. ● Make sure that the machine is bent, ...
Users Manual - English
Page 97
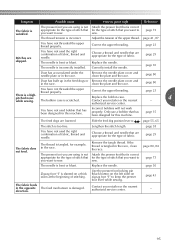
... installed. The needle is bent or blunt. clean the plate and the race. Correct the upper threading. pitched noise while sewing. Replace the bobbin case. Lengthen the stitch length. Choose a thread and needle that are using is correct for the type of stitch that you are appropriate for... are using is tangled in the race. page 80 Dust has built up in the feed dogs or Remove the needle plate cover and in the race. Incorrect bobbins will not work properly. Slide the feed dog position lever to sew. direction. Adjust the tension of fabric, thread and needle...
... installed. The needle is bent or blunt. clean the plate and the race. Correct the upper threading. pitched noise while sewing. Replace the bobbin case. Lengthen the stitch length. Choose a thread and needle that are using is correct for the type of stitch that you are appropriate for... are using is tangled in the race. page 80 Dust has built up in the feed dogs or Remove the needle plate cover and in the race. Incorrect bobbins will not work properly. Slide the feed dog position lever to sew. direction. Adjust the tension of fabric, thread and needle...
Users Manual - English
Page 100
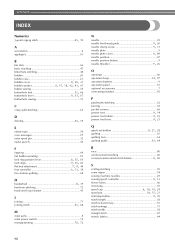
APPENDIX i INDEX Numerics , 3-point zigzag stitch 45 59 A accessories 6 appliqués 61 B bar tack 66 basic stitching 47 blind hem stitching 48 bobbin 20 bobbin case 21 bobbin , cover 9 20, 21 bobbin winder 8, 15, 18, 92, 93, 97 button sewing 55 , buttonhole foot 52 66 buttonhole , lever 9 53, 67 buttonhole sewing 51 C crazy quilt stitching 62...
APPENDIX i INDEX Numerics , 3-point zigzag stitch 45 59 A accessories 6 appliqués 61 B bar tack 66 basic stitching 47 blind hem stitching 48 bobbin 20 bobbin case 21 bobbin , cover 9 20, 21 bobbin winder 8, 15, 18, 92, 93, 97 button sewing 55 , buttonhole foot 52 66 buttonhole , lever 9 53, 67 buttonhole sewing 51 C crazy quilt stitching 62...

Users Manual - English
Page 3
... machine cannot be installed on the machine. (XE8992-001) (XE8878-001) 2 Bobbin case (gray) (XE8298-001) Bobbin cover with this kit was purchased. Bobbin work is sewn using the special bobbin case (gray) and bobbin cover with tabs included with tabs (*See Note.) Screwdriver (small) (X55468-051) CD...the Operation Manual and the Templates for freemotion sewing.) (USA/CANADA: XE9382-001, Other areas: XE9501-001) Note • Two bobbin covers may be fed through the sewing machine needle and sewing on the country or region where this kit. Utility stitches Decorative stitches (For...
... machine cannot be installed on the machine. (XE8992-001) (XE8878-001) 2 Bobbin case (gray) (XE8298-001) Bobbin cover with this kit was purchased. Bobbin work is sewn using the special bobbin case (gray) and bobbin cover with tabs included with tabs (*See Note.) Screwdriver (small) (X55468-051) CD...the Operation Manual and the Templates for freemotion sewing.) (USA/CANADA: XE9382-001, Other areas: XE9501-001) Note • Two bobbin covers may be fed through the sewing machine needle and sewing on the country or region where this kit. Utility stitches Decorative stitches (For...
Users Manual - English
Page 8
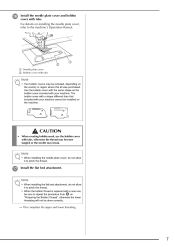
... where this kit was purchased. Use the bobbin cover with the same shape as the bobbin cover included with tabs. Note • When installing the needle plate cover, do not allow it to pinch the thread. • When the bobbin thread is replaced with your machine. For details... needle may be installed on installing the needle plate cover, refer to pinch the thread. q Install the flat bed attachment. p Install the needle plate cover and bobbin cover with your machine cannot be included, depending on "Preparing the Bobbin Thread", otherwise the lower threading will not be done...
... where this kit was purchased. Use the bobbin cover with the same shape as the bobbin cover included with tabs. Note • When installing the needle plate cover, do not allow it to pinch the thread. • When the bobbin thread is replaced with your machine. For details... needle may be installed on installing the needle plate cover, refer to pinch the thread. q Install the flat bed attachment. p Install the needle plate cover and bobbin cover with your machine cannot be included, depending on "Preparing the Bobbin Thread", otherwise the lower threading will not be done...


