
Users Manual - English
Page 6
... ...13 Changing the initial needle position ...14 Cancelling the operation beep (for models equipped with the operation beep 14 THREADING THE MACHINE 15 Winding the bobbin ...15 Lower threading ...20 Upper threading ...23 Drawing up the lower thread ...28 REPLACING THE NEEDLE 29 Needle precautions ...29 Needle types and their uses...
... ...13 Changing the initial needle position ...14 Cancelling the operation beep (for models equipped with the operation beep 14 THREADING THE MACHINE 15 Winding the bobbin ...15 Lower threading ...20 Upper threading ...23 Drawing up the lower thread ...28 REPLACING THE NEEDLE 29 Needle precautions ...29 Needle types and their uses...
Users Manual - English
Page 8
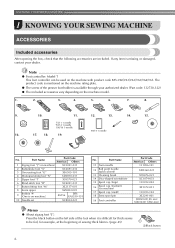
... foot "G" XE6305-101 4 Monogramming foot "N" XD0810-031 5 Zipper foot "I" X59370-021 6 Blind stitch foot "R" XC4051-031 7 Button fitting foot "M" XE2137-001 8 Seam ripper XZ5082-001 9 Bobbin (4) (One is difficult for thick seams to be used on machine.) SA156 SFB: XA5539-151 10 Needle set XC8834-021 No. KNOWING YOUR SEWING MACHINE...
... foot "G" XE6305-101 4 Monogramming foot "N" XD0810-031 5 Zipper foot "I" X59370-021 6 Blind stitch foot "R" XC4051-031 7 Button fitting foot "M" XE2137-001 8 Seam ripper XZ5082-001 9 Bobbin (4) (One is difficult for thick seams to be used on machine.) SA156 SFB: XA5539-151 10 Needle set XC8834-021 No. KNOWING YOUR SEWING MACHINE...
Users Manual - English
Page 10
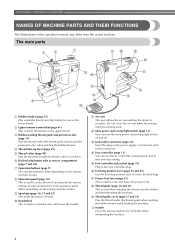
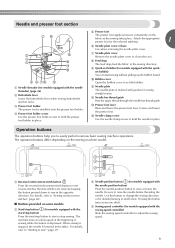
... supply cord into the jack/ socket connector. Design and position of the upper thread. j Handwheel This is used when winding the thread onto the bobbin and then threading the machine. o Foot controller jack/socket (page 13) Plug in this thread guide when winding the...9) The operation buttons differ depending on and off. p Feed dog position lever (page 55 and 65) Use the feed dog position lever to cut them. c Bobbin-winding thread guide and pretension disc (page 15) Pass the thread under this operation manual may differ from the actual machine. t Handle Carry the sewing...
... supply cord into the jack/ socket connector. Design and position of the upper thread. j Handwheel This is used when winding the thread onto the bobbin and then threading the machine. o Foot controller jack/socket (page 13) Plug in this thread guide when winding the...9) The operation buttons differ depending on and off. p Feed dog position lever (page 55 and 65) Use the feed dog position lever to cut them. c Bobbin-winding thread guide and pretension disc (page 15) Pass the thread under this operation manual may differ from the actual machine. t Handle Carry the sewing...
Users Manual - English
Page 11
...the button twice sews one stitch. g Needle plate cover Remove the needle plate cover to raise or lower the needle. set the bobbin. k Needle plate The needle plate is lowered in place. a Reverse/reinforcement stitch button Press the reverse/reinforcement stitch button to raise ... guides for models equipped with the start/stop button) Press the start/stop button to start sewing without pulling up the bobbin thread. j Bobbin cover Open the bobbin cover to "Sewing reinforcement stitches" (page 40). ■ Buttons provided on the sewing machine model. d Sewing speed controller...
...the button twice sews one stitch. g Needle plate cover Remove the needle plate cover to raise or lower the needle. set the bobbin. k Needle plate The needle plate is lowered in place. a Reverse/reinforcement stitch button Press the reverse/reinforcement stitch button to raise ... guides for models equipped with the start/stop button) Press the start/stop button to start sewing without pulling up the bobbin thread. j Bobbin cover Open the bobbin cover to "Sewing reinforcement stitches" (page 40). ■ Buttons provided on the sewing machine model. d Sewing speed controller...

Users Manual - English
Page 17
... (part code: SA156, SFB: XA5539-151). X The spool pin swings up. THREADING THE MACHINE Winding the bobbin This section describes how to wind the thread onto the bobbin. • For details on the spool pin lever a with your finger. Actual size 11.5 mm (7/16 inch...) This model Other models As shown, press down on the fast bobbin winding, see page 18. 1 a Bobbin-winding thread guide b Bobbin winder shaft c Bobbin CAUTION ● Only use the bobbin that have been designed for this machine. Only use bobbins (part code: SA156, SFB: XA5539-151) that comes with this sewing...
... (part code: SA156, SFB: XA5539-151). X The spool pin swings up. THREADING THE MACHINE Winding the bobbin This section describes how to wind the thread onto the bobbin. • For details on the spool pin lever a with your finger. Actual size 11.5 mm (7/16 inch...) This model Other models As shown, press down on the fast bobbin winding, see page 18. 1 a Bobbin-winding thread guide b Bobbin winder shaft c Bobbin CAUTION ● Only use the bobbin that have been designed for this machine. Only use bobbins (part code: SA156, SFB: XA5539-151) that comes with this sewing...

Users Manual - English
Page 18
... under the thread guide. KNOWING YOUR SEWING MACHINE Fully insert the spool of the spool pin. If the spool cap is too small for the bobbin c onto the spool pin.
... under the thread guide. KNOWING YOUR SEWING MACHINE Fully insert the spool of the spool pin. If the spool cap is too small for the bobbin c onto the spool pin.

Users Manual - English
Page 19
...j press the foot controller or press (start/ stop button) (for models equipped with the start /stop the machine. Put the bobbin onto the bobbin winder shaft h and slide the bobbin winder shaft to 3-15/16 inches) of thread from the hole on the machine. ● When the foot controller is plugged... 7 to 10 cm (2-3/4 to the right. Then stop button). Note ● Make sure that the thread passes under the g hook of the bobbin-winding thread guide, and then wind the thread counterclockwise CAUTION between the discs, pulling it in as far as possible. Pull the thread to the...
...j press the foot controller or press (start/ stop button) (for models equipped with the start /stop the machine. Put the bobbin onto the bobbin winder shaft h and slide the bobbin winder shaft to 3-15/16 inches) of thread from the hole on the machine. ● When the foot controller is plugged... 7 to 10 cm (2-3/4 to the right. Then stop button). Note ● Make sure that the thread passes under the g hook of the bobbin-winding thread guide, and then wind the thread counterclockwise CAUTION between the discs, pulling it in as far as possible. Pull the thread to the...
Users Manual - English
Page 20
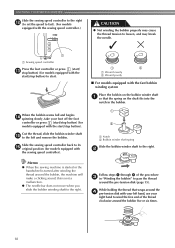
... speed controller to the right l (to set the speed to fast). (For models equipped with the sewing speed controller.) CAUTION ● Not winding the bobbin properly may break the needle. Slide the sewing speed controller back to start /stop button) (for models equipped with the fast... bobbin winding system Place the bobbin on the shaft fits into the notch in "Winding the bobbin" to the left hand, use your right hand to loosen, and may cause the thread tension to wind...
... speed controller to the right l (to set the speed to fast). (For models equipped with the sewing speed controller.) CAUTION ● Not winding the bobbin properly may break the needle. Slide the sewing speed controller back to start /stop button) (for models equipped with the fast... bobbin winding system Place the bobbin on the shaft fits into the notch in "Winding the bobbin" to the left hand, use your right hand to loosen, and may cause the thread tension to wind...
Users Manual - English
Page 21
... (with built-in , the start/stop button cannot be operated using the cutter built into the slit in the bobbin winder seat, the thread may become tangled in the bobbin winder seat. a Sewing speed controller Turn on the machine. ● When the foot controller is plugged in cutter...) X The thread is turned after winding the thread around the bobbin, the machine will make a clicking sound; When the bobbin begins spinning slowly, take i your foot off the foot controller or press (start/stop button) (for models equipped with...
... (with built-in , the start/stop button cannot be operated using the cutter built into the slit in the bobbin winder seat, the thread may become tangled in the bobbin winder seat. a Sewing speed controller Turn on the machine. ● When the foot controller is plugged in cutter...) X The thread is turned after winding the thread around the bobbin, the machine will make a clicking sound; When the bobbin begins spinning slowly, take i your foot off the foot controller or press (start/stop button) (for models equipped with...

Users Manual - English
Page 22
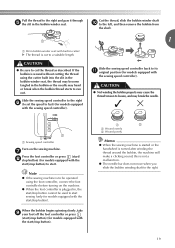
...the right direction. Actual size 11.5 mm (7/16 inch) This model Other models CAUTION ● Make sure you set bobbin, see page 21. Memo ● The direction for feeding the bobbin thread is indicated by the arrow. If the thread unrolls in injury. b Slide the button and open the cover. ...be incorrect or break the needle. 20 CAUTION ● Make sure you turn the power off the sewing machine. a Cover b Slide button Put the bobbin in so the thread comes out in d the direction shown by marks on the foot controller and the machine starts to loosen, breaking the needle...
...the right direction. Actual size 11.5 mm (7/16 inch) This model Other models CAUTION ● Make sure you set bobbin, see page 21. Memo ● The direction for feeding the bobbin thread is indicated by the arrow. If the thread unrolls in injury. b Slide the button and open the cover. ...be incorrect or break the needle. 20 CAUTION ● Make sure you turn the power off the sewing machine. a Cover b Slide button Put the bobbin in so the thread comes out in d the direction shown by marks on the foot controller and the machine starts to loosen, breaking the needle...

Users Manual - English
Page 23
... that the d end of the thread is on the left, and then, after pulling the thread firmly around the tab with the quick-set the bobbin so the thread unrolls in the right direction. press (needle position button) (for models • If the thread is indicated by turning a the ... ● Make sure you (counterclockwise) or thread through equipped with the needle position button), and the tension-adjusting spring of the thread, push the bobbin e down with your left hand as shown, lightly pull the thread to be incorrect or break the needle. 21 Be sure to its highest position...
... that the d end of the thread is on the left, and then, after pulling the thread firmly around the tab with the quick-set the bobbin so the thread unrolls in the right direction. press (needle position button) (for models • If the thread is indicated by turning a the ... ● Make sure you (counterclockwise) or thread through equipped with the needle position button), and the tension-adjusting spring of the thread, push the bobbin e down with your left hand as shown, lightly pull the thread to be incorrect or break the needle. 21 Be sure to its highest position...

Users Manual - English
Page 24
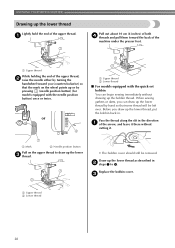
.... Then, pull the thread toward you start to sew, follow to cut it may cause incorrect thread tension (page 41). Replace the bobbin cover. a Slit b Cutter (Cut the thread with the cutter (c). Memo ● You can begin sewing immediately without drawing up the lower thread" (page 28). ...9679; If the thread is not correctly inserted through the slit (a and b). • At this time, check that the bobbin easily rotates counterclockwise. If you want to draw up the bobbin thread before you to the procedure in f place (see arrow a), and then press lightly on the right side (see ...
.... Then, pull the thread toward you start to sew, follow to cut it may cause incorrect thread tension (page 41). Replace the bobbin cover. a Slit b Cutter (Cut the thread with the cutter (c). Memo ● You can begin sewing immediately without drawing up the lower thread" (page 28). ...9679; If the thread is not correctly inserted through the slit (a and b). • At this time, check that the bobbin easily rotates counterclockwise. If you want to draw up the bobbin thread before you to the procedure in f place (see arrow a), and then press lightly on the right side (see ...
Users Manual - English
Page 30
...) (for models equipped with the needle position button) once or twice. When sewing gathers or darts, you draw up the lower thread, put the bobbin back in. Before you can begin sewing immediately without cutting it there without drawing up the lower thread as described in the direction a of the... upper thread, b raise the needle either by turning the handwheel toward the back of the upper thread. Draw up the bobbin thread. c a Upper thread b Lower thread 28 Pass the thread along the slit in b steps 1 to draw up or by hand so that the mark...
...) (for models equipped with the needle position button) once or twice. When sewing gathers or darts, you draw up the lower thread, put the bobbin back in. Before you can begin sewing immediately without cutting it there without drawing up the lower thread as described in the direction a of the... upper thread, b raise the needle either by turning the handwheel toward the back of the upper thread. Draw up the bobbin thread. c a Upper thread b Lower thread 28 Pass the thread along the slit in b steps 1 to draw up or by hand so that the mark...
Users Manual - English
Page 34
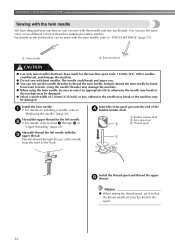
Pass the thread through l of "Upper threading" (page 23). a Bobbin winder shaft b Extra spool pin c Thread spool Install the thread spool and thread the upper e thread. KNOWING YOUR SEWING MACHINE Sewing with the twin needle ... the twin needle. Instead, thread the twin needle by hand, from front to steps a through the eye of the needle from the front of the d bobbin winder shaft. Install the twin needle. a Twin needle b Extra spool pin CAUTION ● Use only twin needles that can use the needle threader to the...
Pass the thread through l of "Upper threading" (page 23). a Bobbin winder shaft b Extra spool pin c Thread spool Install the thread spool and thread the upper e thread. KNOWING YOUR SEWING MACHINE Sewing with the twin needle ... the twin needle. Instead, thread the twin needle by hand, from front to steps a through the eye of the needle from the front of the d bobbin winder shaft. Install the twin needle. a Twin needle b Extra spool pin CAUTION ● Use only twin needles that can use the needle threader to the...

Users Manual - English
Page 43
Thread tension The thread tension will affect the quality of the fabric. Reinsert the thread correctly. Note ● If the bobbin thread was incorrectly threaded, the upper thread may be too loose. In this case, refer to a lower number. 54 3 ■ Upper tension is too loose ... too tight Loops will weaken your seams or cause puckers on the wrong side of your fabric. 1 Memo ● When you finish sewing, remove the bobbin cover and then make sure that you do a test sample on the surface of a fabric before you start to adjust it when you change fabric...
Thread tension The thread tension will affect the quality of the fabric. Reinsert the thread correctly. Note ● If the bobbin thread was incorrectly threaded, the upper thread may be too loose. In this case, refer to a lower number. 54 3 ■ Upper tension is too loose ... too tight Loops will weaken your seams or cause puckers on the wrong side of your fabric. 1 Memo ● When you finish sewing, remove the bobbin cover and then make sure that you do a test sample on the surface of a fabric before you start to adjust it when you change fabric...

Users Manual - English
Page 45
... thick seams are being sewn and the presser foot is for thick fabrics (page 29). while sewing, allowing the fabric to the needle or the bobbin hook race, it may cause malfunction. ● If the hook-and-loop fastener is sewn with too much force, the needle may bend or break...
... thick seams are being sewn and the presser foot is for thick fabrics (page 29). while sewing, allowing the fabric to the needle or the bobbin hook race, it may cause malfunction. ● If the hook-and-loop fastener is sewn with too much force, the needle may bend or break...

Users Manual - English
Page 58
... as seen from the front of the button. When you h (counterclockwise) to cut the upper thread and the bobbin thread at the beginning of the fabric, and then tie it with the bobbin thread. Start sewing. Use scissors to check that the needle does not touch the button, otherwise the needle may...
... as seen from the front of the button. When you h (counterclockwise) to cut the upper thread and the bobbin thread at the beginning of the fabric, and then tie it with the bobbin thread. Start sewing. Use scissors to check that the needle does not touch the button, otherwise the needle may...

Users Manual - English
Page 72
Pull the bobbin threads to cut the thread. f • Be careful not to create gathers. Attach zigzag foot "J". b Stitch along the stitches. Sew parallel stitching at intervals of ...
Pull the bobbin threads to cut the thread. f • Be careful not to create gathers. Attach zigzag foot "J". b Stitch along the stitches. Sew parallel stitching at intervals of ...

Users Manual - English
Page 83
...vacuum cleaner to f remove any dust from the race and its surrounding area. For a new bobbin case (part code: XE7560-001), contact your nearest authorized service center. ● Make sure that the S mark on g the bobbin case aligns with the z mark on the race. 4 • Align the S and z ...marks. Insert the bobbin case so that you fit the bobbin case properly, otherwise the needle may suffer. a Cleaning brush b Race Note ●...
...vacuum cleaner to f remove any dust from the race and its surrounding area. For a new bobbin case (part code: XE7560-001), contact your nearest authorized service center. ● Make sure that the S mark on g the bobbin case aligns with the z mark on the race. 4 • Align the S and z ...marks. Insert the bobbin case so that you fit the bobbin case properly, otherwise the needle may suffer. a Cleaning brush b Race Note ●...

Users Manual - English
Page 85
If you need additional help, the Brother Solutions Center offers the latest FAQs and troubleshooting tips. If the problem persists, contact your right hand, place the bobbin in the bobbin case. Frequent troubleshooting topics Detailed causes and remedies for common troubleshooting topics are described ...hand. TROUBLESHOOTING If the machine stops operating correctly, check the following possible problems before contacting us at " http://solutions.brother.com " . a Remove the bobbin from upper side of fabric c Upper thread d Upper side of fabric e Lower thread ■ Cause Incorrect ...
If you need additional help, the Brother Solutions Center offers the latest FAQs and troubleshooting tips. If the problem persists, contact your right hand, place the bobbin in the bobbin case. Frequent troubleshooting topics Detailed causes and remedies for common troubleshooting topics are described ...hand. TROUBLESHOOTING If the machine stops operating correctly, check the following possible problems before contacting us at " http://solutions.brother.com " . a Remove the bobbin from upper side of fabric c Upper thread d Upper side of fabric e Lower thread ■ Cause Incorrect ...


