
Operation Manual
Page 4
.... 2 Use this machine, avoid direct sunlight and high humidity locations. FOR USERS IN CENELEC COUNTRIES This appliance can damage the case and machine, and should never be used. • Always consult the operation manual when replacing or installing any assemblies, the presser feet, needle, or other hot objects. • Use only neutral soaps or detergents to clean the case. The contents of this manual and specifications of this manual. FOR USERS IN...
.... 2 Use this machine, avoid direct sunlight and high humidity locations. FOR USERS IN CENELEC COUNTRIES This appliance can damage the case and machine, and should never be used. • Always consult the operation manual when replacing or installing any assemblies, the presser feet, needle, or other hot objects. • Use only neutral soaps or detergents to clean the case. The contents of this manual and specifications of this manual. FOR USERS IN...
Operation Manual
Page 5
... 4 Accessory compartment 5 NAMES OF MACHINE PARTS AND THEIR FUNCTIONS 5 The main parts 5 Needle and presser foot section 6 Operation buttons 6 Operation panel 6 Spool pin 7 USING YOUR SEWING MACHINE 7 Power supply precautions 7 Power supply 8 Foot controller 8 Sewing speed controller (for models equipped with the start/stop button 9 Changing the needle stop position 9 Changing the initial needle position 9 Cancelling the operation beep (for models equipped with the operation beep) ........ 9 THREADING THE MACHINE 10 Winding the bobbin 10 Lower threading 13 Upper threading 15...
... 4 Accessory compartment 5 NAMES OF MACHINE PARTS AND THEIR FUNCTIONS 5 The main parts 5 Needle and presser foot section 6 Operation buttons 6 Operation panel 6 Spool pin 7 USING YOUR SEWING MACHINE 7 Power supply precautions 7 Power supply 8 Foot controller 8 Sewing speed controller (for models equipped with the start/stop button 9 Changing the needle stop position 9 Changing the initial needle position 9 Cancelling the operation beep (for models equipped with the operation beep) ........ 9 THREADING THE MACHINE 10 Winding the bobbin 10 Lower threading 13 Upper threading 15...
Operation Manual
Page 8
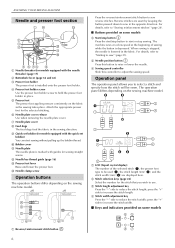
...sewing machine model. The machine sews at a slow speed at the beginning of the selected stitch (1), the presser foot type to start sewing without pulling up the bobbin thread. a LCD (liquid crystal display) The number of sewing while the button is installed onto the presser foot holder. g Needle plate cover h Feed dogs The feed dogs feed the fabric in the opposite direction. For details, refer to "Starting to use. Operation panel The operation panel allows you wish to sew" (page 25). KNOWING YOUR SEWING MACHINE Needle and presser foot section a Needle threader (for models...
...sewing machine model. The machine sews at a slow speed at the beginning of the selected stitch (1), the presser foot type to start sewing without pulling up the bobbin thread. a LCD (liquid crystal display) The number of sewing while the button is installed onto the presser foot holder. g Needle plate cover h Feed dogs The feed dogs feed the fabric in the opposite direction. For details, refer to "Starting to use. Operation panel The operation panel allows you wish to sew" (page 25). KNOWING YOUR SEWING MACHINE Needle and presser foot section a Needle threader (for models...
Operation Manual
Page 14
... winding the bobbin properly may cause the thread tension to loosen, and may tangle around c the bobbin five or six times. If the bobbin is wound without cutting the thread using the cutter built into the notch in b "Winding the bobbin" to start /stop button) (for models equipped with the sewing speed controller). If you follow the instructions carefully. a Sewing speed controller Press the foot controller or press (start . Memo ● When the sewing machine is started or...
... winding the bobbin properly may cause the thread tension to loosen, and may tangle around c the bobbin five or six times. If the bobbin is wound without cutting the thread using the cutter built into the notch in b "Winding the bobbin" to start /stop button) (for models equipped with the sewing speed controller). If you follow the instructions carefully. a Sewing speed controller Press the foot controller or press (start . Memo ● When the sewing machine is started or...

Operation Manual
Page 15
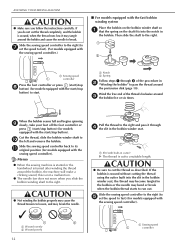
... (needle position button) (for models equipped with the needle position button), and raise the presser foot lever. Memo ● The direction for models equipped with the start/stop button). f Press the foot controller or press (start/stop g button) (for models equipped with the start/stop button) to start sewing (only for feeding the bobbin thread is turned after winding the thread around the bobbin, the machine will make a clicking sound; Note ● If the sewing machine is to be operated using the foot controller, connect the foot controller before...
... (needle position button) (for models equipped with the needle position button), and raise the presser foot lever. Memo ● The direction for models equipped with the start/stop button). f Press the foot controller or press (start/stop g button) (for models equipped with the start/stop button) to start sewing (only for feeding the bobbin thread is turned after winding the thread around the bobbin, the machine will make a clicking sound; Note ● If the sewing machine is to be operated using the foot controller, connect the foot controller before...

Operation Manual
Page 16
... the needle plate cover. f CAUTION ● Make sure you to cut it may cause the thread tension to its highest position by the line in the wrong direction, it may cause incorrect thread tension (page 26). If the thread unrolls in the diagram). ■ For models equipped with the needle position button), and raise the presser foot lever. 14 a Tension-adjusting spring Hold the end of the thread, push the bobbin e down the bobbin, guide e the thread...
... the needle plate cover. f CAUTION ● Make sure you to cut it may cause the thread tension to its highest position by the line in the wrong direction, it may cause incorrect thread tension (page 26). If the thread unrolls in the diagram). ■ For models equipped with the needle position button), and raise the presser foot lever. 14 a Tension-adjusting spring Hold the end of the thread, push the bobbin e down the bobbin, guide e the thread...

Operation Manual
Page 19
...the needle threader. ● The needle threader cannot be used with the wing needle or the twin needle. ● If the needle threader cannot be wrapped around the thread takeup lever. Lower the presser foot lever. a Loop of thread CAUTION ● Be careful not to pull on the foot controller and the machine starts to "Upper threading" (page 15). While lowering the needle threader lever, hook c the thread onto the guide. 1 a Needle holder b Needle threader lever c Guide Fully lower the needle threader lever. When using the needle threader (for models equipped with the needle threader...
...the needle threader. ● The needle threader cannot be used with the wing needle or the twin needle. ● If the needle threader cannot be wrapped around the thread takeup lever. Lower the presser foot lever. a Loop of thread CAUTION ● Be careful not to pull on the foot controller and the machine starts to "Upper threading" (page 15). While lowering the needle threader lever, hook c the thread onto the guide. 1 a Needle holder b Needle threader lever c Guide Fully lower the needle threader lever. When using the needle threader (for models equipped with the needle threader...

Operation Manual
Page 20
... up or by pressing (needle position button) (for models equipped with the quick-set bobbin You can draw up the bobbin thread. or a Mark b Needle position button a Upper thread b Lower thread ■ For models equipped with the needle position button) once or twice. c REPLACING THE NEEDLE This section provides information on the upper thread to 4. f Pull on sewing machine needles. g a Upper thread b Lower thread Pull out about 10 cm (4 inches) of the needle. KNOWING YOUR SEWING MACHINE Raise the presser foot lever. Needle precautions Be sure to observe...
... up or by pressing (needle position button) (for models equipped with the quick-set bobbin You can draw up the bobbin thread. or a Mark b Needle position button a Upper thread b Lower thread ■ For models equipped with the needle position button) once or twice. c REPLACING THE NEEDLE This section provides information on the upper thread to 4. f Pull on sewing machine needles. g a Upper thread b Lower thread Pull out about 10 cm (4 inches) of the needle. KNOWING YOUR SEWING MACHINE Raise the presser foot lever. Needle precautions Be sure to observe...

Operation Manual
Page 23
... thread the twin needle. a Needle bar thread guide Attach zigzag foot "J". (Refer to the back. Instead, thread the twin needle by hand, from the front of the spool. Using the needle threader may be damaged. Install the twin needle. Pass the thread through the eye of the needle from the front to page 22.) h Note Models equipped with this machine (part code: 131096-121). ● Do not sew with bent needles. Sewing with the upper c thread. a • For details on the sewing machine. Manually thread...
... thread the twin needle. a Needle bar thread guide Attach zigzag foot "J". (Refer to the back. Instead, thread the twin needle by hand, from the front of the spool. Using the needle threader may be damaged. Install the twin needle. Pass the thread through the eye of the needle from the front to page 22.) h Note Models equipped with this machine (part code: 131096-121). ● Do not sew with bent needles. Sewing with the upper c thread. a • For details on the sewing machine. Manually thread...

Operation Manual
Page 24
... the power on and step on the types of stitching are used with (needle position button), raise the needle by turning the handwheel a toward you use the correct presser foot for the stitch pattern you change the presser foot. Raise the needle by pressing once or twice.) Note ● When using the twin needle, the stitches may become bunched together, depending on the controller, the machine will start /stop button is accidentally pressed and the machine starts sewing...
... the power on and step on the types of stitching are used with (needle position button), raise the needle by turning the handwheel a toward you use the correct presser foot for the stitch pattern you change the presser foot. Raise the needle by pressing once or twice.) Note ● When using the twin needle, the stitches may become bunched together, depending on the controller, the machine will start /stop button is accidentally pressed and the machine starts sewing...

Operation Manual
Page 27
... the starting point of the stitching. If the needle hits the presser foot, the needle may result in the needle bending or breaking. a Presser foot lever Place the fabric under the presser foot, pass the thread c under the presser foot, and then pull out about 5 cm (2 inches) of thread toward you (counterclockwise) with your left or right to adjust the sewing speed. Lower the presser foot lever. a Sewing speed controller Slowly press down on the foot controller. (With g models equipped with (needle position button...
... the starting point of the stitching. If the needle hits the presser foot, the needle may result in the needle bending or breaking. a Presser foot lever Place the fabric under the presser foot, pass the thread c under the presser foot, and then pull out about 5 cm (2 inches) of thread toward you (counterclockwise) with your left or right to adjust the sewing speed. Lower the presser foot lever. a Sewing speed controller Slowly press down on the foot controller. (With g models equipped with (needle position button...

Operation Manual
Page 28
...-adjusting spring of the fabric. Thread tension The thread tension will stay up . (With models equipped with (needle position button), raise the needle by pressing (start/stop button)) (for models equipped with reverse stitching, pressing (reverse/reinforcement stitch button) sews reinforcement stitches, 3 to a lower number. 54 3 Memo ● When you change fabric or thread. Raise the presser foot lever. Reinsert the thread correctly. You may be used to the raised position (page 9). j Pull the fabric to the left side of each other than straight or zigzag stitches...
...-adjusting spring of the fabric. Thread tension The thread tension will stay up . (With models equipped with (needle position button), raise the needle by pressing (start/stop button)) (for models equipped with reverse stitching, pressing (reverse/reinforcement stitch button) sews reinforcement stitches, 3 to a lower number. 54 3 Memo ● When you change fabric or thread. Raise the presser foot lever. Reinsert the thread correctly. You may be used to the raised position (page 9). j Pull the fabric to the left side of each other than straight or zigzag stitches...

Operation Manual
Page 35
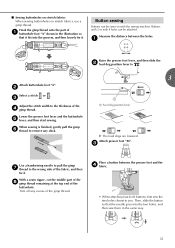
... button guide plate of buttonhole b foot "A", and then insert the button that will be set the button guide plate to the calculated length. (The distance between 3 the markings on the scale. 4 d 10 mm (3/8 inch) 5 e 15 mm (9/16 inch) Attach buttonhole foot "A". d Pass the upper thread down through the buttonhole. The size of the buttonhole is 5 mm (3/16 inch).) a Reinforcement stitching ■ Part names of the buttonhole foot "A" a Button guide plate b Presser foot scale c Pin d Marks on buttonhole foot e 5 mm (3/16 inch) Use...
... button guide plate of buttonhole b foot "A", and then insert the button that will be set the button guide plate to the calculated length. (The distance between 3 the markings on the scale. 4 d 10 mm (3/8 inch) 5 e 15 mm (9/16 inch) Attach buttonhole foot "A". d Pass the upper thread down through the buttonhole. The size of the buttonhole is 5 mm (3/16 inch).) a Reinforcement stitching ■ Part names of the buttonhole foot "A" a Button guide plate b Presser foot scale c Pin d Marks on buttonhole foot e 5 mm (3/16 inch) Use...
Operation Manual
Page 37
... the sewing machine. c Adjust the stitch width to remove any excess of the buttonhole. Then, slide the button so that it fits into the two holes, and then sew them in the illustration so that the needle goes into the grooves, and then loosely tie it . Hook the gimp thread onto the part of the d gimp thread. b Select a stitch or . a Feed dog position lever The feed dogs are lowered. a Raise the presser foot lever, and...
... the sewing machine. c Adjust the stitch width to remove any excess of the buttonhole. Then, slide the button so that it fits into the two holes, and then sew them in the illustration so that the needle goes into the grooves, and then loosely tie it . Hook the gimp thread onto the part of the d gimp thread. b Select a stitch or . a Feed dog position lever The feed dogs are lowered. a Raise the presser foot lever, and...

Operation Manual
Page 38
... the handwheel toward you are finished attaching the button, k slide the feed dog position lever to check that the needle correctly goes into the two holes of the fabric, and then tie it with the bobbin thread. Use scissors to cut the upper thread and the bobbin thread at low speed, press (reverse/reinforcement stitch button) to the distance between the holes in place. Pattern No. Attach zigzag foot "J". Start sewing. Open the seam allowance, press it from the...
... the handwheel toward you are finished attaching the button, k slide the feed dog position lever to check that the needle correctly goes into the two holes of the fabric, and then tie it with the bobbin thread. Use scissors to cut the upper thread and the bobbin thread at low speed, press (reverse/reinforcement stitch button) to the distance between the holes in place. Pattern No. Attach zigzag foot "J". Start sewing. Open the seam allowance, press it from the...
Operation Manual
Page 60
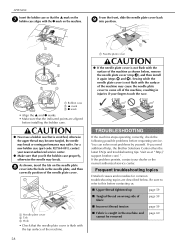
...; Make sure that you need additional help, the Brother Solutions Center offers the latest FAQs and troubleshooting tips. CAUTION ● Never use a bobbin case that the needle plate cover is flush with the top surface of the machine. 58 a Needle plate cover CAUTION ● If the needle plate cover is scratched, otherwise the upper thread may become tangled, the needle may break or sewing performance may cause the needle plate cover to this before requesting service. a Needle plate cover b Tab c Hole...
...; Make sure that you need additional help, the Brother Solutions Center offers the latest FAQs and troubleshooting tips. CAUTION ● Never use a bobbin case that the needle plate cover is flush with the top surface of the machine. 58 a Needle plate cover CAUTION ● If the needle plate cover is scratched, otherwise the upper thread may become tangled, the needle may break or sewing performance may cause the needle plate cover to this before requesting service. a Needle plate cover b Tab c Hole...

Operation Manual
Page 64
... needle bar and feed dogs operate correctly. Note ● After completing this time, increase the d stitch length and width to their maximum settings. • Refer to "Upper threading" (page 15). Correctly thread the machine. APPENDIX Insert the bobbin case by following procedure in "Checking machine operations" to check that the machine is correctly threaded. Attach the needle plate cover according to "Lower threading" (page 13) and "Replacing the presser foot" (page 22). Turn off the machine, and then install the f bobbin and presser foot...
... needle bar and feed dogs operate correctly. Note ● After completing this time, increase the d stitch length and width to their maximum settings. • Refer to "Upper threading" (page 15). Correctly thread the machine. APPENDIX Insert the bobbin case by following procedure in "Checking machine operations" to check that the machine is correctly threaded. Attach the needle plate cover according to "Lower threading" (page 13) and "Replacing the presser foot" (page 22). Turn off the machine, and then install the f bobbin and presser foot...

Operation Manual
Page 66
... needle plate. The bobbin winder shaft is a notch (a) on the main power switch. To use a bobbin that are pulling the fabric too much. The bobbin case is incorrectly installed. Correctly install the needle. Replace the needle. Loosen the upper thread tension. Replace the presser foot. Contact your retailer or the nearest authorized service center. Only use the start/stop button, disconnect the foot controller. The foot controller or the start /stop button. Do not use the start / stop button). Choose a thread and needle that has been designed...
... needle plate. The bobbin winder shaft is a notch (a) on the main power switch. To use a bobbin that are pulling the fabric too much. The bobbin case is incorrectly installed. Correctly install the needle. Replace the needle. Loosen the upper thread tension. Replace the presser foot. Contact your retailer or the nearest authorized service center. Only use the start/stop button, disconnect the foot controller. The foot controller or the start /stop button. Do not use the start / stop button). Choose a thread and needle that has been designed...

Operation Manual
Page 67
... The upper thread tension is scratched or does not turn smoothly. Correctly install the needle. Replace the needle plate. Only use a bobbin that is appropriate for thread you are appropriate for this machine. The bobbin is too tight. Remove the tangled thread and clean the race. Incorrect bobbins will not work properly. Reset the bobbin thread correctly. Choose a thread and needle that has been designed for the type of the opening in the needle plate is scratched. Replace the needle...
... The upper thread tension is scratched or does not turn smoothly. Correctly install the needle. Replace the needle plate. Only use a bobbin that is appropriate for thread you are appropriate for this machine. The bobbin is too tight. Remove the tangled thread and clean the race. Incorrect bobbins will not work properly. Reset the bobbin thread correctly. Choose a thread and needle that has been designed for the type of the opening in the needle plate is scratched. Replace the needle...

Operation Manual
Page 71
... E error messages 68 extra spool pin 21 eyelet punch 34 F fagoting 43 fast bobbin winding 12 feed dog position lever 5, 35, 41 feed , dogs 6 35, 40 , flat bed attachment 5 28 foot controller 4 8, 25 free-motion quilting 40 H , handwheel 5 25 heirloom stitching 45 hook-and-loop fastener 28 J joining 45 , joining stitch 38 43 M main parts 5 main power switch 8 , monogramming 44 45 N , needle bar thread guide 6 16 needle clamp screw 6 needle plate 6 , needle plate cover 6 57 needle position 30 needle position button 6 , needle threader 6 17 O openings 41 , operation beep...
... E error messages 68 extra spool pin 21 eyelet punch 34 F fagoting 43 fast bobbin winding 12 feed dog position lever 5, 35, 41 feed , dogs 6 35, 40 , flat bed attachment 5 28 foot controller 4 8, 25 free-motion quilting 40 H , handwheel 5 25 heirloom stitching 45 hook-and-loop fastener 28 J joining 45 , joining stitch 38 43 M main parts 5 main power switch 8 , monogramming 44 45 N , needle bar thread guide 6 16 needle clamp screw 6 needle plate 6 , needle plate cover 6 57 needle position 30 needle position button 6 , needle threader 6 17 O openings 41 , operation beep...


