
Users Manual - English
Page 2
... reduce the risk of lint, dust, and loose cloth. 5. Never operate this machine. 18. Return the machine to be used as threading needle, changing needle, threading bobbin, or changing presser foot, and the like. 15. Do not unplug by young children or infirm persons without supervision. (For...spray) products are being administered. 8. Switch the machine to break. 14. Keep ventilation openings of electric shock: 1. Do not use bent needles. 13. If the Light unit is intended for use as contained in the instruction manual. 16. The machine should always be left unattended ...
... reduce the risk of lint, dust, and loose cloth. 5. Never operate this machine. 18. Return the machine to be used as threading needle, changing needle, threading bobbin, or changing presser foot, and the like. 15. Do not unplug by young children or infirm persons without supervision. (For...spray) products are being administered. 8. Switch the machine to break. 14. Keep ventilation openings of electric shock: 1. Do not use bent needles. 13. If the Light unit is intended for use as contained in the instruction manual. 16. The machine should always be left unattended ...
Users Manual - English
Page 4
... manual when replacing or installing any other hot objects. 2. For additional product information and updates, visit our web site at www.brother.com The contents of this manual and specifications of the most advanced computerized household sewing machines. Do not touch the hand wheel,...this machine, avoid direct sunlight and high humidity locations. Be sure to keep your local authorized Brother dealer. Do not store anything on the needle while sewing. up lever, needle, or other parts to assure correct installation. CONGRATULATIONS ON CHOOSING OUR MACHINE Your machine is one...
... manual when replacing or installing any other hot objects. 2. For additional product information and updates, visit our web site at www.brother.com The contents of this manual and specifications of the most advanced computerized household sewing machines. Do not touch the hand wheel,...this machine, avoid direct sunlight and high humidity locations. Be sure to keep your local authorized Brother dealer. Do not store anything on the needle while sewing. up lever, needle, or other parts to assure correct installation. CONGRATULATIONS ON CHOOSING OUR MACHINE Your machine is one...
Users Manual - English
Page 5
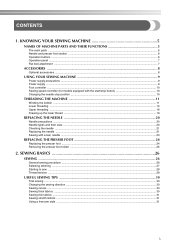
... precautions ...9 Power supply ...9 Foot controller ...10 Sewing speed controller (for models equipped with the start/stop button 10 Changing the needle stop position ...10 THREADING THE MACHINE 11 Winding the bobbin ...11 Lower threading ...14 Upper threading ...16 Drawing up the lower ...thread ...19 REPLACING THE NEEDLE 20 Needle precautions ...20 Needle types and their uses ...20 Checking the needle ...21 Replacing the needle ...21 Sewing with a twin needle ...23 REPLACING THE PRESSER FOOT 24 Replacing the presser foot ...24 Removing the...
... precautions ...9 Power supply ...9 Foot controller ...10 Sewing speed controller (for models equipped with the start/stop button 10 Changing the needle stop position ...10 THREADING THE MACHINE 11 Winding the bobbin ...11 Lower threading ...14 Upper threading ...16 Drawing up the lower ...thread ...19 REPLACING THE NEEDLE 20 Needle precautions ...20 Needle types and their uses ...20 Checking the needle ...21 Replacing the needle ...21 Sewing with a twin needle ...23 REPLACING THE PRESSER FOOT 24 Replacing the presser foot ...24 Removing the...
Users Manual - English
Page 7
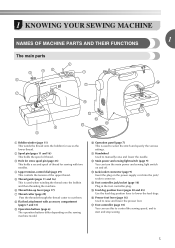
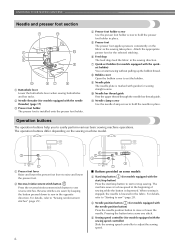
... to lower the feed dogs. o Feed dog position lever (pages 38 and 45) Use the feed dog position lever to manually raise and lower the needle. q Foot controller (page 10) You can turn the main power and sewing light switch on and off. c Hole for extra spool pin (page 23) This... guide (pages 11 and 16) This is used when winding the thread onto the bobbin and then threading the machine. h Flat bed attachment with two needles. p Presser foot lever (page 16) Used to cut them. 1 KNOWING YOUR SEWING MACHINE 1 NAMES OF MACHINE PARTS AND THEIR FUNCTIONS The main parts a Bobbin winder...
... to lower the feed dogs. o Feed dog position lever (pages 38 and 45) Use the feed dog position lever to manually raise and lower the needle. q Foot controller (page 10) You can turn the main power and sewing light switch on and off. c Hole for extra spool pin (page 23) This... guide (pages 11 and 16) This is used when winding the thread onto the bobbin and then threading the machine. h Flat bed attachment with two needles. p Presser foot lever (page 16) Used to cut them. 1 KNOWING YOUR SEWING MACHINE 1 NAMES OF MACHINE PARTS AND THEIR FUNCTIONS The main parts a Bobbin winder...
Users Manual - English
Page 8
...Sewing speed controller (for models equipped with the sewing speed controller) Slide the sewing speed controller to sew reverse stitches. b Needle threader (for models equipped with the needle threader) (page 17) c Presser foot holder The presser foot is lowered in the fabric. b Reverse/reinforcement stitch button Press...foot lever to sew" (page 28). Pressing the button twice sews one stitch. h Bobbin cover Open the bobbin cover to hold the needle in the sewing direction. For details, refer to "Starting to raise and lower the presser foot. d Presser foot holder screw Use ...
...Sewing speed controller (for models equipped with the sewing speed controller) Slide the sewing speed controller to sew reverse stitches. b Needle threader (for models equipped with the needle threader) (page 17) c Presser foot holder The presser foot is lowered in the fabric. b Reverse/reinforcement stitch button Press...foot lever to sew" (page 28). Pressing the button twice sews one stitch. h Bobbin cover Open the bobbin cover to hold the needle in the sewing direction. For details, refer to "Starting to raise and lower the presser foot. d Presser foot holder screw Use ...
Users Manual - English
Page 10
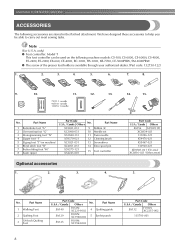
..., ES-2400, ES-2000, EX-660, CE-4000, BC-1000, HS-1000, XR-7700, CE-5000PRW, SM-6500PRW ● The screw of the presser foot holder is available through your authorized dealer. (Part code: 132730-122) 1. 2. 3. 4. 5. 6. 7. 8. 9. 10. 11. 12. 13. 14. 15. 75/11 1 needle 90/14 1 needle 100/16 1 needle No. Part Name 1 Walking Foot...
..., ES-2400, ES-2000, EX-660, CE-4000, BC-1000, HS-1000, XR-7700, CE-5000PRW, SM-6500PRW ● The screw of the presser foot holder is available through your authorized dealer. (Part code: 132730-122) 1. 2. 3. 4. 5. 6. 7. 8. 9. 10. 11. 12. 13. 14. 15. 75/11 1 needle 90/14 1 needle 100/16 1 needle No. Part Name 1 Walking Foot...
Users Manual - English
Page 12
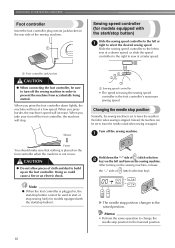
...the sewing speed controller is stopped. After turning on the sewing machine. Slower a Sewing speed controller • The speed set to leave the needle in , the start/stop button cannot be used to the raised position. When you press harder, the machine's speed will run at a faster... speed. Hold down lightly, the machine will increase. Memo • Perform the same operation to change the needle stop position changes to start or stop sewing (only for models equipped with the start /stop button). Doing so could cause a fire or an...
...the sewing speed controller is stopped. After turning on the sewing machine. Slower a Sewing speed controller • The speed set to leave the needle in , the start/stop button cannot be used to the raised position. When you press harder, the machine's speed will run at a faster... speed. Hold down lightly, the machine will increase. Memo • Perform the same operation to change the needle stop position changes to start or stop sewing (only for models equipped with the start /stop button). Doing so could cause a fire or an...
Users Manual - English
Page 14
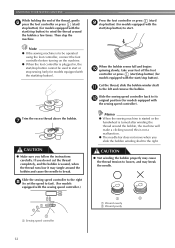
... the foot controller, connect the foot controller before turning on the machine. ● When the foot controller is not a malfunction. ● The needle bar does not move when you follow the instructions carefully. Note ● If the sewing machine is to start /stop button). g CAUTION ●...sewing speed controller.) Memo ● When the sewing machine is started or the handwheel is wound, when the thread runs low it may break the needle. 1 2 a Wound evenly b Wound poorly a Sewing speed controller 12 Then stop the machine. Trim the excess thread above the bobbin. Slide...
... the foot controller, connect the foot controller before turning on the machine. ● When the foot controller is not a malfunction. ● The needle bar does not move when you follow the instructions carefully. Note ● If the sewing machine is to start /stop button). g CAUTION ●...sewing speed controller.) Memo ● When the sewing machine is started or the handwheel is wound, when the thread runs low it may break the needle. 1 2 a Wound evenly b Wound poorly a Sewing speed controller 12 Then stop the machine. Trim the excess thread above the bobbin. Slide...
Users Manual - English
Page 15
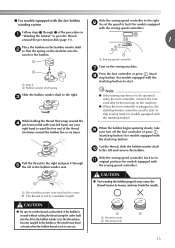
... using the foot controller, connect the foot controller before turning on the sewing machine. If the bobbin is plugged in the bobbin or the needle may break the needle. a Sewing speed controller a Notch b Bobbin winder shaft spring Slide the bobbin winder shaft to start or stop sewing (only for models equipped with...
... using the foot controller, connect the foot controller before turning on the sewing machine. If the bobbin is plugged in the bobbin or the needle may break the needle. a Sewing speed controller a Notch b Bobbin winder shaft spring Slide the bobbin winder shaft to start or stop sewing (only for models equipped with...
Users Manual - English
Page 16
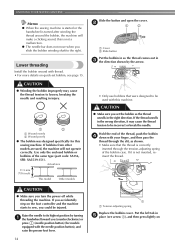
... Memo ● When the sewing machine is started or the handwheel is not inserted, reinsert the thread. Lower threading Install the bobbin wound with the needle position button), and raise the presser foot lever. 14 1 a Tension-adjusting spring Replace the bobbin cover. b 1 2 a Cover b Slide button ...and the machine starts to the right. CAUTION ● Make sure you slide the bobbin winding shaft to sew, you (counterclockwise) or press (needle position button) (for this sewing machine. Actual size 11.5 mm (7/16 inch) This model Other models • Only use bobbins that the...
... Memo ● When the sewing machine is started or the handwheel is not inserted, reinsert the thread. Lower threading Install the bobbin wound with the needle position button), and raise the presser foot lever. 14 1 a Tension-adjusting spring Replace the bobbin cover. b 1 2 a Cover b Slide button ...and the machine starts to the right. CAUTION ● Make sure you slide the bobbin winding shaft to sew, you (counterclockwise) or press (needle position button) (for this sewing machine. Actual size 11.5 mm (7/16 inch) This model Other models • Only use bobbins that the...
Users Manual - English
Page 17
... case is correctly inserted through the slit, and then pull the thread to cut it may cause the thread tension to be used with the needle position button), and raise the presser foot lever. Be sure to thread the machine as shown by marks around the bobbin case. CAUTION ●... in the right direction. If you want to draw up the bobbin thread before you set bobbin Raise the needle to its highest position by turning a the handwheel toward you (counterclockwise) or press (needle position button) (for models equipped with this machine. a Cover b Slide button Put the bobbin in the ...
... case is correctly inserted through the slit, and then pull the thread to cut it may cause the thread tension to be used with the needle position button), and raise the presser foot lever. Be sure to thread the machine as shown by marks around the bobbin case. CAUTION ●... in the right direction. If you want to draw up the bobbin thread before you set bobbin Raise the needle to its highest position by turning a the handwheel toward you (counterclockwise) or press (needle position button) (for models equipped with this machine. a Cover b Slide button Put the bobbin in the ...
Users Manual - English
Page 18
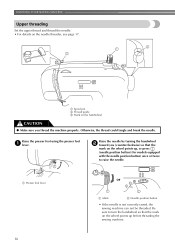
... turning the handwheel b toward you thread the machine properly. Otherwise, the thread could tangle and break the needle. Be sure to turn the handwheel so that the mark on the wheel points up before threading the sewing machine. 16 KNOWING YOUR SEWING ...MACHINE Upper threading Set the upper thread and thread the needle. • For details on the wheel points up , or press (needle position button) (for models equipped with the needle position button) once or twice to raise the needle. Raise the presser foot using the presser foot a lever. a Spool pin b ...
... turning the handwheel b toward you thread the machine properly. Otherwise, the thread could tangle and break the needle. Be sure to turn the handwheel so that the mark on the wheel points up before threading the sewing machine. 16 KNOWING YOUR SEWING ...MACHINE Upper threading Set the upper thread and thread the needle. • For details on the wheel points up , or press (needle position button) (for models equipped with the needle position button) once or twice to raise the needle. Raise the presser foot using the presser foot a lever. a Spool pin b ...
Users Manual - English
Page 19
...possible, and c then put a spool of 90/14-100/16. ● You cannot use needles in your right hand. ● The needle threader can easily be passed behind the needle bar thread f guide above the needle. Note ● If the thread take -up lever is lowered, the upper thread cannot be...(2 inch) of the procedure in a "Upper threading" to thread the machine to the needle bar thread guide. a Needle bar thread guide Thread the needle from right to break. If you are using decorative threads or special needles, such as shown in the figure d on the previous page. Make sure the main ...
...possible, and c then put a spool of 90/14-100/16. ● You cannot use needles in your right hand. ● The needle threader can easily be passed behind the needle bar thread f guide above the needle. Note ● If the thread take -up lever is lowered, the upper thread cannot be...(2 inch) of the procedure in a "Upper threading" to thread the machine to the needle bar thread guide. a Needle bar thread guide Thread the needle from right to break. If you are using decorative threads or special needles, such as shown in the figure d on the previous page. Make sure the main ...

Users Manual - English
Page 20
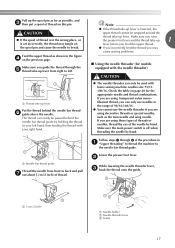
KNOWING YOUR SEWING MACHINE Fully lower the needle threader lever. e a Hook b Thread While lightly holding the thread, release the f needle threader lever. Catch the thread on the hook as shown below. X The end of the needle threader rotates toward the back of the needle. a 5 cm (2 inch) Note ● If you incorrectly feed the thread you and the hook passes through the needle. The hook will pull the thread through the eye of the sewing machine. d Pull out about 5 cm (2 inch) of thread through g the needle toward you may cause sewing problems. 18
KNOWING YOUR SEWING MACHINE Fully lower the needle threader lever. e a Hook b Thread While lightly holding the thread, release the f needle threader lever. Catch the thread on the hook as shown below. X The end of the needle threader rotates toward the back of the needle. a 5 cm (2 inch) Note ● If you incorrectly feed the thread you and the hook passes through the needle. The hook will pull the thread through the eye of the sewing machine. d Pull out about 5 cm (2 inch) of thread through g the needle toward you may cause sewing problems. 18
Users Manual - English
Page 21
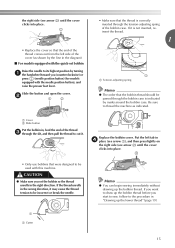
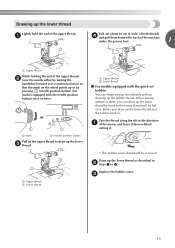
... thread to 4. Draw up the lower thread as described in b steps 1 to draw up the bobbin thread. Drawing up the lower thread by pressing (needle position button) (for models equipped with the quick-set bobbin You can draw up the lower thread Lightly hold the end of the upper thread...darts, you can begin sewing immediately without cutting it there without drawing up the lower c thread. Pass the thread along the slit in . or a Mark b Needle position button Pull on the wheel points up the lower thread, put the bobbin back in the direction a of the arrow, and leave it . •...
... thread to 4. Draw up the lower thread as described in b steps 1 to draw up the bobbin thread. Drawing up the lower thread by pressing (needle position button) (for models equipped with the quick-set bobbin You can draw up the lower thread Lightly hold the end of the upper thread...darts, you can begin sewing immediately without cutting it there without drawing up the lower c thread. Pass the thread along the slit in . or a Mark b Needle position button Pull on the wheel points up the lower thread, put the bobbin back in the direction a of the arrow, and leave it . •...
Users Manual - English
Page 22
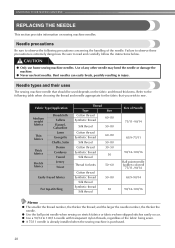
...Synthetic thread Silk thread Synthetic thread Silk thread 50-80 30 Size of any other needle may bend the needle or damage the machine. ● Never use home sewing machine needles. Needle precautions Be sure to the following precautions concerning the handling of the fabric being sewn....Failure to sew. CAUTION ● Only use bent needles. and the larger the needle number, the thicker the needle. ● Use the ball point needle when sewing on sewing machine needles. KNOWING YOUR SEWING MACHINE REPLACING THE NEEDLE This section provides information on stretch fabrics or fabrics ...
...Synthetic thread Silk thread Synthetic thread Silk thread 50-80 30 Size of any other needle may bend the needle or damage the machine. ● Never use home sewing machine needles. Needle precautions Be sure to the following precautions concerning the handling of the fabric being sewn....Failure to sew. CAUTION ● Only use bent needles. and the larger the needle number, the thicker the needle. ● Use the ball point needle when sewing on sewing machine needles. KNOWING YOUR SEWING MACHINE REPLACING THE NEEDLE This section provides information on stretch fabrics or fabrics ...

Users Manual - English
Page 23
...the instructions in the table on the previous page. Checking the needle Replacing the needle Replace the needle as denim) with a bent needle is extremely dangerous since the needle may bend or break. CAUTION ● Before replacing the needle, be sure to turn off the sewing machine. Do not... (counterclockwise) so that the mark on a flat surface and check that the distance between the needle and the flat surface is not even, the needle is even. 1 2 a Mark b Needle position button Turn off the sewing machine, otherwise injuries may occur if the foot controller or the...
...the instructions in the table on the previous page. Checking the needle Replacing the needle Replace the needle as denim) with a bent needle is extremely dangerous since the needle may bend or break. CAUTION ● Before replacing the needle, be sure to turn off the sewing machine. Do not... (counterclockwise) so that the mark on a flat surface and check that the distance between the needle and the flat surface is not even, the needle is even. 1 2 a Mark b Needle position button Turn off the sewing machine, otherwise injuries may occur if the foot controller or the...

Users Manual - English
Page 24
... from the front of the needle bar, and then tighten the needle clamp screw. a Needle bar b Needle holder c Needle clamp screw d Align 22 Note ● The needle can be damaged. Therefore, do not loosen the needle clamp screw too much , the needle clamp (which holds the needle) may result. ■ Installing the needle clamp If the needle clamp is at the...
... from the front of the needle bar, and then tighten the needle clamp screw. a Needle bar b Needle holder c Needle clamp screw d Align 22 Note ● The needle can be damaged. Therefore, do not loosen the needle clamp screw too much , the needle clamp (which holds the needle) may result. ■ Installing the needle clamp If the needle clamp is at the...
Users Manual - English
Page 25
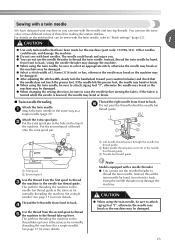
...Note Models equipped with a needle threader ● You cannot use the needle threader to attach zigzag foot "J", otherwise the needle may break or the machine may bend or break. ■ Twin needle threading Attach the twin needle. Using the needle threader may be sewn with the twin needle, refer to attach zigzag ...; Select a stitch width of the machine. f Do not pass the thread behind the needle bar thread guide. The path for threading the machine to the needle bar thread guide is lowered, the needle may be sure to the thread take -up lever. If the fabric is turned while ...
...Note Models equipped with a needle threader ● You cannot use the needle threader to attach zigzag foot "J", otherwise the needle may break or the machine may bend or break. ■ Twin needle threading Attach the twin needle. Using the needle threader may be sewn with the twin needle, refer to attach zigzag ...; Select a stitch width of the machine. f Do not pass the thread behind the needle bar thread guide. The path for threading the machine to the needle bar thread guide is lowered, the needle may be sure to the thread take -up lever. If the fabric is turned while ...

Users Manual - English
Page 26
... back of the d presser foot holder to "Selecting stitching" (page 27). a Presser foot lever 24 Raise the needle by pressing once or twice.) or a Mark b Needle position button If the sewing machine has been turned on the controller, the machine will start /stop button is aligned ... the presser foot as described below the holder e so that the mark on the wheel points up. (With models equipped with (needle position button), raise the needle by turning the handwheel a toward you (counterclockwise) so that the presser foot pin is accidentally pressed and the machine starts sewing....
... back of the d presser foot holder to "Selecting stitching" (page 27). a Presser foot lever 24 Raise the needle by pressing once or twice.) or a Mark b Needle position button If the sewing machine has been turned on the controller, the machine will start /stop button is aligned ... the presser foot as described below the holder e so that the mark on the wheel points up. (With models equipped with (needle position button), raise the needle by turning the handwheel a toward you (counterclockwise) so that the presser foot pin is accidentally pressed and the machine starts sewing....


