

Users Manual - English
Page 1
KNOWING YOUR SEWING MACHINE SEWING BASICS UTILITY STITCHES APPENDIX Computerized Sewing Machine Operation Manual
KNOWING YOUR SEWING MACHINE SEWING BASICS UTILITY STITCHES APPENDIX Computerized Sewing Machine Operation Manual
Users Manual - English
Page 2
... must be taken, including the following: Read all moving parts. Never drop or insert any object into water. Do not pull or push fabric while stitching. Use only accessories recommended by the manufacturer as described in this machine only for household use by pulling on cord. Do not unplug by young...
... must be taken, including the following: Read all moving parts. Never drop or insert any object into water. Do not pull or push fabric while stitching. Use only accessories recommended by the manufacturer as described in this machine only for household use by pulling on cord. Do not unplug by young...
Users Manual - English
Page 5
SEWING BASICS 26 SEWING ...26 General sewing procedure ...26 Selecting stitching ...27 Starting to sew ...28 Thread tension ...29 USEFUL SEWING TIPS ...30 Trial sewing ...30 Changing the sewing direction ...30 Sewing curves ...30 Sewing thick ...
SEWING BASICS 26 SEWING ...26 General sewing procedure ...26 Selecting stitching ...27 Starting to sew ...28 Thread tension ...29 USEFUL SEWING TIPS ...30 Trial sewing ...30 Changing the sewing direction ...30 Sewing curves ...30 Sewing thick ...

Users Manual - English
Page 6
... Cleaning the bobbin case ...57 TROUBLESHOOTING ...59 ERROR MESSAGES ...62 Operation beep (for models equipped with the operation beep 62 INDEX ...63 4 UTILITY STITCHES 32 OVERCASTING STITCHES 32 BASIC STITCHING ...33 Basic stitching ...33 BLIND HEM STITCHING 34 BUTTONHOLE SEWING 35 Button sewing ...38 ZIPPER INSERTION ...40 SEWING STRETCH FABRICS AND ELASTIC TAPE 41 Stretch...
... Cleaning the bobbin case ...57 TROUBLESHOOTING ...59 ERROR MESSAGES ...62 Operation beep (for models equipped with the operation beep 62 INDEX ...63 4 UTILITY STITCHES 32 OVERCASTING STITCHES 32 BASIC STITCHING ...33 Basic stitching ...33 BLIND HEM STITCHING 34 BUTTONHOLE SEWING 35 Button sewing ...38 ZIPPER INSERTION ...40 SEWING STRETCH FABRICS AND ELASTIC TAPE 41 Stretch...
Users Manual - English
Page 7
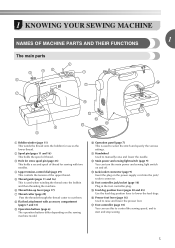
... them. b Spool pin (pages 11 and 16) This holds the spool of thread for use this to control the sewing speed, and to select the stitch and specify the various settings. e Thread guide (pages 11 and 16) This is used when winding the thread onto the bobbin and then threading the...
... them. b Spool pin (pages 11 and 16) This holds the spool of thread for use this to control the sewing speed, and to select the stitch and specify the various settings. e Thread guide (pages 11 and 16) This is used when winding the thread onto the bobbin and then threading the...
Users Manual - English
Page 8
... k Needle clamp screw Use the needle clamp screw to easily perform various basic sewing machine operations. b Needle threader (for the selected stitching. a Presser foot lever Raise and lower the presser foot lever to sew" (page 28). e Sewing speed controller (for models equipped...lower the presser foot. The operation buttons differ depending on the fabric as the sewing takes place. For details, refer to "Sewing reinforcement stitches" (page 29). ■ Buttons provided on some models c Start/stop sewing. d Needle position button (for sewing straight seams. ...
... k Needle clamp screw Use the needle clamp screw to easily perform various basic sewing machine operations. b Needle threader (for the selected stitching. a Presser foot lever Raise and lower the presser foot lever to sew" (page 28). e Sewing speed controller (for models equipped...lower the presser foot. The operation buttons differ depending on the fabric as the sewing takes place. For details, refer to "Sewing reinforcement stitches" (page 29). ■ Buttons provided on some models c Start/stop sewing. d Needle position button (for sewing straight seams. ...

Users Manual - English
Page 9
.... Slide the flat bed attachment to the left to "Selecting stitching" (page 27). b Stitch selection keys Press the stitch selection keys, and then select the number for the stitch that should be used (2), stitch length in millimeters (3), and stitch width in a bag, they may fall out, and be ...sewn. press the "+" side to increase the stitch length.) d Stitch width adjustment key Press this key to adjust the stitch length. (Press the "-" side to reduce the stitch length; Flat bed attachment The accessories are displayed. Operation panel The operation panel,...
.... Slide the flat bed attachment to the left to "Selecting stitching" (page 27). b Stitch selection keys Press the stitch selection keys, and then select the number for the stitch that should be used (2), stitch length in millimeters (3), and stitch width in a bag, they may fall out, and be ...sewn. press the "+" side to increase the stitch length.) d Stitch width adjustment key Press this key to adjust the stitch length. (Press the "-" side to reduce the stitch length; Flat bed attachment The accessories are displayed. Operation panel The operation panel,...
Users Manual - English
Page 10
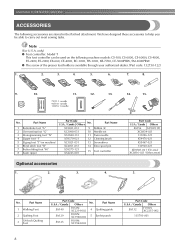
.... Note (For U.S.A. only) ● Foot controller: Model T This foot controller can be able to help you be used on machine) 6 Blind stitch foot "R" 7 Button fitting foot "M" 8 Seam ripper Part Code U.S.A. / Canada Others No. Part Name SA140 F033N: XC2214-002 4 Quilting guide SA129...SEWING MACHINE ACCESSORIES The following machine models: CS-100, CS-6000, CS-6000i, CS-4000, ES-2400, ES-2000, EX-660, CE-4000, BC-1000, HS-1000, XR-7700, CE-5000PRW, SM-6500PRW ● The screw of the presser foot holder is available through your authorized dealer. (Part code: 132730-122) 1. ...
.... Note (For U.S.A. only) ● Foot controller: Model T This foot controller can be able to help you be used on machine) 6 Blind stitch foot "R" 7 Button fitting foot "M" 8 Seam ripper Part Code U.S.A. / Canada Others No. Part Name SA140 F033N: XC2214-002 4 Quilting guide SA129...SEWING MACHINE ACCESSORIES The following machine models: CS-100, CS-6000, CS-6000i, CS-4000, ES-2400, ES-2000, EX-660, CE-4000, BC-1000, HS-1000, XR-7700, CE-5000PRW, SM-6500PRW ● The screw of the presser foot holder is available through your authorized dealer. (Part code: 132730-122) 1. ...
Users Manual - English
Page 12
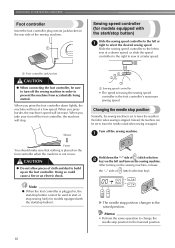
... position. KNOWING YOUR SEWING MACHINE Foot controller Insert the foot controller plug into its jack/socket on the sewing machine, release the "-" side of (stitch selection key). Slide the sewing speed controller to the left to sew at a low speed. When you press the foot controller down the "-" side... of (stitch selection b key) on the sewing machine. Hold down lightly, the machine will stop button) Slide the sewing speed controller to the left and turn...
... position. KNOWING YOUR SEWING MACHINE Foot controller Insert the foot controller plug into its jack/socket on the sewing machine, release the "-" side of (stitch selection key). Slide the sewing speed controller to the left to sew at a low speed. When you press the foot controller down the "-" side... of (stitch selection b key) on the sewing machine. Hold down lightly, the machine will stop button) Slide the sewing speed controller to the left and turn...
Users Manual - English
Page 22
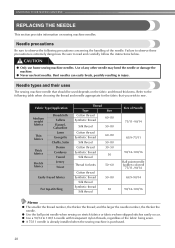
... sewing on sewing machine needles. KNOWING YOUR SEWING MACHINE REPLACING THE NEEDLE This section provides information on stretch fabrics or fabrics where skipped stitches easily occur. ● Use a 90/14 to 100/16 needle with transparent nylon threads, regardless of the fabric being sewn. ... Stretch fabrics Broadcloth Taffeta Flannel, Gabardine Lawn Georgette Challis, Satin Denim Corduroy Tweed Jersey Tricot Easily frayed fabrics For top-stitching Thread Type Size Cotton thread Synthetic thread 60-80 Silk thread 50-80 Cotton thread Synthetic thread Silk thread Cotton thread ...
... sewing on sewing machine needles. KNOWING YOUR SEWING MACHINE REPLACING THE NEEDLE This section provides information on stretch fabrics or fabrics where skipped stitches easily occur. ● Use a 90/14 to 100/16 needle with transparent nylon threads, regardless of the fabric being sewn. ... Stretch fabrics Broadcloth Taffeta Flannel, Gabardine Lawn Georgette Challis, Satin Denim Corduroy Tweed Jersey Tricot Easily frayed fabrics For top-stitching Thread Type Size Cotton thread Synthetic thread 60-80 Silk thread 50-80 Cotton thread Synthetic thread Silk thread Cotton thread ...

Users Manual - English
Page 23
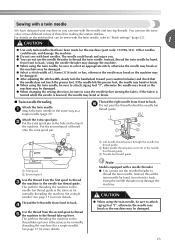
Use the screwdriver and a needle that has been determined to be skipped stitches. b a Flat side b Needle type marking ■ Correct needle 1 a Flat surface ■ Incorrect needle If the distance between the needle and the flat surface is even. 1 2 a ... puckered or there may occur if the foot controller or the start/ stop button is accidentally pressed and the machine starts sewing. In addition, the stitching may be sure to 75/11), the needle may break while the machine is being operated.
Use the screwdriver and a needle that has been determined to be skipped stitches. b a Flat side b Needle type marking ■ Correct needle 1 a Flat surface ■ Incorrect needle If the distance between the needle and the flat surface is even. 1 2 a ... puckered or there may occur if the foot controller or the start/ stop button is accidentally pressed and the machine starts sewing. In addition, the stitching may be sure to 75/11), the needle may break while the machine is being operated.
Users Manual - English
Page 25
...for normally threading the machine (for threading the machine to thread the twin needle. b Put the extra spool pin in the hole on the stitches that have designed your machine so you (counterclockwise) and check that the needle does not touch the presser foot. c Needle bar thread guide ... Using the needle threader may be sewn with bent needles. Put the second spool of thread for more details. See page 17 for making decorative stitches. CAUTION ● When using the twin needle, be sure to attach zigzag foot "J", otherwise the needle may break or the machine may be ...
...for normally threading the machine (for threading the machine to thread the twin needle. b Put the extra spool pin in the hole on the stitches that have designed your machine so you (counterclockwise) and check that the needle does not touch the presser foot. c Needle bar thread guide ... Using the needle threader may be sewn with bent needles. Put the second spool of thread for more details. See page 17 for making decorative stitches. CAUTION ● When using the twin needle, be sure to attach zigzag foot "J", otherwise the needle may break or the machine may be ...

Users Manual - English
Page 26
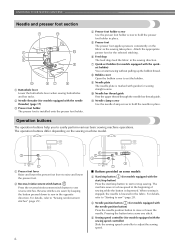
...that the mark on , b turn it off the power before you may cause injury. ● Only use the correct presser foot for the stitch pattern you (counterclockwise) so that the presser foot pin is positioned to be injured. ● Always use presser feet that have chosen. Raise the...PRESSER FOOT CAUTION ● Always turn off . Replacing the presser foot Press the black button at the back of the d presser foot holder to "Selecting stitching" (page 27). c a Presser foot holder b Shank c Pin Note ● The presser foot to turn off the sewing machine, otherwise injuries may...
...that the mark on , b turn it off the power before you may cause injury. ● Only use the correct presser foot for the stitch pattern you (counterclockwise) so that the presser foot pin is positioned to be injured. ● Always use presser feet that have chosen. Raise the...PRESSER FOOT CAUTION ● Always turn off . Replacing the presser foot Press the black button at the back of the d presser foot holder to "Selecting stitching" (page 27). c a Presser foot holder b Shank c Pin Note ● The presser foot to turn off the sewing machine, otherwise injuries may...

Users Manual - English
Page 28
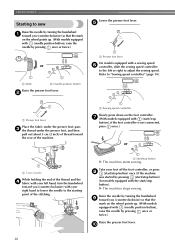
Select the stitch appropriate for the stitch. Attach the presser foot appropriate for the area to "Replacing the presser foot" (page 24). ↓ 4 Start sewing. CAUTION ● While the machine is finished, .... Before operating the sewing machine, read the following precautions. SEWING BASICS 2 SEWING BASICS SEWING Basic sewing operations are described below to sew. 1 Turn on selecting a stitch, refer to sew" (page 28). 26 Bent needles can easily break, possibly resulting in operation, pay special attention to "Power supply" (page 9). ↓ 2 Select the...
Select the stitch appropriate for the stitch. Attach the presser foot appropriate for the area to "Replacing the presser foot" (page 24). ↓ 4 Start sewing. CAUTION ● While the machine is finished, .... Before operating the sewing machine, read the following precautions. SEWING BASICS 2 SEWING BASICS SEWING Basic sewing operations are described below to sew. 1 Turn on selecting a stitch, refer to sew" (page 28). 26 Bent needles can easily break, possibly resulting in operation, pay special attention to "Power supply" (page 9). ↓ 2 Select the...

Users Manual - English
Page 29
...setting, reappears around or disappears from the standard setting, around or in the LCD. CAUTION ● After adjusting the stitch width, slowly turn the handwheel toward you (counterclockwise) and check that the needle does not touch the presser foot. If... J, N, or R) below to increase or reduce the stitch width. X The stitch is displayed. When the stitch length or stitch width is selected. a Press (stitch selection keys). Selecting stitching Using the stitch selection keys, select the desired stitch. Press the stitch selection keys to the right of in the LCD. &#...
...setting, reappears around or disappears from the standard setting, around or in the LCD. CAUTION ● After adjusting the stitch width, slowly turn the handwheel toward you (counterclockwise) and check that the needle does not touch the presser foot. If... J, N, or R) below to increase or reduce the stitch width. X The stitch is displayed. When the stitch length or stitch width is selected. a Press (stitch selection keys). Selecting stitching Using the stitch selection keys, select the desired stitch. Press the stitch selection keys to the right of in the LCD. &#...
Users Manual - English
Page 30
... foot lever Place the fabric under the presser foot, pass c the thread under the presser foot, and then pull out about 5 cm (2 inch) of the stitching. j 28 a Mark b Needle position button Raise the presser foot lever. e Raise the needle by turning the handwheel a toward you (counterclockwise) so that the mark on...
... foot lever Place the fabric under the presser foot, pass c the thread under the presser foot, and then pull out about 5 cm (2 inch) of the stitching. j 28 a Mark b Needle position button Raise the presser foot lever. e Raise the needle by turning the handwheel a toward you (counterclockwise) so that the mark on...

Users Manual - English
Page 31
...your seams or cause puckers on surface of each other. 1 2 a Reverse stitching b Reinforcement stitching Memo ● Whether reverse stitches or reinforcement stitches are sewn depends on the stitch that the needle will stay up when sewing is stopped, refer to "Changing ... stop position" (page 10). ■ Sewing reinforcement stitches When sewing stitches other than straight or zigzag stitches that are secured with reverse stitching, pressing (reverse/reinforcement stitch button) sews reinforcement stitches, 3 to 5 stitches on top of fabric Solution Reduce the tension by turning...
...your seams or cause puckers on surface of each other. 1 2 a Reverse stitching b Reinforcement stitching Memo ● Whether reverse stitches or reinforcement stitches are sewn depends on the stitch that the needle will stay up when sewing is stopped, refer to "Changing ... stop position" (page 10). ■ Sewing reinforcement stitches When sewing stitches other than straight or zigzag stitches that are secured with reverse stitching, pressing (reverse/reinforcement stitch button) sews reinforcement stitches, 3 to 5 stitches on top of fabric Solution Reduce the tension by turning...
Users Manual - English
Page 32
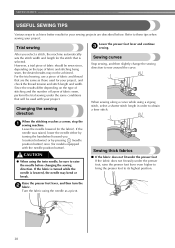
... and then turn the b fabric. However, a trial piece of fabric should be sure to obtain a finer stitch. Turn the fabric using the needle as those used for the stitch that is lowered, the needle may not be used with the needle position button). Changing the sewing direction Sewing ...position. 30 When sewing along a curve while using the twin needle, be sewn since, depending on the type of stitching and the number of layers of fabric and stitching being sewn, the desired results may bend or break. After you (counterclockwise) or by turning the handwheel toward you select...
... and then turn the b fabric. However, a trial piece of fabric should be sure to obtain a finer stitch. Turn the fabric using the needle as those used for the stitch that is lowered, the needle may not be used with the needle position button). Changing the sewing direction Sewing ...position. 30 When sewing along a curve while using the twin needle, be sewn since, depending on the type of stitching and the number of layers of fabric and stitching being sewn, the desired results may bend or break. After you (counterclockwise) or by turning the handwheel toward you select...
Users Manual - English
Page 33
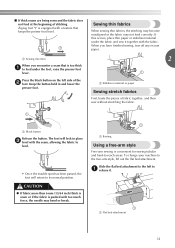
... any excess paper. The foot will return to feed under the fabric and sew it . Slide the flat bed attachment to the left side of stitching Zigzag foot "J" is too thick a to its normal position. Keep the button held in place c level with a feature that keeps the presser foot level.... to the free-arm style, lift out the flat bed attachment. a Black button Release the button. Sewing thin fabrics When sewing thin fabrics, the stitching may become misaligned or the fabric may bend or break. When you encounter a seam that is equipped with the seam, allowing the fabric to feed...
... any excess paper. The foot will return to feed under the fabric and sew it . Slide the flat bed attachment to the left side of stitching Zigzag foot "J" is too thick a to its normal position. Keep the button held in place c level with a feature that keeps the presser foot level.... to the free-arm style, lift out the flat bed attachment. a Black button Release the button. Sewing thin fabrics When sewing thin fabrics, the stitching may become misaligned or the fabric may bend or break. When you encounter a seam that is equipped with the seam, allowing the fabric to feed...
Users Manual - English
Page 34
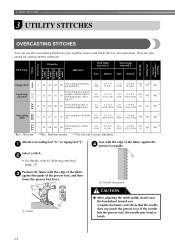
...on stretch fabrics 5.0 (3/16) 0.0-7.0 (0-1/4) 2.5 0.5-4.0 Yes (3/32) (1/32-3/16) ( J ) No **Rfc.: Reinforcement ***Do not use the overcasting stitches to "Selecting stitching" (page 27). Select a stitch. G 06 06 06 06 Overcasting on thin or medium weight fabrics 3.5 (1/8) 2.5-5.0 (3/32-3/16) 2.0 (1/16) 1.0-4.0 (1/16-3/16) No No Rfc... lower the presser foot lever. UTILITY STITCHES 3 UTILITY STITCHES OVERCASTING STITCHES You can use reverse stitching. a Needle drop point a Guide CAUTION ● After adjusting the stitch width, slowly turn the handwheel toward ...
...on stretch fabrics 5.0 (3/16) 0.0-7.0 (0-1/4) 2.5 0.5-4.0 Yes (3/32) (1/32-3/16) ( J ) No **Rfc.: Reinforcement ***Do not use the overcasting stitches to "Selecting stitching" (page 27). Select a stitch. G 06 06 06 06 Overcasting on thin or medium weight fabrics 3.5 (1/8) 2.5-5.0 (3/32-3/16) 2.0 (1/16) 1.0-4.0 (1/16-3/16) No No Rfc... lower the presser foot lever. UTILITY STITCHES 3 UTILITY STITCHES OVERCASTING STITCHES You can use reverse stitching. a Needle drop point a Guide CAUTION ● After adjusting the stitch width, slowly turn the handwheel toward ...


