
Users Manual - English
Page 2
... use . SAVE THESE INSTRUCTIONS This machine is required around the machine needle. 11. DANGER - Return the machine to break. 14. Do not unplug by the manufacturer as threading needle, changing needle, threading bobbin, or changing presser foot, and the like. 15. Special care is intended for... examination, repair, electrical or mechanical adjustment. 4. It may deflect the needle causing it to the nearest authorized dealer ...
... use . SAVE THESE INSTRUCTIONS This machine is required around the machine needle. 11. DANGER - Return the machine to break. 14. Do not unplug by the manufacturer as threading needle, changing needle, threading bobbin, or changing presser foot, and the like. 15. Special care is intended for... examination, repair, electrical or mechanical adjustment. 4. It may deflect the needle causing it to the nearest authorized dealer ...
Users Manual - English
Page 4
...READ BEFORE USING THIS MACHINE For safe operation 1. Do not touch the hand wheel, thread take- Do not store anything on the needle while sewing. Always consult the operation manual when replacing or installing any other parts • A power failure occurs during use extension ...wall. For additional product information and updates, visit our web site at www.brother.com The contents of this manual and specifications of the most advanced computerized household sewing machines. Remember to change without notice. 2 When storing this product are subject to turn off the...
...READ BEFORE USING THIS MACHINE For safe operation 1. Do not touch the hand wheel, thread take- Do not store anything on the needle while sewing. Always consult the operation manual when replacing or installing any other parts • A power failure occurs during use extension ...wall. For additional product information and updates, visit our web site at www.brother.com The contents of this manual and specifications of the most advanced computerized household sewing machines. Remember to change without notice. 2 When storing this product are subject to turn off the...
Users Manual - English
Page 5
...General sewing procedure ...26 Selecting stitching ...27 Starting to sew ...28 Thread tension ...29 USEFUL SEWING TIPS ...30 Trial sewing ...30 Changing the sewing direction ...30 Sewing curves ...30 Sewing thick fabrics ...30 Sewing thin fabrics ...31 Sewing stretch fabrics ...31 Using a free...Power supply precautions ...9 Power supply ...9 Foot controller ...10 Sewing speed controller (for models equipped with the start/stop button 10 Changing the needle stop position ...10 THREADING THE MACHINE 11 Winding the bobbin ...11 Lower threading ...14 Upper threading ...16 Drawing up the lower ...
...General sewing procedure ...26 Selecting stitching ...27 Starting to sew ...28 Thread tension ...29 USEFUL SEWING TIPS ...30 Trial sewing ...30 Changing the sewing direction ...30 Sewing curves ...30 Sewing thick fabrics ...30 Sewing thin fabrics ...31 Sewing stretch fabrics ...31 Using a free...Power supply precautions ...9 Power supply ...9 Foot controller ...10 Sewing speed controller (for models equipped with the start/stop button 10 Changing the needle stop position ...10 THREADING THE MACHINE 11 Winding the bobbin ...11 Lower threading ...14 Upper threading ...16 Drawing up the lower ...
Users Manual - English
Page 12
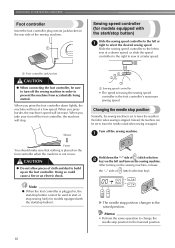
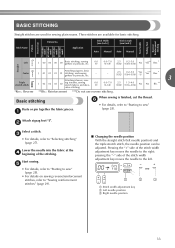
...used to build up on the foot controller. Slower a Sewing speed controller • The speed set to leave the needle in order to sew at a low speed. Changing the needle stop . Slide the sewing speed controller to the left to sew at a slower speed, or slide the speed controller...in , the start/stop button cannot be sure to turn on the sewing machine. Memo • Perform the same operation to change the needle stop position changes to select the desired sewing speed. Hold down lightly, the machine will stop position Normally, the sewing machine is stopped. KNOWING ...
...used to build up on the foot controller. Slower a Sewing speed controller • The speed set to leave the needle in order to sew at a low speed. Changing the needle stop . Slide the sewing speed controller to the left to sew at a slower speed, or slide the speed controller...in , the start/stop button cannot be sure to turn on the sewing machine. Memo • Perform the same operation to change the needle stop position changes to select the desired sewing speed. Hold down lightly, the machine will stop position Normally, the sewing machine is stopped. KNOWING ...
Users Manual - English
Page 25
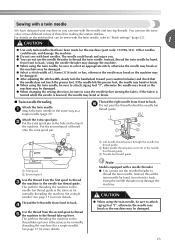
... may damage the machine. ● When using the twin needle, be sure to attach zigzag foot "J", otherwise the needle may break or the machine may be damaged. ● When changing the sewing direction, be damaged. 23 If the fabric is turned while the needle is the same as for normally threading the machine (for...
... may damage the machine. ● When using the twin needle, be sure to attach zigzag foot "J", otherwise the needle may break or the machine may be damaged. ● When changing the sewing direction, be damaged. 23 If the fabric is turned while the needle is the same as for normally threading the machine (for...

Users Manual - English
Page 26
...that have chosen. If you (counterclockwise) so that the presser foot pin is aligned with (needle position button), raise the needle by turning the handwheel a toward you use the wrong presser foot, the needle may strike the presser foot and bend or break, and may cause an accident or injury...presser feet may cause injury. ● Only use the correct presser foot for the stitch pattern you change the presser foot. Raise the needle by pressing once or twice.) or a Mark b Needle position button If the sewing machine has been turned on the wheel points up. (With models equipped ...
...that have chosen. If you (counterclockwise) so that the presser foot pin is aligned with (needle position button), raise the needle by turning the handwheel a toward you use the wrong presser foot, the needle may strike the presser foot and bend or break, and may cause an accident or injury...presser feet may cause injury. ● Only use the correct presser foot for the stitch pattern you change the presser foot. Raise the needle by pressing once or twice.) or a Mark b Needle position button If the sewing machine has been turned on the wheel points up. (With models equipped ...

Users Manual - English
Page 29
...sewing with each of (stitch width c adjustment key) to select stitch 04. Pressing on the right changes the digit on the right and pressing on the left needle position) is changed from the LCD. Press the stitch selection keys to increase or reduce the stitch width. a Stitch length...select the desired stitch. CAUTION ● After adjusting the stitch width, slowly turn the handwheel toward you (counterclockwise) and check that the needle does not touch the presser foot. X The stitch is reset back to the standard setting, reappears around or disappears from the standard ...
...sewing with each of (stitch width c adjustment key) to select stitch 04. Pressing on the right changes the digit on the right and pressing on the left needle position) is changed from the LCD. Press the stitch selection keys to increase or reduce the stitch width. a Stitch length...select the desired stitch. CAUTION ● After adjusting the stitch width, slowly turn the handwheel toward you (counterclockwise) and check that the needle does not touch the presser foot. X The stitch is reset back to the standard setting, reappears around or disappears from the standard ...

Users Manual - English
Page 31
... thread cutter to adjust it when you start /stop button) cannot be set so that the needle will stay up when sewing is stopped, refer to "Changing the needle stop sewing. ● When sewing is stopped, the needle remains lowered (in the fabric). For details, refer to sew. ■ Correct tension 2 Correct tension is...
... thread cutter to adjust it when you start /stop button) cannot be set so that the needle will stay up when sewing is stopped, refer to "Changing the needle stop sewing. ● When sewing is stopped, the needle remains lowered (in the fabric). For details, refer to sew. ■ Correct tension 2 Correct tension is...
Users Manual - English
Page 32
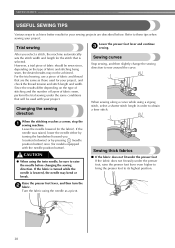
... direction Sewing curves Stop sewing, and then slightly change the sewing direction to these tips when sewing your sewing projects are the same as a pivot. If the needle was raised, lower the needle either by turning the handwheel toward you select a stitch, the machine automatically sets the stitch ... obtain a finer stitch. Raise the presser foot lever, and then turn the b fabric. Turn the fabric using the twin needle, be sure to raise the needle before changing the sewing direction. Sewing thick fabrics ■ If the fabric does not fit under the presser foot If the fabric does ...
... direction Sewing curves Stop sewing, and then slightly change the sewing direction to these tips when sewing your sewing projects are the same as a pivot. If the needle was raised, lower the needle either by turning the handwheel toward you select a stitch, the machine automatically sets the stitch ... obtain a finer stitch. Raise the presser foot lever, and then turn the b fabric. Turn the fabric using the twin needle, be sure to raise the needle before changing the sewing direction. Sewing thick fabrics ■ If the fabric does not fit under the presser foot If the fabric does ...
Users Manual - English
Page 33
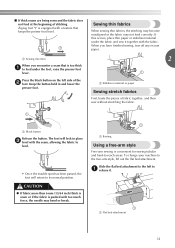
... fabric. CAUTION ● If fabric more than 6 mm (15/64 inch) thick is sewn or if the fabric is pushed with too much force, the needle may not feed correctly. Sewing thin fabrics When sewing thin fabrics, the stitching may become misaligned or the fabric may bend or break. The foot... lock in and lower the presser foot. Slide the flat bed attachment to the left side of the b foot. a Black button Release the button. To change your machine to the free-arm style, lift out the flat bed attachment. Keep the button held in place c level with the seam, allowing the...
... fabric. CAUTION ● If fabric more than 6 mm (15/64 inch) thick is sewn or if the fabric is pushed with too much force, the needle may not feed correctly. Sewing thin fabrics When sewing thin fabrics, the stitching may become misaligned or the fabric may bend or break. The foot... lock in and lower the presser foot. Slide the flat bed attachment to the left side of the b foot. a Black button Release the button. To change your machine to the free-arm style, lift out the flat bed attachment. Keep the button held in place c level with the seam, allowing the...
Users Manual - English
Page 35
... to "Sewing reinforcement stitches" (page 29). ■ Changing the needle position With the straight stitch (left . Pressing the "+" side of the stitching. a Stitch width adjustment key b Left needle position c Right needle position 33 Basic stitching Baste or pin together the fabric ...pieces. b Select a stitch. Stitch Name Pattern No. Start sewing. pressing the "-" side of the stitch width adjustment key moves the needle to the right; Attaching sleeves, sew- - 2.5 0.2-5.0 Yes (3/32) (1/64-3/16) ( J ) Ye*s** Rev.* 3 J 02 02 02 02 ing ...
... to "Sewing reinforcement stitches" (page 29). ■ Changing the needle position With the straight stitch (left . Pressing the "+" side of the stitching. a Stitch width adjustment key b Left needle position c Right needle position 33 Basic stitching Baste or pin together the fabric ...pieces. b Select a stitch. Stitch Name Pattern No. Start sewing. pressing the "-" side of the stitch width adjustment key moves the needle to the right; Attaching sleeves, sew- - 2.5 0.2-5.0 Yes (3/32) (1/64-3/16) ( J ) Ye*s** Rev.* 3 J 02 02 02 02 ing ...
Users Manual - English
Page 36
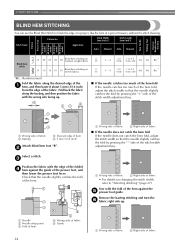
...[mm (inch.)] Stitch Name Application Auto Manual Auto Manual Pattern Presser Foot 70 stitches model 60 stitches model 50 stitches model 40 stitches model Twin Needle Walking Foot Reverse/ Reinforcement Stitching Blind hem stitch R 09 09 09 09 Blind hem stitching on medium weight fabrics 0 (0) 3 - -3 2.0 ...(1/16) 1.0-3.5 (1/16-1/8) No No Rfc.* R 10 10 10 10 Blind hem stitching on changing the stitch width, refer to finish the edge of a project, like the hem of a pair of the stitch width adjustment key. a Wrong side ...
...[mm (inch.)] Stitch Name Application Auto Manual Auto Manual Pattern Presser Foot 70 stitches model 60 stitches model 50 stitches model 40 stitches model Twin Needle Walking Foot Reverse/ Reinforcement Stitching Blind hem stitch R 09 09 09 09 Blind hem stitching on medium weight fabrics 0 (0) 3 - -3 2.0 ...(1/16) 1.0-3.5 (1/16-1/8) No No Rfc.* R 10 10 10 10 Blind hem stitching on changing the stitch width, refer to finish the edge of a project, like the hem of a pair of the stitch width adjustment key. a Wrong side ...
Users Manual - English
Page 45
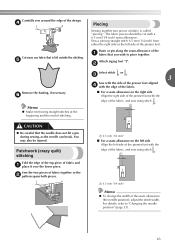
You may also be cut with the edge of the fabric, and sew using stitch . 1 a 6.5 mm (1/4 inch) Memo ● To change the width of the presser foot with a 6.5 mm (1/4 inch) seam allowance. Sew the two pieces of fabric and a place it over the lower piece. For ...; For a seam allowance on the right side Align the right side of the seam allowance (the needle position), adjust the stitch width. Carefully sew around the edge of the a fabric that you wish to "Changing the needle position" (page 33). 43 e Piecing Sewing together two pieces of the fabric, and sew using stitch...
You may also be cut with the edge of the fabric, and sew using stitch . 1 a 6.5 mm (1/4 inch) Memo ● To change the width of the presser foot with a 6.5 mm (1/4 inch) seam allowance. Sew the two pieces of fabric and a place it over the lower piece. For ...; For a seam allowance on the right side Align the right side of the seam allowance (the needle position), adjust the stitch width. Carefully sew around the edge of the a fabric that you wish to "Changing the needle position" (page 33). 43 e Piecing Sewing together two pieces of the fabric, and sew using stitch...


