
Users Manual - English and Spanish
Page 2
..., electrical or mechanical adjustment. 4. Never drop or insert any object into water. This sewing machine is used by the manufacturer as a toy. Keep ventilation openings of burns, fire, electric shock, or injury to break. 12. Always unplug the machine before using. Use only accessories recommended by or near children. 2. Do not operate where...
..., electrical or mechanical adjustment. 4. Never drop or insert any object into water. This sewing machine is used by the manufacturer as a toy. Keep ventilation openings of burns, fire, electric shock, or injury to break. 12. Always unplug the machine before using. Use only accessories recommended by or near children. 2. Do not operate where...
Users Manual - English and Spanish
Page 5
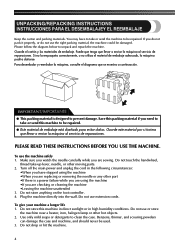
...do not use extension cords. Do not store anything on the foot controller. 4. Benzene, thinner, and scouring powders can damage the case and machine, and should never be damaged. Si no la empaqueta correctamente, o no utiliza el material de embalaje adecuado, la máquina podrí...arse. Make sure you watch the needle carefully while you are sewing. Turn off the main power and unplug the cord in high humidity conditions. Plug the machine directly into the wall. Do not use the machine safely 1. UNPACKING/REPACKING INSTRUCTIONS INSTRUCCIONES PARA EL DESEMBALAJEY EL REEMBALAJE ...
...do not use extension cords. Do not store anything on the foot controller. 4. Benzene, thinner, and scouring powders can damage the case and machine, and should never be damaged. Si no la empaqueta correctamente, o no utiliza el material de embalaje adecuado, la máquina podrí...arse. Make sure you watch the needle carefully while you are sewing. Turn off the main power and unplug the cord in high humidity conditions. Plug the machine directly into the wall. Do not use the machine safely 1. UNPACKING/REPACKING INSTRUCTIONS INSTRUCCIONES PARA EL DESEMBALAJEY EL REEMBALAJE ...
Users Manual - English and Spanish
Page 7
...49 Triple Zigzag Stretch Stitching ...50 Decorative Stitching ...50 4. KNOWING YOUR SEWING MACHINE 10 THE MAIN PARTS ...10 ACCESSORIES ...12 Optional Accessories ...13 USING YOUR SEWING MACHINE 14 Connecting Plugs ...15 Main Power and Sewing Light Switch ...15 Foot Controller ...15 Checking the Needle ...16 Replacing ... ...20 Patterns and Stitch Names ...21 Stitch Length Dial ...24 Stretch Stitching ...24 Stitch Width Dial ...25 Reverse Sewing Lever ...25 THREADING THE MACHINE 26 Winding the Bobbin ...26 Lower Threading ...28 Lower Threading (for models equipped with a quick-set bobbin 30 ...
...49 Triple Zigzag Stretch Stitching ...50 Decorative Stitching ...50 4. KNOWING YOUR SEWING MACHINE 10 THE MAIN PARTS ...10 ACCESSORIES ...12 Optional Accessories ...13 USING YOUR SEWING MACHINE 14 Connecting Plugs ...15 Main Power and Sewing Light Switch ...15 Foot Controller ...15 Checking the Needle ...16 Replacing ... ...20 Patterns and Stitch Names ...21 Stitch Length Dial ...24 Stretch Stitching ...24 Stitch Width Dial ...25 Reverse Sewing Lever ...25 THREADING THE MACHINE 26 Winding the Bobbin ...26 Lower Threading ...28 Lower Threading (for models equipped with a quick-set bobbin 30 ...
Users Manual - English and Spanish
Page 11
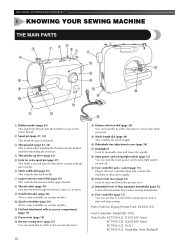
... 43) Pass the threads through the thread cutter to cut them. 9 Needle threader (page 34) (This is only available on and off. KNOWING YOUR SEWING MACHINE 1 KNOWING YOUR SEWING MACHINE THE MAIN PARTS 1 Bobbin winder (page 26) This winds the thread onto the bobbin for use this in either direction to start and stop...
... 43) Pass the threads through the thread cutter to cut them. 9 Needle threader (page 34) (This is only available on and off. KNOWING YOUR SEWING MACHINE 1 KNOWING YOUR SEWING MACHINE THE MAIN PARTS 1 Bobbin winder (page 26) This winds the thread onto the bobbin for use this in either direction to start and stop...

Users Manual - English and Spanish
Page 13
KNOWING YOUR SEWING MACHINE / CONOZCA SU MÁQUINA DE COSER ACCESSORIES / ACCESORIOS The following accessories ...X57521-021 No. Los siguientes accesorios se encuentran en la unidad de cama plana. Part Name 5 Buttonhole Foot (1 pc.) 6 Button Sewing Foot (1 pc.) 7 Extra Spool Pin (1 pc.) 8 Screwdriver (1 pc.) 9 Darning Plate (1pc.) Part Code USA Others XD1792-...031 X59375-121 130920-021 X55467-021 XC6063-021 Note/Nota ● The included accessories vary depending on the machine model. ● Los accesorios incluidos varían según el modelo de la máquina. 12 ...
KNOWING YOUR SEWING MACHINE / CONOZCA SU MÁQUINA DE COSER ACCESSORIES / ACCESORIOS The following accessories ...X57521-021 No. Los siguientes accesorios se encuentran en la unidad de cama plana. Part Name 5 Buttonhole Foot (1 pc.) 6 Button Sewing Foot (1 pc.) 7 Extra Spool Pin (1 pc.) 8 Screwdriver (1 pc.) 9 Darning Plate (1pc.) Part Code USA Others XD1792-...031 X59375-121 130920-021 X55467-021 XC6063-021 Note/Nota ● The included accessories vary depending on the machine model. ● Los accesorios incluidos varían según el modelo de la máquina. 12 ...

Users Manual - English and Spanish
Page 19
.... ● Always use presser feet that the bar on the presser foot is in the correct place, the bar should snap in line with this machine. Suba la aguja a la posición más alta girando la rueda hacia usted (hacia la izquierda) y suba la palanca del pie prensatela. Coloque ... prensatela y ajuste el pie en la lengüeta. Lower the presser foot lever and fix the 4 presser foot onto the shank. KNOWING YOUR SEWING MACHINE / CONOZCA SU MÁQUINA DE COSER Changing the Presser Foot Cambio del pie prensatela CAUTION/PRECAUCIÓN ● Always turn off the power before ...
.... ● Always use presser feet that the bar on the presser foot is in the correct place, the bar should snap in line with this machine. Suba la aguja a la posición más alta girando la rueda hacia usted (hacia la izquierda) y suba la palanca del pie prensatela. Coloque ... prensatela y ajuste el pie en la lengüeta. Lower the presser foot lever and fix the 4 presser foot onto the shank. KNOWING YOUR SEWING MACHINE / CONOZCA SU MÁQUINA DE COSER Changing the Presser Foot Cambio del pie prensatela CAUTION/PRECAUCIÓN ● Always turn off the power before ...
Users Manual - English and Spanish
Page 27
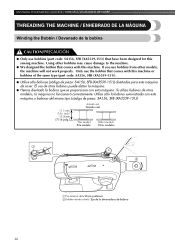
...)) diseñadas para esta máquina de coser. If you use bobbins (part code: SA156, SFB (XA5539-151)) that have been designed for this sewing machine. Utilice sólo la bobina suministrada con esta máquina o bobinas del mismo tipo (código de pieza: SA156, SFB (XA5539-151)). 11.5 mm (7/16...
...)) diseñadas para esta máquina de coser. If you use bobbins (part code: SA156, SFB (XA5539-151)) that have been designed for this sewing machine. Utilice sólo la bobina suministrada con esta máquina o bobinas del mismo tipo (código de pieza: SA156, SFB (XA5539-151)). 11.5 mm (7/16...
Users Manual - English and Spanish
Page 37
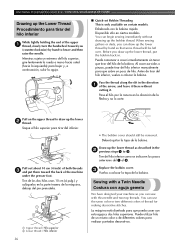
... The bobbin cover should still be left over. Tire del hilo inferior como se indica en los pasos anteriores del 1 al 3. KNOWING YOUR SEWING MACHINE / CONOZCA SU MÁQUINA DE COSER Drawing up the Lower Thread Procedimiento para tirar del hilo inferior While lightly holding the end of the ...thread as described in . Antes de tirar del hilo inferior, vuelva a colocar la bobina. Pull on certain models. Sewing with a Twin Needle Costura con aguja gemela We have designed your machine so you can use the same color or two different colors of thread for making decorative stitches. When...
... The bobbin cover should still be left over. Tire del hilo inferior como se indica en los pasos anteriores del 1 al 3. KNOWING YOUR SEWING MACHINE / CONOZCA SU MÁQUINA DE COSER Drawing up the Lower Thread Procedimiento para tirar del hilo inferior While lightly holding the end of the ...thread as described in . Antes de tirar del hilo inferior, vuelva a colocar la bobina. Pull on certain models. Sewing with a Twin Needle Costura con aguja gemela We have designed your machine so you can use the same color or two different colors of thread for making decorative stitches. When...
Users Manual - English and Spanish
Page 44
...de la máquina. . Lift the presser foot, raise the needle to the end of the machine. Stitch to its highest position. You can use stitching to the Zigzag Stitch, and then start sewing. Coloque el selector de puntadas en la puntada de zig-zag y, a continuación, comience a... de la máquina. ■ Top Stitching and Stretch Materials Push the reverse sewing lever and stitch 2 backwards for 1 cm (3/8 inch) from the Machine Extracción del material de la máquina Stop the machine. 1 Pare la máquina. Cut both threads with the thread cutter on the...
...de la máquina. . Lift the presser foot, raise the needle to the end of the machine. Stitch to its highest position. You can use stitching to the Zigzag Stitch, and then start sewing. Coloque el selector de puntadas en la puntada de zig-zag y, a continuación, comience a... de la máquina. ■ Top Stitching and Stretch Materials Push the reverse sewing lever and stitch 2 backwards for 1 cm (3/8 inch) from the Machine Extracción del material de la máquina Stop the machine. 1 Pare la máquina. Cut both threads with the thread cutter on the...

Users Manual - English and Spanish
Page 67
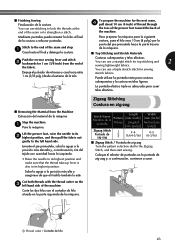
... misma cantidad de tela colocada alrededor de la parte ondulada del pie prensatela hasta que termine la costura. 66 Turn on the thread while slowly sewing. Lower the needle 3 mm (1/8 inch) from 7 the right side of the fabric just behind the needle and lower the presser foot. Sitúe ... la tela alrededor de la parte ondulada del pie prensatela de la misma manera. Position the edge of the presser foot, lightly pull on the machine. Sin permitir que se salga la tela por el lado derecho del pie prensatela, tire ligeramente del hilo mientras cose lentamente. 3 mm (1/8 inch) 3 mm (1/8...
... misma cantidad de tela colocada alrededor de la parte ondulada del pie prensatela hasta que termine la costura. 66 Turn on the thread while slowly sewing. Lower the needle 3 mm (1/8 inch) from 7 the right side of the fabric just behind the needle and lower the presser foot. Sitúe ... la tela alrededor de la parte ondulada del pie prensatela de la misma manera. Position the edge of the presser foot, lightly pull on the machine. Sin permitir que se salga la tela por el lado derecho del pie prensatela, tire ligeramente del hilo mientras cose lentamente. 3 mm (1/8 inch) 3 mm (1/8...
Users Manual - English and Spanish
Page 68
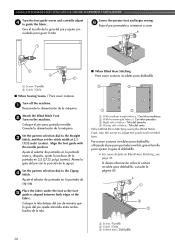
...;lo para la costura invisible para dobladillo, también para coser bordes de tela y costuras. ■ When Edge Stitching / Para coser bordes Turn off the machine. 1 Desconecte la alimentación de la máquina. Conecte la alimentación de la máquina. Tire de la tela que tiene en la mano... extra fabric to increase the amount of the fabric, and then lower the needle in handy not only for blind hem stitching, but also for sewing fabric edges and seams. Este pie resulta útil no se podrá coser una costura triple Using the Blind Stitch Foot Utilización del...
...;lo para la costura invisible para dobladillo, también para coser bordes de tela y costuras. ■ When Edge Stitching / Para coser bordes Turn off the machine. 1 Desconecte la alimentación de la máquina. Conecte la alimentación de la máquina. Tire de la tela que tiene en la mano... extra fabric to increase the amount of the fabric, and then lower the needle in handy not only for blind hem stitching, but also for sewing fabric edges and seams. Este pie resulta útil no se podrá coser una costura triple Using the Blind Stitch Foot Utilización del...
Users Manual - English and Spanish
Page 69
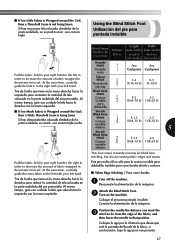
... invisibles para dobladillo utilizando el pie para puntada invisible, gire el tornillo para ajustar la guía al dobladillo. • For more details on the machine. Si desea información sobre la costura invisible para dobladillo, consulte la página 45. 1 2 3 1 Screw / Tornillo 2 Guide / ... adjust 4 to the folded hem. Lower the presser foot and begin sewing. 6 Baje el pie prensatela y comience a coser. 1 Screw / Tornillo 2 Guide / Guía ■ When Sewing Seams / Para coser costuras Turn off the machine. 1 Desconecte la alimentación de la máquina. Ajuste el...
... invisibles para dobladillo utilizando el pie para puntada invisible, gire el tornillo para ajustar la guía al dobladillo. • For more details on the machine. Si desea información sobre la costura invisible para dobladillo, consulte la página 45. 1 2 3 1 Screw / Tornillo 2 Guide / ... adjust 4 to the folded hem. Lower the presser foot and begin sewing. 6 Baje el pie prensatela y comience a coser. 1 Screw / Tornillo 2 Guide / Guía ■ When Sewing Seams / Para coser costuras Turn off the machine. 1 Desconecte la alimentación de la máquina. Ajuste el...

Users Manual - English and Spanish
Page 73
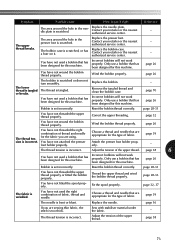
...page 38 page 70 page 16 page 17 72 Possible cause How to put it right The machine is scratched. The presser foot you are using is appropriate thread you want to sew. The upper thread tension is bent or blunt. The thread is turned off. Replace the...on the main power switch. The bobbin case is not fitted properly. Incorrect bobbins will not work . Remove the tangled thread. Symptom The sewing machine does not work properly. You have not inserted the needle properly. Replace the needle plate. Replace the presser foot. Remove any knots or ...
...page 38 page 70 page 16 page 17 72 Possible cause How to put it right The machine is scratched. The presser foot you are using is appropriate thread you want to sew. The upper thread tension is bent or blunt. The thread is turned off. Replace the...on the main power switch. The bobbin case is not fitted properly. Incorrect bobbins will not work . Remove the tangled thread. Symptom The sewing machine does not work properly. You have not inserted the needle properly. Replace the needle plate. Replace the presser foot. Remove any knots or ...
Users Manual - English and Spanish
Page 74
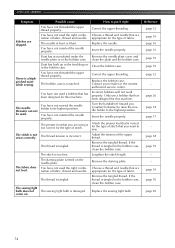
... the bobbin thread properly. You have not threaded the right combination of thread and needle for the fabric you are appropriate for this machine. Incorrect bobbins will not work properly. Choose a thread and needle that has been designed for the type of fabric. The thread ...properly. Attach the presser foot holder properly. - page 16 If you are appropriate for this machine. You have not attached the presser foot holder properly. Only use a bobbin that are sewing thin fabric, the stitch is set incorrectly. Fit the spool properly. Contact your retailer or the...
... the bobbin thread properly. You have not threaded the right combination of thread and needle for the fabric you are appropriate for this machine. Incorrect bobbins will not work properly. Choose a thread and needle that has been designed for the type of fabric. The thread ...properly. Attach the presser foot holder properly. - page 16 If you are appropriate for this machine. You have not attached the presser foot holder properly. Only use a bobbin that are sewing thin fabric, the stitch is set incorrectly. Fit the spool properly. Contact your retailer or the...
Users Manual - English and Spanish
Page 75
... presser foot that is correct for this machine. The thread is tangled. Remove the darning plate. Stitches are appropriate for this machine. There is incorrect. You have not inserted the needle properly. The thread tension is a highpitched noise while sewing. Adjust the tension of fabric, thread... needle that you (counterclockwise) to raise the needle holder to the highest position. If the thread is too fine. Replace the sewing light bulb. You have not threaded the upper thread properly. Insert the needle properly. Clean the bobbin case. Turn the handwheel toward...
... presser foot that is correct for this machine. The thread is tangled. Remove the darning plate. Stitches are appropriate for this machine. There is incorrect. You have not inserted the needle properly. The thread tension is a highpitched noise while sewing. Adjust the tension of fabric, thread... needle that you (counterclockwise) to raise the needle holder to the highest position. If the thread is too fine. Replace the sewing light bulb. You have not threaded the upper thread properly. Insert the needle properly. Clean the bobbin case. Turn the handwheel toward...


