
Maintenance Schedule - English
Page 1
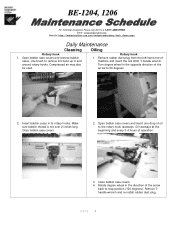
... in to the rotary hook raceways. Make sure bobbin thread is not over 2 inches long. BE-1204, 1206 For Technical Assistance Please Call Toll Fre e 1-877-4BROTHER Email: tsupport@brother.com Website: http://www.brother-usa.com/industembroidery/tech_down.aspx Daily Maintenance Cleaning Rotary hook 1. Insert bobbin cases in and around rotary hooks.
... in to the rotary hook raceways. Make sure bobbin thread is not over 2 inches long. BE-1204, 1206 For Technical Assistance Please Call Toll Fre e 1-877-4BROTHER Email: tsupport@brother.com Website: http://www.brother-usa.com/industembroidery/tech_down.aspx Daily Maintenance Cleaning Rotary hook 1. Insert bobbin cases in and around rotary hooks.

Maintenance Schedule - English
Page 2
... removed for illustration of oil to needle #1. heads. Note: Cover in the needle case cover. BE-1204, 1206 For Technical Assistance Please Call Toll Fre e 1-877-4BROTHER Email: tsupport@brother.com Website: http://www.brother-usa.com/industembroidery/tech_down.aspx Weekly Maintenance Oiling Needle Bars 1. Remove rubber dust plugs to the right of...
... removed for illustration of oil to needle #1. heads. Note: Cover in the needle case cover. BE-1204, 1206 For Technical Assistance Please Call Toll Fre e 1-877-4BROTHER Email: tsupport@brother.com Website: http://www.brother-usa.com/industembroidery/tech_down.aspx Weekly Maintenance Oiling Needle Bars 1. Remove rubber dust plugs to the right of...
Maintenance Schedule - English
Page 3
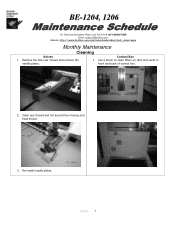
Use a brush to clean filters on fans and vents in needle plates. Re-install needle plates. 4/8/05 3 Remove the two rear screws and remove the 1. front and back of control box. 2. BE-1204, 1206 For Technical Assistance Please Call Toll Fre e 1-877-4BROTHER Email: tsupport@brother.com Website: http://www.brother-usa.com/industembroidery/tech_down.aspx Monthly Maintenance Cleaning Knives Control Box 1. Clean any thread and lint around the moving and fixed knives. 3.
Use a brush to clean filters on fans and vents in needle plates. Re-install needle plates. 4/8/05 3 Remove the two rear screws and remove the 1. front and back of control box. 2. BE-1204, 1206 For Technical Assistance Please Call Toll Fre e 1-877-4BROTHER Email: tsupport@brother.com Website: http://www.brother-usa.com/industembroidery/tech_down.aspx Monthly Maintenance Cleaning Knives Control Box 1. Clean any thread and lint around the moving and fixed knives. 3.
Maintenance Schedule - English
Page 4
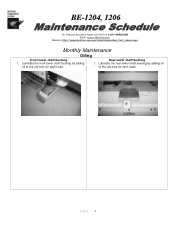
Lubricate the rear lower shaft bushing by adding oil to the red hole for each head. 4/8/05 4 Rear lower shaft bushing 1. Lubricate the front lower shaft bushing by adding oil to the red hole for each head. BE-1204, 1206 For Technical Assistance Please Call Toll Fre e 1-877-4BROTHER Email: tsupport@brother.com Website: http://www.brother-usa.com/industembroidery/tech_down.aspx Monthly Maintenance Oiling Front lower shaft bushing 1.
Lubricate the rear lower shaft bushing by adding oil to the red hole for each head. 4/8/05 4 Rear lower shaft bushing 1. Lubricate the front lower shaft bushing by adding oil to the red hole for each head. BE-1204, 1206 For Technical Assistance Please Call Toll Fre e 1-877-4BROTHER Email: tsupport@brother.com Website: http://www.brother-usa.com/industembroidery/tech_down.aspx Monthly Maintenance Oiling Front lower shaft bushing 1.
Maintenance Schedule - English
Page 5
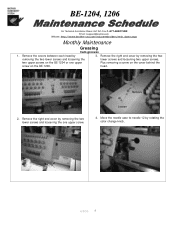
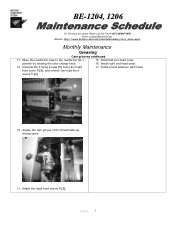
... two removing the two lower screws and loosening the lower screws and loosening two upper screws. BE-1204, 1206 For Technical Assistance Please Call Toll Fre e 1-877-4BROTHER Email: tsupport@brother.com Website: http://www.brother-usa.com/industembroidery/tech_down.aspx Monthly Maintenance Greasing Cam grooves 1. Remove the covers between each head by...
... two removing the two lower screws and loosening the lower screws and loosening two upper screws. BE-1204, 1206 For Technical Assistance Please Call Toll Fre e 1-877-4BROTHER Email: tsupport@brother.com Website: http://www.brother-usa.com/industembroidery/tech_down.aspx Monthly Maintenance Greasing Cam grooves 1. Remove the covers between each head by...

Maintenance Schedule - English
Page 6
... motors [5]. 4 5 8. Grease the cam groove of the jump lever assembly, just touches the jump part [6]. BE-1204, 1206 For Technical Assistance Please Call Toll Fre e 1-877-4BROTHER Email: tsupport@brother.com Website: http://www.brother-usa.com/industembroidery/tech_down.aspx Monthly Maintenance Greasing Cam grooves continued 5. Unscrew the lower screw [2] and loosen the...
... motors [5]. 4 5 8. Grease the cam groove of the jump lever assembly, just touches the jump part [6]. BE-1204, 1206 For Technical Assistance Please Call Toll Fre e 1-877-4BROTHER Email: tsupport@brother.com Website: http://www.brother-usa.com/industembroidery/tech_down.aspx Monthly Maintenance Greasing Cam grooves continued 5. Unscrew the lower screw [2] and loosen the...
Maintenance Schedule - English
Page 7
.... Attach the head front covers R [9]. 4/8/05 7 front cover R [9], and remove the head front covers R [9]. 8 9 13. BE-1204, 1206 For Technical Assistance Please Call Toll Fre e 1-877-4BROTHER Email: tsupport@brother.com Website: http://www.brother-usa.com/industembroidery/tech_down.aspx Monthly Maintenance Greasing Cam grooves continued 11. position by rotating the color change...
.... Attach the head front covers R [9]. 4/8/05 7 front cover R [9], and remove the head front covers R [9]. 8 9 13. BE-1204, 1206 For Technical Assistance Please Call Toll Fre e 1-877-4BROTHER Email: tsupport@brother.com Website: http://www.brother-usa.com/industembroidery/tech_down.aspx Monthly Maintenance Greasing Cam grooves continued 11. position by rotating the color change...

Maintenance Schedule - English
Page 8
Attach the table cover L. 3. Attach the head cover R. 4/8/05 8 Grease the intermediate gears. 2. Grease all the cam grooves and two gears. 3. Unscrew four screws fixing the table cover L, and 1. BE-1204, 1206 For Technical Assistance Please Call Toll Fre e 1-877-4BROTHER Email: tsupport@brother.com Website: http://www.brother-usa.com/industembroidery/tech_down.aspx 3 Month Maintenance Greasing Driving shaft Needle bar flip-up mechanism 1. Unscrew three screws fixing the head cover R, and remove the table cover L. remove the head cover R. 2.
Attach the table cover L. 3. Attach the head cover R. 4/8/05 8 Grease the intermediate gears. 2. Grease all the cam grooves and two gears. 3. Unscrew four screws fixing the table cover L, and 1. BE-1204, 1206 For Technical Assistance Please Call Toll Fre e 1-877-4BROTHER Email: tsupport@brother.com Website: http://www.brother-usa.com/industembroidery/tech_down.aspx 3 Month Maintenance Greasing Driving shaft Needle bar flip-up mechanism 1. Unscrew three screws fixing the head cover R, and remove the table cover L. remove the head cover R. 2.

Maintenance Schedule - English
Page 9
.... 3. Unscrew the 4 flat head screws fixing the bed cover B, and remove the bed covers B. Unscrew the screw [4] and remove the table covers R [5] and L [6]. 4. BE-1204, 1206 For Technical Assistance Please Call Toll Fre e 1-877-4BROTHER Email: tsupport@brother.com Website: http://www.brother-usa.com/industembroidery/tech_down.aspx 3 Month Maintenance Greasing Lower gear 1.
.... 3. Unscrew the 4 flat head screws fixing the bed cover B, and remove the bed covers B. Unscrew the screw [4] and remove the table covers R [5] and L [6]. 4. BE-1204, 1206 For Technical Assistance Please Call Toll Fre e 1-877-4BROTHER Email: tsupport@brother.com Website: http://www.brother-usa.com/industembroidery/tech_down.aspx 3 Month Maintenance Greasing Lower gear 1.
Tubular to Cap - English
Page 1
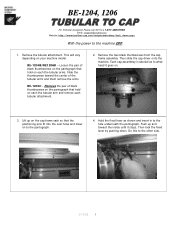
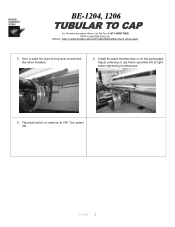
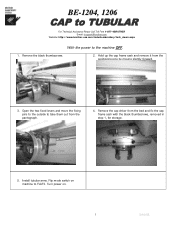
... hold on . 3. Each cap assembley is labeled as shown and insert in to the pantograph. 4. BE-1204, 1206 For Technical Assistance Please Call Toll Fre e 1-877-4BROTHER Email: tsupport@brother.com Website: http://www.brother-usa.com/industembroidery/tech_down.aspx With the power to the other side. This will vary depending on to...
... hold on . 3. Each cap assembley is labeled as shown and insert in to the pantograph. 4. BE-1204, 1206 For Technical Assistance Please Call Toll Fre e 1-877-4BROTHER Email: tsupport@brother.com Website: http://www.brother-usa.com/industembroidery/tech_down.aspx With the power to the other side. This will vary depending on to...
Tubular to Cap - English
Page 2
BE-1204, 1206 For Technical Assistance Please Call Toll Fre e 1-877-4BROTHER Email: tsupport@brother.com Website: http://www.brother-usa.com/industembroidery/tech_down.aspx 5. Install the black thumbscrews on machine to CAP. Adjust centering of cap frame assembly left to the pantograph. Turn power ON. 3/10/05 2 Flip mode switch on to right before tightening thumbscrews. 6. Here is what the fixed driving lever should look like when installed. 6.
BE-1204, 1206 For Technical Assistance Please Call Toll Fre e 1-877-4BROTHER Email: tsupport@brother.com Website: http://www.brother-usa.com/industembroidery/tech_down.aspx 5. Install the black thumbscrews on machine to CAP. Adjust centering of cap frame assembly left to the pantograph. Turn power ON. 3/10/05 2 Flip mode switch on to right before tightening thumbscrews. 6. Here is what the fixed driving lever should look like when installed. 6.
Changing Needle Bar Cushions - English
Page 1
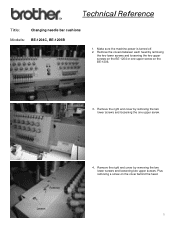
Remove the covers between each head by removing the two lower screws and loosening the two upper screws on the BE-1204 or one upper screw. Remove the right end cover by removing the two lower screws and loosening the one upper screw on the cover behind the head. 1 Technical Reference Title: Changing needle bar cushions Models: BE-1204C, BE-1206B 1. Remove Loosen 4. Plus removing a screw on the BE-1206. 3. Remove the right end cover by removing the two lower screws and loosening two upper screws. Make sure the machine power is turned off. 2.
Remove the covers between each head by removing the two lower screws and loosening the two upper screws on the BE-1204 or one upper screw. Remove the right end cover by removing the two lower screws and loosening the one upper screw on the cover behind the head. 1 Technical Reference Title: Changing needle bar cushions Models: BE-1204C, BE-1206B 1. Remove Loosen 4. Plus removing a screw on the BE-1206. 3. Remove the right end cover by removing the two lower screws and loosening two upper screws. Make sure the machine power is turned off. 2.
Cap to Tubular - English
Page 1
... pantograph. 4. Outside Open 5. Turn power on machine to the machine OFF. 1. Remove the black thumbscrews. 2. BE-1204, 1206 For Technical Assistance Please Call Toll Free 1-877-4BROTHER Email: tsupport@brother.com Website: http://www.brother-usa.com/industembroidery/tech_down.aspx With the power to FLATS. Install tubular arms. Flip mode switch on . 1 3/10...
... pantograph. 4. Outside Open 5. Turn power on machine to the machine OFF. 1. Remove the black thumbscrews. 2. BE-1204, 1206 For Technical Assistance Please Call Toll Free 1-877-4BROTHER Email: tsupport@brother.com Website: http://www.brother-usa.com/industembroidery/tech_down.aspx With the power to FLATS. Install tubular arms. Flip mode switch on . 1 3/10...

Procedure for sewing a DST file using PC - English
Page 1
... click on the machine.) 2. Embroidery Cancel icon Turn on the computer and start the Brother Embroidery Software, ECSC. (Note: You will appear.) 3. If using PC February 4, 2009 BE-0901-PC, BE-1201-PC, BE-1204-PC, BE-1206-PC BES-960, BES-962, BES-1240, BES-1260, BES-1262 Preparation 1. Cancelling... previous design 1. Turn on the Brother embroidery machine. (Note: White window will not see a white window appear until you turn on the...
... click on the machine.) 2. Embroidery Cancel icon Turn on the computer and start the Brother Embroidery Software, ECSC. (Note: You will appear.) 3. If using PC February 4, 2009 BE-0901-PC, BE-1201-PC, BE-1204-PC, BE-1206-PC BES-960, BES-962, BES-1240, BES-1260, BES-1262 Preparation 1. Cancelling... previous design 1. Turn on the Brother embroidery machine. (Note: White window will not see a white window appear until you turn on the...
Procedure for sewing a DST file using PC - English
Page 7
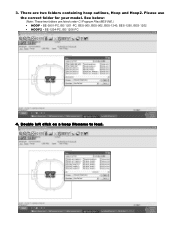
Double left click on a hoop filename to load. BE-0901-PC, BE-1201-PC, BES-960, BES-962, BES-1240, BES-1260, BES-1262 • HOOP2 - BE-1204-PC, BE-1206-PC 4. There are listed under C:\Program Files\BES-960.) • HOOP - 3. Please use the correct folder for your model. See below: (Note: These two folders are two folders containing hoop outlines, Hoop and Hoop2.
Double left click on a hoop filename to load. BE-0901-PC, BE-1201-PC, BES-960, BES-962, BES-1240, BES-1260, BES-1262 • HOOP2 - BE-1204-PC, BE-1206-PC 4. There are listed under C:\Program Files\BES-960.) • HOOP - 3. Please use the correct folder for your model. See below: (Note: These two folders are two folders containing hoop outlines, Hoop and Hoop2.