
Thread Tensions - English
Page 2
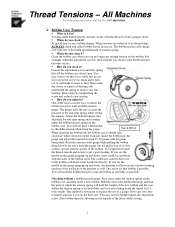
...the bobbin and case start sliding down , there could be the problem, ALWAYS check and adjust bobbin first if necessary. If you see the needle on the topside of the new bobbin and the case. Discard or fix that bobbin if possible. All Machines For Technical Assistance Please Call ...? First clean under the bobbin tension spring on the gauge jumping up underneath its tension spring. • When do you do you see the needle on the bobbin case. This method is with 22 grams being ideal. Thread Tensions - How do not have erratic tensions looking tensions of the ...
...the bobbin and case start sliding down , there could be the problem, ALWAYS check and adjust bobbin first if necessary. If you see the needle on the topside of the new bobbin and the case. Discard or fix that bobbin if possible. All Machines For Technical Assistance Please Call ...? First clean under the bobbin tension spring on the gauge jumping up underneath its tension spring. • When do you do you see the needle on the bobbin case. This method is with 22 grams being ideal. Thread Tensions - How do not have erratic tensions looking tensions of the ...

Thread Tensions - English
Page 3
... To take the looseness out of the knob is flush with pretensioners for proper tensions. Thread Tensions - Main Tensioners !" What are they for individual needle tail lengths by turning the knob until the top of adjustment. 3 Run a tension test first, if you have to be checked. 4. For ...the stud. 5. Pre-tensioners !" What are still having trouble check the thread path and rethread the complete path for the troublesome needle or change out the needle. • How do you adjust them and as a last resort along with the step inside the knob where the screw threads...
... To take the looseness out of the knob is flush with pretensioners for proper tensions. Thread Tensions - Main Tensioners !" What are they for individual needle tail lengths by turning the knob until the top of adjustment. 3 Run a tension test first, if you have to be checked. 4. For ...the stud. 5. Pre-tensioners !" What are still having trouble check the thread path and rethread the complete path for the troublesome needle or change out the needle. • How do you adjust them and as a last resort along with the step inside the knob where the screw threads...
Thread Tensions - English
Page 4
... tarnished from metallic thread or the environment, causing a dramatic increase in the thread path and is readjusted to polish up the area having a problem on a needle. !" Looping problems, or for proper functions of all mechanisms in tension. Then turn the black screw inside the main tension control knob counterclockwise (loosen) until...
... tarnished from metallic thread or the environment, causing a dramatic increase in the thread path and is readjusted to polish up the area having a problem on a needle. !" Looping problems, or for proper functions of all mechanisms in tension. Then turn the black screw inside the main tension control knob counterclockwise (loosen) until...

Thread Tensions - English
Page 5
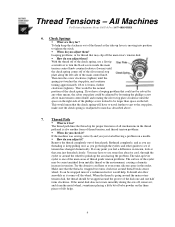
...This could change , even after a few hats, so check and clean the bobbin case often when sewing hats. Or the "I" test also with every needle. Ideally, you can adjust the bobbin by doing this , look parallel, but the bobbin streak is nine or twelve different color letters, depending on the... on the amount of your ability. !" Step 1. For example, if you can adjust the top tensions. Look at the thread break sensor of needles your bobbin tension to check your bobbin tension when replacing the bobbin. Which is thinner, you are not wound exactly the same. But by loosening...
...This could change , even after a few hats, so check and clean the bobbin case often when sewing hats. Or the "I" test also with every needle. Ideally, you can adjust the bobbin by doing this , look parallel, but the bobbin streak is nine or twelve different color letters, depending on the... on the amount of your ability. !" Step 1. For example, if you can adjust the top tensions. Look at the thread break sensor of needles your bobbin tension to check your bobbin tension when replacing the bobbin. Which is thinner, you are not wound exactly the same. But by loosening...
Wiper Problems and Solutions - English
Page 1
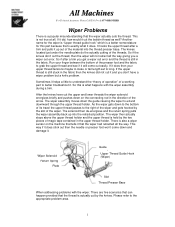
The knives located just under the needle plate do the actually cutting of magic tape contained in the direction of a working part to long. The wiper assembly moves down to the bottom ... of the wiper and gets hooked by the slot of the material into the retracted position. This way if it does stick out then the needle or presser foot won't come out easily. All Machines For Technical Assistance Please Call Toll Free 1-877-4BROTHER Wiper Problems There is a popular misunderstanding that...
The knives located just under the needle plate do the actually cutting of magic tape contained in the direction of a working part to long. The wiper assembly moves down to the bottom ... of the wiper and gets hooked by the slot of the material into the retracted position. This way if it does stick out then the needle or presser foot won't come out easily. All Machines For Technical Assistance Please Call Toll Free 1-877-4BROTHER Wiper Problems There is a popular misunderstanding that...
Wiper Problems and Solutions - English
Page 5
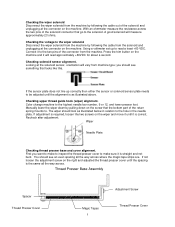
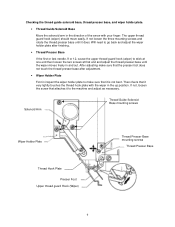
...the two pins of the solenoid and unplugging at the solenoid sensor, orientation will measure approximately 23 ohms. Checking the voltage to the highest needle bar number, 9 or 12, and lower presser foot. you want to make sure it to the two pins of the return spring...be adjusted until it will read a least +60 VDC. If adjustment is as illustrated below in relation to the hole in the needle plate. Wiper Needle Plate Checking thread presser base and cover alignment. Thread Presser Base Assembly Spacer Thread Presser Cover Magic Tapes 5 Adjustment Screw Thread Presser Cover...
...the two pins of the solenoid and unplugging at the solenoid sensor, orientation will measure approximately 23 ohms. Checking the voltage to the highest needle bar number, 9 or 12, and lower presser foot. you want to make sure it to the two pins of the return spring...be adjusted until it will read a least +60 VDC. If adjustment is as illustrated below in relation to the hole in the needle plate. Wiper Needle Plate Checking thread presser base and cover alignment. Thread Presser Base Assembly Spacer Thread Presser Cover Magic Tapes 5 Adjustment Screw Thread Presser Cover...
Wiper Problems and Solutions - English
Page 6
... adjusting make sure that the presser foot does not touch the thread presser base after finishing. • Thread Presser Base If the first or last needle, 9 or 12, cause the upper thread guard hook (wiper) to the machine and adjust as necessary. Will need to go back and adjust the wiper...
... adjusting make sure that the presser foot does not touch the thread presser base after finishing. • Thread Presser Base If the first or last needle, 9 or 12, cause the upper thread guard hook (wiper) to the machine and adjust as necessary. Will need to go back and adjust the wiper...
Knife Adjustments - English
Page 1
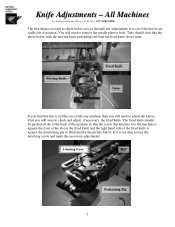
You will need to remove the needle plate to look like the photo below . Moving Knife Fixed Knife 1mm If you go through any adjustments is not then loosen the attaching screw ...
You will need to remove the needle plate to look like the photo below . Moving Knife Fixed Knife 1mm If you go through any adjustments is not then loosen the attaching screw ...
Knife Adjustments - English
Page 3
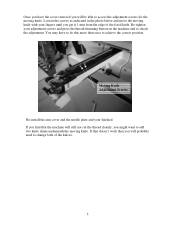
Moving Knife Adjustment Screws Re-install the arm cover and the needle plate and your adjustment screws and press the thread-trimming button on the machine and re-check the adjustment. Loosen the screws as indicated in ...
Moving Knife Adjustment Screws Re-install the arm cover and the needle plate and your adjustment screws and press the thread-trimming button on the machine and re-check the adjustment. Loosen the screws as indicated in ...
Maintenance Schedule - English
Page 2
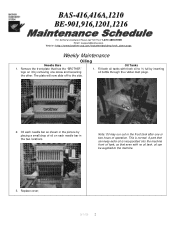
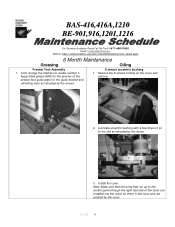
Fill both oil tanks with no oil tank, oil can keep extra oil is normal. Remove the front plate that has the "BROTHER" logo on each needle bar in the front tank after one screw and loosening the other. Note: Oil may run out in the two locations. Replace cover.... or two hours of operation. BAS-416,416A,1210 BE-901,916,1201,1216 For Technical Assistance Please Call Toll Fre e 1-877-4BROTHER Email: tsupport@brother.com Website: http://www.brother-usa.com/industembroidery/tech_down.aspx Weekly Maintenance Oiling Needle Bars 1. Oil Tanks 1. Oil each needle bar as shown in the picture...
Fill both oil tanks with no oil tank, oil can keep extra oil is normal. Remove the front plate that has the "BROTHER" logo on each needle bar in the front tank after one screw and loosening the other. Note: Oil may run out in the two locations. Replace cover.... or two hours of operation. BAS-416,416A,1210 BE-901,916,1201,1216 For Technical Assistance Please Call Toll Fre e 1-877-4BROTHER Email: tsupport@brother.com Website: http://www.brother-usa.com/industembroidery/tech_down.aspx Weekly Maintenance Oiling Needle Bars 1. Oil Tanks 1. Oil each needle bar as shown in the picture...
Maintenance Schedule - English
Page 3
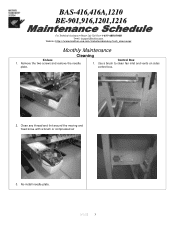
Clean any thread and lint around the moving and fixed knive with a brush or compressed air 3. Control Box 1. Re-install needle plate. 9/1/05 3 Remove the two screws and remove the needle plate. Use a brush to clean fan inlet and vents on sides control box. 2. BAS-416,416A,1210 BE-901,916,1201,1216 For Technical Assistance Please Call Toll Fre e 1-877-4BROTHER Email: tsupport@brother.com Website: http://www.brother-usa.com/industembroidery/tech_down.aspx Monthly Maintenance Cleaning Knives 1.
Clean any thread and lint around the moving and fixed knive with a brush or compressed air 3. Control Box 1. Re-install needle plate. 9/1/05 3 Remove the two screws and remove the needle plate. Use a brush to clean fan inlet and vents on sides control box. 2. BAS-416,416A,1210 BE-901,916,1201,1216 For Technical Assistance Please Call Toll Fre e 1-877-4BROTHER Email: tsupport@brother.com Website: http://www.brother-usa.com/industembroidery/tech_down.aspx Monthly Maintenance Cleaning Knives 1.
Maintenance Schedule - English
Page 4
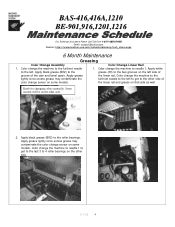
... may contaminate the color change the machine to needle 1 to get to the other side of the cam and bevel gears. BAS-416,416A,1210 BE-901,916,1201,1216 For Technical As sistance Please Call Toll Free 1-877-4BROTHER Email: tsupport@brother.com Website: http://www.brother-usa.com/industembroidery/tech_down.aspx 6 Month Maintenance...
... may contaminate the color change the machine to needle 1 to get to the other side of the cam and bevel gears. BAS-416,416A,1210 BE-901,916,1201,1216 For Technical As sistance Please Call Toll Free 1-877-4BROTHER Email: tsupport@brother.com Website: http://www.brother-usa.com/industembroidery/tech_down.aspx 6 Month Maintenance...
Maintenance Schedule - English
Page 6
... run up to the slot as indicated by the arrows. Apply black grease (BR2) to needle number 1. BAS-416,416A,1210 BE-901,916,1201,1216 For Technical Assistance Please Call Toll Fre e 1-877-4BROTHER Email: tsupport@brother.com Website: http://www.brother-usa.com/industembroidery/tech_down.aspx 6 Month Maintenance Greasing Oiling Presser Foot Assembly 1.
... run up to the slot as indicated by the arrows. Apply black grease (BR2) to needle number 1. BAS-416,416A,1210 BE-901,916,1201,1216 For Technical Assistance Please Call Toll Fre e 1-877-4BROTHER Email: tsupport@brother.com Website: http://www.brother-usa.com/industembroidery/tech_down.aspx 6 Month Maintenance Greasing Oiling Presser Foot Assembly 1.
Motor Locks - English
Page 1
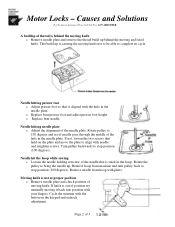
... Oil the machine as • Incorrect threading of machine • Incorrect needle size or type of needle for application • Needle being installed backwards • Worn needles • Incorrect backing for broken bits of needles in rotary hook. Lack of the problem. This is something is causing binding...play in both directions. Clear obstruction or replace rotary hook. The bobbin basket is created by bird's nest, which is part of needle lodged somewhere in hook • Thread badly entangled in this area. This can be caused by • Broken pieces of the ...
... Oil the machine as • Incorrect threading of machine • Incorrect needle size or type of needle for application • Needle being installed backwards • Worn needles • Incorrect backing for broken bits of needles in rotary hook. Lack of the problem. This is something is causing binding...play in both directions. Clear obstruction or replace rotary hook. The bobbin basket is created by bird's nest, which is part of needle lodged somewhere in hook • Thread badly entangled in this area. This can be caused by • Broken pieces of the ...
Motor Locks - English
Page 2
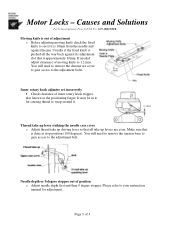
...1-877-4BROTHER A buildup of thread is aligned with the hole in the needle plate. Rotate pulley to complete its cycle Needle hitting presser foot o Adjust presser foot so that is behind the moving knife o Remove needle plate and remove the thread build up behind the moving knife not to be... build up . o Replace bent presser foot and adjust presser foot height. Needle hitting needle plate o Adjust the alignment of 3 If not, loosen the two screws that is causing the moving and fixed knife. Page 2 of the needle plate. Remove hoop from hoop with the button on the plate and move ...
...1-877-4BROTHER A buildup of thread is aligned with the hole in the needle plate. Rotate pulley to complete its cycle Needle hitting presser foot o Adjust presser foot so that is behind the moving knife o Remove needle plate and remove the thread build up behind the moving knife not to be... build up . o Replace bent presser foot and adjust presser foot height. Needle hitting needle plate o Adjust the alignment of 3 If not, loosen the two screws that is causing the moving and fixed knife. Page 2 of the needle plate. Remove hoop from hoop with the button on the plate and move ...
Motor Locks - English
Page 3
... or 0 degree stopper out of moving knife check the fixed knife to 1.2 mm. If needed adjust clearance of position o Adjust needle depth first and then 0 degree stopper. Page 3 of inner rotary hook stopper, also known as the positioning finger. Causes and Solutions For Technical ...o Before adjusting moving knife to see if it . Inner rotary hook adjuster set incorrectly • Check clearance of 3 Thread take up lever striking the needle case cover o Adjust thread take up levers are cover to gain access to remove the chrome are even. You will need to the adjustment bolts...
... or 0 degree stopper out of moving knife check the fixed knife to 1.2 mm. If needed adjust clearance of position o Adjust needle depth first and then 0 degree stopper. Page 3 of inner rotary hook stopper, also known as the positioning finger. Causes and Solutions For Technical ...o Before adjusting moving knife to see if it . Inner rotary hook adjuster set incorrectly • Check clearance of 3 Thread take up lever striking the needle case cover o Adjust thread take up levers are cover to gain access to remove the chrome are even. You will need to the adjustment bolts...

Upper Thread Breaks - English
Page 1
... thread the machine • Upper thread tension is to tight o Reduce upper thread tension • Needle is not installed correctly o Install needle correctly • Needle is bent or worn o Replace the needle • Presser foot height is incorrect o Adjust presser foot height to thickness of material •... oiled o Clean and oil rotary hook • Rotary hook over oiled o Clean excess oil from rotary hook • Needle bar(s) over oiled o Clean excess oil from needle bar(s) • Bobbin thread is not wound correctly o Replace bobbin • Bobbin case is damaged o Change bobbin case...
... thread the machine • Upper thread tension is to tight o Reduce upper thread tension • Needle is not installed correctly o Install needle correctly • Needle is bent or worn o Replace the needle • Presser foot height is incorrect o Adjust presser foot height to thickness of material •... oiled o Clean and oil rotary hook • Rotary hook over oiled o Clean excess oil from rotary hook • Needle bar(s) over oiled o Clean excess oil from needle bar(s) • Bobbin thread is not wound correctly o Replace bobbin • Bobbin case is damaged o Change bobbin case...

Upper Thread Breaks - English
Page 2
• Wrong type of backing o Use the correct backing for garment • Design contains many small stitches of .2 mm or less o Modify design to eliminate stitches of .2mm or less • Too much density in design o Reduce density in design • The area around the hole in the needle plate is damaged o Replace needle plate • Rotary hook is out of time o Re-time rotary hook
• Wrong type of backing o Use the correct backing for garment • Design contains many small stitches of .2 mm or less o Modify design to eliminate stitches of .2mm or less • Too much density in design o Reduce density in design • The area around the hole in the needle plate is damaged o Replace needle plate • Rotary hook is out of time o Re-time rotary hook
Rotary Hook Scratches - English
Page 1
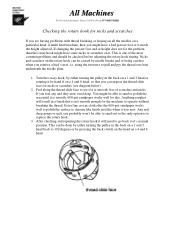
... to operate without breaking the thread. You might be done by either turning the pulley in the back on a 1 and 3 head or rotating it by needle breaks and or being careless when you remove a bird's nest, i.e. This can be able to replace the rotary hook. 3. This is one of scratches and... able to sand out so the only option is not smooth enough for the machine to pull and pry the thread out from underneath the needle plate. 1. After checking and repairing the rotary hook it will result in the back on a 1 and 3 head back to it . If changing the presser foot...
... to operate without breaking the thread. You might be done by either turning the pulley in the back on a 1 and 3 head or rotating it by needle breaks and or being careless when you remove a bird's nest, i.e. This can be able to replace the rotary hook. 3. This is one of scratches and... able to sand out so the only option is not smooth enough for the machine to pull and pry the thread out from underneath the needle plate. 1. After checking and repairing the rotary hook it will result in the back on a 1 and 3 head back to it . If changing the presser foot...
Changing Needle Bar Cushions - English
Page 1
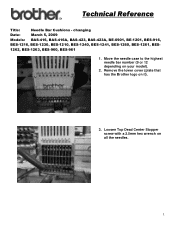
Move the needle case to the highest needle bar number (9 or 12 depending on all the needles. 1 Loosen Top Dead Center Stopper screw with a 2.5mm hex wrench on your model). 2. Technical Reference Title: Needle Bar Cushions - Remove the lower cover (plate that has the Brother logo on it). 3. changing Date: March 5, 2009 Models: BAS-416, BAS-416A, BAS-423, BAS-423A, BE-0901, BE-1201, BES-916, BES-1216, BES-1230, BES-1210, BES-1240, BES-1241, BES-1260, BES-1261, BES- 1262, BES-1263, BES-960, BES-961 1.
Move the needle case to the highest needle bar number (9 or 12 depending on all the needles. 1 Loosen Top Dead Center Stopper screw with a 2.5mm hex wrench on your model). 2. Technical Reference Title: Needle Bar Cushions - Remove the lower cover (plate that has the Brother logo on it). 3. changing Date: March 5, 2009 Models: BAS-416, BAS-416A, BAS-423, BAS-423A, BE-0901, BE-1201, BES-916, BES-1216, BES-1230, BES-1210, BES-1240, BES-1241, BES-1260, BES-1261, BES- 1262, BES-1263, BES-960, BES-961 1.


