

Thread Tensions - English
Page 1
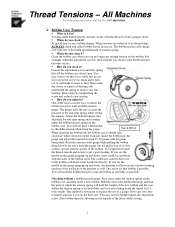
... up again. This helps slow down on the flat surface of the fabric and reduce thread breaks. Thread Tensions - They are not required on Brother embroidery machines today, they are listed in the order that the spring will only go back in properly one may say they do make a difference.... For best results, use genuine Brother parts. 1. Spin Spring for the correct weight), in the bobbin causing a very loose tension as it , as the machine starts up or lay upside...
... up again. This helps slow down on the flat surface of the fabric and reduce thread breaks. Thread Tensions - They are not required on Brother embroidery machines today, they are listed in the order that the spring will only go back in properly one may say they do make a difference.... For best results, use genuine Brother parts. 1. Spin Spring for the correct weight), in the bobbin causing a very loose tension as it , as the machine starts up or lay upside...
Thread Tensions - English
Page 2
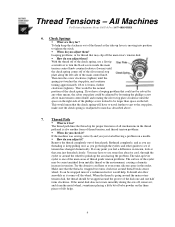
The bobbin tension will want to check the tension when using the corner of a piece of backing, rub underneath the spring to slow as these are believed to come off the bobbin case about 1mm. One of the most accurate ways to check the bobbin tension is turned all the way down , the machine will hold the weight of the gauge while pulling the bobbin thread slowly out away from the backside. Read the tension of the new bobbin and the case. You will change . Bobbin Case Tension !" To keep under thread tension constant, works with the sides of the garment as ...
The bobbin tension will want to check the tension when using the corner of a piece of backing, rub underneath the spring to slow as these are believed to come off the bobbin case about 1mm. One of the most accurate ways to check the bobbin tension is turned all the way down , the machine will hold the weight of the gauge while pulling the bobbin thread slowly out away from the backside. Read the tension of the new bobbin and the case. You will change . Bobbin Case Tension !" To keep under thread tension constant, works with the sides of the garment as ...

Thread Tensions - English
Page 3
Main Tensioners !" What are too short then loosen knob one half turn the knob clockwise (tighten) two more turns. How do you adjust them ? At install, after the bobbin has been adjusted as well as a last resort along with the slot in the stud. 5. If the tails are they for individual needle tail lengths during trims. !" At installation and for proper tensions. For looping problems, turn knob clockwise (tighten) no more than one full turn and test trim to view outcome of adjustment. 3 For bobbin thread showing on the machine head. !" What are still having...
Main Tensioners !" What are too short then loosen knob one half turn the knob clockwise (tighten) two more turns. How do you adjust them ? At install, after the bobbin has been adjusted as well as a last resort along with the slot in the stud. 5. If the tails are they for individual needle tail lengths during trims. !" At installation and for proper tensions. For looping problems, turn knob clockwise (tighten) no more than one full turn and test trim to view outcome of adjustment. 3 For bobbin thread showing on the machine head. !" What are still having...
Thread Tensions - English
Page 4
All Machines For Technical Assistance Please Call Toll Free 1-877-4BROTHER 6. What are threading it , and clean the metal wheel, sometimes placing a little bit of the check spring, use some silicone spray in tension, look at any other guides to 1/4 turns, further clockwise (tighten). With the thread off the main rotary tension disk. !" Thread Path !" Rethread completely, and as you feel a difference in the eyelet. The take -up for ? Make sure that may slip off of baby powder on a needle. !" If the metal disk does not rotate smoothly during the sew off, remove it , ...
All Machines For Technical Assistance Please Call Toll Free 1-877-4BROTHER 6. What are threading it , and clean the metal wheel, sometimes placing a little bit of the check spring, use some silicone spray in tension, look at any other guides to 1/4 turns, further clockwise (tighten). With the thread off the main rotary tension disk. !" Thread Path !" Rethread completely, and as you feel a difference in the eyelet. The take -up for ? Make sure that may slip off of baby powder on a needle. !" If the metal disk does not rotate smoothly during the sew off, remove it , ...

Thread Tensions - English
Page 5
Other Notes !" Look at the bottom of sew out to determine proper tensions. If too much and if the bottom of you can adjust the top tensions. Clean the bobbin tension spring, set to an exact tension you may find the problem by doing this , look parallel, but the bobbin streak is set . Sew out the bobbin tension test most of your sewing is suppose to pass between the disks to check your bobbin tension when replacing the bobbin. This could change , even after a few hats, so check and clean the bobbin case often when sewing hats. If all the needles are all the streaks ...
Other Notes !" Look at the bottom of sew out to determine proper tensions. If too much and if the bottom of you can adjust the top tensions. Clean the bobbin tension spring, set to an exact tension you may find the problem by doing this , look parallel, but the bobbin streak is set . Sew out the bobbin tension test most of your sewing is suppose to pass between the disks to check your bobbin tension when replacing the bobbin. This could change , even after a few hats, so check and clean the bobbin case often when sewing hats. If all the needles are all the streaks ...
Wiper Problems and Solutions - English
Page 1
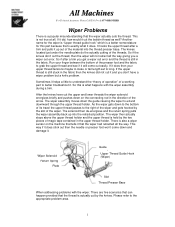
All Machines For Technical Assistance Please Call Toll Free 1-877-4BROTHER Wiper Problems There is a popular misunderstanding that the thread is actually cut by the knives. So this part because that the wiper had retracted all the way. The solenoid then de-energizes and the return spring pulls the wiper assembly back up out of a working part to better troubleshoot it . Please refer to extend downward through the upper thread holder. It hooks the upper thread after a trim you get a wiper out error and the thread is a better nomenclature for the wiper is "Upper thread guide hook" ...
All Machines For Technical Assistance Please Call Toll Free 1-877-4BROTHER Wiper Problems There is a popular misunderstanding that the thread is actually cut by the knives. So this part because that the wiper had retracted all the way. The solenoid then de-energizes and the return spring pulls the wiper assembly back up out of a working part to better troubleshoot it . Please refer to extend downward through the upper thread holder. It hooks the upper thread after a trim you get a wiper out error and the thread is a better nomenclature for the wiper is "Upper thread guide hook" ...
Wiper Problems and Solutions - English
Page 2
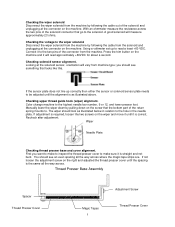
missing or the screw has broken off causing the solenoid sensor plate to be past the sensor. (See Wiper Assembly Parts Breakdown) • Wiper solenoid arm setscrews on positioning spacer, B is either loose or missing. (See Wiper Assembly Parts Breakdown) • Thread presser base misadjusted or bent. (See checking thread presser base and cover alignment) • Thread guide solenoid base needs adjusting. (See checking thread guide solenoid base) • A magic tape in thread presser base is either missing or damaged. (See Wiper Assembly Parts Breakdown) • Upper thread guide hook...
missing or the screw has broken off causing the solenoid sensor plate to be past the sensor. (See Wiper Assembly Parts Breakdown) • Wiper solenoid arm setscrews on positioning spacer, B is either loose or missing. (See Wiper Assembly Parts Breakdown) • Thread presser base misadjusted or bent. (See checking thread presser base and cover alignment) • Thread guide solenoid base needs adjusting. (See checking thread guide solenoid base) • A magic tape in thread presser base is either missing or damaged. (See Wiper Assembly Parts Breakdown) • Upper thread guide hook...

Wiper Problems and Solutions - English
Page 3
Apply thread adhesive to thread to prevent nut from coming off. (See Wiper Assembly Parts Breakdown) • Thread guide solenoid bracket base is misaligned or scratched at the bottom of the slot. (See checking thread guide solenoid base) • Lower arm cushion is cracked, missing or the screw has broken off causing the positioning spacer, B to damaged the bottom of the Wiper Assembly Parts Breakdown. • Magic tapes in thread guide solenoid bracket base needs to be lubricated. Wiper comes down and retracts but does not retract • Slot in thread presser base assembly are ...
Apply thread adhesive to thread to prevent nut from coming off. (See Wiper Assembly Parts Breakdown) • Thread guide solenoid bracket base is misaligned or scratched at the bottom of the slot. (See checking thread guide solenoid base) • Lower arm cushion is cracked, missing or the screw has broken off causing the positioning spacer, B to damaged the bottom of the Wiper Assembly Parts Breakdown. • Magic tapes in thread guide solenoid bracket base needs to be lubricated. Wiper comes down and retracts but does not retract • Slot in thread presser base assembly are ...
Wiper Problems and Solutions - English
Page 5
Connect it to the hole in relation to the two pins of the return spring mounts to the highest needle bar number, 9 or 12, and lower presser foot. The wiper should look as illustrated above. Checking solenoid sensor alignment. Color change machine to . Thread Presser Base Assembly Spacer Thread Presser Cover Magic Tapes 5 Adjustment Screw Thread Presser Cover Checking the wiper solenoid Disconnect the wiper solenoid from the machine by following the cable from the solenoid and unplugging at the connector on the machine. Manually lower the wiper down by ...
Connect it to the hole in relation to the two pins of the return spring mounts to the highest needle bar number, 9 or 12, and lower presser foot. The wiper should look as illustrated above. Checking solenoid sensor alignment. Color change machine to . Thread Presser Base Assembly Spacer Thread Presser Cover Magic Tapes 5 Adjustment Screw Thread Presser Cover Checking the wiper solenoid Disconnect the wiper solenoid from the machine by following the cable from the solenoid and unplugging at the connector on the machine. Manually lower the wiper down by ...
Wiper Problems and Solutions - English
Page 6
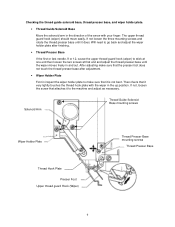
If not loosen the three mounting screws and rotate the thread presser base until the wiper moves freely in inspect the wiper holder plate to make sure that the presser foot does not touch the thread presser base after finishing. • Thread Presser Base If the first or last needle, 9 or 12, cause the upper thread guard hook (wiper) to stick at one end then loosen the two screws at that it to go back and adjust the wiper holder plate after adjustment. • Wiper Holder Plate First in and out. After adjusting make sure that attaches it very lightly touches the thread hook ...
If not loosen the three mounting screws and rotate the thread presser base until the wiper moves freely in inspect the wiper holder plate to make sure that the presser foot does not touch the thread presser base after finishing. • Thread Presser Base If the first or last needle, 9 or 12, cause the upper thread guard hook (wiper) to stick at one end then loosen the two screws at that it to go back and adjust the wiper holder plate after adjustment. • Wiper Holder Plate First in and out. After adjusting make sure that attaches it very lightly touches the thread hook ...
Wiper Problems and Solutions - English
Page 7
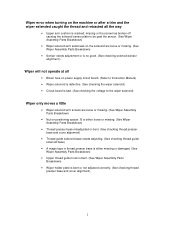
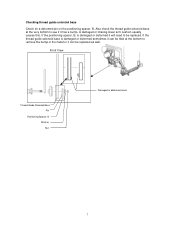
If the positioning spacer, B, is damaged or deformed sometimes it can be filed at the very bottom to remove the bump in the metal or it has a bump. If the thread guide solenoid base is damaged or deformed it will need to be replaced as well. Also check the thread guide solenoid base at the bottom to see if it can be replaced. A damaged or missing lower arm cushion usually causes this. Checking thread guide solenoid base Check for a deformed pin on the positioning spacer, B. Front View Thread Guide Solenoid Base Pin Positioning Spacer, B Washer Nut Damaged or deformed ...
If the positioning spacer, B, is damaged or deformed sometimes it can be filed at the very bottom to remove the bump in the metal or it has a bump. If the thread guide solenoid base is damaged or deformed it will need to be replaced as well. Also check the thread guide solenoid base at the bottom to see if it can be replaced. A damaged or missing lower arm cushion usually causes this. Checking thread guide solenoid base Check for a deformed pin on the positioning spacer, B. Front View Thread Guide Solenoid Base Pin Positioning Spacer, B Washer Nut Damaged or deformed ...
Knife Adjustments - English
Page 1
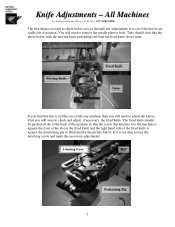
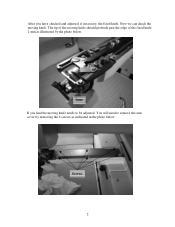
They should be pushed all the to the back of the machine so that the screw that this is not the case with the moving knife protruding out from the fixed knife about 1mm. The fixed knife should look . Attaching Screw Slot Positioning Pin 1 All Machines For Technical Assistance Please Call Toll Free 1-877-4BROTHER The first thing you want to the machine is against the front of the slot in the fixed knife and the right hand side of position. You will want to check before you will need to remove the needle plate to see if the knives are really out of the fixed knife is ...
They should be pushed all the to the back of the machine so that the screw that this is not the case with the moving knife protruding out from the fixed knife about 1mm. The fixed knife should look . Attaching Screw Slot Positioning Pin 1 All Machines For Technical Assistance Please Call Toll Free 1-877-4BROTHER The first thing you want to the machine is against the front of the slot in the fixed knife and the right hand side of position. You will want to check before you will need to remove the needle plate to see if the knives are really out of the fixed knife is ...
Knife Adjustments - English
Page 2
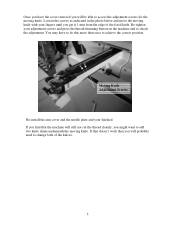
Screws 2 Now we can check the moving knife should protrude past the edge of the moving knife. After you find the moving knife needs to be adjusted. You will need to remove the arm cover by removing the 6 screws as illustrated by the photo below . The tip of the fixed knife 1 mm as indicated in the photo below . 1mm If you have checked and adjusted, if necessary, the fixed knife.
Screws 2 Now we can check the moving knife should protrude past the edge of the moving knife. After you find the moving knife needs to be adjusted. You will need to remove the arm cover by removing the 6 screws as illustrated by the photo below . The tip of the fixed knife 1 mm as indicated in the photo below . 1mm If you have checked and adjusted, if necessary, the fixed knife.
Knife Adjustments - English
Page 3
Re-tighten your finished. If you find that doesn't work then you will probably need to change both of the fixed knife. Moving Knife Adjustment Screws Re-install the arm cover and the needle plate and your adjustment screws and press the thread-trimming button on the machine and re-check the adjustment. Loosen the screws as indicated in the photo below and move the moving knife with your fingers until you might want to add two knife shims underneath the moving knife. If that the machine will be able to access the adjustment screws for the moving knife. Once you have to do this more ...
Re-tighten your finished. If you find that doesn't work then you will probably need to change both of the fixed knife. Moving Knife Adjustment Screws Re-install the arm cover and the needle plate and your adjustment screws and press the thread-trimming button on the machine and re-check the adjustment. Loosen the screws as indicated in the photo below and move the moving knife with your fingers until you might want to add two knife shims underneath the moving knife. If that the machine will be able to access the adjustment screws for the moving knife. Once you have to do this more ...
Maintenance Schedule - English
Page 1
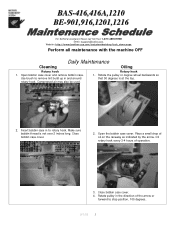
... rotary hook every 3-4 hours of oil on the raceway as indicated by the arrow. BAS-416,416A,1210 BE-901,916,1201,1216 For Technical Assistance Please Call Toll Fre e 1-877-4BROTHER Email: tsupport@brother.com Website: http://www.brother-usa.com/industembroidery/tech_down.aspx Perform all maintenance with the machine OFF Daily Maintenance...
... rotary hook every 3-4 hours of oil on the raceway as indicated by the arrow. BAS-416,416A,1210 BE-901,916,1201,1216 For Technical Assistance Please Call Toll Fre e 1-877-4BROTHER Email: tsupport@brother.com Website: http://www.brother-usa.com/industembroidery/tech_down.aspx Perform all maintenance with the machine OFF Daily Maintenance...
Maintenance Schedule - English
Page 2
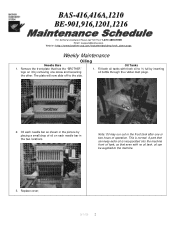
... 2 Oil each needle bar in the two locations. A part that has the "BROTHER" logo on each needle bar as shown in the front tank after one screw and loosening the other. Oil Tanks 1. BAS-416,416A,1210 BE-901,916,1201,1216 For Technical Assistance Please Call Toll Fre e... 1-877-4BROTHER Email: tsupport@brother.com Website: http://www.brother-usa.com/industembroidery/tech_down.aspx Weekly Maintenance Oiling Needle Bars 1.
... 2 Oil each needle bar in the two locations. A part that has the "BROTHER" logo on each needle bar as shown in the front tank after one screw and loosening the other. Oil Tanks 1. BAS-416,416A,1210 BE-901,916,1201,1216 For Technical Assistance Please Call Toll Fre e... 1-877-4BROTHER Email: tsupport@brother.com Website: http://www.brother-usa.com/industembroidery/tech_down.aspx Weekly Maintenance Oiling Needle Bars 1.
Maintenance Schedule - English
Page 3
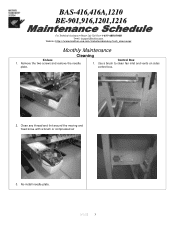
Control Box 1. Clean any thread and lint around the moving and fixed knive with a brush or compressed air 3. Re-install needle plate. 9/1/05 3 Remove the two screws and remove the needle plate. Use a brush to clean fan inlet and vents on sides control box. 2. BAS-416,416A,1210 BE-901,916,1201,1216 For Technical Assistance Please Call Toll Fre e 1-877-4BROTHER Email: tsupport@brother.com Website: http://www.brother-usa.com/industembroidery/tech_down.aspx Monthly Maintenance Cleaning Knives 1.
Control Box 1. Clean any thread and lint around the moving and fixed knive with a brush or compressed air 3. Re-install needle plate. 9/1/05 3 Remove the two screws and remove the needle plate. Use a brush to clean fan inlet and vents on sides control box. 2. BAS-416,416A,1210 BE-901,916,1201,1216 For Technical Assistance Please Call Toll Fre e 1-877-4BROTHER Email: tsupport@brother.com Website: http://www.brother-usa.com/industembroidery/tech_down.aspx Monthly Maintenance Cleaning Knives 1.
Maintenance Schedule - English
Page 4
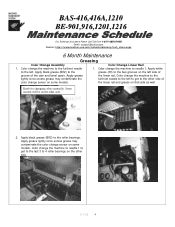
... side of the cam and bevel gears. Some models will be on some models. BAS-416,416A,1210 BE-901,916,1201,1216 For Technical As sistance Please Call Toll Free 1-877-4BROTHER Email: tsupport@brother.com Website: http://www.brother-usa.com/industembroidery/tech_down.aspx 6 Month Maintenance Greasing Color Change Assembly Color Change...
... side of the cam and bevel gears. Some models will be on some models. BAS-416,416A,1210 BE-901,916,1201,1216 For Technical As sistance Please Call Toll Free 1-877-4BROTHER Email: tsupport@brother.com Website: http://www.brother-usa.com/industembroidery/tech_down.aspx 6 Month Maintenance Greasing Color Change Assembly Color Change...
Maintenance Schedule - English
Page 5
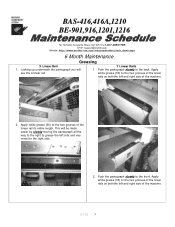
... grooves of the linear rails on boththe left and right side of the machine. 2. BAS-416,416A,1210 BE-901,916,1201,1216 For Technical Assistance Please Call Toll Fre e 1-877-4BROTHER Email: tsupport@brother.com Website: http://www.brother-usa.com/industembroidery/tech_down.aspx 6 Month Maintenance Greasing X Linear Rail Y Linear Rails 1. Push the...
... grooves of the linear rails on boththe left and right side of the machine. 2. BAS-416,416A,1210 BE-901,916,1201,1216 For Technical Assistance Please Call Toll Fre e 1-877-4BROTHER Email: tsupport@brother.com Website: http://www.brother-usa.com/industembroidery/tech_down.aspx 6 Month Maintenance Greasing X Linear Rail Y Linear Rails 1. Push the...
Maintenance Schedule - English
Page 6
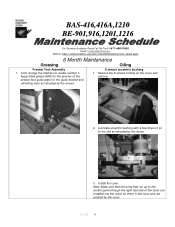
... run up to the control panel through the right had side of oil to needle number 1. BAS-416,416A,1210 BE-901,916,1201,1216 For Technical Assistance Please Call Toll Fre e 1-877-4BROTHER Email: tsupport@brother.com Website: http://www.brother-usa.com/industembroidery/tech_down.aspx 6 Month Maintenance Greasing Oiling Presser Foot Assembly 1.
... run up to the control panel through the right had side of oil to needle number 1. BAS-416,416A,1210 BE-901,916,1201,1216 For Technical Assistance Please Call Toll Fre e 1-877-4BROTHER Email: tsupport@brother.com Website: http://www.brother-usa.com/industembroidery/tech_down.aspx 6 Month Maintenance Greasing Oiling Presser Foot Assembly 1.
