

Instruction Manual - English
Page 1
Please keep this manual before using the machine. DIRECT DRIVE PROGRAMMABLE ELECTRONIC PATTERN SEWER BAS-342G INSTRUCTION MANUAL Please read this manual within easy reach for quick reference.
Please keep this manual before using the machine. DIRECT DRIVE PROGRAMMABLE ELECTRONIC PATTERN SEWER BAS-342G INSTRUCTION MANUAL Please read this manual within easy reach for quick reference.

Instruction Manual - English
Page 2
BAS-342G Before using your new machine, please read the safety instructions below and the explanations given in front of moving parts such as the needle and ... out work while positioned directly in the instruction manual. With industrial sewing machines, it is always a danger of injury that you very much for buying a BROTHER sewing machine. Follow the instructions from training personnel and instructors regarding safe and correct operation before operating the machine so that can be caused by...
BAS-342G Before using your new machine, please read the safety instructions below and the explanations given in front of moving parts such as the needle and ... out work while positioned directly in the instruction manual. With industrial sewing machines, it is always a danger of injury that you very much for buying a BROTHER sewing machine. Follow the instructions from training personnel and instructors regarding safe and correct operation before operating the machine so that can be caused by...
Instruction Manual - English
Page 3
... machine or physical damage to equipment and surroundings. The picture inside the circle indicates the nature of the thing that must make the ground connection".) BAS-342G i This symbol ( ) indicates something that you must be careful of these indications and symbols are provided in order to ensure safe operation of this term...
... machine or physical damage to equipment and surroundings. The picture inside the circle indicates the nature of the thing that must make the ground connection".) BAS-342G i This symbol ( ) indicates something that you must be careful of these indications and symbols are provided in order to ensure safe operation of this term...
Instruction Manual - English
Page 4
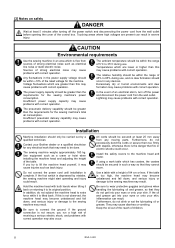
Touching areas where high voltages are present can result. Contact your Brother dealer or a qualified electrician for the sewing machine's total air consumption. If the foot switch is complete. All cords should be greater than this is ... at least 5 minutes after turning off the power and disconnect the power cord from the wall outlet. If using a work that they cannot move. ii BAS-342G Voltage fluctuations which are greater than the requirements for any electrical work table which has casters, the casters should occur in an area which is...
Touching areas where high voltages are present can result. Contact your Brother dealer or a qualified electrician for the sewing machine's total air consumption. If the foot switch is complete. All cords should be greater than this is ... at least 5 minutes after turning off the power and disconnect the power cord from the wall outlet. If using a work that they cannot move. ii BAS-342G Voltage fluctuations which are greater than the requirements for any electrical work table which has casters, the casters should occur in an area which is...
Instruction Manual - English
Page 5
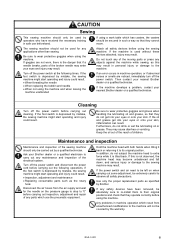
...if abnormal noises or smells are not worn, there is depressed by mistake, the sewing machine might start operating and injury could result. BAS-342G iii If goggles are noticed, immediately turn off the power switch before carrying out cleaning. Turn off the power switch and disconnect the ... for any applications other than sewing. Keep the oil out of the reach of the sewing machine should only be carried out by Brother. If an error occurs in personal injury or damage to the machine. Maintenance and inspection Maintenance and inspection of children. Attach all ...
...if abnormal noises or smells are not worn, there is depressed by mistake, the sewing machine might start operating and injury could result. BAS-342G iii If goggles are noticed, immediately turn off the power switch before carrying out cleaning. Turn off the power switch and disconnect the ... for any applications other than sewing. Keep the oil out of the reach of the sewing machine should only be carried out by Brother. If an error occurs in personal injury or damage to the machine. Maintenance and inspection Maintenance and inspection of children. Attach all ...
Instruction Manual - English
Page 6
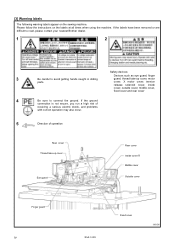
... on the labels at all times when using the machine. If the labels have been removed or are difficult to read, please contact your nearest Brother dealer. 1 2 Safety devices: Devices such as eye guard, finger 3 Be careful to connect the ground. If the ground connection is not secure, you run a high... may also occur. 5 Direction of operation Rear cover Thread take -up cover Eye guard Rear cover Inside cover R Middle cover Outside cover Finger guard iv BAS-342G Fixed cover 3956M
... on the labels at all times when using the machine. If the labels have been removed or are difficult to read, please contact your nearest Brother dealer. 1 2 Safety devices: Devices such as eye guard, finger 3 Be careful to connect the ground. If the ground connection is not secure, you run a high... may also occur. 5 Direction of operation Rear cover Thread take -up cover Eye guard Rear cover Inside cover R Middle cover Outside cover Finger guard iv BAS-342G Fixed cover 3956M

Instruction Manual - English
Page 7
Motor cover Rear cover Tension release solenoid cover Inside cover L Middle cover Outside cover Fixed cover X motor cover BAS-342G 3957M v
Motor cover Rear cover Tension release solenoid cover Inside cover L Middle cover Outside cover Fixed cover X motor cover BAS-342G 3957M v
Instruction Manual - English
Page 8
... air tubes [4 10 4-10. Winding the lower thread 22 5-5. Installing the bobbin case 23 5-6. Writing all sewing data from the CF card at once 50 BAS-342G Installing the needle 19 5-2. List of memory switch settings 35 7-4. Installing the gas spring 8 4-7. Installing the eye guard [11 16 4-17. USING THE OPERATION PANEL...
... air tubes [4 10 4-10. Winding the lower thread 22 5-5. Installing the bobbin case 23 5-6. Writing all sewing data from the CF card at once 50 BAS-342G Installing the needle 19 5-2. List of memory switch settings 35 7-4. Installing the gas spring 8 4-7. Installing the eye guard [11 16 4-17. USING THE OPERATION PANEL...
Instruction Manual - English
Page 9
Cleaning the control box air inlet ports 54 10-5. STANDARD ADJUSTMENTS 55 11-1. Adjusting arm thread guide R 56 11-3. TROUBLESHOOTING 70 14. 7-SEGMENT DISPLAY 73 BAS-342G Cleaning the rotary hook 53 10-2. Cleaning the eye guard 54 10-6. Adjusting the thread wiper 62 11-12. Changing the intermittent stroke 63 11-...
Cleaning the control box air inlet ports 54 10-5. STANDARD ADJUSTMENTS 55 11-1. Adjusting arm thread guide R 56 11-3. TROUBLESHOOTING 70 14. 7-SEGMENT DISPLAY 73 BAS-342G Cleaning the rotary hook 53 10-2. Cleaning the eye guard 54 10-6. Adjusting the thread wiper 62 11-12. Changing the intermittent stroke 63 11-...
Instruction Manual - English
Page 10
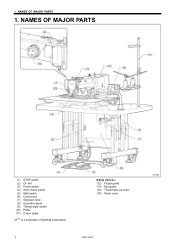
1. NAMES OF MAJOR PARTS (1) STOP switch (2) CF slot (3) Power switch (4) Work clamp switch (5) Start switch (6) Control box (7) Solenoid valve (8) Operation panel (9) Thread wiper switch (10) Pulley (11) Cotton stand CFTM is a trademark of SanDisk Corporation. 1 Safety devices: (12) Finger guard (13) Eye guard (14) Thread take-up cover (15) Motor cover BAS-342G 3958M NAMES OF MAJOR PARTS 1.
1. NAMES OF MAJOR PARTS (1) STOP switch (2) CF slot (3) Power switch (4) Work clamp switch (5) Start switch (6) Control box (7) Solenoid valve (8) Operation panel (9) Thread wiper switch (10) Pulley (11) Cotton stand CFTM is a trademark of SanDisk Corporation. 1 Safety devices: (12) Finger guard (13) Eye guard (14) Thread take-up cover (15) Motor cover BAS-342G 3958M NAMES OF MAJOR PARTS 1.

Instruction Manual - English
Page 11
... (X x Y) Max. 300 x 200 mm Feed mechanism Intermittent feed, pulse motor drive Stitch length 0.05 − 12.7 mm No. of stitches 500,000-stitch internal memory (*) Maximum no. BAS-342G 2 SPECIFICATIONS 2. of stitches No. SPECIFICATIONS Sewing machine Lock stitch, pattern tacking sewing machine (with large shuttle hook) Stitch formation Single needle lock stitch Max...
... (X x Y) Max. 300 x 200 mm Feed mechanism Intermittent feed, pulse motor drive Stitch length 0.05 − 12.7 mm No. of stitches 500,000-stitch internal memory (*) Maximum no. BAS-342G 2 SPECIFICATIONS 2. of stitches No. SPECIFICATIONS Sewing machine Lock stitch, pattern tacking sewing machine (with large shuttle hook) Stitch formation Single needle lock stitch Max...

Instruction Manual - English
Page 12
TABLE PROCESSING DIAGRAM • The thickness of the table should be strong enough to bear the weight and vibration of the sewing machine. • If using casters, use ones which can bear the total weight of sewing machine and table. • Check that the control box is at least 10 mm away from the leg. TABLE PROCESSING DIAGRAM 3. If the control box and the leg are too close together, it should be at least 50 mm, and it may result in incorrect sewing machine operation. 4053M 3 BAS-342G 3.
TABLE PROCESSING DIAGRAM • The thickness of the table should be strong enough to bear the weight and vibration of the sewing machine. • If using casters, use ones which can bear the total weight of sewing machine and table. • Check that the control box is at least 10 mm away from the leg. TABLE PROCESSING DIAGRAM 3. If the control box and the leg are too close together, it should be at least 50 mm, and it may result in incorrect sewing machine operation. 4053M 3 BAS-342G 3.
Instruction Manual - English
Page 13
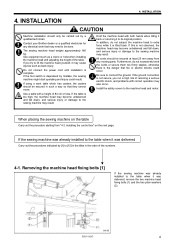
...when tilting it back or returning it was delivered, remove the two machine head fixing bolts (1) and the two plain washers (2). 3960M BAS-342G 4 INSTALLATION CAUTION Machine installation should be carried out by mistake, the sewing machine might start operating and injury could occur. The sewing...fall down , and serious injury or damage to the sewing machine may result. If the ground connection is complete. 4. Contact your Brother dealer or a qualified electrician for any moving parts. Install the safety covers to the table when it was delivered Carry out the procedures...
...when tilting it back or returning it was delivered, remove the two machine head fixing bolts (1) and the two plain washers (2). 3960M BAS-342G 4 INSTALLATION CAUTION Machine installation should be carried out by mistake, the sewing machine might start operating and injury could occur. The sewing...fall down , and serious injury or damage to the sewing machine may result. If the ground connection is complete. 4. Contact your Brother dealer or a qualified electrician for any moving parts. Install the safety covers to the table when it was delivered Carry out the procedures...
Instruction Manual - English
Page 14
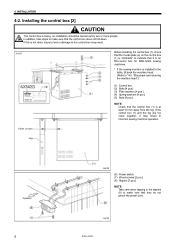
... sewing machine operation. 10mm or more people. If the control box (1) and the leg are too close together, it is an RX-control box for BAS-342G sewing machines. * If the sewing machine is "AX342G" to make sure that it may result in the staples (8) to "4-5. In addition, take steps to indicate... that they do not pierce the power cord. 3963M BAS-342G INSTALLATION 4-2. Installing the control box [2] CAUTION The control box is at least 10 mm away from the leg. 4.
... sewing machine operation. 10mm or more people. If the control box (1) and the leg are too close together, it is an RX-control box for BAS-342G sewing machines. * If the sewing machine is "AX342G" to make sure that it may result in the staples (8) to "4-5. In addition, take steps to indicate... that they do not pierce the power cord. 3963M BAS-342G INSTALLATION 4-2. Installing the control box [2] CAUTION The control box is at least 10 mm away from the leg. 4.

Instruction Manual - English
Page 15
... (d) of the safety switch lever touch the support lever base (b). (1) Rubber bushes (2 pcs.) (2) Hinge holders (2 pcs.) (3) Plain washers [4 pcs.] (4) Spring washers [4 pcs.] (5) Bolts [4 pcs.] 3965M BAS-342G (Continued on top of the following when lowering the machine head onto the table. ! Do not let any cords get clamped between the machine head...
... (d) of the safety switch lever touch the support lever base (b). (1) Rubber bushes (2 pcs.) (2) Hinge holders (2 pcs.) (3) Plain washers [4 pcs.] (4) Spring washers [4 pcs.] (5) Bolts [4 pcs.] 3965M BAS-342G (Continued on top of the following when lowering the machine head onto the table. ! Do not let any cords get clamped between the machine head...
Instruction Manual - English
Page 16
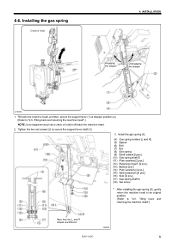
... shaft (9) through the hole in the support lever base (10) and through the groove (f) in the support lever (8), move the end of three heights. 3967M 7 BAS-342G If you hold it is returned to one of the support lever (8) up and down , and serious injury or damage to its original position. Engaging...
... shaft (9) through the hole in the support lever base (10) and through the groove (f) in the support lever (8), move the end of three heights. 3967M 7 BAS-342G If you hold it is returned to one of the support lever (8) up and down , and serious injury or damage to its original position. Engaging...
Instruction Manual - English
Page 17
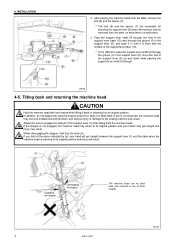
... its original position. (Refer to tilt back the machine head. 2. Tilting back and returning the machine head".) Note that the L and R shapes are different. 3969M BAS-342G 8 INSTALLATION Engaging the stopper Disengaging the stopper 3968M 1. Tilting back and returning the machine head".) NOTE: Use equipment such as a crane or hoist to "4-5. 4-6.
... its original position. (Refer to tilt back the machine head. 2. Tilting back and returning the machine head".) Note that the L and R shapes are different. 3969M BAS-342G 8 INSTALLATION Engaging the stopper Disengaging the stopper 3968M 1. Tilting back and returning the machine head".) NOTE: Use equipment such as a crane or hoist to "4-5. 4-6.
Instruction Manual - English
Page 18
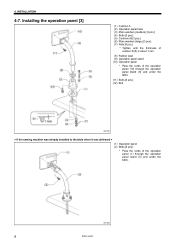
... when it was delivered > (1) Operation panel (2) Bolts [3 pcs.] * Pass the cords of the operation panel (1) through the operation panel stand (3) and under the table. 3971M 9 BAS-342G INSTALLATION 4-7. 4.
... when it was delivered > (1) Operation panel (2) Bolts [3 pcs.] * Pass the cords of the operation panel (1) through the operation panel stand (3) and under the table. 3971M 9 BAS-342G INSTALLATION 4-7. 4.
Instruction Manual - English
Page 19
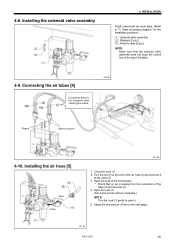
... marks. 3972M Plugs 4 Branch unions Y 4-10. Open the cock (1). (The meter pointer will turn clockwise.) NOTE: Turn the cock (1) gently to the next page.) 3974M BAS-342G 10 Turn the nut (3) at the compressor. * Check that the solenoid valve assembly does not touch the control box or the leg of the table...
... marks. 3972M Plugs 4 Branch unions Y 4-10. Open the cock (1). (The meter pointer will turn clockwise.) NOTE: Turn the cock (1) gently to the next page.) 3974M BAS-342G 10 Turn the nut (3) at the compressor. * Check that the solenoid valve assembly does not touch the control box or the leg of the table...

Instruction Manual - English
Page 20
... 2 Upper knob Lower knob Fully tighten Fully tighten and then loosen by 8 turns Fully tighten and then loosen by pressing the manual buttons (1). 3976M 11 BAS-342G 4.
... 2 Upper knob Lower knob Fully tighten Fully tighten and then loosen by 8 turns Fully tighten and then loosen by pressing the manual buttons (1). 3976M 11 BAS-342G 4.


