

Instruction Manual - English
Page 1
BAS-342G INSTRUCTION MANUAL Please read this manual within easy reach for quick reference. Please keep this manual before using the machine. DIRECT DRIVE PROGRAMMABLE ELECTRONIC PATTERN SEWER
BAS-342G INSTRUCTION MANUAL Please read this manual within easy reach for quick reference. Please keep this manual before using the machine. DIRECT DRIVE PROGRAMMABLE ELECTRONIC PATTERN SEWER

Instruction Manual - English
Page 2
... before operating the machine so that can be caused by these parts. BAS-342G Thank you will know how to use it is always a danger of injury that you very much for buying a BROTHER sewing machine. With industrial sewing machines, it correctly. Before using your new machine, please read the safety instructions below and the...
... before operating the machine so that can be caused by these parts. BAS-342G Thank you will know how to use it is always a danger of injury that you very much for buying a BROTHER sewing machine. With industrial sewing machines, it correctly. Before using your new machine, please read the safety instructions below and the...
Instruction Manual - English
Page 3
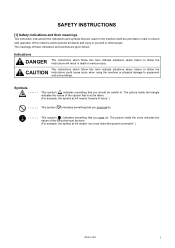
...you must make the ground connection".) BAS-342G i The picture inside the circle indicates the nature of the thing that you must not do . SAFETY INSTRUCTIONS [1] Safety indications and their meanings This instruction manual and the indications and symbols that are used on the machine itself are given ...below. Indications DANGER The instructions which follow the CAUTION instructions could cause injury when using the machine or physical damage to equipment and surroundings. This symbol ( ) indicates something that you must do . The picture ...
...you must make the ground connection".) BAS-342G i The picture inside the circle indicates the nature of the thing that you must not do . SAFETY INSTRUCTIONS [1] Safety indications and their meanings This instruction manual and the indications and symbols that are used on the machine itself are given ...below. Indications DANGER The instructions which follow the CAUTION instructions could cause injury when using the machine or physical damage to equipment and surroundings. This symbol ( ) indicates something that you must do . The picture ...
Instruction Manual - English
Page 4
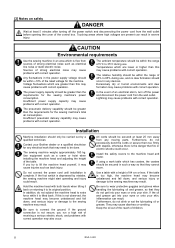
...injury or damage to lift the machine head yourself, it is depressed by a qualified technician. Use a table with correct operation. If the table is not secure, you try to the sewing ...be carried out by mistake, the sewing machine might start operating and injury could occur. ii BAS-342G If you run a high risk of receiving a serious electric shock, and problems with correct ... head with correct operation. If the oil and grease get into your eyes or onto your Brother dealer or a qualified electrician for the sewing machine's total air consumption. They may cause problems...
...injury or damage to lift the machine head yourself, it is depressed by a qualified technician. Use a table with correct operation. If the table is not secure, you try to the sewing ...be carried out by mistake, the sewing machine might start operating and injury could occur. ii BAS-342G If you run a high risk of receiving a serious electric shock, and problems with correct ... head with correct operation. If the oil and grease get into your eyes or onto your Brother dealer or a qualified electrician for the sewing machine's total air consumption. They may cause problems...
Instruction Manual - English
Page 5
... its original position. BAS-342G iii If the foot switch is depressed by mistake, the sewing machine might start operating and injury could result. • Inspection, adjustment and maintenance • Replacing consumable parts such as specified by Brother. If any applications other than sewing. Be sure to wear protective goggles when using a work table...
... its original position. BAS-342G iii If the foot switch is depressed by mistake, the sewing machine might start operating and injury could result. • Inspection, adjustment and maintenance • Replacing consumable parts such as specified by Brother. If any applications other than sewing. Be sure to wear protective goggles when using a work table...
Instruction Manual - English
Page 6
... take -up cover Eye guard Rear cover Inside cover R Middle cover Outside cover Finger guard iv BAS-342G Fixed cover 3956M If the labels have been removed or are difficult to read, please contact your nearest Brother dealer. 1 2 Safety devices: Devices such as eye guard, finger 3 Be careful to connect the ground. cover... hands caught in sliding guard, thread take -up cover, motor parts. [3] Warning labels The following warning labels appear on the labels at all times when using the machine.
... take -up cover Eye guard Rear cover Inside cover R Middle cover Outside cover Finger guard iv BAS-342G Fixed cover 3956M If the labels have been removed or are difficult to read, please contact your nearest Brother dealer. 1 2 Safety devices: Devices such as eye guard, finger 3 Be careful to connect the ground. cover... hands caught in sliding guard, thread take -up cover, motor parts. [3] Warning labels The following warning labels appear on the labels at all times when using the machine.
Instruction Manual - English
Page 8
... of memory switch settings 35 7-4. List of advanced functions 33 7-2. Using the lower thread counter 36 7-5. USING CF CARDS 47 8-1. Writing all sewing data from the CF card at once 50 BAS-342G SPECIFICATIONS 2 3. Installing the gas spring 8 4-7. Adjusting the air ... 49 8-3-2. Installing the control box [2 5 4-3. Winding the lower thread 22 5-5. Setting 2-step operation for the work clamp..... 26 6. Using user programs 39 7-8. Clearing memory data (reinitialization 46 8. Notes on handling CF cards (sold separately) ...47 8-2. TABLE PROCESSING DIAGRAM ....... ...
... of memory switch settings 35 7-4. List of advanced functions 33 7-2. Using the lower thread counter 36 7-5. USING CF CARDS 47 8-1. Writing all sewing data from the CF card at once 50 BAS-342G SPECIFICATIONS 2 3. Installing the gas spring 8 4-7. Adjusting the air ... 49 8-3-2. Installing the control box [2 5 4-3. Winding the lower thread 22 5-5. Setting 2-step operation for the work clamp..... 26 6. Using user programs 39 7-8. Clearing memory data (reinitialization 46 8. Notes on handling CF cards (sold separately) ...47 8-2. TABLE PROCESSING DIAGRAM ....... ...
Instruction Manual - English
Page 9
... 11-7. Adjusting the air pressure 65 12. Cleaning the control box air inlet ports 54 10-5. Lubrication 54 11. Using the STOP switch 52 9-3. Cleaning the rotary hook 53 10-2. Adjusting the driver needle guard 57 11-6. Replacing the ...movable and fixed knives...... 61 11-10-1. Using the thread wiper switch 52 10. Changing the intermittent stroke 63 11-14. Adjusting the work clamp lift amount 65 ...amount... 58 11-9. Draining the oil 53 10-3. TROUBLESHOOTING 70 14. 7-SEGMENT DISPLAY 73 BAS-342G
... 11-7. Adjusting the air pressure 65 12. Cleaning the control box air inlet ports 54 10-5. Lubrication 54 11. Using the STOP switch 52 9-3. Cleaning the rotary hook 53 10-2. Adjusting the driver needle guard 57 11-6. Replacing the ...movable and fixed knives...... 61 11-10-1. Using the thread wiper switch 52 10. Changing the intermittent stroke 63 11-14. Adjusting the work clamp lift amount 65 ...amount... 58 11-9. Draining the oil 53 10-3. TROUBLESHOOTING 70 14. 7-SEGMENT DISPLAY 73 BAS-342G

Instruction Manual - English
Page 12
3. If the control box and the leg are too close together, it should be strong enough to bear the weight and vibration of the sewing machine. • If using casters, use ones which can bear the total weight of sewing machine and table. • Check that the control box is at least 10 mm away from the leg. TABLE PROCESSING DIAGRAM • The thickness of the table should be at least 50 mm, and it may result in incorrect sewing machine operation. 4053M 3 BAS-342G TABLE PROCESSING DIAGRAM 3.
3. If the control box and the leg are too close together, it should be strong enough to bear the weight and vibration of the sewing machine. • If using casters, use ones which can bear the total weight of sewing machine and table. • Check that the control box is at least 10 mm away from the leg. TABLE PROCESSING DIAGRAM • The thickness of the table should be at least 50 mm, and it may result in incorrect sewing machine operation. 4053M 3 BAS-342G TABLE PROCESSING DIAGRAM 3.
Instruction Manual - English
Page 13
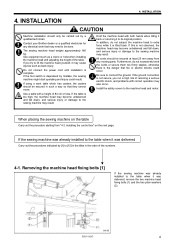
Contact your Brother dealer or a qualified electrician for any moving parts. If this is not ...If the sewing machine was delivered, remove the two machine head fixing bolts (1) and the two plain washers (2). 3960M BAS-342G 4 The sewing machine head weighs approximately 160 kg. If the foot switch is the danger that fire or electric ... Carry out the procedures indicated by mistake, the sewing machine might start operating and injury could occur. INSTALLATION 4. Use a table with correct operation may cause injuries such as a crane or hoist when installing the machine head and ...
Contact your Brother dealer or a qualified electrician for any moving parts. If this is not ...If the sewing machine was delivered, remove the two machine head fixing bolts (1) and the two plain washers (2). 3960M BAS-342G 4 The sewing machine head weighs approximately 160 kg. If the foot switch is the danger that fire or electric ... Carry out the procedures indicated by mistake, the sewing machine might start operating and injury could occur. INSTALLATION 4. Use a table with correct operation may cause injuries such as a crane or hoist when installing the machine head and ...

Instruction Manual - English
Page 15
... pan and support lever base 4. NOTE: • Use a crane or hoist to install the sewing machine. • Be careful of the safety switch lever touch the support lever base (b). (1) Rubber bushes (2 pcs.) (2) Hinge holders (2 pcs.) (3) Plain washers [4 pcs.] (4) Spring washers [4 pcs.] (5) Bolts [4 pcs.] 3965M BAS-342G (Continued on top of the oil pan...
... pan and support lever base 4. NOTE: • Use a crane or hoist to install the sewing machine. • Be careful of the safety switch lever touch the support lever base (b). (1) Rubber bushes (2 pcs.) (2) Hinge holders (2 pcs.) (3) Plain washers [4 pcs.] (4) Spring washers [4 pcs.] (5) Bolts [4 pcs.] 3965M BAS-342G (Continued on top of the oil pan...
Instruction Manual - English
Page 17
... to tilt back the machine head. 2. Tilting back and returning the machine head".) NOTE: Use equipment such as a crane or hoist to "4-5. Tilting back and returning the machine head".) Note that the L and R shapes are different. 3969M BAS-342G 8 INSTALLATION Engaging the stopper Disengaging the stopper 3968M 1. Tighten the two set screws (2) to...
... to tilt back the machine head. 2. Tilting back and returning the machine head".) NOTE: Use equipment such as a crane or hoist to "4-5. Tilting back and returning the machine head".) Note that the L and R shapes are different. 3969M BAS-342G 8 INSTALLATION Engaging the stopper Disengaging the stopper 3968M 1. Tighten the two set screws (2) to...

Instruction Manual - English
Page 20
INSTALLATION 4-11. Adjusting the speed controller [7] You can operate the work clamp using the knobs on the valves. • When the upper knob is tightened, the lowering speed becomes slower. When it is loosened, the lifting speed becomes ... 1 You can adjust the lifting and lowering speeds for the work clamp when the power is turned off by pressing the manual buttons (1). 3976M 11 BAS-342G 4. Adjusting the air pressure [6] Lift up the handle (2) of the regulator (1) and then turn it . 3975M 4-12.
INSTALLATION 4-11. Adjusting the speed controller [7] You can operate the work clamp using the knobs on the valves. • When the upper knob is tightened, the lowering speed becomes slower. When it is loosened, the lifting speed becomes ... 1 You can adjust the lifting and lowering speeds for the work clamp when the power is turned off by pressing the manual buttons (1). 3976M 11 BAS-342G 4. Adjusting the air pressure [6] Lift up the handle (2) of the regulator (1) and then turn it . 3975M 4-12.
Instruction Manual - English
Page 25
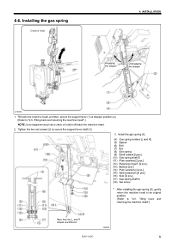
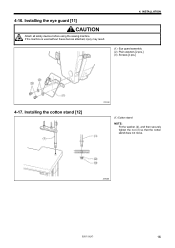
Installing the cotton stand [12] 4934Q (1) Cotton stand NOTE: Fit the washer (2), and then securely tighten the nut (3) so that the cotton stand does not move. 3983M BAS-342G 16 If the machine is used without these devices attached, injury may result. 4. 4-16. Installing the eye guard [11] CAUTION Attach all safety devices before using the sewing machine. INSTALLATION (1) Eye guard assembly (2) Plain washers [2 pcs.] (3) Screws [2 pcs.] 4-17.
Installing the cotton stand [12] 4934Q (1) Cotton stand NOTE: Fit the washer (2), and then securely tighten the nut (3) so that the cotton stand does not move. 3983M BAS-342G 16 If the machine is used without these devices attached, injury may result. 4. 4-16. Installing the eye guard [11] CAUTION Attach all safety devices before using the sewing machine. INSTALLATION (1) Eye guard assembly (2) Plain washers [2 pcs.] (3) Screws [2 pcs.] 4-17.
Instruction Manual - English
Page 26
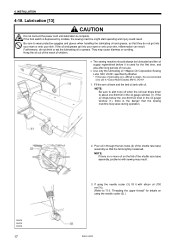
... onto your skin, inflammation can result. If the oil drops below the one -third full in the oil gauge window (1). If using the needle cooler (3).) BAS-342G Keep the oil out of the reach of the shuttle race base assembly, problems with sewing may cause diarrhea or vomiting. Fill the...the oil supply replenished before it with oil. Lubrication [13] CAUTION Do not connect the power cord until lubrication is depressed by Brother. * If this type of non-use. • Use only the lubricating oil specified by mistake, the sewing machine might start operating and injury could result.
... onto your skin, inflammation can result. If the oil drops below the one -third full in the oil gauge window (1). If using the needle cooler (3).) BAS-342G Keep the oil out of the reach of the shuttle race base assembly, problems with sewing may cause diarrhea or vomiting. Fill the...the oil supply replenished before it with oil. Lubrication [13] CAUTION Do not connect the power cord until lubrication is depressed by Brother. * If this type of non-use. • Use only the lubricating oil specified by mistake, the sewing machine might start operating and injury could result.
Instruction Manual - English
Page 27
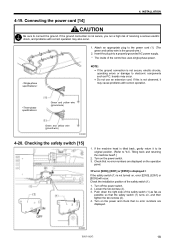
... (1) as fas as P.C. Turn on , error [E050], [E051] or [E055] will occur. Check that no error numbers are displayed. 3989M BAS-342G 18 Turn on the power and check that no error numbers are displayed on , and then tighten the two screws (2). 4. INSTALLATION 4-19. Checking... the safety switch [15] 1. Check the installation position of the control box uses single-phase power. Turn off the power switch. 2. Insert the plug into a properly-grounded AC power supply. * The inside of the safety switch...
... (1) as fas as P.C. Turn on , error [E050], [E051] or [E055] will occur. Check that no error numbers are displayed. 3989M BAS-342G 18 Turn on the power and check that no error numbers are displayed on , and then tighten the two screws (2). 4. INSTALLATION 4-19. Checking... the safety switch [15] 1. Check the installation position of the control box uses single-phase power. Turn off the power switch. 2. Insert the plug into a properly-grounded AC power supply. * The inside of the safety switch...

Instruction Manual - English
Page 28
..., making sure that the long groove on the needle is then depressed, the sewing machine starts operating. * The work clamp (2) lowering method can be changed using memory switch No. 002. (Refer to "7-3. If the foot switch is depressed by mistake, the sewing machine might start switch (right side) is at the...
..., making sure that the long groove on the needle is then depressed, the sewing machine starts operating. * The work clamp (2) lowering method can be changed using memory switch No. 002. (Refer to "7-3. If the foot switch is depressed by mistake, the sewing machine might start switch (right side) is at the...
Instruction Manual - English
Page 29
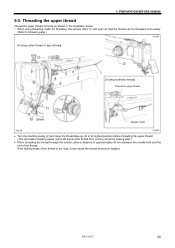
...BAS-342G 20 If the trailing length of the thread. Threading the upper thread Thread the upper thread correctly as shown in the illustration below. * When using threading mode for threading, the tension discs (1) will open so that the thread can be threaded more easily. (Refer to following page.) 3994M [If using... cotton thread or spun thread] [If using synthetic thread] Thread the upper thread Needle cooler 3993M 3995M • Turn the machine pulley (2) and raise the ...
...BAS-342G 20 If the trailing length of the thread. Threading the upper thread Thread the upper thread correctly as shown in the illustration below. * When using threading mode for threading, the tension discs (1) will open so that the thread can be threaded more easily. (Refer to following page.) 3994M [If using... cotton thread or spun thread] [If using synthetic thread] Thread the upper thread Needle cooler 3993M 3995M • Turn the machine pulley (2) and raise the ...

Instruction Manual - English
Page 33
... tension Stronger Weaker Adjust the thread tension to adjust the tension as appropriate for the material being sewn. 2. Stronger Weaker Stronger Weaker 4003M BAS-342G 24 Upper thread tension 2536Q 1. PREPARATION BEFORE SEWING 5-6-1. Thread tension Thread tension reference Upper thread Lower thread Upper thread tension (N) Lower thread... tension (N) Pre-tension (N) Needle #20 or similar #20 or similar 1.4 − 1.8 0.3 − 0.4 0.2 − 0.4 DP×17#19 5. Use the tension nut (2) (sub tension) to adjust the upper thread trailing length to about 42 mm.
... tension Stronger Weaker Adjust the thread tension to adjust the tension as appropriate for the material being sewn. 2. Stronger Weaker Stronger Weaker 4003M BAS-342G 24 Upper thread tension 2536Q 1. PREPARATION BEFORE SEWING 5-6-1. Thread tension Thread tension reference Upper thread Lower thread Upper thread tension (N) Lower thread... tension (N) Pre-tension (N) Needle #20 or similar #20 or similar 1.4 − 1.8 0.3 − 0.4 0.2 − 0.4 DP×17#19 5. Use the tension nut (2) (sub tension) to adjust the upper thread trailing length to about 42 mm.
Instruction Manual - English
Page 36
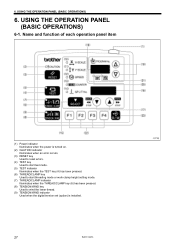
... Power indicator Illuminates when the power is turned on. (2) CAUTION indicator Illuminates when an error occurs. (3) RESET key Used to reset errors. (4) TEST key Used to start test mode. (5) TEST indicator Illuminates when the TEST key (4) has been pressed. (6) THREAD/CLAMP key... Used to start threading mode or work clamp height setting mode. (7) THREAD/CLAMP indicator Illuminates when the THREAD/CLAMP key (6) has been pressed. (8) TENSION/WIND key Used to wind the lower thread. (9) TENSION/WIND indicator Used when the digital tension set (option) is installed. 27 BAS-342G 4435Q USING THE...
... Power indicator Illuminates when the power is turned on. (2) CAUTION indicator Illuminates when an error occurs. (3) RESET key Used to reset errors. (4) TEST key Used to start test mode. (5) TEST indicator Illuminates when the TEST key (4) has been pressed. (6) THREAD/CLAMP key... Used to start threading mode or work clamp height setting mode. (7) THREAD/CLAMP indicator Illuminates when the THREAD/CLAMP key (6) has been pressed. (8) TENSION/WIND key Used to wind the lower thread. (9) TENSION/WIND indicator Used when the digital tension set (option) is installed. 27 BAS-342G 4435Q USING THE...


