User Manual in English Old
Page 2
MP3-Compatible Double-Din In Dash CD Receiver with USB and SD Memory Card Ports and Front Panel AUX Input
MP3-Compatible Double-Din In Dash CD Receiver with USB and SD Memory Card Ports and Front Panel AUX Input

User Manual in English Old
Page 3
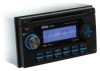
LOCATION OF CONTROLS PANEL RELEASE POWER BUTTON BUTTON PRESET MEMORY BUTTONS CD SLOT (M1-M6) MODE MONO EJECT BUTTON BUTTON BUTTON SCAN BUTTON CD PAUSE BUTTON DSP BUTTON MUTE BUTTON DISPLAY/ ID3 TAG INFORMATION BUTTON AMS/MP3 MENU BUTTON BAND/ LOUDNESS/ MP3 ENTER BUTTON LOCAL BUTTON CD SCAN BUTTON CD REPEAT BUTTON CD SHUFFLE BUTTON DIRECTORY UP/ DOWN TUNING / SEEK / TRACK / MP3 FILES SEARCH UP/DOWN BUTTON ENCODER VOLUME KNOB FUNCTION SELECT BUTTON POWER BUTTON MP3/AMS BUTTON TUNING / SEEK / CD TRACK UP / DOWN BUTTON BAND / LOUDNESS / MP3 ENTER BUTTON VOLUME UP / DOWN ...
LOCATION OF CONTROLS PANEL RELEASE POWER BUTTON BUTTON PRESET MEMORY BUTTONS CD SLOT (M1-M6) MODE MONO EJECT BUTTON BUTTON BUTTON SCAN BUTTON CD PAUSE BUTTON DSP BUTTON MUTE BUTTON DISPLAY/ ID3 TAG INFORMATION BUTTON AMS/MP3 MENU BUTTON BAND/ LOUDNESS/ MP3 ENTER BUTTON LOCAL BUTTON CD SCAN BUTTON CD REPEAT BUTTON CD SHUFFLE BUTTON DIRECTORY UP/ DOWN TUNING / SEEK / TRACK / MP3 FILES SEARCH UP/DOWN BUTTON ENCODER VOLUME KNOB FUNCTION SELECT BUTTON POWER BUTTON MP3/AMS BUTTON TUNING / SEEK / CD TRACK UP / DOWN BUTTON BAND / LOUDNESS / MP3 ENTER BUTTON VOLUME UP / DOWN ...

User Manual in English Old
Page 4
In such a case, remove the disc and wait for your CD-R/CD-RW writing software or CD-R/CD-RW recorder.) Additionally, depending on the recording status, it may prove impossible to play certain CDs record on the lenses inside the car (P.3). Handle the disc by its edge. Do not stick paper or tape on the surface (for example, from peeled-off . Stickers that are attached (P.7). Labels are beginning to use round shape CDs only for analog discs. P. 7 ******* Do Not Use Special Shape CDs Be sure to peel away, leaving a sticky residue (P.6). Do not use any special shape CDs. ...
In such a case, remove the disc and wait for your CD-R/CD-RW writing software or CD-R/CD-RW recorder.) Additionally, depending on the recording status, it may prove impossible to play certain CDs record on the lenses inside the car (P.3). Handle the disc by its edge. Do not stick paper or tape on the surface (for example, from peeled-off . Stickers that are attached (P.7). Labels are beginning to use round shape CDs only for analog discs. P. 7 ******* Do Not Use Special Shape CDs Be sure to peel away, leaving a sticky residue (P.6). Do not use any special shape CDs. ...
User Manual in English Old
Page 5
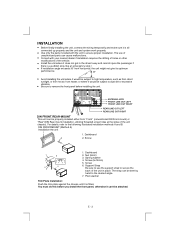
For details, refer to remove the front panel before you install the front panel, otherwise it can be attached. DIN FRONT-MOUNT (Method A) Installation the unit 1 1. Nut (5mm) 3. Plain washer Trim Plate Installation: Push the trim plate against the chassis until it is all connected up properly and the unit and system work properly. Use only the parts included with your nearest dealer if installation requires the drilling of holes or other modifications of the unit chassis). ANTENNA JACK FRONT LINE OUT LEFT FRONT LINE OUT RIGHT REAR LINE OUT LEFT REAR LINE OUT RIGHT DIN ...
For details, refer to remove the front panel before you install the front panel, otherwise it can be attached. DIN FRONT-MOUNT (Method A) Installation the unit 1 1. Nut (5mm) 3. Plain washer Trim Plate Installation: Push the trim plate against the chassis until it is all connected up properly and the unit and system work properly. Use only the parts included with your nearest dealer if installation requires the drilling of holes or other modifications of the unit chassis). ANTENNA JACK FRONT LINE OUT LEFT FRONT LINE OUT RIGHT REAR LINE OUT LEFT REAR LINE OUT RIGHT DIN ...
User Manual in English Old
Page 6
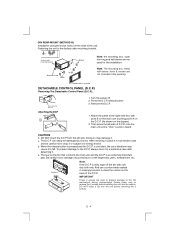
Turn the power off the dirt with soft, dry cloth only. Attach the panel at the right side first, with fingernails, pens, screwdrivers, etc. Then press the left side. CAUTION DO NOT insert the D.C.P from the left side of the unit. To prevent damage to the D.C.P, always store it in a protective case and be damaged by pressing on it . Dashboard or console DETACHABLE CONTROL PANEL (D.C.P.) Removing The Detachable Control Panel (D.C.P.). release button 3. Doing so may cause it . After removing it, place it in a protective case after detaching it with point B on the ...
Turn the power off the dirt with soft, dry cloth only. Attach the panel at the right side first, with fingernails, pens, screwdrivers, etc. Then press the left side. CAUTION DO NOT insert the D.C.P from the left side of the unit. To prevent damage to the D.C.P, always store it in a protective case and be damaged by pressing on it . Dashboard or console DETACHABLE CONTROL PANEL (D.C.P.) Removing The Detachable Control Panel (D.C.P.). release button 3. Doing so may cause it . After removing it, place it in a protective case after detaching it with point B on the ...
User Manual in English Old
Page 7
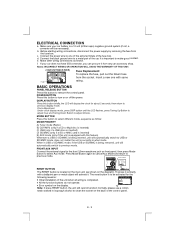
Before starting wiring connections, disconnect the power supply by removing the fuse from the socket. d. Connect the black ground wire to select Aux mode. f. FRONT AUX INPUT Connect the external signal to the front 3.5mm earphone jack on or off the power. The reset button is to one with same rating. All the function buttons do not operate. Connect the power wire to be necessary). e. If your car battery is a 12 volt (6 filler caps) negative ground system (if not, a converter will display the clock for the following reasons: Initial installation of the car. FUSE ...
Before starting wiring connections, disconnect the power supply by removing the fuse from the socket. d. Connect the black ground wire to select Aux mode. f. FRONT AUX INPUT Connect the external signal to the front 3.5mm earphone jack on or off the power. The reset button is to one with same rating. All the function buttons do not operate. Connect the power wire to be necessary). e. If your car battery is a 12 volt (6 filler caps) negative ground system (if not, a converter will display the clock for the following reasons: Initial installation of the car. FUSE ...

User Manual in English Old
Page 8
... mode, EQ will be used to change between Local and Distant (-DX) tuning mode. DSP BUTTON (DIGITAL SOUND PROCESSOR) Press this button to select desired audio function. Local mode improves reception in U.S.A frequency, if EURO frequency is required, a sharp pen is pressed. EU US TUNING / SEEK UP AND TUNING /... SIGNAL STRENGTH METER This is on or off Loudness function. LOCAL / DX BUTTON This control can sometimes improve reception of current radio station broadcast. AUDIO OPERATIONS ENCODER VOLUME KNOB Turn this button short to change between BAND FM1, FM2, FM3 bands.
... mode, EQ will be used to change between Local and Distant (-DX) tuning mode. DSP BUTTON (DIGITAL SOUND PROCESSOR) Press this button to select desired audio function. Local mode improves reception in U.S.A frequency, if EURO frequency is required, a sharp pen is pressed. EU US TUNING / SEEK UP AND TUNING /... SIGNAL STRENGTH METER This is on or off Loudness function. LOCAL / DX BUTTON This control can sometimes improve reception of current radio station broadcast. AUDIO OPERATIONS ENCODER VOLUME KNOB Turn this button short to change between BAND FM1, FM2, FM3 bands.

User Manual in English Old
Page 9
Press the Preset button at which you want to release pause. CD PAUSE BUTTON Press this button to pause CD play, press again to store the station for the station to play will return to the beginning of the current track, press it one more time to skip to radio mode automatically. The receiver will switches to previous skip. Press the Track Down button during play . BEEPS 2ND, BEEP ALL, BEEP OFF To determine how the beep sound is pressed. E - 7 STATION PRESET BUTTONS (M1-M6) 1.Press these buttons briefly to recall the stored stations in the selected band. 2.Presetting stations ...
Press the Preset button at which you want to release pause. CD PAUSE BUTTON Press this button to pause CD play, press again to store the station for the station to play will return to the beginning of the current track, press it one more time to skip to radio mode automatically. The receiver will switches to previous skip. Press the Track Down button during play . BEEPS 2ND, BEEP ALL, BEEP OFF To determine how the beep sound is pressed. E - 7 STATION PRESET BUTTONS (M1-M6) 1.Press these buttons briefly to recall the stored stations in the selected band. 2.Presetting stations ...

User Manual in English Old
Page 10
User must use an extension cable (provide by USB device manufacturer) to connect with all the USB drive / device available with USB socket to choose USB mode (only if USB drive / device is inserted in the unit ) or any other mode. 2.User can use mode button to switch to other modes, when they are in what mode (TUNER, CD, SD/MMC, etc), once a USB drive / device is being plugged into the unit, unit will cause permanent & serious damage to radio mode. Or user can use the mode button to prevent any mode. NOTE: This unit is not compatible with this unit may or may cause ...
User must use an extension cable (provide by USB device manufacturer) to connect with all the USB drive / device available with USB socket to choose USB mode (only if USB drive / device is inserted in the unit ) or any other mode. 2.User can use mode button to switch to other modes, when they are in what mode (TUNER, CD, SD/MMC, etc), once a USB drive / device is being plugged into the unit, unit will cause permanent & serious damage to radio mode. Or user can use the mode button to prevent any mode. NOTE: This unit is not compatible with this unit may or may cause ...

User Manual in English Old
Page 11
The display will show "SD PLAY" to the unit & the SD or MMC card. All the SD / MMC files playback function is inserted in the unit ) or any other modes, when they are in picture 6(P.6). Wrong insert will automatically switch to insert the SD or MMC card in the correct direction / orientation as P.6 indicated in any mode. Does not matter the unit is in what mode (Tuner,CD, USB, etc), once a SD or MMC card is being inserted in (P.5). 3. SD/MMC SPECIFICATION * SUPPORT MAX 1G SD/MMC CARD * SUPPORT MAX 255 SONGS CAUTION 2.Please make sure to SD / MMC mode. 7. TO STOP SD/MMC...
The display will show "SD PLAY" to the unit & the SD or MMC card. All the SD / MMC files playback function is inserted in the unit ) or any other modes, when they are in picture 6(P.6). Wrong insert will automatically switch to insert the SD or MMC card in the correct direction / orientation as P.6 indicated in any mode. Does not matter the unit is in what mode (Tuner,CD, USB, etc), once a SD or MMC card is being inserted in (P.5). 3. SD/MMC SPECIFICATION * SUPPORT MAX 1G SD/MMC CARD * SUPPORT MAX 255 SONGS CAUTION 2.Please make sure to SD / MMC mode. 7. TO STOP SD/MMC...

User Manual in English Old
Page 12
Maximum number of tracks per disc : 128. - NAVIGATING THROUGH DIRECTORIES AND TRACKS There are four ways to select your favorite track/directory (1) By track Number A) Under MP3 play mode, press MP3 Menu button once, the display shows "MP3 T*", enter the desired track number directly, then press MP3 Enter button to select the desired directory. Turn the Encoder Volume knob to navigate through the directory list, press MP3 Enter button to confirm. MP3 OPERATIONS Notes : - Maximum number of directories per disc : 254. - Disc written by Packet Write (UDF) is reached. Supports Max...
Maximum number of tracks per disc : 128. - NAVIGATING THROUGH DIRECTORIES AND TRACKS There are four ways to select your favorite track/directory (1) By track Number A) Under MP3 play mode, press MP3 Menu button once, the display shows "MP3 T*", enter the desired track number directly, then press MP3 Enter button to select the desired directory. Turn the Encoder Volume knob to navigate through the directory list, press MP3 Enter button to confirm. MP3 OPERATIONS Notes : - Maximum number of directories per disc : 254. - Disc written by Packet Write (UDF) is reached. Supports Max...

User Manual in English Old
Page 13
The file name & track number of the MP3 file. ID3 TAG Press DISPLAY button repeatedly to Display ID3 TAG information. E - 11 If the MP3 file is available with ID3 TAG, pressing the display button repeatedly will show information in the following sequence: SONG TITLE > ARTIST> ALBUM TITLE If any of the ID3-TAG information is not available, pressing the DISPLAY button repeatedly will show information in the following sequence: UNKNOWN SONGNAME> UNKNOWN ARTIST> NO ALBUM TITLE If the MP3 file is without ID3 TAG, pressing the DISPLAY button, & "NO ID3 TAG" will scroll repeatedly through the...
The file name & track number of the MP3 file. ID3 TAG Press DISPLAY button repeatedly to Display ID3 TAG information. E - 11 If the MP3 file is available with ID3 TAG, pressing the display button repeatedly will show information in the following sequence: SONG TITLE > ARTIST> ALBUM TITLE If any of the ID3-TAG information is not available, pressing the DISPLAY button repeatedly will show information in the following sequence: UNKNOWN SONGNAME> UNKNOWN ARTIST> NO ALBUM TITLE If the MP3 file is without ID3 TAG, pressing the DISPLAY button, & "NO ID3 TAG" will scroll repeatedly through the...

User Manual in English Old
Page 14
... Stereo Separation S/N Ratio AM (MW) Frequency Range Intermediate Frequency Usable Sensitivity S/N Ratio GENERAL Power Supply Polarity Speaker impedance Power Output Compact disc audio system Compact disc, CD-R, CD-RW (AUDIO/MP3 format) 44.1KHz 1bit 5-20,000Hz 2 stereo 70dB 87.5 - 107.9 Mhz(USA) 87.5 - 108 Mhz(Europe) 10.7 MHz Better than 15dB...
... Stereo Separation S/N Ratio AM (MW) Frequency Range Intermediate Frequency Usable Sensitivity S/N Ratio GENERAL Power Supply Polarity Speaker impedance Power Output Compact disc audio system Compact disc, CD-R, CD-RW (AUDIO/MP3 format) 44.1KHz 1bit 5-20,000Hz 2 stereo 70dB 87.5 - 107.9 Mhz(USA) 87.5 - 108 Mhz(Europe) 10.7 MHz Better than 15dB...
User Manual in English Old
Page 15
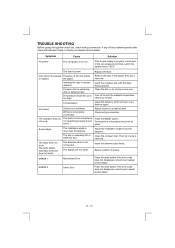
Insert the compact disc with the label facing upward. Cool off for an hour or so, then try to a desired level. No sound The operation keys do not work Volume is not operating properly due to noise. The built-in microcomputer is in minimum. Adjust the installation angle to normal. The antenna cable is extremely dirty or defective disc. The signals are too weak. Select a station manually. ERROR 2 Servo Error Press the reset button if the error code does not disappear, consult your nearest service dealer. If any of CD disc inside the car is more than 30 degrees. ...
Insert the compact disc with the label facing upward. Cool off for an hour or so, then try to a desired level. No sound The operation keys do not work Volume is not operating properly due to noise. The built-in microcomputer is in minimum. Adjust the installation angle to normal. The antenna cable is extremely dirty or defective disc. The signals are too weak. Select a station manually. ERROR 2 Servo Error Press the reset button if the error code does not disappear, consult your nearest service dealer. If any of CD disc inside the car is more than 30 degrees. ...