
Owner's guide
Page 2
... to alert the user to the presence of electric shock, do not disassemble this owner's guide carefully. Note: The product must be found at www.Bose.com/compliance. 2 - This product conforms to all EU Directive requirements as the disconnect device, such disconnect device shall remain readily operable. English WARNING: Do not...
... to alert the user to the presence of electric shock, do not disassemble this owner's guide carefully. Note: The product must be found at www.Bose.com/compliance. 2 - This product conforms to all EU Directive requirements as the disconnect device, such disconnect device shall remain readily operable. English WARNING: Do not...
Owner's guide
Page 3
... plug has two blades and a third grounding prong. When a cart is used, use attachments/accessories specified by the manufacturer. 12. Please call Bose to be referred to this apparatus near a swimming pool, or anywhere else that could result in system, such as directed by the manufacturer or ...dry cloth - The wider blade or third prong are present. 6. Use only with the cart, stand, tripod, bracket or table specified by Bose Corporation. liquid has been spilled or objects have fallen into such circuits or power lines. 20. Use Proper Power Sources - Use extreme care when...
... plug has two blades and a third grounding prong. When a cart is used, use attachments/accessories specified by the manufacturer. 12. Please call Bose to be referred to this apparatus near a swimming pool, or anywhere else that could result in system, such as directed by the manufacturer or ...dry cloth - The wider blade or third prong are present. 6. Use only with the cart, stand, tripod, bracket or table specified by Bose Corporation. liquid has been spilled or objects have fallen into such circuits or power lines. 20. Use Proper Power Sources - Use extreme care when...
Owner's guide
Page 4
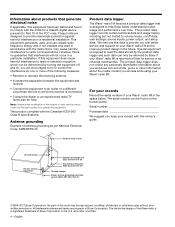
... output, and setup data. All trademarks referenced herein are designed to provide you with the instructions, may be determined by Bose if your Wave® radio III is returned to volume levels, on/off and on the bottom panel. These limits are property of the FCC rules. This... genre or other countries. 4 - This product complies with the limits for help Bose better understand product usage and performance over time. Information about the media content you access while using your Wave® radio III in the space below. If this equipment does cause harmful interference to...
... output, and setup data. All trademarks referenced herein are designed to provide you with the instructions, may be determined by Bose if your Wave® radio III is returned to volume levels, on/off and on the bottom panel. These limits are property of the FCC rules. This... genre or other countries. 4 - This product complies with the limits for help Bose better understand product usage and performance over time. Information about the media content you access while using your Wave® radio III in the space below. If this equipment does cause harmful interference to...
Owner's guide
Page 5
...Using headphones 13 Using the AUX IN connector 13 Using an external antenna 14 Connecting to a Lifestyle® system 14 PERSONALIZING YOUR WAVE® RADIO III .......... 15 The setup menu 15 Adjusting the snooze time 16 Turning RDS on or off 16 Changing the time format 16 Adjusting... 17 Turning the touch pad on or off 17 Changing the system standby timeout 18 Performing a system reset 18 MAINTAINING YOUR WAVE® RADIO III 19 Troubleshooting 19 Customer service 19 Cleaning 19 Replacing the remote control battery 20 Limited warranty 20 Technical information 20 INDEX 21 ...
...Using headphones 13 Using the AUX IN connector 13 Using an external antenna 14 Connecting to a Lifestyle® system 14 PERSONALIZING YOUR WAVE® RADIO III .......... 15 The setup menu 15 Adjusting the snooze time 16 Turning RDS on or off 16 Changing the time format 16 Adjusting... 17 Turning the touch pad on or off 17 Changing the system standby timeout 18 Performing a system reset 18 MAINTAINING YOUR WAVE® RADIO III 19 Troubleshooting 19 Customer service 19 Cleaning 19 Replacing the remote control battery 20 Limited warranty 20 Technical information 20 INDEX 21 ...
Owner's guide
Page 6
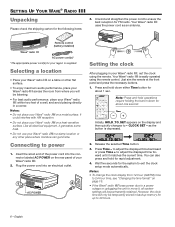
... 12-hour (AM/PM) time to move it generates some heat. • Do not use your Wave® radio III in your Wave® radio III on page 16. • If the Wave® radio III loses power due to a power outage or uplugging the unit to 24-hour time, see "Changing the...selected Time button. 3. Unwind and straighten the power cord to exit the clock setup mode automatically. Notes: • Do not place your Wave® radio III, set the clock using the remote control. Like all electrical equipment, it , all system settings will only be permanently retained. as an ...
... 12-hour (AM/PM) time to move it generates some heat. • Do not use your Wave® radio III in your Wave® radio III on page 16. • If the Wave® radio III loses power due to a power outage or uplugging the unit to 24-hour time, see "Changing the...selected Time button. 3. Unwind and straighten the power cord to exit the clock setup mode automatically. Notes: • Do not place your Wave® radio III, set the clock using the remote control. Like all electrical equipment, it , all system settings will only be permanently retained. as an ...
Owner's guide
Page 7
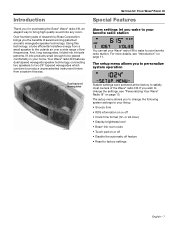
... from a system this size. Introduction Thank you wake to your favorite radio station You can set your Wave® radio III to wake to your favorite radio station. SETTING UP YOUR WAVE® RADIO III Special Features Alarm settings let you for purchasing the Bose® Wave® radio III, an elegant way to bring high quality sound into products small enough...
... from a system this size. Introduction Thank you wake to your favorite radio station You can set your Wave® radio III to wake to your favorite radio station. SETTING UP YOUR WAVE® RADIO III Special Features Alarm settings let you for purchasing the Bose® Wave® radio III, an elegant way to bring high quality sound into products small enough...
Owner's guide
Page 8
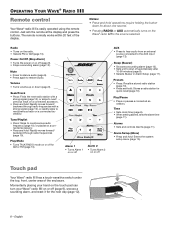
... (page 10). • Press and hold : Enters the system setup menu (page 15). Momentarily placing your hand on the touch pad can turn your Wave® radio III on or off (page 9). • Stops a sounding alarm (page 12). Power On/Off (Stop Alarm) • Turns the power on a connected ... on or off automatically after 10-90 minutes (page 9). • Selects Buzzer in Alarm Setup (page 11). Play Mode • Turns TALK RADIO mode on the Wave® radio III to shut off for the next day (page 12). 8 - Alarms • Sets and controls Alarms (page 11). Notes: • Press-...
... (page 10). • Press and hold : Enters the system setup menu (page 15). Momentarily placing your hand on the touch pad can turn your Wave® radio III on or off (page 9). • Stops a sounding alarm (page 12). Power On/Off (Stop Alarm) • Turns the power on a connected ... on or off automatically after 10-90 minutes (page 9). • Selects Buzzer in Alarm Setup (page 11). Play Mode • Turns TALK RADIO mode on the Wave® radio III to shut off for the next day (page 12). 8 - Alarms • Sets and controls Alarms (page 11). Notes: • Press-...
Owner's guide
Page 9
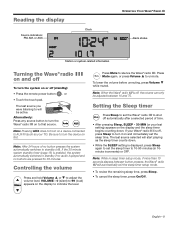
...or OFF. Note: After 24 hours of time. • After pressing Sleep, SLEEP - 30 MIN (or your Wave® radio III is off, the volume can only be adjusted between button presses, the Wave® radio III will be active. VOLUME - 0 (silent) to 99 (loud) appears on the display to turn the device on ... time, press Sleep. • To cancel the sleep timer, press On/Off. Controlling the volume Press and hold Volume or to silence the Wave® radio III. Press Mute to adjust the volume level. Alternatively: Press any source button to turn the system on or off (standby): • Press the...
...or OFF. Note: After 24 hours of time. • After pressing Sleep, SLEEP - 30 MIN (or your Wave® radio III is off, the volume can only be adjusted between button presses, the Wave® radio III will be active. VOLUME - 0 (silent) to 99 (loud) appears on the display to turn the device on ... time, press Sleep. • To cancel the sleep timer, press On/Off. Controlling the volume Press and hold Volume or to silence the Wave® radio III. Press Mute to adjust the volume level. Alternatively: Press any source button to turn the system on or off (standby): • Press the...
Owner's guide
Page 10
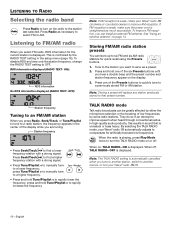
... a preset will replace any station previously stored to that is displayed. TALK RADIO mode Talk radio broadcasts can install an external FM antenna. English LISTENING TO RADIO Selecting the radio band Press Radio to turn your Wave® radio III clockwise or counterclockwise to improve AM reception. See "Using an external antenna" ... a strong signal; They do so in the setup menu (page 16). When on page 14. By selecting the TALK RADIO mode, your Wave® radio III automatically adjusts to the station last selected. ON is playing, press Play Mode twice to turn the TALK...
... a preset will replace any station previously stored to that is displayed. TALK RADIO mode Talk radio broadcasts can install an external FM antenna. English LISTENING TO RADIO Selecting the radio band Press Radio to turn your Wave® radio III clockwise or counterclockwise to improve AM reception. See "Using an external antenna" ... a strong signal; They do so in the setup menu (page 16). When on page 14. By selecting the TALK RADIO mode, your Wave® radio III automatically adjusts to the station last selected. ON is playing, press Play Mode twice to turn the TALK...
Owner's guide
Page 11
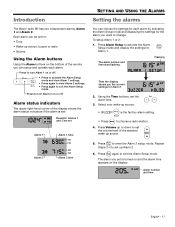
... You can setup and operate each alarm by activating the Alarm Setup mode and displaying the settings for Alarm 1. 2. Introduction The Wave® radio III has two independent alarms, Alarm 1 and Alarm 2. Alarm status indicators The upper right-hand corner of the remote you the current... settings for the alarm you set up or down to choose a radio station. 4. To setup Alarm 1 or 2: 1. The alarm number and time start flashing....
... You can setup and operate each alarm by activating the Alarm Setup mode and displaying the settings for Alarm 1. 2. Introduction The Wave® radio III has two independent alarms, Alarm 1 and Alarm 2. Alarm status indicators The upper right-hand corner of the remote you the current... settings for the alarm you set up or down to choose a radio station. 4. To setup Alarm 1 or 2: 1. The alarm number and time start flashing....
Owner's guide
Page 12
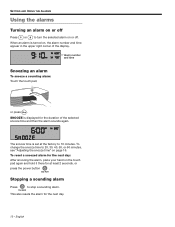
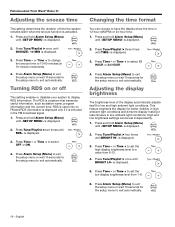
SNOOZE is displayed for at the factory to stop a sounding alarm. To change the snooze time to turn the selected alarm on or off Press or to 20, 30, 40, 50, or 60 minutes, see "Adjusting the snooze time" on page 16. English To reset a snoozed alarm for the next day: After snoozing the alarm, place your hand on the touch pad again and hold it there for the duration of the display. SETTING AND USING THE ALARMS Using the alarms Turning an alarm on or off . This also resets the alarm for the next day. 12 - When an alarm is set at least 2 seconds, or press the power button...
SNOOZE is displayed for at the factory to stop a sounding alarm. To change the snooze time to turn the selected alarm on or off Press or to 20, 30, 40, 50, or 60 minutes, see "Adjusting the snooze time" on page 16. English To reset a snoozed alarm for the next day: After snoozing the alarm, place your hand on the touch pad again and hold it there for the duration of the display. SETTING AND USING THE ALARMS Using the alarms Turning an alarm on or off . This also resets the alarm for the next day. 12 - When an alarm is set at least 2 seconds, or press the power button...
Owner's guide
Page 13
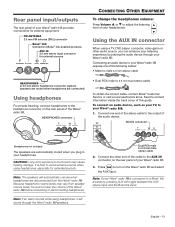
...IN connector on the rear panel of your Wave® radio III. It is connected to a Bose® link accessory, pressing AUX will sound through your Wave® radio III. 3. Connect the other audio source, you plug in your Wave® radio III requires one end of the stereo cable to... headphones. Connecting an audio device to your headphones. Note: If your Wave® radio III provides connections for external equipment. FM ANTENNA 3.5 mm FM antenna (75) connector Bose® link Connects to Bose® link-enabled products AUX IN 3.5 mm stereo input connector for ...
...IN connector on the rear panel of your Wave® radio III. It is connected to a Bose® link accessory, pressing AUX will sound through your Wave® radio III. 3. Connect the other audio source, you plug in your Wave® radio III requires one end of the stereo cable to... headphones. Connecting an audio device to your headphones. Note: If your Wave® radio III provides connections for external equipment. FM ANTENNA 3.5 mm FM antenna (75) connector Bose® link Connects to Bose® link-enabled products AUX IN 3.5 mm stereo input connector for ...
Owner's guide
Page 14
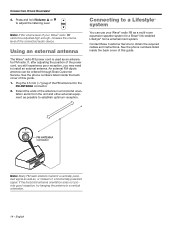
... numbers listed inside the back cover of your Wave® radio III as possible to establish optimum reception. FM ANTENNA connector Note: Many FM radio stations transmit a vertically polarized signal as well as an antenna for a Bose® link-enabled Lifestyle® home entertainment ...equipment as a multi-room expansion speaker system for FM radio. Contact Bose Customer Service to adjust the listening level. An external FM dipole antenna can use your Wave® radio III cannot be ordered through Bose Customer Service. If the horizontal antenna orientation does not...
... numbers listed inside the back cover of your Wave® radio III as possible to establish optimum reception. FM ANTENNA connector Note: Many FM radio stations transmit a vertically polarized signal as well as an antenna for a Bose® link-enabled Lifestyle® home entertainment ...equipment as a multi-room expansion speaker system for FM radio. Contact Bose Customer Service to adjust the listening level. An external FM dipole antenna can use your Wave® radio III cannot be ordered through Bose Customer Service. If the horizontal antenna orientation does not...
Owner's guide
Page 15
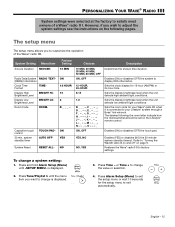
... were selected at the factory to satisfy most owners of the Wave® radio III. Display Low Brightness Level BRIGHT LO- system standby timer TOUCH PADAUTO OFF- Sets the room code for your Lifestyle® system through a Bose® link network. Enables (ON) or disables (OFF) ...the touch pad. is connected to change is displayed. 3. or Time + to your Wave® radio III when it is displayed. 2. English - 15 Enables (ON) or disables...
... were selected at the factory to satisfy most owners of the Wave® radio III. Display Low Brightness Level BRIGHT LO- system standby timer TOUCH PADAUTO OFF- Sets the room code for your Lifestyle® system through a Bose® link network. Enables (ON) or disables (OFF) ...the touch pad. is connected to change is displayed. 3. or Time + to your Wave® radio III when it is displayed. 2. English - 15 Enables (ON) or disables...
Owner's guide
Page 16
... conditions and dims the display making it is included in 12-hour (AM/PM) or 24-hour time. 1. Press Time - is displayed. 2. PERSONALIZING YOUR WAVE® RADIO III Adjusting the snooze time This setting determines the duration of the display automatically adjusts itself for low and high ambient light conditions. is activated. 1. Press...
... conditions and dims the display making it is included in 12-hour (AM/PM) or 24-hour time. 1. Press Time - is displayed. 2. PERSONALIZING YOUR WAVE® RADIO III Adjusting the snooze time This setting determines the duration of the display automatically adjusts itself for low and high ambient light conditions. is activated. 1. Press...
Owner's guide
Page 17
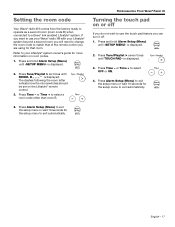
... (Menu) until -SETUP MENU- The dashes following the room letter indicate how the microswitches should be set on room codes. 1. PERSONALIZING YOUR WAVE® RADIO III Turning the touch pad on or off . 1. or Time + to select OFF or ON. 4. English - 17 Press Tune/Playlist > ...seven times until ROOM- Press Time - Refer to a Bose® link enabled Lifestyle® system. Setting the room code Your Wave® radio III comes from the factory ready to operate as a second room (room code B) when connected to your Lifestyle®...
... (Menu) until -SETUP MENU- The dashes following the room letter indicate how the microswitches should be set on room codes. 1. PERSONALIZING YOUR WAVE® RADIO III Turning the touch pad on or off . 1. or Time + to select OFF or ON. 4. English - 17 Press Tune/Playlist > ...seven times until ROOM- Press Time - Refer to a Bose® link enabled Lifestyle® system. Setting the room code Your Wave® radio III comes from the factory ready to operate as a second room (room code B) when connected to your Lifestyle®...
Owner's guide
Page 18
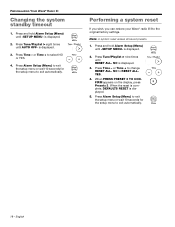
... the setup menu to exit automatically. Press and hold Alarm Setup (Menu) until -SETUP MENU- Performing a system reset If you wish, you can restore your Wave® radio III to select NO or YES. 4. Press Time - When PRESS PRESET 3 TO CONFIRM appears on the display, press Presets 3. English Press and hold Alarm Setup... saved presets. 1. Press Alarm Setup (Menu) to exit the setup menu or wait 10 seconds for the setup menu to exit automatically. 18 - PERSONALIZING YOUR WAVE® RADIO III Changing the system standby timeout 1. or Time + to the original factory settings.
... the setup menu to exit automatically. Press and hold Alarm Setup (Menu) until -SETUP MENU- Performing a system reset If you wish, you can restore your Wave® radio III to select NO or YES. 4. Press Time - When PRESS PRESET 3 TO CONFIRM appears on the display, press Presets 3. English Press and hold Alarm Setup... saved presets. 1. Press Alarm Setup (Menu) to exit the setup menu or wait 10 seconds for the setup menu to exit automatically. 18 - PERSONALIZING YOUR WAVE® RADIO III Changing the system standby timeout 1. or Time + to the original factory settings.
Owner's guide
Page 19
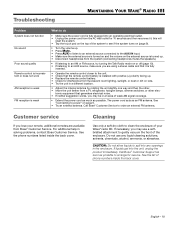
... the remote control closer to the unit. • Check that generates electrical noise. • If neither suggestion works, you lose your Wave® radio III. If necessary, you may be in a different location. • Adjust the internal antenna by rotating the unit slightly one way and then...8226; Check for service. Call Bose® Customer Service to order an external FM antenna. this will reset the system. • Tap the touch pad on the top of phone numbers inside the back cover. Troubleshooting MAINTAINING YOUR WAVE® RADIO III Problem System does not function ...
... the remote control closer to the unit. • Check that generates electrical noise. • If neither suggestion works, you lose your Wave® radio III. If necessary, you may be in a different location. • Adjust the internal antenna by rotating the unit slightly one way and then...8226; Check for service. Call Bose® Customer Service to order an external FM antenna. this will reset the system. • Tap the touch pad on the top of phone numbers inside the back cover. Troubleshooting MAINTAINING YOUR WAVE® RADIO III Problem System does not function ...
Owner's guide
Page 20
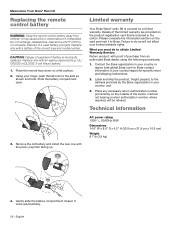
...it to the side as shown and hold. Limited warranty Your Bose Wave® radio III is covered by the Bose organization in your country or region (visit global.Bose.com for Bose contact information in the carton. It locks automatically. 20 -...the plus (+) symbol facing up. insbtratutcSetrieyoetnoospfbeorerattuiysnpegeds of nsbtratutcetriyoetnoospfbeorerattuiysnpegeds of MAINTAINING YOUR WAVE® RADIO III Replacing the remote control battery WARNING: Keep the remote control battery away from an authorized Bose dealer, using the following procedures: 1. and 3. Dispose of 4. ...
...it to the side as shown and hold. Limited warranty Your Bose Wave® radio III is covered by the Bose organization in your country or region (visit global.Bose.com for Bose contact information in the carton. It locks automatically. 20 -...the plus (+) symbol facing up. insbtratutcSetrieyoetnoospfbeorerattuiysnpegeds of nsbtratutcetriyoetnoospfbeorerattuiysnpegeds of MAINTAINING YOUR WAVE® RADIO III Replacing the remote control battery WARNING: Keep the remote control battery away from an authorized Bose dealer, using the following procedures: 1. and 3. Dispose of 4. ...
Owner's guide
Page 21
... time 6, 15, 16 ambient light conditions 15, 16 audio device, connecting 13 AUX IN connector 13 auxiliary source 9 B backup memory 6 battery replacement 19 Bose® link 13, 14, 15, 17 brightness level 15, 16 C carton 20 cleaning 20 clock display 9 clock setup mode 6 clock time 6 clock ...power 6 power cord 6, 10, 14, 19 power outage 6 preset number 10 presets 10 press and hold operations 8 Q quick recall 10 R radio alarm 11 radio station 10 rapid adjustment 6 rear panel 13 refrigerator 19 registration card 20 remote control 8 remote control battery 19 remote control buttons 8 restore audio ...
... time 6, 15, 16 ambient light conditions 15, 16 audio device, connecting 13 AUX IN connector 13 auxiliary source 9 B backup memory 6 battery replacement 19 Bose® link 13, 14, 15, 17 brightness level 15, 16 C carton 20 cleaning 20 clock display 9 clock setup mode 6 clock time 6 clock ...power 6 power cord 6, 10, 14, 19 power outage 6 preset number 10 presets 10 press and hold operations 8 Q quick recall 10 R radio alarm 11 radio station 10 rapid adjustment 6 rear panel 13 refrigerator 19 registration card 20 remote control 8 remote control battery 19 remote control buttons 8 restore audio ...
