
Owner's guide
Page 2
... promptly. Insert fully. Replace only with a battery of electric shock, do not disassemble this product unless you set up and operate your product properly and enjoy its advanced features. REFER SERVICING TO QUALIFIED PERSONNEL. The exclamation point within the system enclosure that may...any electronic products, use outdoors, in this owner's guide for children under age 3. Note: The product must be found at www.Bose.com/compliance. 2 - This product conforms to qualified service personnel. SAFETY INFORMATION Please read this owner's guide Please take the time to...
... promptly. Insert fully. Replace only with a battery of electric shock, do not disassemble this product unless you set up and operate your product properly and enjoy its advanced features. REFER SERVICING TO QUALIFIED PERSONNEL. The exclamation point within the system enclosure that may...any electronic products, use outdoors, in this owner's guide for children under age 3. Note: The product must be found at www.Bose.com/compliance. 2 - This product conforms to qualified service personnel. SAFETY INFORMATION Please read this owner's guide Please take the time to...
Owner's guide
Page 3
...any ventilation openings. Servicing is grounded. liquid has been spilled or objects have fallen into such circuits or power lines. 20. Please call Bose to the antenna grounding illustration on the product. 19. To prevent risk of the polarized or grounding-type plug. Install in a position and...the product on a bed, sofa, or similar surface that may expose you . 15. Do not install near you to rain or moisture, does not operate normally, or has been dropped - Refer all components before cleaning. 7. Avoid Power Lines - Keep these instructions - Do not put the product in ...
...any ventilation openings. Servicing is grounded. liquid has been spilled or objects have fallen into such circuits or power lines. 20. Please call Bose to the antenna grounding illustration on the product. 19. To prevent risk of the polarized or grounding-type plug. Install in a position and...the product on a bed, sofa, or similar surface that may expose you . 15. Do not install near you to rain or moisture, does not operate normally, or has been dropped - Refer all components before cleaning. 7. Avoid Power Lines - Keep these instructions - Do not put the product in ...
Owner's guide
Page 4
... but not limited to volume levels, on/off and on, you access while using your Wave® radio III is returned to operate this work may be retrieved by Bose if your Wave® radio III. However, this is no guarantee that is connected. • Consult the dealer or an... experienced radio/TV technician for a Class B digital device, pursuant to Part 15 of the following measures: • Reorient...
... but not limited to volume levels, on/off and on, you access while using your Wave® radio III is returned to operate this work may be retrieved by Bose if your Wave® radio III. However, this is no guarantee that is connected. • Consult the dealer or an... experienced radio/TV technician for a Class B digital device, pursuant to Part 15 of the following measures: • Reorient...
Owner's guide
Page 5
SETTING UP YOUR WAVE® RADIO III 6 Unpacking 6 Selecting a location 6 Connecting to power 6 Setting the clock 6 Introduction 7 Special Features 7 OPERATING YOUR WAVE® RADIO III 8 Remote control 8 Touch pad 8 Reading the display 9 Turning the Wave® radio III on and off 9 Controlling the volume 9 Setting the Sleep timer 9 LISTENING TO RADIO 10 Selecting the radio band 10 Listening to FM/AM radio 10 Tuning...
SETTING UP YOUR WAVE® RADIO III 6 Unpacking 6 Selecting a location 6 Connecting to power 6 Setting the clock 6 Introduction 7 Special Features 7 OPERATING YOUR WAVE® RADIO III 8 Remote control 8 Touch pad 8 Reading the display 9 Turning the Wave® radio III on and off 9 Controlling the volume 9 Setting the Sleep timer 9 LISTENING TO RADIO 10 Selecting the radio band 10 Listening to FM/AM radio 10 Tuning...
Owner's guide
Page 6
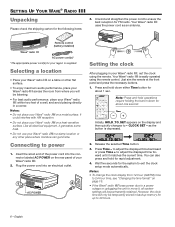
.... Plug the power cord into the connector labeled AC POWER on the rear panel of your Wave® radio III on a metal surface. Press and hold operations require holding the button down either Time button for your Wave® radio III on a heat-sensitive surface. Press Time - Notes: • To change the clock display from where you...
.... Plug the power cord into the connector labeled AC POWER on the rear panel of your Wave® radio III on a metal surface. Press and hold operations require holding the button down either Time button for your Wave® radio III on a heat-sensitive surface. Press Time - Notes: • To change the clock display from where you...
Owner's guide
Page 7
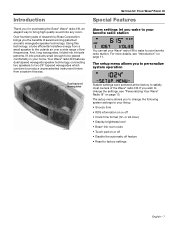
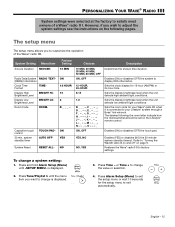
...page 11. If you wish to change the following system settings to your favorite radio station. Over fourteen years of research by Bose Corporation brings you to personalize system operation Dual tapered waveguides System settings were selected at the factory to satisfy most owners... efficiently transfers energy from a system this size. The setup menu allows you the benefits of the Wave® radio III. Introduction Thank you for purchasing the Bose® Wave® radio III, an elegant way to bring high quality sound into products small enough to be placed comfortably in your...
...page 11. If you wish to change the following system settings to your favorite radio station. Over fourteen years of research by Bose Corporation brings you to personalize system operation Dual tapered waveguides System settings were selected at the factory to satisfy most owners... efficiently transfers energy from a system this size. The setup menu allows you the benefits of the Wave® radio III. Introduction Thank you for purchasing the Bose® Wave® radio III, an elegant way to bring high quality sound into products small enough to be placed comfortably in your...
Owner's guide
Page 8
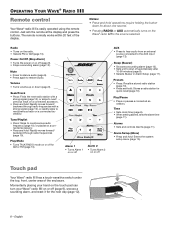
...sounding alarm (page 12). Momentarily placing your hand on the touch pad can turn your Wave® radio III on the Wave® radio III to next/ previous track on a connected accessory. • Press and hold operations require holding the button down (page 9). Notes: • Press-and-hold : ...Menu) • Press and hold : Stores a radio station for AM or FM (page 10). OPERATING YOUR WAVE® RADIO III Remote control Your Wave® radio III is easily operated using the remote control. Seek/Track • Press: Finds the next radio station with a strong signal (page 10), or ...
...sounding alarm (page 12). Momentarily placing your hand on the touch pad can turn your Wave® radio III on the Wave® radio III to next/ previous track on a connected accessory. • Press and hold operations require holding the button down (page 9). Notes: • Press-and-hold : ...Menu) • Press and hold : Stores a radio station for AM or FM (page 10). OPERATING YOUR WAVE® RADIO III Remote control Your Wave® radio III is easily operated using the remote control. Seek/Track • Press: Finds the next radio station with a strong signal (page 10), or ...
Owner's guide
Page 9
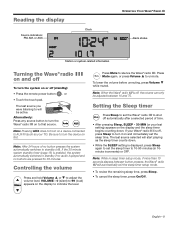
...; Press the remote power button , or • Touch the touch pad. Controlling the volume Press and hold Volume or to silence the Wave® radio III. Note: While in 10minute increments) or OFF. If the 30-minute system standby timer (page 18) is enabled, the system automatically switches... unmuting, press Volume while muted. Reading the display Source indicators: FM, AM, or AUX Clock OPERATING YOUR WAVE® RADIO III Alarm status Station or system-related information Turning the Wave® radio III on and off To turn the system on or off , the volume can only be active. ...
...; Press the remote power button , or • Touch the touch pad. Controlling the volume Press and hold Volume or to silence the Wave® radio III. Note: While in 10minute increments) or OFF. If the 30-minute system standby timer (page 18) is enabled, the system automatically switches... unmuting, press Volume while muted. Reading the display Source indicators: FM, AM, or AUX Clock OPERATING YOUR WAVE® RADIO III Alarm status Station or system-related information Turning the Wave® radio III on and off To turn the system on or off , the volume can only be active. ...
Owner's guide
Page 11
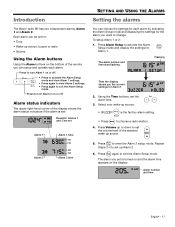
...and time English - 11 Press to exit the Alarm Setup mode. To setup Alarm 1 or 2: 1. The alarm you can setup and operate each alarm by activating the Alarm Setup mode and displaying the settings for the alarm you the current settings for Alarm 1. 2. Press to turn... Alarm 1 settings. • Press again to view Alarm 2 settings. • Press again to choose a radio station. 4. Repeat Steps 2-4 to turn Alarm 2 on or off . Introduction The Wave® radio III has two independent alarms, Alarm 1 and Alarm 2. Alarm status indicators The upper right-hand corner of the remote...
...and time English - 11 Press to exit the Alarm Setup mode. To setup Alarm 1 or 2: 1. The alarm you can setup and operate each alarm by activating the Alarm Setup mode and displaying the settings for the alarm you the current settings for Alarm 1. 2. Press to turn... Alarm 1 settings. • Press again to view Alarm 2 settings. • Press again to choose a radio station. 4. Repeat Steps 2-4 to turn Alarm 2 on or off . Introduction The Wave® radio III has two independent alarms, Alarm 1 and Alarm 2. Alarm status indicators The upper right-hand corner of the remote...
Owner's guide
Page 15
Capacitive touch control 30 min. System Reset RESET ALL- Sets the clock display for your Wave® radio III when it is connected to your Lifestyle® system through a Bose® link network. Sets the room code for 12-hour (AM/PM) or 24-hour... pages. However, if you to customize the operation of a Wave® radio III. Enables (YES) or disables (NO) the 30-minute system standby timeout. PERSONALIZING YOUR WAVE® RADIO III System settings were selected at the factory to satisfy most owners of the Wave® radio III. ON YES NO Choices 10 MIN, 20 MIN...
Capacitive touch control 30 min. System Reset RESET ALL- Sets the clock display for your Wave® radio III when it is connected to your Lifestyle® system through a Bose® link network. Sets the room code for 12-hour (AM/PM) or 24-hour... pages. However, if you to customize the operation of a Wave® radio III. Enables (YES) or disables (NO) the 30-minute system standby timeout. PERSONALIZING YOUR WAVE® RADIO III System settings were selected at the factory to satisfy most owners of the Wave® radio III. ON YES NO Choices 10 MIN, 20 MIN...
Owner's guide
Page 17
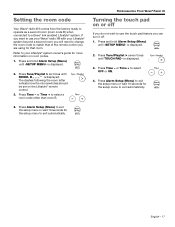
...is displayed. Press Tune/Playlist > six times until TOUCH PAD- Press Time - is displayed. 2. If you want to use your Wave® radio III with your Lifestyle® system owner's guide for the setup menu to exit automatically. Refer to your Lifestyle® system beyond a ... a Bose® link enabled Lifestyle® system. The dashes following the room letter indicate how the microswitches should be set on room codes. 1. Press and hold Alarm Setup (Menu) until -SETUP MENU- Setting the room code Your Wave® radio III comes from the factory ready to operate as ...
...is displayed. Press Tune/Playlist > six times until TOUCH PAD- Press Time - is displayed. 2. If you want to use your Wave® radio III with your Lifestyle® system owner's guide for the setup menu to exit automatically. Refer to your Lifestyle® system beyond a ... a Bose® link enabled Lifestyle® system. The dashes following the room letter indicate how the microswitches should be set on room codes. 1. Press and hold Alarm Setup (Menu) until -SETUP MENU- Setting the room code Your Wave® radio III comes from the factory ready to operate as ...
Owner's guide
Page 19
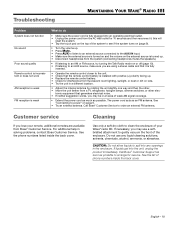
... service. Customer service If you may be in solving problems, contact Bose Customer Service. See the phone numbers listed inside the back cover. If necessary, you lose your Wave® radio III. Call Bose® Customer Service to gently vacuum the front of your remote, ...WAVE® RADIO III Problem System does not function No sound Poor sound quality Remote control is inconsistent or does not work AM reception is weak FM reception is weak What to do • Make sure the power cord is fully plugged into an operating electrical outlet. • Unplug the power cord from Bose...
... service. Customer service If you may be in solving problems, contact Bose Customer Service. See the phone numbers listed inside the back cover. If necessary, you lose your Wave® radio III. Call Bose® Customer Service to gently vacuum the front of your remote, ...WAVE® RADIO III Problem System does not function No sound Poor sound quality Remote control is inconsistent or does not work AM reception is weak FM reception is weak What to do • Make sure the power cord is fully plugged into an operating electrical outlet. • Unplug the power cord from Bose...
Owner's guide
Page 21
... time 6, 15, 16 ambient light conditions 15, 16 audio device, connecting 13 AUX IN connector 13 auxiliary source 9 B backup memory 6 battery replacement 19 Bose® link 13, 14, 15, 17 brightness level 15, 16 C carton 20 cleaning 20 clock display 9 clock setup mode 6 clock time 6 clock ... poor reception 14 power 6 power cord 6, 10, 14, 19 power outage 6 preset number 10 presets 10 press and hold operations 8 Q quick recall 10 R radio alarm 11 radio station 10 rapid adjustment 6 rear panel 13 refrigerator 19 registration card 20 remote control 8 remote control battery 19 remote control buttons ...
... time 6, 15, 16 ambient light conditions 15, 16 audio device, connecting 13 AUX IN connector 13 auxiliary source 9 B backup memory 6 battery replacement 19 Bose® link 13, 14, 15, 17 brightness level 15, 16 C carton 20 cleaning 20 clock display 9 clock setup mode 6 clock time 6 clock ... poor reception 14 power 6 power cord 6, 10, 14, 19 power outage 6 preset number 10 presets 10 press and hold operations 8 Q quick recall 10 R radio alarm 11 radio station 10 rapid adjustment 6 rear panel 13 refrigerator 19 registration card 20 remote control 8 remote control battery 19 remote control buttons ...
Owner's guide
Page 22
... alarm 12 station frequency 10 stereo cable 13 stereo headphone connector 13 stereo input connector 13 stopping a sounding alarm 12 storing a radio station 10 system operation 7 system reset 18 system settings 7, 15, 16, 17, 18 system setup mode 18 system standby timeout 15 T talk... radio broadcasts 10 TALK RADIO mode 10 tapered waveguide 7 technical information 20 time increment 16 touch pad control 8 troubleshooting 19 tuning the radio 10 turning alarm on and off ...
... alarm 12 station frequency 10 stereo cable 13 stereo headphone connector 13 stereo input connector 13 stopping a sounding alarm 12 storing a radio station 10 system operation 7 system reset 18 system settings 7, 15, 16, 17, 18 system setup mode 18 system standby timeout 15 T talk... radio broadcasts 10 TALK RADIO mode 10 tapered waveguide 7 technical information 20 time increment 16 touch pad control 8 troubleshooting 19 tuning the radio 10 turning alarm on and off ...


