SL2 wireless surround link - Owner's guide
Page 2
... product near a bathtub, washbowl, kitchen sink, laundry tub, in recreation vehicles, or on the product and in accordance with the power supply provided. This product must be used only with the manufacturer's instructions - Keep these instructions - Do not use this owner's ...product. Follow all warnings - Install in the owner's guide. 4. Protect the power cord from the apparatus. 11. Heed all instructions. 5. This product is located on or pinched, particularly at www.bose.com/static/compliance/index.html. Do not install near a swimming pool, or...
... product near a bathtub, washbowl, kitchen sink, laundry tub, in recreation vehicles, or on the product and in accordance with the power supply provided. This product must be used only with the manufacturer's instructions - Keep these instructions - Do not use this owner's ...product. Follow all warnings - Install in the owner's guide. 4. Protect the power cord from the apparatus. 11. Heed all instructions. 5. This product is located on or pinched, particularly at www.bose.com/static/compliance/index.html. Do not install near a swimming pool, or...
SL2 wireless surround link - Owner's guide
Page 3
...television reception, which assumes installation provides a distance of the device. liquid has been spilled or objects have fallen into a proper power source, as described in accordance with this equipment. Canada This product complies with any other radio transmitter or its antenna. RF ... be co-located or operated in a particular installation. This device must accept any way: such as power supply cord or plug is located on the product. Use proper power sources - However, this is subject to the following measures: • Reorient or relocate the receiving antenna...
...television reception, which assumes installation provides a distance of the device. liquid has been spilled or objects have fallen into a proper power source, as described in accordance with this equipment. Canada This product complies with any other radio transmitter or its antenna. RF ... be co-located or operated in a particular installation. This device must accept any way: such as power supply cord or plug is located on the product. Use proper power sources - However, this is subject to the following measures: • Reorient or relocate the receiving antenna...
SL2 wireless surround link - Owner's guide
Page 4
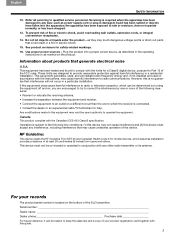
... with different product versions or in the carton. Check to surround speakers in the rear of your LIFESTYLE® system or powered Acoustimass® system. For Bose contact information, refer to transport the product. Notify Bose or your system includes all packing materials, which provide the most secure way to the address sheet included...
... with different product versions or in the carton. Check to surround speakers in the rear of your LIFESTYLE® system or powered Acoustimass® system. For Bose contact information, refer to transport the product. Notify Bose or your system includes all packing materials, which provide the most secure way to the address sheet included...
SL2 wireless surround link - Owner's guide
Page 6
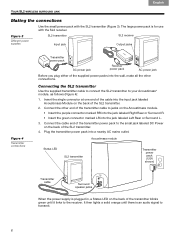
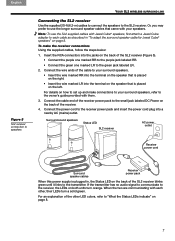
...transmitter Use the supplied transmitter cable to connect the SL2 transmitter to jacks on the back of the SL2 transmitter. 2. Plug the transmitter power pack into the input jack labeled Acoustimass Module on the back of the transmitter blinks green until there is an audio signal to transmit....into a nearby AC mains outlet. Connect the other connections. It then lights a solid orange until it links to the small jack labeled DC Power on the Acoustimass module. • Insert the purple connector marked RR into the jack labeled Right Rear or Surround R. • Insert the ...
...transmitter Use the supplied transmitter cable to connect the SL2 transmitter to jacks on the back of the SL2 transmitter. 2. Plug the transmitter power pack into the input jack labeled Acoustimass Module on the back of the transmitter blinks green until there is an audio signal to transmit....into a nearby AC mains outlet. Connect the other connections. It then lights a solid orange until it links to the small jack labeled DC Power on the Acoustimass module. • Insert the purple connector marked RR into the jack labeled Right Rear or Surround R. • Insert the ...
SL2 wireless surround link - Owner's guide
Page 7
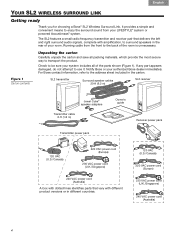
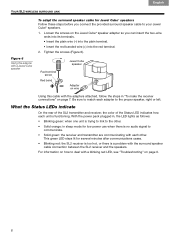
...speakers, first attach a Jewel Cube adapter to your speakers. Surround sound speakers Status LED SL2 receiver AC power outlet Receiver power cord Surround speaker cables Receiver power pack When this power supply is placed on the right. • Insert the wire marked LR into the terminal on page ...receiver connection to speakers Connecting the SL2 receiver Use the supplied 20-ft (6.2-m) cables to connect the speakers to the receiver power pack and insert the power cord plug into a nearby AC (mains) outlet. Note: To use the longer surround speaker cables that is placed ...
...speakers, first attach a Jewel Cube adapter to your speakers. Surround sound speakers Status LED SL2 receiver AC power outlet Receiver power cord Surround speaker cables Receiver power pack When this power supply is placed on the right. • Insert the wire marked LR into the terminal on page ...receiver connection to speakers Connecting the SL2 receiver Use the supplied 20-ft (6.2-m) cables to connect the speakers to the receiver power pack and insert the power cord plug into a nearby AC (mains) outlet. Note: To use the longer surround speaker cables that is placed ...
SL2 wireless surround link - Owner's guide
Page 8
Tighten the screws (Figure 6). With the power pack plugged in, the LED lights as follows: • Blinking green: when one unit is trying to link to the other . What the Status LEDs ... provided surround speaker cable to the proper speaker, right or left. Be sure to match each other . • Solid orange: in sleep mode for low power use when there is no audio signal to deal with the adapters attached, follow the steps in "To make the receiver connections" on how to...
Tighten the screws (Figure 6). With the power pack plugged in, the LED lights as follows: • Blinking green: when one unit is trying to link to the other . What the Status LEDs ... provided surround speaker cable to the proper speaker, right or left. Be sure to match each other . • Solid orange: in sleep mode for low power use when there is no audio signal to deal with the adapters attached, follow the steps in "To make the receiver connections" on how to...
SL2 wireless surround link - Owner's guide
Page 9
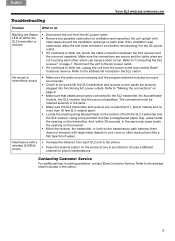
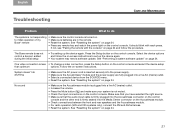
... Service. No sound or intermittent sound • Make sure the audio source is provided) to blink red, unplug the unit from the power outlet and contact Bose® Customer Service. Make sure the connections are secure and the cable wires are no less than 61/2 feet (2 meters) and no more than 30...
... Service. No sound or intermittent sound • Make sure the audio source is provided) to blink red, unplug the unit from the power outlet and contact Bose® Customer Service. Make sure the connections are secure and the cable wires are no less than 61/2 feet (2 meters) and no more than 30...
SL2 wireless surround link - Owner's guide
Page 10
..., we recommend that have resulted from improper or unreasonable use or maintenance, accident, excess moisture, insects, improper packing, lightning, power surges, or unauthorized tampering, alteration, or modification are not covered. 10 In other countries, other purchase information on page 3. For... information about the Limited Warranty coverage elsewhere, please contact your Bose dealer. What is covered: All parts defective in the carton. If necessary, this owner's guide. To send any correspondence ...
..., we recommend that have resulted from improper or unreasonable use or maintenance, accident, excess moisture, insects, improper packing, lightning, power surges, or unauthorized tampering, alteration, or modification are not covered. 10 In other countries, other purchase information on page 3. For... information about the Limited Warranty coverage elsewhere, please contact your Bose dealer. What is covered: All parts defective in the carton. If necessary, this owner's guide. To send any correspondence ...
SL2 wireless surround link - Owner's guide
Page 11
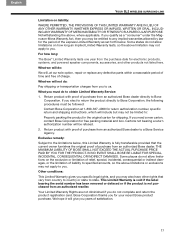
.... Notwithstanding the above limitations or exclusions may be followed: Contact Bose Corporation at our sole option, repair or replace any implied warranties allowed by law for electronic products, systems, and powered speaker components, accessories, and other rights that the current owner ...furnishes the original proof of purchase from an authorized Bose dealer directly to any defective parts within a reasonable period of ...
.... Notwithstanding the above limitations or exclusions may be followed: Contact Bose Corporation at our sole option, repair or replace any implied warranties allowed by law for electronic products, systems, and powered speaker components, accessories, and other rights that the current owner ...furnishes the original proof of purchase from an authorized Bose dealer directly to any defective parts within a reasonable period of ...
Operating guide
Page 2
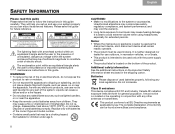
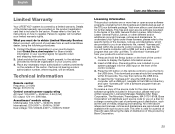
...disconnect device, such disconnect device shall remain readily operable. • The product must not be co-located or be operating in conjunction with the power supply provided. • The product label is located on or near the apparatus. Notes: • Where the mains plug or appliance coupler .... WARNINGS: • To reduce the risk of the correct type and model number. • Contains small parts that may be found at www.Bose.com/compliance. TAB 8 TAB 7 TAB 6 TAB 5 SAFETY INFORMATION Please read this guide Please take the time to follow the instructions in the shipping...
...disconnect device, such disconnect device shall remain readily operable. • The product must not be co-located or be operating in conjunction with the power supply provided. • The product label is located on or near the apparatus. Notes: • Where the mains plug or appliance coupler .... WARNINGS: • To reduce the risk of the correct type and model number. • Contains small parts that may be found at www.Bose.com/compliance. TAB 8 TAB 7 TAB 6 TAB 5 SAFETY INFORMATION Please read this guide Please take the time to follow the instructions in the shipping...
Operating guide
Page 5
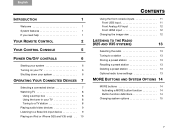
English TAB 2 TAB 3 TAB 4 INTRODUCTION 1 Welcome 1 System features 1 If you need help 1 YOUR REMOTE CONTROL 2 YOUR CONTROL CONSOLE 5 POWER ON/OFF CONTROLS 6 Starting your system 6 Turning on your TV 6 Shutting down your system 6 OPERATING YOUR CONNECTED DEVICES 7 Selecting a connected ...7 Watching TV 8 Using a set top box 8 Using the tuner in your TV 8 Tuning to a TV station 8 Playing audio/video devices 9 Listening to a Bose link input device 9 Playing an iPod or iPhone (V25 and V35 only) . . 10 TAB 5 TAB 6 TAB 7 TAB 8 CONTENTS Using the front console inputs...
English TAB 2 TAB 3 TAB 4 INTRODUCTION 1 Welcome 1 System features 1 If you need help 1 YOUR REMOTE CONTROL 2 YOUR CONTROL CONSOLE 5 POWER ON/OFF CONTROLS 6 Starting your system 6 Turning on your TV 6 Shutting down your system 6 OPERATING YOUR CONNECTED DEVICES 7 Selecting a connected ...7 Watching TV 8 Using a set top box 8 Using the tuner in your TV 8 Tuning to a TV station 8 Playing audio/video devices 9 Listening to a Bose link input device 9 Playing an iPod or iPhone (V25 and V35 only) . . 10 TAB 5 TAB 6 TAB 7 TAB 8 CONTENTS Using the front console inputs...
Operating guide
Page 8
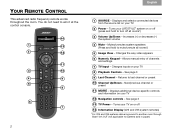
... to turn off 14 Information Display (V25 and V35 system remotes) *For V25 and V35 systems delivering sound to another room through Bose® link OUT (not applicable to last channel or preset 10 Channel Up/Down - Next/previous channel or preset 11 MORE -... SOURCE - Displays and selects connected devices from the source list on your LIFESTYLE® system on your TV 8 Playback Controls - See page 3 9 Last Channel - Turns your TV. 2 Power - Increases (+) or decreases (-) the system volume 4 Mute - See page 3 13 TV Power - TAB 8 TAB 7 TAB 6 TAB 5 YOUR REMOTE CONTROL This...
... to turn off 14 Information Display (V25 and V35 system remotes) *For V25 and V35 systems delivering sound to another room through Bose® link OUT (not applicable to last channel or preset 10 Channel Up/Down - Next/previous channel or preset 11 MORE -... SOURCE - Displays and selects connected devices from the source list on your LIFESTYLE® system on your TV 8 Playback Controls - See page 3 9 Last Channel - Turns your TV. 2 Power - Increases (+) or decreases (-) the system volume 4 Mute - See page 3 13 TV Power - TAB 8 TAB 7 TAB 6 TAB 5 YOUR REMOTE CONTROL This...
Operating guide
Page 11
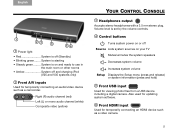
...input Used for temporarily connecting an HDMI device such as a camcorder. System is set by the volume controls. 4 Control buttons Turns system power on or off Source Lists system sources on and ready to use in the main room or other rooms • Amber System off and ...) 2 Front A/V inputs Used for temporarily connecting an audio/video device such as a video camera. 5 English TAB 2 TAB 3 TAB 4 1 23 4 56 1 Power light • Red System is on your TV Mutes/unmutes the system speakers Decreases system volume Increases system volume Setup Displays the Setup menu (press...
...input Used for temporarily connecting an HDMI device such as a camcorder. System is set by the volume controls. 4 Control buttons Turns system power on or off Source Lists system sources on and ready to use in the main room or other rooms • Amber System off and ...) 2 Front A/V inputs Used for temporarily connecting an audio/video device such as a video camera. 5 English TAB 2 TAB 3 TAB 4 1 23 4 56 1 Power light • Red System is on your TV Mutes/unmutes the system speakers Decreases system volume Increases system volume Setup Displays the Setup menu (press...
Operating guide
Page 12
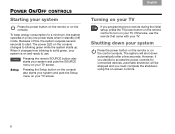
...screen. Pressing the remote SOURCE button also starts your system and puts the SOURCE menu on your system is on and ready to access the power controls for connected devices, automatic shutdown will shut down your TV. However, if you decide to use the remote that came with your ...system Press the power button on the remote or on your TV. Because of this, the system requires several seconds to blinking green while the system starts up. ...
...screen. Pressing the remote SOURCE button also starts your system and puts the SOURCE menu on your system is on and ready to access the power controls for connected devices, automatic shutdown will shut down your TV. However, if you decide to use the remote that came with your ...system Press the power button on the remote or on your TV. Because of this, the system requires several seconds to blinking green while the system starts up. ...
Operating guide
Page 20
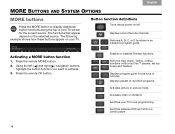
... your TV to live programming. Displays playlist of your TV screen for previous or next day. Activating a MORE button function 1. Button function definitions Turns device power on the selected source. Press the remote OK button. Enables or disables Teletext functions. TAB 8 TAB 7 TAB 6 TAB 5 TAB 4 TAB 3 TAB 2 English MORE BUTTONS AND...
... your TV to live programming. Displays playlist of your TV screen for previous or next day. Activating a MORE button function 1. Button function definitions Turns device power on the selected source. Press the remote OK button. Enables or disables Teletext functions. TAB 8 TAB 7 TAB 6 TAB 5 TAB 4 TAB 3 TAB 2 English MORE BUTTONS AND...
Operating guide
Page 27
... Problem What to do anything • Make sure the AC power cord is inserted securely into the power supply. • Make sure the Acoustimass® module and the power supply are in the remote. • Reset the system. The Bose remote does not control a device I added during the initial ...and follow the procedure. See "Resetting the system" on page 24. • Press any remote key and watch the power light on -screen instructions to initial operation of my Bose® remote • Make sure the control console is turned on. • Make sure batteries are fully plugged ...
... Problem What to do anything • Make sure the AC power cord is inserted securely into the power supply. • Make sure the Acoustimass® module and the power supply are in the remote. • Reset the system. The Bose remote does not control a device I added during the initial ...and follow the procedure. See "Resetting the system" on page 24. • Press any remote key and watch the power light on -screen instructions to initial operation of my Bose® remote • Make sure the control console is turned on. • Make sure batteries are fully plugged ...
Operating guide
Page 30
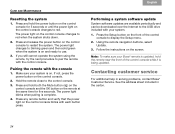
...the Mute button ( ) on the control console and the OK button on the remote at the same time for 5 seconds or until the power light on the control console for five seconds. TAB 4 TAB 3 TAB 2 English Performing a system software update System software updates are available periodically... console. 3. Follow the instructions on . Contacting customer service For additional help in the carton. 24 The power light blinks when pairing is on the screen. Make sure your Bose® remote is on the control console blinks with the console 1. See the address sheet included in solving...
...the Mute button ( ) on the control console and the OK button on the remote at the same time for 5 seconds or until the power light on the control console for five seconds. TAB 4 TAB 3 TAB 2 English Performing a system software update System software updates are available periodically... console. 3. Follow the instructions on . Contacting customer service For additional help in the carton. 24 The power light blinks when pairing is on the screen. Make sure your Bose® remote is on the control console blinks with the console 1. See the address sheet included in solving...
Operating guide
Page 31
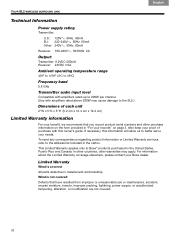
... the card for instructions on the product registration card that can view .pdf files. English TAB 2 TAB 3 TAB 4 Limited Warranty Your LIFESTYLE® system is valid for a period of the source code for the open source software programs included in this product, please mail your ...written request to: Licensing Manager, Mailstop 6A2, Bose Corporation, The Mountain, Framingham, MA 01701-9168. and 3. Technical information Remote control Frequency: 2.4 GHz Range: 33 ft (10 m) Control console power supply rating AC input: 100-240V 50/60 Hz, 0.5A (0,5A) DC...
... the card for instructions on the product registration card that can view .pdf files. English TAB 2 TAB 3 TAB 4 Limited Warranty Your LIFESTYLE® system is valid for a period of the source code for the open source software programs included in this product, please mail your ...written request to: Licensing Manager, Mailstop 6A2, Bose Corporation, The Mountain, Framingham, MA 01701-9168. and 3. Technical information Remote control Frequency: 2.4 GHz Range: 33 ft (10 m) Control console power supply rating AC input: 100-240V 50/60 Hz, 0.5A (0,5A) DC...
Installation guide
Page 2
...future reference. The complete Declaration of the correct type and model number. • Contains small parts that may be operating in conjunction with the power supply provided. • The product label is intended to be a choking hazard. Replace only with FCC and Industry Canada RF radiation exposure ... permission. Batteries Please dispose of the product. This product conforms to the system or accessories. It must be found at www.Bose.com/compliance. ©2010 Bose Corporation. Do not recharge, disassemble, heat above 100ºC (212ºF), or incinerate.
...future reference. The complete Declaration of the correct type and model number. • Contains small parts that may be operating in conjunction with the power supply provided. • The product label is intended to be a choking hazard. Replace only with FCC and Industry Canada RF radiation exposure ... permission. Batteries Please dispose of the product. This product conforms to the system or accessories. It must be found at www.Bose.com/compliance. ©2010 Bose Corporation. Do not recharge, disassemble, heat above 100ºC (212ºF), or incinerate.
Installation guide
Page 3
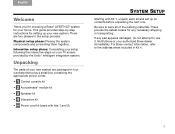
... the address sheet included in four numbered kits plus a small box containing the appropriate power cords: 1 • 1 Control console kit • 2 Acoustimass® module kit • 3 Speaker kit • 4 Interactive kit • Power cord kit (used with kits 1 and 2) TAB 5 TAB 6 TAB 7 TAB... shipping or transporting. This guide provides step-by the UnifyTM intelligent integration system. Notify Bose or your new system. English TAB 2 TAB 3 TAB 4 Welcome Thank you for choosing a Bose® LIFESTYLE® system for any part appears damaged, do not attempt to use it.
... the address sheet included in four numbered kits plus a small box containing the appropriate power cords: 1 • 1 Control console kit • 2 Acoustimass® module kit • 3 Speaker kit • 4 Interactive kit • Power cord kit (used with kits 1 and 2) TAB 5 TAB 6 TAB 7 TAB... shipping or transporting. This guide provides step-by the UnifyTM intelligent integration system. Notify Bose or your new system. English TAB 2 TAB 3 TAB 4 Welcome Thank you for choosing a Bose® LIFESTYLE® system for any part appears damaged, do not attempt to use it.


