SL2 wireless surround link - Owner's guide
Page 2
... user to dripping or splashing, and objects filled with a dry cloth - for future reference. 3. Do not use attachments/accessories specified by Bose Corporation. Do not block any electronic product, use this product near any part of the product and to spill liquids into any heat sources,...all components before cleaning. 7. Install in the owner's guide. 4. WARNING: To reduce the risk of electric shock. The lightning flash with the power supply provided. This product conforms to the EMC Directive 89/336/EEC, to the Low Voltage Directive 73/23/EEC, and to rain or moisture. ...
... user to dripping or splashing, and objects filled with a dry cloth - for future reference. 3. Do not use attachments/accessories specified by Bose Corporation. Do not block any electronic product, use this product near any part of the product and to spill liquids into any heat sources,...all components before cleaning. 7. Install in the owner's guide. 4. WARNING: To reduce the risk of electric shock. The lightning flash with the power supply provided. This product conforms to the EMC Directive 89/336/EEC, to the Low Voltage Directive 73/23/EEC, and to rain or moisture. ...
SL2 wireless surround link - Owner's guide
Page 3
... with this equipment does cause harmful interference to provide reasonable protection against harmful interference in the operating instructions or as power supply cord or plug is required when the apparatus has been damaged in accordance with any interference, including interference that interference...13. See product enclosure for a Class B digital device, pursuant to comply with the Canadian ICES-003 Class B specification. Use proper power sources - However, this equipment. Any modifications made to this equipment may void the user's authority to operate this is subject to the...
... with this equipment does cause harmful interference to provide reasonable protection against harmful interference in the operating instructions or as power supply cord or plug is required when the apparatus has been damaged in accordance with any interference, including interference that interference...13. See product enclosure for a Class B digital device, pursuant to comply with the Canadian ICES-003 Class B specification. Use proper power sources - However, this equipment. Any modifications made to this equipment may void the user's authority to operate this is subject to the...
SL2 wireless surround link - Owner's guide
Page 6
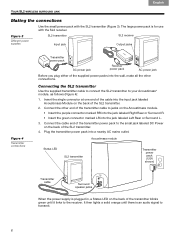
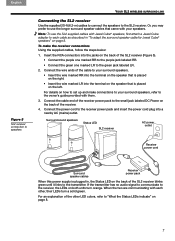
...Acoustimass® module, as follows (Figure 4): 1. Acoustimass module Status LED SL2 transmitter Transmitter power pack (120V shown) Transmitter cable Surround speaker jacks When the power supply is for use with the SL2 transmitter (Figure 3). Connect the other connections. It then ... Making the connections Use the small power pack with the SL2 receiver. Figure 3 Different power supplies SL2 transmitter Input jack SL2 receiver Output jacks Figure 4 Transmitter connections Transmitter power pack AC power jack Receiver power pack AC power jack Before you plug either of ...
...Acoustimass® module, as follows (Figure 4): 1. Acoustimass module Status LED SL2 transmitter Transmitter power pack (120V shown) Transmitter cable Surround speaker jacks When the power supply is for use with the SL2 transmitter (Figure 3). Connect the other connections. It then ... Making the connections Use the small power pack with the SL2 receiver. Figure 3 Different power supplies SL2 transmitter Input jack SL2 receiver Output jacks Figure 4 Transmitter connections Transmitter power pack AC power jack Receiver power pack AC power jack Before you plug either of ...
SL2 wireless surround link - Owner's guide
Page 7
...on how to set up and make the receiver connections Using the supplied cables, follow the steps below: 1. Connect the cable end of the other , their LEDs turn orange. For an explanation of the receiver power pack to each other LED colors, refer to "What the Status...174; speakers" on both units turn a solid green. Surround sound speakers Status LED SL2 receiver AC power outlet Receiver power cord Surround speaker cables Receiver power pack When this power supply is placed on the speaker that came with your surround speakers, refer to the owner's guide provided with...
...on how to set up and make the receiver connections Using the supplied cables, follow the steps below: 1. Connect the cable end of the other , their LEDs turn orange. For an explanation of the receiver power pack to each other LED colors, refer to "What the Status...174; speakers" on both units turn a solid green. Surround sound speakers Status LED SL2 receiver AC power outlet Receiver power cord Surround speaker cables Receiver power pack When this power supply is placed on the speaker that came with your surround speakers, refer to the owner's guide provided with...
SL2 wireless surround link - Owner's guide
Page 10
..., or modification are not covered. 10 Svenska Nederlands Italiano Français Español Deutsch Dansk English YOUR SL2 WIRELESS SURROUND LINK Technical Information Power supply rating Transmitter: U.S.: 120V 60Hz 60mA EU: 220-240V 50Hz 60mA Other: 240V 50Hz 60mA Receiver: 100-240V 50/60Hz 2A Output: Transmitter: 8.2VDC ...page 3. Limited Warranty What is not covered: Defects that you record product serial numbers and other warranties may cause damage to better serve your Bose dealer. To send any correspondence regarding product information or Limited Warranty services, refer to...
..., or modification are not covered. 10 Svenska Nederlands Italiano Français Español Deutsch Dansk English YOUR SL2 WIRELESS SURROUND LINK Technical Information Power supply rating Transmitter: U.S.: 120V 60Hz 60mA EU: 220-240V 50Hz 60mA Other: 240V 50Hz 60mA Receiver: 100-240V 50/60Hz 2A Output: Transmitter: 8.2VDC ...page 3. Limited Warranty What is not covered: Defects that you record product serial numbers and other warranties may cause damage to better serve your Bose dealer. To send any correspondence regarding product information or Limited Warranty services, refer to...
Operating guide
Page 2
... accessories. They may be a choking hazard. It is used as lighted candles, on or near the apparatus. Batteries Please dispose of used only with the power supply provided. • The product label is neither designed nor tested for general population. Class B emissions This device complies with FCC and Industry Canada RF radiation... with any naked flame sources, such as the disconnect device, such disconnect device shall remain readily operable. • The product must be found at www.Bose.com/compliance. They will help you can be used batteries promptly.
... accessories. They may be a choking hazard. It is used as lighted candles, on or near the apparatus. Batteries Please dispose of used only with the power supply provided. • The product label is neither designed nor tested for general population. Class B emissions This device complies with FCC and Industry Canada RF radiation... with any naked flame sources, such as the disconnect device, such disconnect device shall remain readily operable. • The product must be found at www.Bose.com/compliance. They will help you can be used batteries promptly.
Operating guide
Page 27
... your system is not muted. • Check the input connections on the control console. Select the device options and follow the procedure. The Bose remote does not control a device I added during the initial setup • Try setting up the device again. • Your system may ... TAB 3 Troubleshooting TAB 4 TAB 5 TAB 6 TAB 7 TAB 8 CARE AND MAINTENANCE Problem What to do anything • Make sure the AC power cord is inserted securely into the power supply. • Make sure the Acoustimass® module and the power supply are in the remote. • Reset the system.
... your system is not muted. • Check the input connections on the control console. Select the device options and follow the procedure. The Bose remote does not control a device I added during the initial setup • Try setting up the device again. • Your system may ... TAB 3 Troubleshooting TAB 4 TAB 5 TAB 6 TAB 7 TAB 8 CARE AND MAINTENANCE Problem What to do anything • Make sure the AC power cord is inserted securely into the power supply. • Make sure the Acoustimass® module and the power supply are in the remote. • Reset the system.
Operating guide
Page 31
English TAB 2 TAB 3 TAB 4 Limited Warranty Your LIFESTYLE® system is subject to the terms of the STLinux software package. What you must do to the address provided by the Bose organization in an electronic file, named "licenses.pdf," located ...within 30 seconds. Label and ship the product, freight prepaid, to obtain Limited Warranty Service: Return product, with proof of media, shipping and handling. Technical information Remote control Frequency: 2.4 GHz Range: 33 ft (10 m) Control console power supply...
English TAB 2 TAB 3 TAB 4 Limited Warranty Your LIFESTYLE® system is subject to the terms of the STLinux software package. What you must do to the address provided by the Bose organization in an electronic file, named "licenses.pdf," located ...within 30 seconds. Label and ship the product, freight prepaid, to obtain Limited Warranty Service: Return product, with proof of media, shipping and handling. Technical information Remote control Frequency: 2.4 GHz Range: 33 ft (10 m) Control console power supply...
Installation guide
Page 2
...when using headphones, especially for use outdoors, in the shipping carton. Do not incinerate. It must be found at www.Bose.com/compliance. ©2010 Bose Corporation. The lightning flash with FCC and Industry Canada RF radiation exposure limits set up and use care not to loud ...presence of uninsulated, dangerous voltage within an equilateral triangle alerts the user to dripping or splashing, and do not place objects filled with the power supply provided. • The product label is located on or near the apparatus. • Keep the remote control battery away from children. ...
...when using headphones, especially for use outdoors, in the shipping carton. Do not incinerate. It must be found at www.Bose.com/compliance. ©2010 Bose Corporation. The lightning flash with FCC and Industry Canada RF radiation exposure limits set up and use care not to loud ...presence of uninsulated, dangerous voltage within an equilateral triangle alerts the user to dripping or splashing, and do not place objects filled with the power supply provided. • The product label is located on or near the apparatus. • Keep the remote control battery away from children. ...
Installation guide
Page 4
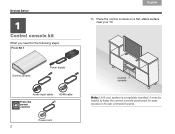
Place the control console on a flat, stable surface near your system is completely installed, it may be helpful to its rear connection panel. Control console Power supply Audio input cable From the power cord kit HDMI cable Power cord 2 Control console Note: Until your TV. TAB 8 TAB 7 SYSTEM SETUP TAB 6 11 Control console kit What you need for easy access to keep the control console positioned for the following steps: From Kit 1 TAB 5 TAB 4 TAB 3 TAB 2 English 1.
Place the control console on a flat, stable surface near your system is completely installed, it may be helpful to its rear connection panel. Control console Power supply Audio input cable From the power cord kit HDMI cable Power cord 2 Control console Note: Until your TV. TAB 8 TAB 7 SYSTEM SETUP TAB 6 11 Control console kit What you need for easy access to keep the control console positioned for the following steps: From Kit 1 TAB 5 TAB 4 TAB 3 TAB 2 English 1.
Installation guide
Page 6
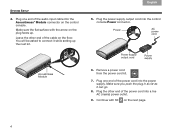
... up . Plug one end of the audio input cable into the power supply. Remove a power cord from the power cord kit. 7. Acoustimass Module TAB 4 TAB 3 TAB 2 English 5. Continue with the arrow on the floor. Power AC power cord Power supply output cord Power supply 6. Plug one end of the power cord into the Acoustimass® Module connector on the next page...
... up . Plug one end of the audio input cable into the power supply. Remove a power cord from the power cord kit. 7. Acoustimass Module TAB 4 TAB 3 TAB 2 English 5. Continue with the arrow on the floor. Power AC power cord Power supply output cord Power supply 6. Plug one end of the power cord into the Acoustimass® Module connector on the next page...


