
English Owners Guide
Page 3
... Ethernet cable. Deactivating all wireless network ports are activated, at 230V/50Hz input ≤ 2.0 W Network port deactivation/activation procedures. Activate by pairing with a Bluetooth® source. This equipment should be installed and operated with a minimum distance of Directive 2014/53/EU and all network types ≤ 2.0 W Time after which equipment is automatically switched into an outlet on the console for 10 seconds. The low power radio-frequency devices...
... Ethernet cable. Deactivating all wireless network ports are activated, at 230V/50Hz input ≤ 2.0 W Network port deactivation/activation procedures. Activate by pairing with a Bluetooth® source. This equipment should be installed and operated with a minimum distance of Directive 2014/53/EU and all network types ≤ 2.0 W Time after which equipment is automatically switched into an outlet on the console for 10 seconds. The low power radio-frequency devices...
English Owners Guide
Page 5
... disclosures that Bose makes available. Obtain your router owner's guide for installing security updates that apply to the Internet. In the UNIFY menu, select System Info > Network to SiriusXM Internet Radio in the U.S. On a device connected to view the applicable license disclosures. Go to /licenses.pdf to your product's IP address. and other countries. Android, Google Play and the Google Play logo are trademarks of Bose Corporation in...
... disclosures that Bose makes available. Obtain your router owner's guide for installing security updates that apply to the Internet. In the UNIFY menu, select System Info > Network to SiriusXM Internet Radio in the U.S. On a device connected to view the applicable license disclosures. Go to /licenses.pdf to your product's IP address. and other countries. Android, Google Play and the Google Play logo are trademarks of Bose Corporation in...

English Owners Guide
Page 6
... Remote Control Remote control overview...16 Using the SOURCE button 17 Function buttons...17 Adjusting volume...17 Using the MORE button...17 The AV OUTPUT menu...17 The AV SETTINGS menu...18 Remote glow button...18 SoundTouch® App Setup Download and install the SoundTouch® app 19 SoundTouch® Owner's Center 19 Existing SoundTouch® Users Add the system to an existing account 20 Connect the system to a new network 20 Preset Personalization Set a preset...21 Play a preset...21 Set a preset using your remote control 21 Select a preset using...
... Remote Control Remote control overview...16 Using the SOURCE button 17 Function buttons...17 Adjusting volume...17 Using the MORE button...17 The AV OUTPUT menu...17 The AV SETTINGS menu...18 Remote glow button...18 SoundTouch® App Setup Download and install the SoundTouch® app 19 SoundTouch® Owner's Center 19 Existing SoundTouch® Users Add the system to an existing account 20 Connect the system to a new network 20 Preset Personalization Set a preset...21 Play a preset...21 Set a preset using your remote control 21 Select a preset using...

English Owners Guide
Page 8
... Front HDMI™ input...34 Back console panel...34 Connecting an OmniJewel™ base 35 Installing the front speakers 36 Connecting the front speakers to the console 37 Attaching the rubber feet to your center speaker 37 Connecting the center speaker to the console 38 Installing the rear speakers 39 Identifying switch settings on wireless receivers 40 Connecting the rear speakers 40 Connecting the rear speakers to power 41 Mounting your speakers...41 Appendix B: System Maintenance Replacing the remote control...
... Front HDMI™ input...34 Back console panel...34 Connecting an OmniJewel™ base 35 Installing the front speakers 36 Connecting the front speakers to the console 37 Attaching the rubber feet to your center speaker 37 Connecting the center speaker to the console 38 Installing the rear speakers 39 Identifying switch settings on wireless receivers 40 Connecting the rear speakers 40 Connecting the rear speakers to power 41 Mounting your speakers...41 Appendix B: System Maintenance Replacing the remote control...

English Owners Guide
Page 14
.... Speaker Management Revisit your front headphones/AUX input (see page 34). Headphone Connector Set the default usage of optional procedures to help guide you can do Bluetooth Setup Manage your Bluetooth devices. ENGLISH SETTING UP THE SYSTEM UNIFY® system overview The UNIFY intelligent integration system guides you choose the correct cables and inputs and programs the Bose® remote control to operate your connected devices. Note: Before you begin, make sure...
.... Speaker Management Revisit your front headphones/AUX input (see page 34). Headphone Connector Set the default usage of optional procedures to help guide you can do Bluetooth Setup Manage your Bluetooth devices. ENGLISH SETTING UP THE SYSTEM UNIFY® system overview The UNIFY intelligent integration system guides you choose the correct cables and inputs and programs the Bose® remote control to operate your connected devices. Note: Before you begin, make sure...

English Owners Guide
Page 16
Numbers 1 - 6 can play SoundTouch® presets. Changes TV's input The remote control's display is an essential part of your cable box Displays additional device-specific controls Opens SoundTouch® Launches the UNIFY® setup menu 16 - ENGLISH Display Provides access to connected sources Powers on /off your Lifestyle® experience. Powers on /off your Bose® system Function buttons (see page 17) Home button Controls the DVR functionality of your TV Teletext mode Navigation pad Previous channel, chapter or selection Playback controls Numeric...
Numbers 1 - 6 can play SoundTouch® presets. Changes TV's input The remote control's display is an essential part of your cable box Displays additional device-specific controls Opens SoundTouch® Launches the UNIFY® setup menu 16 - ENGLISH Display Provides access to connected sources Powers on /off your Lifestyle® experience. Powers on /off your Bose® system Function buttons (see page 17) Home button Controls the DVR functionality of your TV Teletext mode Navigation pad Previous channel, chapter or selection Playback controls Numeric...
English Owners Guide
Page 19
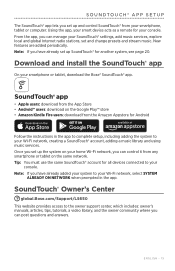
... 20. Download and install the SoundTouch® app On your smartphone or tablet, download the Bose® SoundTouch® app. • Apple users: download from the App Store • Android™ users: download on the Google Play™ store • Amazon Kindle Fire users: download from the Amazon Appstore for all devices connected to the owner support center, which includes: owner's manuals, articles, tips, tutorials, a video library...
... 20. Download and install the SoundTouch® app On your smartphone or tablet, download the Bose® SoundTouch® app. • Apple users: download from the App Store • Android™ users: download on the Google Play™ store • Amazon Kindle Fire users: download from the Amazon Appstore for all devices connected to the owner support center, which includes: owner's manuals, articles, tips, tutorials, a video library...

English Owners Guide
Page 26
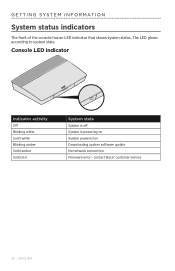
The LED glows according to system state. contact Bose® customer service 26 - ENGLISH Console LED indicator Indicator activity Off Blinking white Solid white Blinking amber Solid amber Solid red System state System is off System is powering on System powered on Downloading system software update No network connection Firmware error - GETTING SYSTEM INFORMATION System status indicators The front of the console has an LED indicator that shows system status.
The LED glows according to system state. contact Bose® customer service 26 - ENGLISH Console LED indicator Indicator activity Off Blinking white Solid white Blinking amber Solid amber Solid red System state System is off System is powering on System powered on Downloading system software update No network connection Firmware error - GETTING SYSTEM INFORMATION System status indicators The front of the console has an LED indicator that shows system status.
English Owners Guide
Page 29
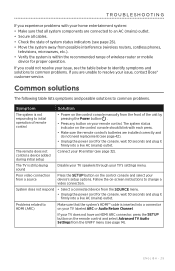
... speakers through your issue, contact Bose® customer service. Poor video connection from the menu. • Unplug the power cord for the console, wait 30 seconds and plug it firmly into a live AC (mains) outlet. System does not respond • Select a connected device from a source Press the button on -screen instructions to resolve your TV's settings menu. The remote does not control a device added during initial setup Connect your remote control...
... speakers through your issue, contact Bose® customer service. Poor video connection from the menu. • Unplug the power cord for the console, wait 30 seconds and plug it firmly into a live AC (mains) outlet. System does not respond • Select a connected device from a source Press the button on -screen instructions to resolve your TV's settings menu. The remote does not control a device added during initial setup Connect your remote control...

English Owners Guide
Page 30
... the power cord for setup. • Test your internet connection. • Restart your mobile device. • Restart your modem and router. • Uninstall the app, reinstall the app, reset the system and restart setup. • Follow the on-screen troubleshooting prompts. • Press the button on the control console or your remote and select Speaker Management to your TV's HDMI ARC connector, make sure that the HDMI™ cable is...
... the power cord for setup. • Test your internet connection. • Restart your mobile device. • Restart your modem and router. • Uninstall the app, reinstall the app, reset the system and restart setup. • Follow the on-screen troubleshooting prompts. • Press the button on the control console or your remote and select Speaker Management to your TV's HDMI ARC connector, make sure that the HDMI™ cable is...

English Owners Guide
Page 31
.... No TV picture, but audio Make sure the TV video input selection is in -app help. • If having problems connecting wirelessly, connect to the SoundTouch® in the line of sight of the console. • Try setting up your IR emitter (see page 14). • Unplug the power cord for the video source. Press the button on -screen instructions to the control console. • Make sure the audio input cable from your remote's batteries...
.... No TV picture, but audio Make sure the TV video input selection is in -app help. • If having problems connecting wirelessly, connect to the SoundTouch® in the line of sight of the console. • Try setting up your IR emitter (see page 14). • Unplug the power cord for the video source. Press the button on -screen instructions to the control console. • Make sure the audio input cable from your remote's batteries...

English Owners Guide
Page 34
To use this input as an AUX IN, press the button on -screen display. Note: The Bose remote control does not control functions specific to devices that have an HDMI output. The headphone setting is connected. Front HDMI™ input You can use this 3.5 mm input with your headphones, or as an audio option with your remote control and select Headphone Connector from the menu when a device is connected. ENGLISH APPENDIX A: INSTALLATION REFERENCE Front console panel The front...
To use this input as an AUX IN, press the button on -screen display. Note: The Bose remote control does not control functions specific to devices that have an HDMI output. The headphone setting is connected. Front HDMI™ input You can use this 3.5 mm input with your headphones, or as an audio option with your remote control and select Headphone Connector from the menu when a device is connected. ENGLISH APPENDIX A: INSTALLATION REFERENCE Front console panel The front...

Multilingual Owners Guide
Page 5
... the SETUP button. To subscribe to the software packages included with permission. Bose Corporation Headquarters: 1-877-230-5639 ©2018 Bose Corporation. To receive automatic security updates, you will be reproduced, modified, distributed or otherwise used with your product's IP address. Select the applicable license type. Go to /licenses.pdf to your router owner's guide for installing security updates that apply to SiriusXM Internet Radio...
... the SETUP button. To subscribe to the software packages included with permission. Bose Corporation Headquarters: 1-877-230-5639 ©2018 Bose Corporation. To receive automatic security updates, you will be reproduced, modified, distributed or otherwise used with your product's IP address. Select the applicable license type. Go to /licenses.pdf to your router owner's guide for installing security updates that apply to SiriusXM Internet Radio...

Multilingual Owners Guide
Page 6
... Remote Control Remote control overview...16 Using the SOURCE button 17 Function buttons...17 Adjusting volume...17 Using the MORE button...17 The AV OUTPUT menu...17 The AV SETTINGS menu...18 Remote glow button...18 SoundTouch® App Setup Download and install the SoundTouch® app 19 SoundTouch® Owner's Center 19 Existing SoundTouch® Users Add the system to an existing account 20 Connect the system to a new network 20 Preset Personalization Set a preset...21 Play a preset...21 Set a preset using your remote control 21 Select a preset using...
... Remote Control Remote control overview...16 Using the SOURCE button 17 Function buttons...17 Adjusting volume...17 Using the MORE button...17 The AV OUTPUT menu...17 The AV SETTINGS menu...18 Remote glow button...18 SoundTouch® App Setup Download and install the SoundTouch® app 19 SoundTouch® Owner's Center 19 Existing SoundTouch® Users Add the system to an existing account 20 Connect the system to a new network 20 Preset Personalization Set a preset...21 Play a preset...21 Set a preset using your remote control 21 Select a preset using...

Multilingual Owners Guide
Page 8
... Front HDMI™ input...34 Back console panel...34 Connecting an OmniJewel™ base 35 Installing the front speakers 36 Connecting the front speakers to the console 37 Attaching the rubber feet to your center speaker 37 Connecting the center speaker to the console 38 Installing the rear speakers 39 Identifying switch settings on wireless receivers 40 Connecting the rear speakers 40 Connecting the rear speakers to power 41 Mounting your speakers...41 Appendix B: System Maintenance Replacing the remote control...
... Front HDMI™ input...34 Back console panel...34 Connecting an OmniJewel™ base 35 Installing the front speakers 36 Connecting the front speakers to the console 37 Attaching the rubber feet to your center speaker 37 Connecting the center speaker to the console 38 Installing the rear speakers 39 Identifying switch settings on wireless receivers 40 Connecting the rear speakers 40 Connecting the rear speakers to power 41 Mounting your speakers...41 Appendix B: System Maintenance Replacing the remote control...

Multilingual Owners Guide
Page 16
...;connected sources Powers on /off your TV Teletext mode Navigation pad Previous channel, chapter or selection Playback controls Numeric keypad. Changes TV's input The remote control's display is an essential part of your cable box Displays additional device-specific controls Opens SoundTouch® Launches the UNIFY® setup menu 16 - USING THE REMOTE CONTROL Remote control overview The Bose® advanced RF (radio frequency) remote control works from anywhere in your room without requiring you through your sources and system settings. Numbers 1 - 6 can play SoundTouch...
...;connected sources Powers on /off your TV Teletext mode Navigation pad Previous channel, chapter or selection Playback controls Numeric keypad. Changes TV's input The remote control's display is an essential part of your cable box Displays additional device-specific controls Opens SoundTouch® Launches the UNIFY® setup menu 16 - USING THE REMOTE CONTROL Remote control overview The Bose® advanced RF (radio frequency) remote control works from anywhere in your room without requiring you through your sources and system settings. Numbers 1 - 6 can play SoundTouch...

Multilingual Owners Guide
Page 19
...; Apple users: download from your SoundTouch® settings, add music services, explore local and global Internet radio stations, set and change presets and stream music. Note: If you set up SoundTouch® for another system, see page 20. ENGLISH - 19 Tip: You must use the same SoundTouch® account for your smart device acts as a remote for all devices connected to the owner support center, which includes: owner's manuals, articles...
...; Apple users: download from your SoundTouch® settings, add music services, explore local and global Internet radio stations, set and change presets and stream music. Note: If you set up SoundTouch® for another system, see page 20. ENGLISH - 19 Tip: You must use the same SoundTouch® account for your smart device acts as a remote for all devices connected to the owner support center, which includes: owner's manuals, articles...
Multilingual Owners Guide
Page 26
GETTING SYSTEM INFORMATION System status indicators The front of the console has an LED indicator that shows system status. contact Bose® customer service 26 - Console LED indicator Indicator activity Off Blinking white Solid white Blinking amber Solid amber Solid red System state System is off System is powering on System powered on Downloading system software update No network connection Firmware error - ENGLISH The LED glows according to system state.
GETTING SYSTEM INFORMATION System status indicators The front of the console has an LED indicator that shows system status. contact Bose® customer service 26 - Console LED indicator Indicator activity Off Blinking white Solid white Blinking amber Solid amber Solid red System state System is off System is powering on System powered on Downloading system software update No network connection Firmware error - ENGLISH The LED glows according to system state.

Multilingual Owners Guide
Page 30
... TV owner's guide or press the button on the control console or your remote and select Speaker Management to rerun setup (see page 15). • Move the bass module away from nearby walls and corners. 30 - If your TV does not have an HDMI ARC connector, use a secondary audio cable in addition to the HDMI cable. • If using a secondary audio cable, insert the cable into a connector on your TV labeled Output or...
... TV owner's guide or press the button on the control console or your remote and select Speaker Management to rerun setup (see page 15). • Move the bass module away from nearby walls and corners. 30 - If your TV does not have an HDMI ARC connector, use a secondary audio cable in addition to the HDMI cable. • If using a secondary audio cable, insert the cable into a connector on your TV labeled Output or...

Multilingual Owners Guide
Page 34
Back console panel HDMI™ (ARC) HDMI™ Ethernet Service Power Speaker connectors Optical Coaxial Analog Troubleshooting 34 - ENGLISH They can be used to the front HDMI™ input. Front Headphones/AUX input You can use this input for devices that are connected to connect digital cameras, video cameras, media players and your favorite mobile device. The headphone setting is connected. To use this input as an AUX IN, press the button on your remote control and select Headphone Connector from...
Back console panel HDMI™ (ARC) HDMI™ Ethernet Service Power Speaker connectors Optical Coaxial Analog Troubleshooting 34 - ENGLISH They can be used to the front HDMI™ input. Front Headphones/AUX input You can use this input for devices that are connected to connect digital cameras, video cameras, media players and your favorite mobile device. The headphone setting is connected. To use this input as an AUX IN, press the button on your remote control and select Headphone Connector from...


