

Operation Guide
Page 2
... with part 15 of Apple, Inc., registered in a particular installation. Important Safety Information Please refer to the following measures: • Reorient or relocate the receiving antenna. • Increase the separation between this device and your system's setup guide for Important Safety Information. Operation is connected. • Consult the dealer or an experienced radio/TV technician for : • LIfestyle® 535 and 525 series III home entertainment systems For...
... with part 15 of Apple, Inc., registered in a particular installation. Important Safety Information Please refer to the following measures: • Reorient or relocate the receiving antenna. • Increase the separation between this device and your system's setup guide for Important Safety Information. Operation is connected. • Consult the dealer or an experienced radio/TV technician for : • LIfestyle® 535 and 525 series III home entertainment systems For...

Operation Guide
Page 3
... display 8 Remote glow button 8 MORE buttons...9 Activating a MORE button function 9 Button function definitions 9 Control Console 11 Speaker Array (135 series III systems only 12 Acoustimass® Module (135 series III systems only 12 Power On/Off Controls Starting your system 13 Turning on your TV 13 Shutting down your system 13 Operating Your System Sources Selecting a source 14 Watching TV...15 Using a set-top box 15 Using the tuner in your TV 15 Tuning to a TV station 15 Playing audio/video devices 16 Using SoundTouch 16 Selecting the radio...
... display 8 Remote glow button 8 MORE buttons...9 Activating a MORE button function 9 Button function definitions 9 Control Console 11 Speaker Array (135 series III systems only 12 Acoustimass® Module (135 series III systems only 12 Power On/Off Controls Starting your system 13 Turning on your TV 13 Shutting down your system 13 Operating Your System Sources Selecting a source 14 Watching TV...15 Using a set-top box 15 Using the tuner in your TV 15 Tuning to a TV station 15 Playing audio/video devices 16 Using SoundTouch 16 Selecting the radio...
Operation Guide
Page 4
... Playing content from an iPod or iPhone 18 Using the front console inputs 19 Front USB input 19 Front Analog A/V input 20 Front HDMI™ input 20 Changing the image view 20 Changing System Options Using the system OPTIONS menu 21 OPTIONS menu 21 Changing Your System Setup UNIFY® system overview 24 Using the UNIFY menu 24 Care and Maintenance Troubleshooting 25 Resetting the system 28 Pairing the remote with this owner's guide. 4 - LIFESTYLE® model Control console serial number Acoustimass® serial number Speaker array serial number (135 Series III systems...
... Playing content from an iPod or iPhone 18 Using the front console inputs 19 Front USB input 19 Front Analog A/V input 20 Front HDMI™ input 20 Changing the image view 20 Changing System Options Using the system OPTIONS menu 21 OPTIONS menu 21 Changing Your System Setup UNIFY® system overview 24 Using the UNIFY menu 24 Care and Maintenance Troubleshooting 25 Resetting the system 28 Pairing the remote with this owner's guide. 4 - LIFESTYLE® model Control console serial number Acoustimass® serial number Speaker array serial number (135 Series III systems...

Operation Guide
Page 5
... you experience any operating difficulties, be sure to -use system delivers superior performance for a 30-pin accessory dock (not included) compatible with most iPod and iPhone devices. • The control console and attached components can solve the most common operating problems using a USB flash drive. • AM/FM radio • Back panel connector for both music and video. It also allows us to 1080p • Photo viewing using the helpful tips provided...
... you experience any operating difficulties, be sure to -use system delivers superior performance for a 30-pin accessory dock (not included) compatible with most iPod and iPhone devices. • The control console and attached components can solve the most common operating problems using a USB flash drive. • AM/FM radio • Back panel connector for both music and video. It also allows us to 1080p • Photo viewing using the helpful tips provided...

Operation Guide
Page 6
... 7 TV Input - Changes inputs on or off Color functions - English Changes how video appears Numeric Keypad - Turns Teletext controls on connected sources such as Blu-ray Disc™ players and set-top boxes Volume Up/Down - Controls and Indicators Remote Control Using the remote This advanced radio frequency remote works throughout the room. See page 8 TV Power - Increases (+) or decreases (-) the system volume Mute - Allows manual entry of channels and settings Information Display - Next or previous numbered channel or preset Last Channel - Activates color...
... 7 TV Input - Changes inputs on or off Color functions - English Changes how video appears Numeric Keypad - Turns Teletext controls on connected sources such as Blu-ray Disc™ players and set-top boxes Volume Up/Down - Controls and Indicators Remote Control Using the remote This advanced radio frequency remote works throughout the room. See page 8 TV Power - Increases (+) or decreases (-) the system volume Mute - Allows manual entry of channels and settings Information Display - Next or previous numbered channel or preset Last Channel - Activates color...
Operation Guide
Page 7
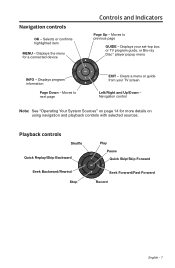
... Stop Play Pause Quick Skip/Skip Forward Seek Forward/Fast Forward Record English - 7 Clears a menu or guide from your set-top box or TV program guide, or Blu-ray Disc™ player popup menu INFO - Navigation control Note: See "Operating Your System Sources" on using navigation and playback controls with selected sources. Displays your TV screen Left/Right and Up/Down - Displays the menu for more details on page 14 for a connected device Controls...
... Stop Play Pause Quick Skip/Skip Forward Seek Forward/Fast Forward Record English - 7 Clears a menu or guide from your set-top box or TV program guide, or Blu-ray Disc™ player popup menu INFO - Navigation control Note: See "Operating Your System Sources" on using navigation and playback controls with selected sources. Displays your TV screen Left/Right and Up/Down - Displays the menu for more details on page 14 for a connected device Controls...
Operation Guide
Page 11
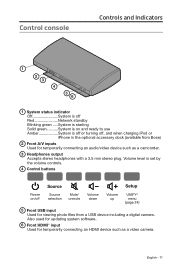
... HDMI™ input Used for temporarily connecting an HDMI device such as a camcorder. 3 Headphones output Accepts stereo headphones with a 3.5 mm stereo plug. English - 11 Control console Controls and Indicators 1 2 3 4 5 6 1 System status indicator Off System is off Red Network standby Blinking green System is starting Solid green System is off or turning off Source selection Mute/ unmute Volume down Volume up UNIFY® menu (page 24) 5 Front USB input Used for viewing photo files from Bose) 2 Front A/V inputs Used for temporarily connecting an audio/video device...
... HDMI™ input Used for temporarily connecting an HDMI device such as a camcorder. 3 Headphones output Accepts stereo headphones with a 3.5 mm stereo plug. English - 11 Control console Controls and Indicators 1 2 3 4 5 6 1 System status indicator Off System is off Red Network standby Blinking green System is starting Solid green System is off or turning off Source selection Mute/ unmute Volume down Volume up UNIFY® menu (page 24) 5 Front USB input Used for viewing photo files from Bose) 2 Front A/V inputs Used for temporarily connecting an audio/video device...

Operation Guide
Page 12
...array and Acoustimass® module are connected Blinks every 3 secs Acoustimass module is disconnected from speaker array or speaker array is off (Acoustimass module standby) Slow blinking orange Acoustimass module is available to make a wireless connection Fast blinking orange........ Speaker array is available to make a wireless connection Solid red System error (Call Bose Customer Service) 12 - English Speaker array is disconnected and trying to connect Solid red System error (Call Bose Customer Service) Acoustimass® module (135 series III systems) Status Status...
...array and Acoustimass® module are connected Blinks every 3 secs Acoustimass module is disconnected from speaker array or speaker array is off (Acoustimass module standby) Slow blinking orange Acoustimass module is available to make a wireless connection Fast blinking orange........ Speaker array is available to make a wireless connection Solid red System error (Call Bose Customer Service) 12 - English Speaker array is disconnected and trying to connect Solid red System error (Call Bose Customer Service) Acoustimass® module (135 series III systems) Status Status...
Operation Guide
Page 13
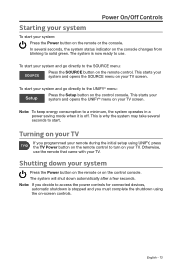
... TV Power button on the remote control to turn on your system and go directly to access the power controls for connected devices, automatic shutdown is off. This starts your system and opens the SOURCE menu on your system and go directly to solid green. This is now ready to use the remote that came with your system: Press the Power button on the console changes from blinking to the SOURCE menu: Press the SOURCE button on -screen controls. In...
... TV Power button on the remote control to turn on your system and go directly to access the power controls for connected devices, automatic shutdown is off. This starts your system and opens the SOURCE menu on your system and go directly to solid green. This is now ready to use the remote that came with your system: Press the Power button on the console changes from blinking to the SOURCE menu: Press the SOURCE button on -screen controls. In...
Operation Guide
Page 14
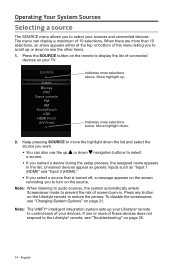
... menu can also use the up or down navigation buttons to select a source. • If you to scroll up . Cable Blu-ray DVD Game console FM AM SoundTouch USB HDMI Front A/V Front Indicates more selections below. English Note: When listening to audio sources, the system automatically enters Screensaver mode to prevent the risk of 10 selections. Unnamed devices appear as generic inputs such...
... menu can also use the up or down navigation buttons to select a source. • If you to scroll up . Cable Blu-ray DVD Game console FM AM SoundTouch USB HDMI Front A/V Front Indicates more selections below. English Note: When listening to audio sources, the system automatically enters Screensaver mode to prevent the risk of 10 selections. Unnamed devices appear as generic inputs such...
Operation Guide
Page 16
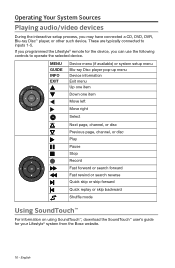
... Lifestyle® remote for your Lifestyle® system from the Bose website. 16 - English Operating Your System Sources Playing audio/video devices During the interactive setup process, you can use the following controls to inputs 1-5. These are typically connected to operate the selected device. MENU GUIDE INFO EXIT Device menu (if available) or system setup menu Blu-ray Disc player pop-up menu Device information Exit menu Up one item Down one item Move left Move right Select Next page, channel...
... Lifestyle® remote for your Lifestyle® system from the Bose website. 16 - English Operating Your System Sources Playing audio/video devices During the interactive setup process, you can use the following controls to inputs 1-5. These are typically connected to operate the selected device. MENU GUIDE INFO EXIT Device menu (if available) or system setup menu Blu-ray Disc player pop-up menu Device information Exit menu Up one item Down one item Move left Move right Select Next page, channel...
Operation Guide
Page 19
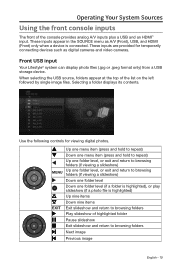
... file is connected. Operating Your System Sources Using the front console inputs The front of the list on the left followed by single image files. These inputs appear in the SOURCE menu as digital cameras and video cameras. These inputs are provided for viewing digital photos. Selecting a folder displays its contents. Use the following controls for temporarily connecting devices such as A/V (Front), USB, and HDMI (Front) only when a device is highlighted...
... file is connected. Operating Your System Sources Using the front console inputs The front of the list on the left followed by single image files. These inputs appear in the SOURCE menu as digital cameras and video cameras. These inputs are provided for viewing digital photos. Selecting a folder displays its contents. Use the following controls for temporarily connecting devices such as A/V (Front), USB, and HDMI (Front) only when a device is highlighted...

Operation Guide
Page 21
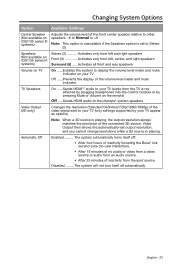
... setting. 6. Changing System Options Using the system OPTIONS menu The number of items appearing in the OPTIONS menu depends on which source is received from the current stereo FM radio station Stereo Off Changes the current station to mono, which can help when tuning to a weak radio station RDS On Displays RDS information on the remote Off No RDS information on the remote English - 21 or 5-channel audio is received from the source Alternative Plays 5-channel audio when either stereo or 5-channel audio...
... setting. 6. Changing System Options Using the system OPTIONS menu The number of items appearing in the OPTIONS menu depends on which source is received from the current stereo FM radio station Stereo Off Changes the current station to mono, which can help when tuning to a weak radio station RDS On Displays RDS information on the remote Off No RDS information on the remote English - 21 or 5-channel audio is received from the source Alternative Plays 5-channel audio when either stereo or 5-channel audio...

Operation Guide
Page 22
... with the 3D video -2 to Normal to +10 Power Down Normal System shuts down without presenting the Power Down Menu Power Down Menu System presents the Power Down Menu when shutting down Screensaver On Displays a screensaver after 20 minutes of no user activity when playing audio-only sources Off Disables screensaver mode Rear Speakers (Not available on 235/135 series III systems) Adjusts the volume level of the rear speakers relative to front speakers: (-10 to Normal...
... with the 3D video -2 to Normal to +10 Power Down Normal System shuts down without presenting the Power Down Menu Power Down Menu System presents the Power Down Menu when shutting down Screensaver On Displays a screensaver after 20 minutes of no user activity when playing audio-only sources Off Disables screensaver mode Rear Speakers (Not available on 235/135 series III systems) Adjusts the volume level of the rear speakers relative to front speakers: (-10 to Normal...
Operation Guide
Page 23
... affected by plugging headphones into the control console or by pressing Mute or Volume on the remote) Off Sends HDMI audio to the Lifestyle® system speakers Video Output (2D only) Changes the resolution (Standard Definition/720p/1080i/1080p) of the video signal sent to Stereo (2) Speakers (Not available on 235/135 series III systems) Stereo (2 Activates only front left and right speakers Front (3 Activates only front left, center, and right speakers Surround (5) ...... Video Output then...
... affected by plugging headphones into the control console or by pressing Mute or Volume on the remote) Off Sends HDMI audio to the Lifestyle® system speakers Video Output (2D only) Changes the resolution (Standard Definition/720p/1080i/1080p) of the video signal sent to Stereo (2) Speakers (Not available on 235/135 series III systems) Stereo (2 Activates only front left and right speakers Front (3 Activates only front left, center, and right speakers Surround (5) ...... Video Output then...
Operation Guide
Page 24
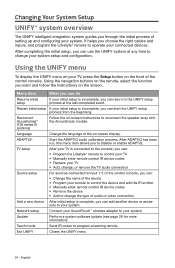
... buttons on the remote, select the function you want and follow the instructions on the front of audio or video connection Add a new device After initial setup is connected to the console, you can: • Program the Lifestyle® remote to control your TV • Manually enter remote control IR device codes • Replace your system setup and configuration. Exit UNIFY Closes the UNIFY menu 24 - Reconnect Acoustimass® (135 series III systems) Follow the on -screen display. Update Perform a system...
... buttons on the remote, select the function you want and follow the instructions on the front of audio or video connection Add a new device After initial setup is connected to the console, you can: • Program the Lifestyle® remote to control your TV • Manually enter remote control IR device codes • Replace your system setup and configuration. Exit UNIFY Closes the UNIFY menu 24 - Reconnect Acoustimass® (135 series III systems) Follow the on -screen display. Update Perform a system...
Operation Guide
Page 25
... radio operation, connect the FM and AM antennas. • Reset the system. Follow the is less than optimum on -screen instructions to set up the device again. The Bose remote does not control a device I added during the initial setup • Try setting up the device again. • Your system may need replacement. Make sure that you have selected the right source. • Make sure that the audio input cable is firmly plugged into the Audio Out connector (not Bose link...
... radio operation, connect the FM and AM antennas. • Reset the system. Follow the is less than optimum on -screen instructions to set up the device again. The Bose remote does not control a device I added during the initial setup • Try setting up the device again. • Your system may need replacement. Make sure that you have selected the right source. • Make sure that the audio input cable is firmly plugged into the Audio Out connector (not Bose link...

Operation Guide
Page 26
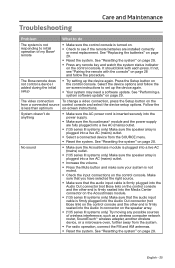
... connections are turned on. • Try changing the 3D system option to a different setting. • If the problem persists, make sure the speaker array is distorted What to reduce interference. • Fully extend the FM antenna. • If your TV. • Make sure the audio input cable is glowing orange. --Press the Setup button on the control console and select the "Reconnect Acoustimass" menu item. Care and Maintenance Problem Sound...
... connections are turned on. • Try changing the 3D system option to a different setting. • If the problem persists, make sure the speaker array is distorted What to reduce interference. • Fully extend the FM antenna. • If your TV. • Make sure the audio input cable is glowing orange. --Press the Setup button on the control console and select the "Reconnect Acoustimass" menu item. Care and Maintenance Problem Sound...

Operation Guide
Page 27
... the Help system in the carton). Select the device options and follow the on the control console. For guidance, press the Setup button on -screen instructions. English - 27 Contact Bose Customer Service to request a composite video cable that the SoundTouch™ app and SoundTouch™ Music Server are securely connected. For more information, visit the SoundTouch™ Online Forum or contact Bose Support (refer to the contact list...
... the Help system in the carton). Select the device options and follow the on the control console. For guidance, press the Setup button on -screen instructions. English - 27 Contact Bose Customer Service to request a composite video cable that the SoundTouch™ app and SoundTouch™ Music Server are securely connected. For more information, visit the SoundTouch™ Online Forum or contact Bose Support (refer to the contact list...
Operation Guide
Page 31
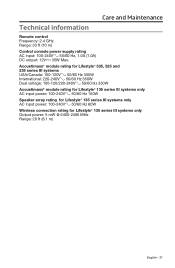
... Dual voltage: 100-120/220-240V 50/60 Hz 350W Acoustimass® module rating for Lifestyle® 135 series III systems only AC input power: 100-240V 50/60 Hz 150W Speaker array rating for Lifestyle® 135 series III systems only AC input power: 100-240V 50/60 Hz 60W Wireless connection rating for Lifestyle® 135 series III systems only Output power: 5 mW @ 2400-2480 MHz Range: 20 ft (6.1 m) English - 31...
... Dual voltage: 100-120/220-240V 50/60 Hz 350W Acoustimass® module rating for Lifestyle® 135 series III systems only AC input power: 100-240V 50/60 Hz 150W Speaker array rating for Lifestyle® 135 series III systems only AC input power: 100-240V 50/60 Hz 60W Wireless connection rating for Lifestyle® 135 series III systems only Output power: 5 mW @ 2400-2480 MHz Range: 20 ft (6.1 m) English - 31...


