
Installation Guide
Page 11
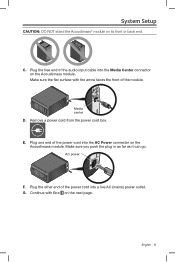
... with the arrow faces the front of the audio input cable into the Media Center connector on the Acoustimass module. English - 11 Remove a power cord from the power cord box. Plug the other end of the power cord into a live ...
... with the arrow faces the front of the audio input cable into the Media Center connector on the Acoustimass module. English - 11 Remove a power cord from the power cord box. Plug the other end of the power cord into a live ...

Installation Guide
Page 12
...Bose® dealer or visit www.Bose.com. 12 - System Setup 3 Speaker box What you need for the following steps: System speakers (one set of the three types shown) Jewel Cube® speakers (4) Left or right, front or rear speaker Direct/Reflecting® cube speaker arrays (1) Center...(4) Left or right, front or rear speaker Virtually Invisible® single cube speakers (1) Center front speaker (5) Left or right, front or rear, and center front speaker Front speaker cables Left front (L) White Center front (C) Brown Rear speaker cables Right front (R) Light blue Left rear (LR) Light...
...Bose® dealer or visit www.Bose.com. 12 - System Setup 3 Speaker box What you need for the following steps: System speakers (one set of the three types shown) Jewel Cube® speakers (4) Left or right, front or rear speaker Direct/Reflecting® cube speaker arrays (1) Center...(4) Left or right, front or rear speaker Virtually Invisible® single cube speakers (1) Center front speaker (5) Left or right, front or rear, and center front speaker Front speaker cables Left front (L) White Center front (C) Brown Rear speaker cables Right front (R) Light blue Left rear (LR) Light...
Installation Guide
Page 13
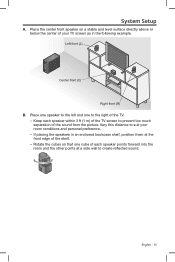
Left front (L) Center front (C) Right front (R) B. Rotate the cubes so that one to the right of each speaker within 3 ft (1 m) of the TV screen to prevent too much ... your TV screen as in an enclosed bookcase shelf, position them at a side wall to the left and one cube of the TV. -- Place the center front speaker on a stable and level surface directly above or below the...
Left front (L) Center front (C) Right front (R) B. Rotate the cubes so that one to the right of each speaker within 3 ft (1 m) of the TV screen to prevent too much ... your TV screen as in an enclosed bookcase shelf, position them at a side wall to the left and one cube of the TV. -- Place the center front speaker on a stable and level surface directly above or below the...
Installation Guide
Page 19
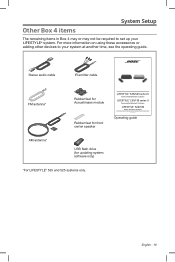
... in Box 4 may or may not be required to your LIFESTYLE® system. Stereo audio cable IR emitter cable FM antenna* Rubber feet for Acoustimass module Rubber feet for front center speaker LIFESTYLE® 535/525 series II home entertainment systems LIFESTYLE® 235/135 series II home entertainment systems LIFESTYLE® 520/510 home theater systems Operating Guide Operating guide AM antenna* USB flash...
... in Box 4 may or may not be required to your LIFESTYLE® system. Stereo audio cable IR emitter cable FM antenna* Rubber feet for Acoustimass module Rubber feet for front center speaker LIFESTYLE® 535/525 series II home entertainment systems LIFESTYLE® 235/135 series II home entertainment systems LIFESTYLE® 520/510 home theater systems Operating Guide Operating guide AM antenna* USB flash...
Installation Guide
Page 20
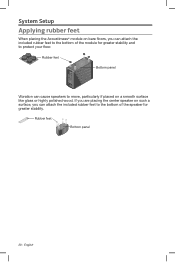
English Rubber feet Bottom panel 20 - If you are placing the center speaker on such a surface, you can attach the included rubber feet to the bottom of the speaker for greater stability and to protect your floor. Rubber feet Bottom panel Vibration can cause speakers to move, particularly if placed on a smooth surface like glass or highly polished wood. System Setup Applying rubber feet When placing the Acoustimass® module on bare floors, you can attach the included rubber feet to the bottom of the module for greater stability.
English Rubber feet Bottom panel 20 - If you are placing the center speaker on such a surface, you can attach the included rubber feet to the bottom of the speaker for greater stability and to protect your floor. Rubber feet Bottom panel Vibration can cause speakers to move, particularly if placed on a smooth surface like glass or highly polished wood. System Setup Applying rubber feet When placing the Acoustimass® module on bare floors, you can attach the included rubber feet to the bottom of the module for greater stability.
Owner's Guide
Page 22
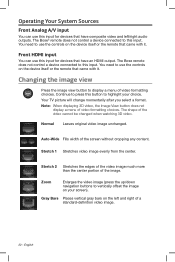
... shape of the image. Stretch 2 Stretches the edges of the video image much more than the center portion of the video cannot be changed when watching 3D video. The Bose remote does not control a device connected to this button to press this input. Continue to highlight ...your screen). Auto-Wide Fills width of a standard-definition video image. 22 - Stretch 1 Stretches video image evenly from the center. Normal Leaves original video ...
... shape of the image. Stretch 2 Stretches the edges of the video image much more than the center portion of the video cannot be changed when watching 3D video. The Bose remote does not control a device connected to this button to press this input. Continue to highlight ...your screen). Auto-Wide Fills width of a standard-definition video image. 22 - Stretch 1 Stretches video image evenly from the center. Normal Leaves original video ...
Owner's Guide
Page 25
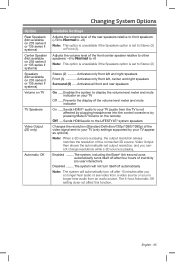
... Speakers (Not available on 235 series II or 135 series II systems) Center Speaker (Not available on 235 series II or 135 series II systems) Speakers (Not available on 235 series II or 135 series II systems) Volume on TV TV ...On Sends HDMITM audio to Stereo (2) or Front (3). Enabled The system, including the Bose® link second zone, automatically turns itself off automatically Note: The system will automatically...level meter and mute indicator on the remote) Off Sends HDMI audio to the LIFESTYLE® system speakers Changes the resolution (Standard Definition/720p/1080i/1080p) of the ...
... Speakers (Not available on 235 series II or 135 series II systems) Center Speaker (Not available on 235 series II or 135 series II systems) Speakers (Not available on 235 series II or 135 series II systems) Volume on TV TV ...On Sends HDMITM audio to Stereo (2) or Front (3). Enabled The system, including the Bose® link second zone, automatically turns itself off automatically Note: The system will automatically...level meter and mute indicator on the remote) Off Sends HDMI audio to the LIFESTYLE® system speakers Changes the resolution (Standard Definition/720p/1080i/1080p) of the ...
Owner's Guide
Page 27
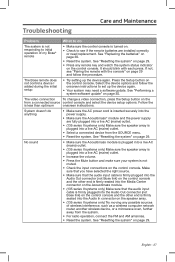
...not muted. • Check the input connections on the control console and the other end is firmly seated into the Media Center connector on the Acoustimass module. • (135 series II systems only) Make sure that the audio input cable is firmly plugged into a live AC (mains) outlet. &#... the device again. Select the device options and follow the procedure. Follow the is firmly seated into the Audio Out connector (not Bose link) on the control console and the other end is less than optimum onscreen instructions. Troubleshooting Care and Maintenance Problem What to do...
...not muted. • Check the input connections on the control console and the other end is firmly seated into the Media Center connector on the Acoustimass module. • (135 series II systems only) Make sure that the audio input cable is firmly plugged into a live AC (mains) outlet. &#... the device again. Select the device options and follow the procedure. Follow the is firmly seated into the Audio Out connector (not Bose link) on the control console and the other end is less than optimum onscreen instructions. Troubleshooting Care and Maintenance Problem What to do...


