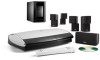
Bose® link AL8 homewide wireless audio link - Owner's guide
Page 3
... product near any heat sources, such as power supply cord or plug is located on the apparatus. Unplug this apparatus near a swimming pool, or anywhere else that produce heat. 9. Read these instructions - . 3. and as lighted candles, should be placed on the bottom of this owner's guide. the apparatus has been exposed to spill liquids into the apparatus; Ultra Low Delay Audio Coding...
Bose® link AL8 homewide wireless audio link - Owner's guide
Page 4
... help. Serial numbers: Transmitter Receiver Dealer name: _____ Dealer phone Purchase date Bose recommends that generate electrical noise U.S.A. For Your Records Serial numbers are designed to operate this guide. 3 RF Guideline: This device meets the RF Guideline FCC/OET 65 and Canadian Health code 6 for non-Bose or older Bose products 7 Check the indicators and settings 8 The Status LED 8 The transmitter Channel button 9 Your Bose® link expansion room remote control 9 Your Bose link expansion room product...
Bose® link AL8 homewide wireless audio link - Owner's guide
Page 5
... audio expansion solution free from your LIFESTYLE® 18 or 28 Series II system or LIFESTYLE® 38 or 48 system in the space provided on "For Your Records" on page 3. 4 Unpacking the carton Carefully unpack the carton and save all of the parts shown (Figure 1). Figure 1 Carton contents Bose link A cables Owner's guide Ooooooooo Transmitter Receiver Power packs Note: Now is a good time to find the serial numbers...
Bose® link AL8 homewide wireless audio link - Owner's guide
Page 7
...product connecting to a LIFESTYLE® media center Transmitter Bose® link INPUT Bose link A cable LIFESTYLE® media center Main Speaker jack Bose link Speaker jack Note: If another product is already connected to "Check the indicators and settings" on page 7. The transmitter and receiver each LIFESTYLE® system. Français Español English SETUP Making the connections You can use the wireless audio link to replace this wired connection. Each unit also connects to power using this power connection. Note: Instructions for non-Bose or older Bose products...
Bose® link AL8 homewide wireless audio link - Owner's guide
Page 8
...; Powered speakers, a radio, or system with some products that are color coded, red for right and white for non-Bose or older Bose products The Bose link AL8 Homewide Wireless Audio Link also works with its own volume and on the receiver. 2. English Español Français SETUP Figure 5 Connection to a Bose link amplifier, as appropriate. 2. To use an adapter cable The RCA connectors are not Bose link compatible. Match left to right. 7 Insert the small plug on the power...
Bose® link AL8 homewide wireless audio link - Owner's guide
Page 9
...Room Product Audio Input L R Transmitter Bose® link INPUT Receiver Bose® link OUTPUT Adapter cable Adapter cable 3. Note: For information on the system, radio, or powered speakers connected to solid green. To control volume when a non-Bose product is the sound source: • There is connected to the transmitter. • Use the volume control on the meaning of both LEDs to change to the receiver in the expansion room: • Use a Bose® link remote control or the PERSONAL® music center II to "Check the indicators and settings" below . Plug...
Bose® link AL8 homewide wireless audio link - Owner's guide
Page 10
... Bose® link expansion room remote control • Room code If you need to match house codes on these house code and room code settings and how to change them , refer to the owner's guide that came with each one channel at a time. English Español Français SETUP The transmitter Channel button You can use the Channel button to narrow the selection of the capabilities provided by your Bose link AL8 Homewide Wireless Audio Link...
Bose® link AL8 homewide wireless audio link - Owner's guide
Page 11
... match the room codes on the connection panel and the power pack is plugged securely into the AC Power jack on the amplifier or powered speaker and are lit a solid green to indicate solid communication between them does not intersect with a telephone, TV or other electronic device • For interference with the Bose® link AL8 Homewide Wireless Audio Link. the Setup code switches on the Bose link remote control or PERSONAL music center II to...
Bose® link AL8 homewide wireless audio link - Owner's guide
Page 12
... with your system. Details of your LIFESTYLE® system and Bose link remote controls. Technical Information Power rating 9.5V , 1.0A Frequency band 2.4000 GHz to the owner's guides that came with your LIFESTYLE® system and any remote controls you are identical. There are provided on house codes and how to change them, refer to 2.4835 GHz Transmitter Audio Input Level 2 Vrms (fixed) Receiver Audio Output Level 2 Vrms (fixed) RF Transmit power Approx. 300mW...
Lifestyle® VS-2 video enhancer - Owner's guide
Page 4
... select a source, such as your cable/satellite box and VCR, connect to the VS-2, but the AUDIO outputs from these devices connect to TV Video AUX Video Video CBL•SAT VCR Audio Audio Audio LIFESTYLE® media center 4 Features and benefits • Incorporates HDMITM (High-Definition Multimedia Interface) technology to help maximize your home theater experience. • Provides HDMI, component, S-Video, and composite video connections for your TV, cable/satellite box, VCR, or other A/V input devices. •...
Lifestyle® VS-2 video enhancer - Owner's guide
Page 19
... TV channels When the VS-2 is set TV control to CBL•SAT and press the TV source button on your remote, you to an audio source from a local radio station. System menu - Just press the remote button (CD/DVD, VCR, CBL•SAT, or AUX) for the source you switch to continue viewing the video portion of your TV. If you to use. If your TV screen is turned on your cable or...
Lifestyle® VS-2 video enhancer - Owner's guide
Page 22
... and phone number list included with your system. Use of certain U.S. and are owned by Macrovision Corporation, and is intended for home and other rights owners. English Technical information Dimensions 15.6" W x 4.8" D x 1.6" H (39.55 cm x 12.07 cm x 4.0 cm) VS-2 power rating 9 W Video inputs (2) HDMI (CBL•SAT and VCR) (3) Component (3) S-Video (3) Composite Video output HDMI Component S-Video Composite Weight (approximate) 2.5 lb (1.13 kg) Finish Diecast aluminum Contacting Customer Service...
SL2 wireless surround link - Owner's guide
Page 2
... product. 2 Follow all warnings - Install in this owner's guide. Do not install near any heat sources, such as radiators, heat registers, stoves, or other apparatus (including amplifiers) that will help you set up and operate your system properly and enjoy its proper ventilation. 8. As with liquids, such as lighted candles, should be of sufficient magnitude to constitute a risk of important operating and maintenance instructions...
SL2 wireless surround link - Owner's guide
Page 6
...; module, as follows (Figure 4): 1. Connect the other connections. Insert the single connector at one end of the cable into the jack labeled Left Rear or Surround L. 3. Figure 3 Different power supplies SL2 transmitter Input jack SL2 receiver Output jacks Figure 4 Transmitter connections Transmitter power pack AC power jack Receiver power pack AC power jack Before you plug either of the SL2 transmitter. 2. Connect the cable end of the transmitter power pack to transmit. 6 Connecting the SL2 transmitter Use the supplied transmitter cable...
SL2 wireless surround link - Owner's guide
Page 8
... for low power use when there is trying to link to deal with a blinking red LED, see "Troubleshooting" on the Jewel Cube® speaker adapter so you connect the provided surround speaker cable to communicate. • Solid green: the receiver and transmitter are communicating with each other . • Solid orange: in "To make the receiver connections" on page 7. What the Status LEDs indicate On the rear of...
SL2 wireless surround link - Owner's guide
Page 9
... WIRELESS SURROUND LINK Troubleshooting Problem What to do Blinking red Status LED on either the SL2 transmitter or receiver • Disconnect the unit from the AC power outlet. • Remove any possible obstruction to the SL2 transmitter, the Acoustimass® module, the SL2 receiver, and the surround speakers. Refer to "Making the connections" on page 6. • Make sure that cables are properly plugged into functioning AC power outlets. No sound or intermittent sound...
uMusic®+ guide
Page 4
... DISC) STORED, remove the disc. Or, you have the legal right to provide the album identity. Before copying audio material onto your collected music. For details on MP3 preparation, refer to add the identity. Put the disc in and close the tray. 3. ACCESSING GRACENOTE MEDIA DATABASE appears on page 26. •Not use the system Edit screen to "More about compatible discs" on the display...
Personal® music center II - Owner's guide
Page 3
... 4 Installing the batteries 4 Confirm that current settings are right 5 Change the settings, as needed 5 Basic controls 6 Getting to what you want 6 What appears on the display 7 Buttons to use while you listen 9 Listening to Your LIFESTYLE® System 10 Performance at your command 10 Playing stored music 10 Searching the library of stored music 13 Using the radio 14 Playing a CD 15 Playing a DVD or VCD 17 Listening to other sources...
Personal® music center II - Owner's guide
Page 6
... to get a feel for what you want The few selection buttons and the display screen, you can see, choose from a value (for other actions. Activates the last used source, which arrows to control. Its radio frequency (RF) signals can reach the system from the display. Alerts the LIFESTYLE® system media center in your home, even outside. Increases or decreases selection values. • Tipping the...
Personal® music center II - Owner's guide
Page 23
...® music center II must change settings for use in an expansion room, while the LIFESTYLE® system media center and primary remote are set up , your LIFESTYLE® system know where commands that came with your PERSONAL® music center II in the main room, in addition to the primary remote control, it must be set for Room A. • For use with other LIFESTYLE® system remotes for use more room code details, refer to the operating guide that...