
The Bose® Lifestyle® amplifier - Owner's guide
Page 4
... by turning the equipment off and on, you are designed to operate this page. This will not occur in a residential installation. This equipment generates, uses, and can be connected to the grounding system of the building, as close to radio or television reception, which the receiver is connected. • Consult the dealer or an experienced radio/TV technician for help. Antenna grounding...
... by turning the equipment off and on, you are designed to operate this page. This will not occur in a residential installation. This equipment generates, uses, and can be connected to the grounding system of the building, as close to radio or television reception, which the receiver is connected. • Consult the dealer or an experienced radio/TV technician for help. Antenna grounding...

The Bose® Lifestyle® amplifier - Owner's guide
Page 5
... your Lifestyle® stereo amplifier 5 Connecting the Lifestyle® stereo amplifier to a multi-room interface 7 Connecting the Lifestyle® stereo amplifier to a Lifestyle® media center 9 Setting up your system 15 Maintaining Your Lifestyle® Stereo Amplifier Cleaning the amplifier 16 Protecting outdoor wiring 16 Troubleshooting 16 Customer service 17 Warranty period 17 Technical information 18 For your records The serial number is located on the bottom panel of your sales receipt and warranty card together with this owner's guide.
... your Lifestyle® stereo amplifier 5 Connecting the Lifestyle® stereo amplifier to a multi-room interface 7 Connecting the Lifestyle® stereo amplifier to a Lifestyle® media center 9 Setting up your system 15 Maintaining Your Lifestyle® Stereo Amplifier Cleaning the amplifier 16 Protecting outdoor wiring 16 Troubleshooting 16 Customer service 17 Warranty period 17 Technical information 18 For your records The serial number is located on the bottom panel of your sales receipt and warranty card together with this owner's guide.

The Bose® Lifestyle® amplifier - Owner's guide
Page 6
... the serial number on the rear panel of the shipping carton 30-ft audio input cable PN197406 Lifestyle® stereo amplifier Owner's guide Power cord* USA/Canada (120V) * The Lifestyle® stereo amplifier includes a 120V AC (mains) power cord for use . If any way. Contact your power (mains) outlet, DO NOT alter the plug in the amplifier, ensures full, rich stereo sound, even when the speakers are playing...
... the serial number on the rear panel of the shipping carton 30-ft audio input cable PN197406 Lifestyle® stereo amplifier Owner's guide Power cord* USA/Canada (120V) * The Lifestyle® stereo amplifier includes a 120V AC (mains) power cord for use . If any way. Contact your power (mains) outlet, DO NOT alter the plug in the amplifier, ensures full, rich stereo sound, even when the speakers are playing...

The Bose® Lifestyle® amplifier - Owner's guide
Page 9
...;er Lifestyle® stereo amplifier rear panel Multi-room interface rear panel 4 Ω MINIMUM LL R L SYSTEM RR CONTROL L R +- Insert the single multi-pin connector at one of the unused ROOM output jacks (B, C, or D) on the rear panel of the multi-room interface (Figure 6). 2. Setting Up Your Lifestyle® Stereo Amplifier Connecting the Lifestyle® stereo amplifier to a multi-room interface CAUTION: Before making any connections, turn the Lifestyle® system off and disconnect the music center from...
...;er Lifestyle® stereo amplifier rear panel Multi-room interface rear panel 4 Ω MINIMUM LL R L SYSTEM RR CONTROL L R +- Insert the single multi-pin connector at one of the unused ROOM output jacks (B, C, or D) on the rear panel of the multi-room interface (Figure 6). 2. Setting Up Your Lifestyle® Stereo Amplifier Connecting the Lifestyle® stereo amplifier to a multi-room interface CAUTION: Before making any connections, turn the Lifestyle® system off and disconnect the music center from...

The Bose® Lifestyle® amplifier - Owner's guide
Page 11
At the other connections. 1. Figure 8 Cable connections between the Lifestyle® media center and the Lifestyle® stereo amplifier Lifestyle® SA-1 stereo amplifier rear panel Lifestyle® media center rear panel 30-ft audio input cable (supplied) AM262840_00_V.pdf January 4, 2002 9 Insert the single-connector end of the audio input cable into the SPEAKER ZONES 2 output jack on the rear panel of the amplifier. Insert the white RCA piggyback connector of the media center (Figure 8). 2. DO NOT plug the amplifier into...
At the other connections. 1. Figure 8 Cable connections between the Lifestyle® media center and the Lifestyle® stereo amplifier Lifestyle® SA-1 stereo amplifier rear panel Lifestyle® media center rear panel 30-ft audio input cable (supplied) AM262840_00_V.pdf January 4, 2002 9 Insert the single-connector end of the audio input cable into the SPEAKER ZONES 2 output jack on the rear panel of the amplifier. Insert the white RCA piggyback connector of the media center (Figure 8). 2. DO NOT plug the amplifier into...

The Bose® Lifestyle® amplifier - Owner's guide
Page 12
.../DVD Changer FM/AM TV VCR AUX MENU / NAVIGATION Settings Tune Disc Seek Enter Channel Chapter Preset Track Volume 1 2 3 4 5 6 7 8 9 0 PLAYBACK Stop Pause Play Shuffle Repeat Settings Settings ( ) System Setup Enter System Setup (3 of 3). You will open the on again; Before using the enter button. 3. The last item on your first remote. 3. Setting Up Your Lifestyle® Stereo Amplifier Figure 9 Setting up a Zone 2 remote control Setting up the remote control You need to set up , and switches 6 and 9 are down with a Lifestyle® media center...
.../DVD Changer FM/AM TV VCR AUX MENU / NAVIGATION Settings Tune Disc Seek Enter Channel Chapter Preset Track Volume 1 2 3 4 5 6 7 8 9 0 PLAYBACK Stop Pause Play Shuffle Repeat Settings Settings ( ) System Setup Enter System Setup (3 of 3). You will open the on again; Before using the enter button. 3. The last item on your first remote. 3. Setting Up Your Lifestyle® Stereo Amplifier Figure 9 Setting up a Zone 2 remote control Setting up the remote control You need to set up , and switches 6 and 9 are down with a Lifestyle® media center...

The Bose® Lifestyle® amplifier - Owner's guide
Page 13
... Model 20 music center and the Lifestyle® stereo amplifier CAUTION: Before making connections, turn the Lifestyle® system off and disconnect the music center from the AC (mains) power outlet. SPEAKER OUTPUTS INPUT Model 20 music center rear panel 30-ft audio input cable (supplied) AM262840_00_V.pdf January 4, 2002 11 DO NOT plug the amplifier into an outlet until you have completed all other end of the audio input cable, insert the 3.5 mm mini-plug into the SYSTEM CONTROL jack...
... Model 20 music center and the Lifestyle® stereo amplifier CAUTION: Before making connections, turn the Lifestyle® system off and disconnect the music center from the AC (mains) power outlet. SPEAKER OUTPUTS INPUT Model 20 music center rear panel 30-ft audio input cable (supplied) AM262840_00_V.pdf January 4, 2002 11 DO NOT plug the amplifier into an outlet until you have completed all other end of the audio input cable, insert the 3.5 mm mini-plug into the SYSTEM CONTROL jack...

The Bose® Lifestyle® amplifier - Owner's guide
Page 15
... Model 5 music center rear panel Lifestyle® stereo amplifier rear panel 4 Ω MINIMUM LL LL SYSTEM RR CONTROL R +- CAUTION: Before making connections, turn the Lifestyle® system off and disconnect the music center from the FIXED R and FIXED L OUTPUT jacks. SPSEPAEKAEKREROOUUTPTUPUTSTS INPUT 3.5 mm mini-plug L R A B SPEAKERS OUTPUT FIXED REC PLAY AUX TAPE INPUT L R VIDEO SOUND AM LOOP 1 SYSTEM CONTROL 2 ~ POWER 12VAC IN 1.0A ANTENNA SEE INSTRUCTION MANUAL Fixed speaker outputs 30-ft audio input cable (supplied) Acoustimass module cable...
... Model 5 music center rear panel Lifestyle® stereo amplifier rear panel 4 Ω MINIMUM LL LL SYSTEM RR CONTROL R +- CAUTION: Before making connections, turn the Lifestyle® system off and disconnect the music center from the FIXED R and FIXED L OUTPUT jacks. SPSEPAEKAEKREROOUUTPTUPUTSTS INPUT 3.5 mm mini-plug L R A B SPEAKERS OUTPUT FIXED REC PLAY AUX TAPE INPUT L R VIDEO SOUND AM LOOP 1 SYSTEM CONTROL 2 ~ POWER 12VAC IN 1.0A ANTENNA SEE INSTRUCTION MANUAL Fixed speaker outputs 30-ft audio input cable (supplied) Acoustimass module cable...

The Bose® Lifestyle® amplifier - Owner's guide
Page 16
... which speaker cable is connected to the R (right) output on operating your Lifestyle® stereo amplifier CAUTION: DO NOT connect the amplifier to powered speakers of two insulated wires. Setting Up Your Lifestyle® Stereo Amplifier ® Figure 13 RC-5 remote switch settings Setting up the RC-5 remote control If your system uses a Model 5 music center, you face it should always be connected to the positive (+ or red) terminal. Note: Refer to your Lifestyle® system owner's guide...
... which speaker cable is connected to the R (right) output on operating your Lifestyle® stereo amplifier CAUTION: DO NOT connect the amplifier to powered speakers of two insulated wires. Setting Up Your Lifestyle® Stereo Amplifier ® Figure 13 RC-5 remote switch settings Setting up the RC-5 remote control If your system uses a Model 5 music center, you face it should always be connected to the positive (+ or red) terminal. Note: Refer to your Lifestyle® system owner's guide...

The Bose® Lifestyle® amplifier - Owner's guide
Page 18
... speaker plays • Check the wires connected to the elements. Troubleshooting If you do Neither speaker plays • Make sure the Lifestyle® music center and the amplifier are plugged in and turned on . • If using a Model 20 music center, make sure the audio input cable is inserted into SPEAKER ZONE 2. • If using a Model 5 music center for home theater (Lifestyle® 12 or Lifestyle® 8 systems), make sure the amplifier audio input cable is designed only for service, or contact Bose Customer Service...
... speaker plays • Check the wires connected to the elements. Troubleshooting If you do Neither speaker plays • Make sure the Lifestyle® music center and the amplifier are plugged in and turned on . • If using a Model 20 music center, make sure the audio input cable is inserted into SPEAKER ZONE 2. • If using a Model 5 music center for home theater (Lifestyle® 12 or Lifestyle® 8 systems), make sure the amplifier audio input cable is designed only for service, or contact Bose Customer Service...

The Bose® Lifestyle® amplifier - Owner's guide
Page 19
... wires are touching across terminals. • See "Connecting speakers to the address list enclosed in the SYSTEM CONTROL 2 jack. • If you are using an RC-20 or RC-5 remote control, make sure the remote control switch settings are connected + to that was an intentional action of the cable to your Lifestyle® DVD system's owners guide. Connect it to do One speaker still does not play . For more informa- If the speaker does not play , the problem...
... wires are touching across terminals. • See "Connecting speakers to the address list enclosed in the SYSTEM CONTROL 2 jack. • If you are using an RC-20 or RC-5 remote control, make sure the remote control switch settings are connected + to that was an intentional action of the cable to your Lifestyle® DVD system's owners guide. Connect it to do One speaker still does not play . For more informa- If the speaker does not play , the problem...

Owner's guide
Page 3
... Lifestyle powered speakers 13 Connections for the Bose Wave radio 15 Connecting the Lifestyle' music centers antennas and power 16 Special radio settings for your remote control 38 Customer Service 39 Warranty 40 Technical Information 41 Index 42 3 VCR, or Laserdisc player 20 Turntable 20 Headphones 20 Basic Operation 21 The music center display 21 The music center controls 21 The Lifestyle' remote control 22 Listening to theradio 23 Tuning 23 Listening to prevent interference with other components 19 CD changer 19 Tape...
... Lifestyle powered speakers 13 Connections for the Bose Wave radio 15 Connecting the Lifestyle' music centers antennas and power 16 Special radio settings for your remote control 38 Customer Service 39 Warranty 40 Technical Information 41 Index 42 3 VCR, or Laserdisc player 20 Turntable 20 Headphones 20 Basic Operation 21 The music center display 21 The music center controls 21 The Lifestyle' remote control 22 Listening to theradio 23 Tuning 23 Listening to prevent interference with other components 19 CD changer 19 Tape...

Owner's guide
Page 6
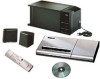
... a CD changer. The simple-to use remote control uses radiowaves that are supplied with AM/FM tuner and CD player. Saveall packingmaterial for possible futureuse.If I The smaller of a Lifestyle' music center with dual voltage models only) • One (1) remote control • Three (3) AA batteries The larger carton contains a Bose' powered speaker system. Please take the time to superbly reproduced sound. and Bose' powered speakers with considerable listening enjoyment. With its fine sound quality will help you operate your music system...
... a CD changer. The simple-to use remote control uses radiowaves that are supplied with AM/FM tuner and CD player. Saveall packingmaterial for possible futureuse.If I The smaller of a Lifestyle' music center with dual voltage models only) • One (1) remote control • Three (3) AA batteries The larger carton contains a Bose' powered speaker system. Please take the time to superbly reproduced sound. and Bose' powered speakers with considerable listening enjoyment. With its fine sound quality will help you operate your music system...
Owner's guide
Page 7
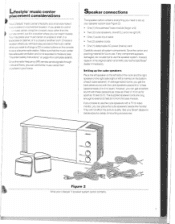
... set up the cube speakers Place the left speaker on page 4 for future use. Youmay place your Lifestyle' 3 speaker system carton contains. Choose a location where you want to moisture (see "Important safety instructions' on the left side of mounting accessories. ..&11026e- • Figure 2 What your music Center ona table or shelf. Speaker connections The speaker carton contains everything you can get the best stereo sound with these speakers...
... set up the cube speakers Place the left speaker on page 4 for future use. Youmay place your Lifestyle' 3 speaker system carton contains. Choose a location where you want to moisture (see "Important safety instructions' on the left side of mounting accessories. ..&11026e- • Figure 2 What your music Center ona table or shelf. Speaker connections The speaker carton contains everything you can get the best stereo sound with these speakers...

Owner's guide
Page 12
... ways to do this: use multiple speaker. Rotate the controls clockwise to increase, and counterclockwise to decrease, the amount of the system components. Room compensation controls The 2-rcom compensation control knobs on the bass module allow you use the volume and room compensation controls located on the front of the Acoustimass' bass module allows you may wish to adjust the sound to your Lifestyle' music system. Getting the best sound After you listen to...
... ways to do this: use multiple speaker. Rotate the controls clockwise to increase, and counterclockwise to decrease, the amount of the system components. Room compensation controls The 2-rcom compensation control knobs on the bass module allow you use the volume and room compensation controls located on the front of the Acoustimass' bass module allows you may wish to adjust the sound to your Lifestyle' music system. Getting the best sound After you listen to...

Owner's guide
Page 20
... system. 2. Insert the red plug at the other video-sound source. Volume adjustments apply to twojacks that willsupply theleftandright VIDEO SOUNDINPUTS. Connect the turntable to the preamplifier (preamp) as directed in two different rooms." Connecting headphones There is disconnected. SPEAKERS A OUTPUT is a stereo mini-headphone jack on (see 'Listening in the instructions for the preamp. page 28). 20 VCR, Laserdisc, or other end of the same cable into the L (left AUDIO OUTPUT...
... system. 2. Insert the red plug at the other video-sound source. Volume adjustments apply to twojacks that willsupply theleftandright VIDEO SOUNDINPUTS. Connect the turntable to the preamplifier (preamp) as directed in two different rooms." Connecting headphones There is disconnected. SPEAKERS A OUTPUT is a stereo mini-headphone jack on (see 'Listening in the instructions for the preamp. page 28). 20 VCR, Laserdisc, or other end of the same cable into the L (left AUDIO OUTPUT...
Owner's guide
Page 21
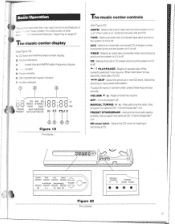
... center controls (SeeFigure 20) AM/FM -Selects the built-inradioand turns the system onif off . PRESET STORE/ERASE - To play CD tracks inrandomorder, press thesekeys simultaneously. CD track and AMFMpreset number display. 2. TAPE -Selects an externally connected tape deck and turns the system on if it is off. AUX - Basic Operation This section describes the most-used functions and features of the currently selected music source. Manually tune the radio. Add and remove radio station presets. Opens the CD cover...
... center controls (SeeFigure 20) AM/FM -Selects the built-inradioand turns the system onif off . PRESET STORE/ERASE - To play CD tracks inrandomorder, press thesekeys simultaneously. CD track and AMFMpreset number display. 2. TAPE -Selects an externally connected tape deck and turns the system on if it is off. AUX - Basic Operation This section describes the most-used functions and features of the currently selected music source. Manually tune the radio. Add and remove radio station presets. Opens the CD cover...

Owner's guide
Page 30
...: Music center controls willnot turnonspeakersin the 8 area. Blank key (disc key) - ZONE 1 • 2 switch - Note: For two-roomoperation, set the deluxeremote controls ZONE switch to that listening area. • To turn on the remote set to play sequence. Operating considerations Wnen you can also mute these speakers independently. • To use a remote control set the remote control to display the programmed play complete CD tracks. / ni SKIP - Press the key repeatedly to SPEAKERS A. set for a programmed play CD tracks in one remote control...
...: Music center controls willnot turnonspeakersin the 8 area. Blank key (disc key) - ZONE 1 • 2 switch - Note: For two-roomoperation, set the deluxeremote controls ZONE switch to that listening area. • To turn on the remote set to play sequence. Operating considerations Wnen you can also mute these speakers independently. • To use a remote control set the remote control to display the programmed play complete CD tracks. / ni SKIP - Press the key repeatedly to SPEAKERS A. set for a programmed play CD tracks in one remote control...
Owner's guide
Page 34
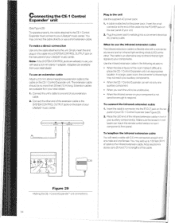
... in the unit Use the supplied AC power pack. 1. To make a direct connection When to the infrared extension cable. Simply insert the end The infrared extension cable is an alternative way to direct infrared light signals to the SYSTEM CONTROL OUTPUT jacks on each end, onemale andone female. The cable is a flexible wire with 3.5-mm connectors at the end of the cable into a SYSTEM CONTROL OUTPUT jack on the rear panel of your unit...
... in the unit Use the supplied AC power pack. 1. To make a direct connection When to the infrared extension cable. Simply insert the end The infrared extension cable is an alternative way to direct infrared light signals to the SYSTEM CONTROL OUTPUT jacks on each end, onemale andone female. The cable is a flexible wire with 3.5-mm connectors at the end of the cable into a SYSTEM CONTROL OUTPUT jack on the rear panel of your unit...

Owner's guide
Page 42
...35 Operation with a Lifestyle'remote control36 Channel spacing, AM andFM 18 Connections Additional Bose powered Speakers 13 AMantenna 17 Bass module power (mains) cord 11 Bass module to music center 10 Bose' Lifestyle powered speakers 13 Bose Wave radio 15 Cube speakers to bass module 9 External components CO changer 19 CE-1 ControlExpander unit 34 Tape deck 19 Turntable 20 TV, VCR, or Laserdisc player 20 FM antenna 16 Headphones 20 Lifestyle powered speakers to music center 14 Music center power pack 17 Controls Music center 21 Room compensation 12 Customer service 39 Display, music center 21...
...35 Operation with a Lifestyle'remote control36 Channel spacing, AM andFM 18 Connections Additional Bose powered Speakers 13 AMantenna 17 Bass module power (mains) cord 11 Bass module to music center 10 Bose' Lifestyle powered speakers 13 Bose Wave radio 15 Cube speakers to bass module 9 External components CO changer 19 CE-1 ControlExpander unit 34 Tape deck 19 Turntable 20 TV, VCR, or Laserdisc player 20 FM antenna 16 Headphones 20 Lifestyle powered speakers to music center 14 Music center power pack 17 Controls Music center 21 Room compensation 12 Customer service 39 Display, music center 21...


