
The Bose® Lifestyle® amplifier - Owner's guide
Page 4
Note: Unauthorized modification of the receiver or radio remote control could void the user's authority to comply with the instructions, may cause harmful interference to the point of antenna-discharge unit, connection to provide ... Outdoor Antennas - Refer to the antenna grounding illustration on a different circuit than the one to CATV system installer This reminder is practical. ©2001 Bose Corporation, The Mountain, Framingham, MA 01701-9168 USA 255805 AM Rev.00 JN10494 2b January 10, 2002 AM262840_00_V.pdf Ground clamp Electric service equipment Antenna...
Note: Unauthorized modification of the receiver or radio remote control could void the user's authority to comply with the instructions, may cause harmful interference to the point of antenna-discharge unit, connection to provide ... Outdoor Antennas - Refer to the antenna grounding illustration on a different circuit than the one to CATV system installer This reminder is practical. ©2001 Bose Corporation, The Mountain, Framingham, MA 01701-9168 USA 255805 AM Rev.00 JN10494 2b January 10, 2002 AM262840_00_V.pdf Ground clamp Electric service equipment Antenna...

The Bose® Lifestyle® amplifier - Owner's guide
Page 5
... you begin 4 Unpacking the carton 4 Selecting a location for your Lifestyle® stereo amplifier 5 Connecting the Lifestyle® stereo amplifier to a multi-room interface 7 Connecting the Lifestyle® stereo amplifier to a Lifestyle® media center 9 Setting up the remote control 10 Setting Zone 2 Protocol 10 Connecting the Lifestyle® stereo amplifier to a Model 20 music center 11 Connecting...
... you begin 4 Unpacking the carton 4 Selecting a location for your Lifestyle® stereo amplifier 5 Connecting the Lifestyle® stereo amplifier to a multi-room interface 7 Connecting the Lifestyle® stereo amplifier to a Lifestyle® media center 9 Setting up the remote control 10 Setting Zone 2 Protocol 10 Connecting the Lifestyle® stereo amplifier to a Model 20 music center 11 Connecting...

The Bose® Lifestyle® amplifier - Owner's guide
Page 12
... Seek Enter Channel Chapter Preset Track Volume 1 2 3 4 5 6 7 8 9 0 PLAYBACK Stop Pause Play Shuffle Repeat Settings Settings ( ) System Setup Enter System Setup (3 of 3). While your remote control. Scroll down with a Lifestyle® media center, you will now see a menu entitled System Setup (1 of 3) Zone 2 Protocol: Legacy 10 January 4, 2002 AM262840_00_V.pdf Make sure switches 5, 7, and...
... Seek Enter Channel Chapter Preset Track Volume 1 2 3 4 5 6 7 8 9 0 PLAYBACK Stop Pause Play Shuffle Repeat Settings Settings ( ) System Setup Enter System Setup (3 of 3). While your remote control. Scroll down with a Lifestyle® media center, you will now see a menu entitled System Setup (1 of 3) Zone 2 Protocol: Legacy 10 January 4, 2002 AM262840_00_V.pdf Make sure switches 5, 7, and...

The Bose® Lifestyle® amplifier - Owner's guide
Page 14
Note: Refer to your Lifestyle® system owner's guide for Zone 2 If your system uses a Model 20 music center, you need to operate the ZONE 2 outputs. 1. Remove the remote control battery cover and locate the miniature switches (Figure 11). 2. ON K40 l 2345678 12 January 4, 2002 ... switches 6 and 8 up a second RC-20 remote control to set up (on operating your system in your first remote. 3. Setting Up Your Lifestyle® Stereo Amplifier Figure 11 Setting up a Zone 2 remote control Setting up the RC-20 remote control for more information on ). Make sure that the ...
Note: Refer to your Lifestyle® system owner's guide for Zone 2 If your system uses a Model 20 music center, you need to operate the ZONE 2 outputs. 1. Remove the remote control battery cover and locate the miniature switches (Figure 11). 2. ON K40 l 2345678 12 January 4, 2002 ... switches 6 and 8 up a second RC-20 remote control to set up (on operating your system in your first remote. 3. Setting Up Your Lifestyle® Stereo Amplifier Figure 11 Setting up a Zone 2 remote control Setting up the RC-20 remote control for more information on ). Make sure that the ...

The Bose® Lifestyle® amplifier - Owner's guide
Page 16
...is connected to the R (right) output on the left in the listening area (as you need to set up a second RC-5 remote control to operate your Lifestyle® stereo amplifier. 1. Insert the wire coming from the speaker's positive (+) terminal into the black jack and release the tab...L (left speaker cable to the SPEAKER OUTPUT L terminals in more than one room. Setting Up Your Lifestyle® Stereo Amplifier ® Figure 13 RC-5 remote switch settings Setting up the RC-5 remote control If your system uses a Model 5 music center, you face it should always be connected to the ...
...is connected to the R (right) output on the left in the listening area (as you need to set up a second RC-5 remote control to operate your Lifestyle® stereo amplifier. 1. Insert the wire coming from the speaker's positive (+) terminal into the black jack and release the tab...L (left speaker cable to the SPEAKER OUTPUT L terminals in more than one room. Setting Up Your Lifestyle® Stereo Amplifier ® Figure 13 RC-5 remote switch settings Setting up the RC-5 remote control If your system uses a Model 5 music center, you face it should always be connected to the ...

The Bose® Lifestyle® amplifier - Owner's guide
Page 17
... new remote control and adjust the vol- If you plan to your system CAUTION: DO NOT plug the AC power cord into the AC power jack on the rear panel of the Lifestyle®... Connect the power cord of the amplifier (Figure 16). 2. If you have a dual voltage Lifestyle® amplifier • Dual voltage units have a voltage selection switch on the amplifier... AM262840_00_V.pdf January 4, 2002 15 Select a music source with your Lifestyle® stereo amplifier, firmly insert the small connector on one end of the power...
... new remote control and adjust the vol- If you plan to your system CAUTION: DO NOT plug the AC power cord into the AC power jack on the rear panel of the Lifestyle®... Connect the power cord of the amplifier (Figure 16). 2. If you have a dual voltage Lifestyle® amplifier • Dual voltage units have a voltage selection switch on the amplifier... AM262840_00_V.pdf January 4, 2002 15 Select a music source with your Lifestyle® stereo amplifier, firmly insert the small connector on one end of the power...

The Bose® Lifestyle® amplifier - Owner's guide
Page 18
...as RTV adhesive, to arrange for service, or contact Bose Customer Service. Do not use caulking, apply it only after installing the Lifestyle® stereo amplifier, follow the guidelines below. Problem What to your Lifestyle® system after the wires are connected and the... to the piggyback jacks on page 14. 16 January 4, 2002 AM262840_00_V.pdf Maintaining Your Lifestyle® Stereo Amplifier Cleaning the amplifier The amplifier, which is designed only for indoor use any headphones. • Make sure the remote control switch settings are correct.
...as RTV adhesive, to arrange for service, or contact Bose Customer Service. Do not use caulking, apply it only after installing the Lifestyle® stereo amplifier, follow the guidelines below. Problem What to your Lifestyle® system after the wires are connected and the... to the piggyback jacks on page 14. 16 January 4, 2002 AM262840_00_V.pdf Maintaining Your Lifestyle® Stereo Amplifier Cleaning the amplifier The amplifier, which is designed only for indoor use any headphones. • Make sure the remote control switch settings are correct.

The Bose® Lifestyle® amplifier - Owner's guide
Page 19
... intentional action of the amplifier. Zone 2 does not • If you are using an RC-20 or RC-5 remote control, make sure the remote control switch settings are using a Lifestyle® DVD system, the stereo amplifier will not work unless work at all "Zone 2 Protocol" in the system ... is • Check the speaker wire connections. Bass or treble is overdriving the speakers. This engages automatically if the volume is set to Bose. For more informa- Customer service For additional help in the product packaging for the source of the speaker and on the back of the...
... intentional action of the amplifier. Zone 2 does not • If you are using an RC-20 or RC-5 remote control, make sure the remote control switch settings are using a Lifestyle® DVD system, the stereo amplifier will not work unless work at all "Zone 2 Protocol" in the system ... is • Check the speaker wire connections. Bass or treble is overdriving the speakers. This engages automatically if the volume is set to Bose. For more informa- Customer service For additional help in the product packaging for the source of the speaker and on the back of the...

Owner's guide
Page 3
...block the ventilation openings. Unplug this product near a bathtub, washbowl, kitchen sink, laundry tub, in a particular installation. Please call Bose to be determined by turning the equipment off and on, you . 15. This equipment generates, uses, and can be referred to ...fire or electric shock. 17. These limits are encouraged to try to correct the interference by Bose® Corporation. Unplug this product. 2. for long periods of the receiver or radio remote control could result in a residential installation. A polarized plug has two blades with a dry cloth ...
...block the ventilation openings. Unplug this product near a bathtub, washbowl, kitchen sink, laundry tub, in a particular installation. Please call Bose to be determined by turning the equipment off and on, you . 15. This equipment generates, uses, and can be referred to ...fire or electric shock. 17. These limits are encouraged to try to correct the interference by Bose® Corporation. Unplug this product. 2. for long periods of the receiver or radio remote control could result in a residential installation. A polarized plug has two blades with a dry cloth ...
Owner's guide
Page 5
... Selecting the locations for your Lifestyle® 25 Series II system 6 Connecting the speakers and Lifestyle® music center 9 Connecting your home theater components to the Lifestyle® 25 system 12 Connecting the antennas 16 Installing the batteries in the remote control 17 Setting radio channel spacing ... Information Technical information 36 Accessories ...36 Index ...37 Bose® Corporation inside back cover For your sales slip and warranty card together with external components 28 Maintaining Your Lifestyle® 25 System Fine-tuning your system 29 Using two listening ...
... Selecting the locations for your Lifestyle® 25 Series II system 6 Connecting the speakers and Lifestyle® music center 9 Connecting your home theater components to the Lifestyle® 25 system 12 Connecting the antennas 16 Installing the batteries in the remote control 17 Setting radio channel spacing ... Information Technical information 36 Accessories ...36 Index ...37 Bose® Corporation inside back cover For your sales slip and warranty card together with external components 28 Maintaining Your Lifestyle® 25 System Fine-tuning your system 29 Using two listening ...
Owner's guide
Page 6
... 2001 AM196575_05_V.pdf Compatibility Your system is increased surround sound realism and impact both for purchasing the Bose® Lifestyle® 25 Series II system. Your Lifestyle® 25 Series II system cannot process MPEG-2 or DTS digital bitstreams. • Surround-sound sources such as two or... or two. • Monaural program material. Videostage decoding directs stereo information to -use remote control Realism and impact Your Lifestyle® 25 Series II home theater system is enhanced by a loud special effect (e.g., a crash or explosion). Automatic sound level monitoring...
... 2001 AM196575_05_V.pdf Compatibility Your system is increased surround sound realism and impact both for purchasing the Bose® Lifestyle® 25 Series II system. Your Lifestyle® 25 Series II system cannot process MPEG-2 or DTS digital bitstreams. • Surround-sound sources such as two or... or two. • Monaural program material. Videostage decoding directs stereo information to -use remote control Realism and impact Your Lifestyle® 25 Series II home theater system is enhanced by a loud special effect (e.g., a crash or explosion). Automatic sound level monitoring...
Owner's guide
Page 7
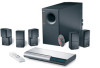
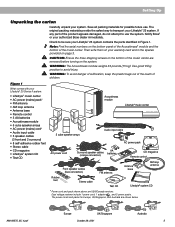
..., 2001 Australia 5 Setting Up Unpacking the carton Carefully unpack your authorized Bose dealer immediately. Then write them on your Lifestyle® 25 Series II system: • Lifestyle® music center • AC power (mains) pack* • FM antenna • AM loop antenna • Antenna base • Remote control • 3 AA batteries • Acoustimass module • 5 cube speaker arrays...
..., 2001 Australia 5 Setting Up Unpacking the carton Carefully unpack your authorized Bose dealer immediately. Then write them on your Lifestyle® 25 Series II system: • Lifestyle® music center • AC power (mains) pack* • FM antenna • AM loop antenna • Antenna base • Remote control • 3 AA batteries • Acoustimass module • 5 cube speaker arrays...
Owner's guide
Page 12
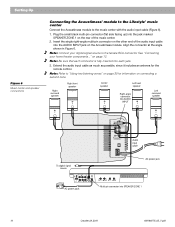
...RL R TAPE OUT Multi-pin connector into each jack. 3. Setting Up Figure 6 Music center and speaker connections Connecting the Acoustimass® module to the Lifestyle® music center Connect the Acoustimass module to the music center with the audio input cable (Figure 6). 1. Note: Be sure that each connector is ...of the music center. 2. on the Acoustimass module. See "Connecting your digital signal source to "Using two listening zones" on page 30 for the remote control. Plug the small black multi-pin connector (flat side facing up) into the AUDIO INPUT jack on page 12.
...RL R TAPE OUT Multi-pin connector into each jack. 3. Setting Up Figure 6 Music center and speaker connections Connecting the Acoustimass® module to the Lifestyle® music center Connect the Acoustimass module to the music center with the audio input cable (Figure 6). 1. Note: Be sure that each connector is ...of the music center. 2. on the Acoustimass module. See "Connecting your digital signal source to "Using two listening zones" on page 30 for the remote control. Plug the small black multi-pin connector (flat side facing up) into the AUDIO INPUT jack on page 12.

Owner's guide
Page 19
... as shown. markings inside the compartment. 3. Replace the batteries when the remote control stops operating or its range seems reduced. Alkaline batteries are recommended. To change the settings of the remote (Figure 15). 2. While holding ERASE, press SOURCE SELECT again to change...miniature switches. Setting Up Installing the batteries in the remote control 1. While holding the ERASE key, press SOURCE SELECT (on the batteries with other Lifestyle® music systems. Figure 15 Installing the remote control batteries 3 AA batteries Battery compartment cover Miniature switches ...
... as shown. markings inside the compartment. 3. Replace the batteries when the remote control stops operating or its range seems reduced. Alkaline batteries are recommended. To change the settings of the remote (Figure 15). 2. While holding ERASE, press SOURCE SELECT again to change...miniature switches. Setting Up Installing the batteries in the remote control 1. While holding the ERASE key, press SOURCE SELECT (on the batteries with other Lifestyle® music systems. Figure 15 Installing the remote control batteries 3 AA batteries Battery compartment cover Miniature switches ...

Owner's guide
Page 20
...indicator Source indicators Mute indicator Random play all cable and power connections are ready to the instructions on operating the music center controls and the Lifestyle® remote control. Note: If your system will not operate unless all discs or random play one disc indicator Play Pause indicator indicator ... pressing upwards on the music center Plug the Acoustimass® module power cord into an AC (mains) outlet. Operating Your Lifestyle® 25 System Turning on the bottom of the door (Figure 16). Listen to enjoy your pets from accidentally turning it on.
...indicator Source indicators Mute indicator Random play all cable and power connections are ready to the instructions on operating the music center controls and the Lifestyle® remote control. Note: If your system will not operate unless all discs or random play one disc indicator Play Pause indicator indicator ... pressing upwards on the music center Plug the Acoustimass® module power cord into an AC (mains) outlet. Operating Your Lifestyle® 25 System Turning on the bottom of the door (Figure 16). Listen to enjoy your pets from accidentally turning it on.

Owner's guide
Page 21
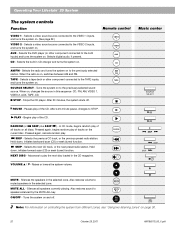
...the remote will not operate. STORE or ERASE - Figure 18 The music center controls ON O FF / II VOLUME PLAY/PAUSE SKIP STORE SOURCE SELECT NEXT DISC TUNE ERASE The Lifestyle® remote control Figure 19 The remote control The advanced radio-frequency remote control works... with better remote response. AM196575_05_V.pdf October 29, 2001 19 For instructions, see page 27. Simply press the desired button. Operating Your Lifestyle® 25 System The music center controls The music center function keys are described on the remote control select the ...
...the remote will not operate. STORE or ERASE - Figure 18 The music center controls ON O FF / II VOLUME PLAY/PAUSE SKIP STORE SOURCE SELECT NEXT DISC TUNE ERASE The Lifestyle® remote control Figure 19 The remote control The advanced radio-frequency remote control works... with better remote response. AM196575_05_V.pdf October 29, 2001 19 For instructions, see page 27. Simply press the desired button. Operating Your Lifestyle® 25 System The music center controls The music center function keys are described on the remote control select the ...
Owner's guide
Page 22
... play of all tracks on and off . Selects a video sound source connected to play of the CD. Remote control VIDEO 1 VIDEO 2 AUX CD AM/FM - Operating Your Lifestyle® 25 System The system controls Function VIDEO 1 - Selects the DVD player (or other component connected to the VIDEO 1 inputs, and turns... on to MUTE speakers silenced by the MUTE ALL key. Pauses play of tracks on . SKIP - Music center SOURCE SELECT / II / II SKIP SKIP SKIP MUTE - Also restores sound to the previously selected AM station. Turns the system on all speakers currently playing.
... play of all tracks on and off . Selects a video sound source connected to play of the CD. Remote control VIDEO 1 VIDEO 2 AUX CD AM/FM - Operating Your Lifestyle® 25 System The system controls Function VIDEO 1 - Selects the DVD player (or other component connected to the VIDEO 1 inputs, and turns... on to MUTE speakers silenced by the MUTE ALL key. Pauses play of tracks on . SKIP - Music center SOURCE SELECT / II / II SKIP SKIP SKIP MUTE - Also restores sound to the previously selected AM station. Turns the system on all speakers currently playing.

Owner's guide
Page 23
...• Press and hold for 8 seconds to restore (3 chimes) factory settings for speaker mode and surround volume level. Operating Your Lifestyle® 25 System Additional system controls Function SURROUND • Press and release to select SURROUND (5-speaker) mode for all sources. • Press and hold for 3 ...you hear the 3-chime confirmation tone, then press and SURROUND hold the STEREO+CENTER (3-speaker) until you select another speaker mode. Remote control SURROUND STEREO+CENTER STEREO SURROUND Note: If you set the master volume level very high or very low, a built-in feature ...
...• Press and hold for 8 seconds to restore (3 chimes) factory settings for speaker mode and surround volume level. Operating Your Lifestyle® 25 System Additional system controls Function SURROUND • Press and release to select SURROUND (5-speaker) mode for all sources. • Press and hold for 3 ...you hear the 3-chime confirmation tone, then press and SURROUND hold the STEREO+CENTER (3-speaker) until you select another speaker mode. Remote control SURROUND STEREO+CENTER STEREO SURROUND Note: If you set the master volume level very high or very low, a built-in feature ...
Owner's guide
Page 30
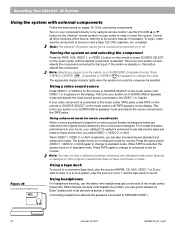
...tape, CD, DVD, laserdisc, etc. When TAPE is connected to dialogue or other functions at Bose® dealers and most electronics stores, if needed. Note: You may not hear a difference ... When VIDEO 1, VIDEO 2, or AUX is selected. This turns your system on your Lifestyle® 25 system's enhanced mode restores the bass and treble to these levels when you want to ..., VIDEO 1, or VIDEO 2 button on the remote or press SOURCE SELECT on the music center until VIDEO 1 or 2 appears on the Lifestyle® remote control or music center to enhanced mode for connecting components...
...tape, CD, DVD, laserdisc, etc. When TAPE is connected to dialogue or other functions at Bose® dealers and most electronics stores, if needed. Note: You may not hear a difference ... When VIDEO 1, VIDEO 2, or AUX is selected. This turns your system on your Lifestyle® 25 system's enhanced mode restores the bass and treble to these levels when you want to ..., VIDEO 1, or VIDEO 2 button on the remote or press SOURCE SELECT on the music center until VIDEO 1 or 2 appears on the Lifestyle® remote control or music center to enhanced mode for connecting components...
Owner's guide
Page 32
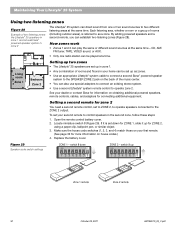
...on obtaining additional powered speakers, remote controls, cables, and adapters for information on house codes.) 4. Open the remote control battery cover. 2. Maintaining Your Lifestyle® 25 System Using two listening zones Figure 28 Example of two listening zones: the Lifestyle® 25 speakers in zone 1 and ...up for zone 2 You need a second remote control, set up in zone 1. • Any combination of rooms and floors in your second remote to as zones. • Use an appropriate Lifestyle® system cable to connect a second Bose® powered speaker system to two different...
...on obtaining additional powered speakers, remote controls, cables, and adapters for information on house codes.) 4. Open the remote control battery cover. 2. Maintaining Your Lifestyle® 25 System Using two listening zones Figure 28 Example of two listening zones: the Lifestyle® 25 speakers in zone 1 and ...up for zone 2 You need a second remote control, set up in zone 1. • Any combination of rooms and floors in your second remote to as zones. • Use an appropriate Lifestyle® system cable to connect a second Bose® powered speaker system to two different...

