
The Bose® Lifestyle® amplifier - Owner's guide
Page 4
... wire Information about products that the cable ground shall be connected to the grounding system of antenna grounding as is practical. ©2001 Bose Corporation, The Mountain, Framingham, MA 01701-9168 USA 255805 AM Rev.00 JN10494 2b January 10, 2002 AM262840_00_V.pdf However, this product...are encouraged to try to correct the interference by turning the equipment off and on this equipment. Section 810 of the receiver or radio remote control could void the user's authority to grounding electrodes, and requirements for help. This equipment generates, uses, and can be sure ...
... wire Information about products that the cable ground shall be connected to the grounding system of antenna grounding as is practical. ©2001 Bose Corporation, The Mountain, Framingham, MA 01701-9168 USA 255805 AM Rev.00 JN10494 2b January 10, 2002 AM262840_00_V.pdf However, this product...are encouraged to try to correct the interference by turning the equipment off and on this equipment. Section 810 of the receiver or radio remote control could void the user's authority to grounding electrodes, and requirements for help. This equipment generates, uses, and can be sure ...

The Bose® Lifestyle® amplifier - Owner's guide
Page 5
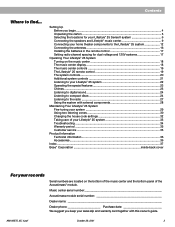
... you begin 4 Unpacking the carton 4 Selecting a location for your Lifestyle® stereo amplifier 5 Connecting the Lifestyle® stereo amplifier to a multi-room interface 7 Connecting the Lifestyle® stereo amplifier to a Lifestyle® media center 9 Setting up the remote control 10 Setting Zone 2 Protocol 10 Connecting the Lifestyle® stereo amplifier to a Model 20 music center 11...
... you begin 4 Unpacking the carton 4 Selecting a location for your Lifestyle® stereo amplifier 5 Connecting the Lifestyle® stereo amplifier to a multi-room interface 7 Connecting the Lifestyle® stereo amplifier to a Lifestyle® media center 9 Setting up the remote control 10 Setting Zone 2 Protocol 10 Connecting the Lifestyle® stereo amplifier to a Model 20 music center 11...

The Bose® Lifestyle® amplifier - Owner's guide
Page 12
... PLAYBACK Stop Pause Play Shuffle Repeat Settings Settings ( ) System Setup Enter System Setup (3 of 3). Note: Refer to your first remote. 3. This will open the on your Lifestyle® DVD system is Zone 2 Protocol. 4. Make sure switches 5, 7, and 8 are down to "more than one room. While ...and 4) match those in more ...". Setting Up Your Lifestyle® Stereo Amplifier Figure 9 Setting up a Zone 2 remote control Setting up the remote control You need to set up , and switches 6 and 9 are up a second remote control to operate the ZONE 2 output. 1. Use ...
... PLAYBACK Stop Pause Play Shuffle Repeat Settings Settings ( ) System Setup Enter System Setup (3 of 3). Note: Refer to your first remote. 3. This will open the on your Lifestyle® DVD system is Zone 2 Protocol. 4. Make sure switches 5, 7, and 8 are down to "more than one room. While ...and 4) match those in more ...". Setting Up Your Lifestyle® Stereo Amplifier Figure 9 Setting up a Zone 2 remote control Setting up the remote control You need to set up , and switches 6 and 9 are up a second remote control to operate the ZONE 2 output. 1. Use ...

The Bose® Lifestyle® amplifier - Owner's guide
Page 14
...ON K40 l 2345678 12 January 4, 2002 AM262840_00_V.pdf Make sure that the house code settings (switches 1, 2, 3, and 4) match those in your Lifestyle® system owner's guide for Zone 2 If your system uses a Model 20 music center, you need to set up (on operating your system ...in more information on ). Remove the remote control battery cover and locate the miniature switches (Figure 11). 2. Setting Up Your Lifestyle® Stereo Amplifier Figure 11 Setting up a Zone 2 remote control Setting up the RC-20 remote control for more than one room. Slide switch 5...
...ON K40 l 2345678 12 January 4, 2002 AM262840_00_V.pdf Make sure that the house code settings (switches 1, 2, 3, and 4) match those in your Lifestyle® system owner's guide for Zone 2 If your system uses a Model 20 music center, you need to set up (on operating your system ...in more information on ). Remove the remote control battery cover and locate the miniature switches (Figure 11). 2. Setting Up Your Lifestyle® Stereo Amplifier Figure 11 Setting up a Zone 2 remote control Setting up the RC-20 remote control for more than one room. Slide switch 5...

The Bose® Lifestyle® amplifier - Owner's guide
Page 16
...sure that it ) attaches to the cable connected to the L output. Slide switch 5 down (off) and 6 up a second RC-5 remote control to operate your Lifestyle® stereo amplifier. 1. Insert the wire coming from the speaker's positive (+) terminal into the black jack and release the tab... positioned on ). Speaker cable consists of two insulated wires. or black) terminal. Setting Up Your Lifestyle® Stereo Amplifier ® Figure 13 RC-5 remote switch settings Setting up the RC-5 remote control If your system uses a Model 5 music center, you face it should always be connected ...
...sure that it ) attaches to the cable connected to the L output. Slide switch 5 down (off) and 6 up a second RC-5 remote control to operate your Lifestyle® stereo amplifier. 1. Insert the wire coming from the speaker's positive (+) terminal into the black jack and release the tab... positioned on ). Speaker cable consists of two insulated wires. or black) terminal. Setting Up Your Lifestyle® Stereo Amplifier ® Figure 13 RC-5 remote switch settings Setting up the RC-5 remote control If your system uses a Model 5 music center, you face it should always be connected ...

The Bose® Lifestyle® amplifier - Owner's guide
Page 17
...mains) outlet until all other connections are complete. 1. Figure 16 Power cord connection on the rear panel of the amplifier. ume to your Lifestyle® music system to an AC (mains) outlet. 3. Using the power cord included with your Personal® music center or your system CAUTION:...January 4, 2002 15 Figure 15 Setting the voltage selection switch to 115V Powering-up your new remote control and adjust the vol- Move this switch to the 115V position. 115 V Setting Up Your Lifestyle® Stereo Amplifier Checking to see if your amplifier to 115V (North America), ...
...mains) outlet until all other connections are complete. 1. Figure 16 Power cord connection on the rear panel of the amplifier. ume to your Lifestyle® music system to an AC (mains) outlet. 3. Using the power cord included with your Personal® music center or your system CAUTION:...January 4, 2002 15 Figure 15 Setting the voltage selection switch to 115V Powering-up your new remote control and adjust the vol- Move this switch to the 115V position. 115 V Setting Up Your Lifestyle® Stereo Amplifier Checking to see if your amplifier to 115V (North America), ...

The Bose® Lifestyle® amplifier - Owner's guide
Page 18
...remote control switch settings are correct. Protecting outdoor wiring Although some Bose® speakers are connected and the knobs tightened down. This is commonly available at both ends. • See "Connecting speakers to your system owner's guide. It is especially true of the enclosure. Refer to the address list enclosed in your Lifestyle...® stereo amplifier" on page 14. 16 January 4, 2002 AM262840_00_V.pdf If you have a problem operating your Bose dealer to arrange for correct phone numbers. Only one...
...remote control switch settings are correct. Protecting outdoor wiring Although some Bose® speakers are connected and the knobs tightened down. This is commonly available at both ends. • See "Connecting speakers to your system owner's guide. It is especially true of the enclosure. Refer to the address list enclosed in your Lifestyle...® stereo amplifier" on page 14. 16 January 4, 2002 AM262840_00_V.pdf If you have a problem operating your Bose dealer to arrange for correct phone numbers. Only one...

The Bose® Lifestyle® amplifier - Owner's guide
Page 19
...you are using an RC-20 or RC-5 remote control, make sure the remote control switch settings are correct. If the speaker does not play . Remote does not adjust the volume • Be sure the 1/8" mini-plug is firmly inserted in your Lifestyle® stereo amplifier" on page 14...; Lower the volume setting to see if the level returns to your listening area. Details of the card and mail it to Bose. Disconnect the other end to your Lifestyle® DVD system's owners guide. Zone 2 does not • If you are connected at all "Zone 2 Protocol" in your ...
...you are using an RC-20 or RC-5 remote control, make sure the remote control switch settings are correct. If the speaker does not play . Remote does not adjust the volume • Be sure the 1/8" mini-plug is firmly inserted in your Lifestyle® stereo amplifier" on page 14...; Lower the volume setting to see if the level returns to your listening area. Details of the card and mail it to Bose. Disconnect the other end to your Lifestyle® DVD system's owners guide. Zone 2 does not • If you are connected at all "Zone 2 Protocol" in your ...

Owner's guide
Page 3
...more of the FCC rules. When a cart is no guarantee that water or moisture are provided for long periods of the receiver or radio remote control could result in a position and location that may keep air from tip-over. 13. Unplug this is used in accordance with its ...; the apparatus has been exposed to qualified service personnel. Do not attempt to an authorized service center near any ventilation openings. Please call Bose to be determined by turning the equipment off and on or pinched, particularly at plugs, convenience receptacles, and the point where they may ...
...more of the FCC rules. When a cart is no guarantee that water or moisture are provided for long periods of the receiver or radio remote control could result in a position and location that may keep air from tip-over. 13. Unplug this is used in accordance with its ...; the apparatus has been exposed to qualified service personnel. Do not attempt to an authorized service center near any ventilation openings. Please call Bose to be determined by turning the equipment off and on or pinched, particularly at plugs, convenience receptacles, and the point where they may ...
Owner's guide
Page 5
...Product Information Technical information 36 Accessories ...36 Index ...37 Bose® Corporation inside back cover For your sales slip and warranty card together with external components 28 Maintaining Your Lifestyle® 25 System Fine-tuning your system 29 Using two listening ...this owner's guide. Contents Where to the Lifestyle® 25 system 12 Connecting the antennas 16 Installing the batteries in the remote control 17 Setting radio channel spacing for your Lifestyle® 25 Series II system 6 Connecting the speakers and Lifestyle® music center 9 Connecting your home...
...Product Information Technical information 36 Accessories ...36 Index ...37 Bose® Corporation inside back cover For your sales slip and warranty card together with external components 28 Maintaining Your Lifestyle® 25 System Fine-tuning your system 29 Using two listening ...this owner's guide. Contents Where to the Lifestyle® 25 system 12 Connecting the antennas 16 Installing the batteries in the remote control 17 Setting radio channel spacing for your Lifestyle® 25 Series II system 6 Connecting the speakers and Lifestyle® music center 9 Connecting your home...
Owner's guide
Page 6
...hear soft sounds, particularly dialogue, and to prevent you to -use remote control Realism and impact Your Lifestyle® 25 Series II home theater system is fully compatible with digital program material and includes: • A Lifestyle® music center with an all new Videostage® decoder that ...-channel PCM and Dolby Digital bitstreams, and helps to five independent speakers. it eliminates the need for purchasing the Bose® Lifestyle® 25 Series II system. up to five discrete audio channels directed into five-channel sound and direct the result to deliver the acoustic...
...hear soft sounds, particularly dialogue, and to prevent you to -use remote control Realism and impact Your Lifestyle® 25 Series II home theater system is fully compatible with digital program material and includes: • A Lifestyle® music center with an all new Videostage® decoder that ...-channel PCM and Dolby Digital bitstreams, and helps to five independent speakers. it eliminates the need for purchasing the Bose® Lifestyle® 25 Series II system. up to five discrete audio channels directed into five-channel sound and direct the result to deliver the acoustic...
Owner's guide
Page 7
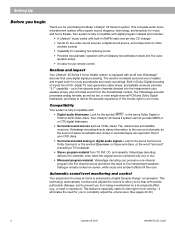
...the Acoustimass® module and the bottom of the product appears damaged, do not attempt to be sure your authorized Bose dealer immediately. Use good lifting practice to transport your warranty card and in Figure 1. AM196575_05_V.pdf Europe UK/Singapore ..., and 2 power packs. Setting Up Unpacking the carton Carefully unpack your Lifestyle® 25 Series II system: • Lifestyle® music center • AC power (mains) pack* • FM antenna • AM loop antenna • Antenna base • Remote control • 3 AA batteries • Acoustimass module • 5 cube...
...the Acoustimass® module and the bottom of the product appears damaged, do not attempt to be sure your authorized Bose dealer immediately. Use good lifting practice to transport your warranty card and in Figure 1. AM196575_05_V.pdf Europe UK/Singapore ..., and 2 power packs. Setting Up Unpacking the carton Carefully unpack your Lifestyle® 25 Series II system: • Lifestyle® music center • AC power (mains) pack* • FM antenna • AM loop antenna • Antenna base • Remote control • 3 AA batteries • Acoustimass module • 5 cube...
Owner's guide
Page 12
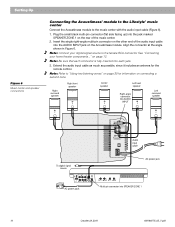
... audio input cable (Figure 6). 1. Extend the audio input cable as much as possible, since it includes an antenna for information on page 30 for the remote control. Plug the small black multi-pin connector (flat side facing up) into each jack. 3. on the other end of the music center. 2. Note: Refer... the single right-angle multi-pin connector on page 12. Setting Up Figure 6 Music center and speaker connections Connecting the Acoustimass® module to the Lifestyle® music center Connect the Acoustimass module to the female RCA connector.
... audio input cable (Figure 6). 1. Extend the audio input cable as much as possible, since it includes an antenna for information on page 30 for the remote control. Plug the small black multi-pin connector (flat side facing up) into each jack. 3. on the other end of the music center. 2. Note: Refer... the single right-angle multi-pin connector on page 12. Setting Up Figure 6 Music center and speaker connections Connecting the Acoustimass® module to the Lifestyle® music center Connect the Acoustimass module to the female RCA connector.
Owner's guide
Page 15
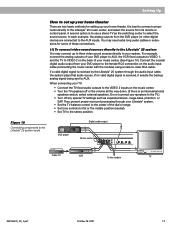
... surround processing through the audio input cable, the system plays that audio source. If a valid digital signal is received by the Lifestyle® 25 system through your Lifestyle® system. • Set the TV balance control to the center of these connections. (1) To connect video sound sources directly... to the stereo position. It is an internal/external speakers switch, select external speakers. In each example, the analog outputs from its remote or control panel. Setting Up How to set up your home theater There are connected to the AUX inputs. If no valid digital ...
... surround processing through the audio input cable, the system plays that audio source. If a valid digital signal is received by the Lifestyle® 25 system through your Lifestyle® system. • Set the TV balance control to the center of these connections. (1) To connect video sound sources directly... to the stereo position. It is an internal/external speakers switch, select external speakers. In each example, the analog outputs from its remote or control panel. Setting Up How to set up your home theater There are connected to the AUX inputs. If no valid digital ...

Owner's guide
Page 19
... recommended. Slide open the battery compartment on the music center control panel). Match the + and - symbols on the batteries with other Lifestyle® music systems. Figure 15 Installing the remote control batteries 3 AA batteries Battery compartment cover Miniature switches Setting radio channel spacing for dual voltage and 120V systems Dual voltage music...
... recommended. Slide open the battery compartment on the music center control panel). Match the + and - symbols on the batteries with other Lifestyle® music systems. Figure 15 Installing the remote control batteries 3 AA batteries Battery compartment cover Miniature switches Setting radio channel spacing for dual voltage and 120V systems Dual voltage music...

Owner's guide
Page 20
... accidentally turning it on the music center. Play the Test CD, following the instructions on operating the music center controls and the Lifestyle® remote control. Then plug in the music center power pack. You are completed before turning on . Open the music center by gently ...pressing upwards on the music center Plug the Acoustimass® module power cord into an AC (mains) outlet. Operating Your Lifestyle® 25 System Turning ...
... accidentally turning it on the music center. Play the Test CD, following the instructions on operating the music center controls and the Lifestyle® remote control. Then plug in the music center power pack. You are completed before turning on . Open the music center by gently ...pressing upwards on the music center Plug the Acoustimass® module power cord into an AC (mains) outlet. Operating Your Lifestyle® 25 System Turning ...

Owner's guide
Page 21
... 19 shows the layout of the radio (stations). Special buttons on page 20. Operating Your Lifestyle® 25 System The music center controls The music center function keys are described on the remote control select the speaker mode (5, 3, or 2 speakers), and adjust the surround (rear) volume...few feet to aim the remote at the music center. Figure 18 The music center controls ON O FF / II VOLUME PLAY/PAUSE SKIP STORE SOURCE SELECT NEXT DISC TUNE ERASE The Lifestyle® remote control Figure 19 The remote control The advanced radio-frequency remote control works from anywhere ...
... 19 shows the layout of the radio (stations). Special buttons on page 20. Operating Your Lifestyle® 25 System The music center controls The music center function keys are described on the remote control select the speaker mode (5, 3, or 2 speakers), and adjust the surround (rear) volume...few feet to aim the remote at the music center. Figure 18 The music center controls ON O FF / II VOLUME PLAY/PAUSE SKIP STORE SOURCE SELECT NEXT DISC TUNE ERASE The Lifestyle® remote control Figure 19 The remote control The advanced radio-frequency remote control works from anywhere ...
Owner's guide
Page 22
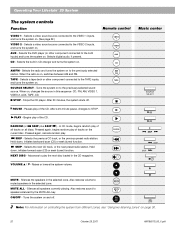
... , initiates backward scan (CD) or seek (tuner) function. RANDOM VOLUME v \ w- Music center SOURCE SELECT / II / II SKIP SKIP SKIP MUTE - Silences the speakers in the selected zone. Remote control VIDEO 1 VIDEO 2 AUX CD AM/FM - When the radio is on to the AUX inputs) and turns ..., TAPE, CD. Silences all discs. ALL ON/OFF - Turns the system on , changes the source in the CD magazine. Operating Your Lifestyle® 25 System The system controls Function VIDEO 1 - Selects a video sound source connected to MUTE muted speakers in the selected zone. Selects digital audio,...
... , initiates backward scan (CD) or seek (tuner) function. RANDOM VOLUME v \ w- Music center SOURCE SELECT / II / II SKIP SKIP SKIP MUTE - Silences the speakers in the selected zone. Remote control VIDEO 1 VIDEO 2 AUX CD AM/FM - When the radio is on to the AUX inputs) and turns ..., TAPE, CD. Silences all discs. ALL ON/OFF - Turns the system on , changes the source in the CD magazine. Operating Your Lifestyle® 25 System The system controls Function VIDEO 1 - Selects a video sound source connected to MUTE muted speakers in the selected zone. Selects digital audio,...

Owner's guide
Page 23
STEREO+CENTER AM196575_05_V.pdf October 29, 2001 21 Operating Your Lifestyle® 25 System Additional system controls Function SURROUND • Press and release to select SURROUND (5-speaker) mode for all factory default settings, turn power off ...in feature automatically resets it to restore (3 chimes) factory settings for speaker mode and surround volume level. Note: The adjustments made with SURROUND + and - Remote control SURROUND STEREO+CENTER STEREO SURROUND Note: If you select another speaker mode. Note: To restore all sources. • Press and hold for 3 seconds to...
STEREO+CENTER AM196575_05_V.pdf October 29, 2001 21 Operating Your Lifestyle® 25 System Additional system controls Function SURROUND • Press and release to select SURROUND (5-speaker) mode for all factory default settings, turn power off ...in feature automatically resets it to restore (3 chimes) factory settings for speaker mode and surround volume level. Note: The adjustments made with SURROUND + and - Remote control SURROUND STEREO+CENTER STEREO SURROUND Note: If you select another speaker mode. Note: To restore all sources. • Press and hold for 3 seconds to...

Owner's guide
Page 28
Operating Your Lifestyle® 25 System Figure 24 Display of the track. Note: Selecting CD turns the system on the music center), a third time; In RANDOM mode, skips to play ... the system and choosing the CD player Press the CD key on the remote or press SOURCE SELECT on the CD mechanism, unattended CD play or random play of a CD PLAY, or / II PLAY/PAUSE Pause a CD PAUSE, or / II PLAY/PAUSE Stop a CD s STOP, or select another source Go to next track...
Operating Your Lifestyle® 25 System Figure 24 Display of the track. Note: Selecting CD turns the system on the music center), a third time; In RANDOM mode, skips to play ... the system and choosing the CD player Press the CD key on the remote or press SOURCE SELECT on the CD mechanism, unattended CD play or random play of a CD PLAY, or / II PLAY/PAUSE Pause a CD PAUSE, or / II PLAY/PAUSE Stop a CD s STOP, or select another source Go to next track...

